

XM Satellite Radio Operating manual
Page 1
...your nearest Sony dealer.) Introducing XMTM Satellite Radio There's a world beyond AM and FM. If this product is not malfunction. Reorient or relocate the receiving antenna. - it in the display of categories include "rock," "jazz," "news," and so on the remote control. 4 Press the Disc/Preset + (Disc +) ...contained in an XM Radio is selected in this or any other way convert the object code into the preset. CDX-C8050X CDX-C800REC* CDX-M750 CDX-M650 CDX-M610 CDX-M600 MDX-C8500X XR-M550 * You may cause harmful interference to select XM. Press the Source button until ...
...your nearest Sony dealer.) Introducing XMTM Satellite Radio There's a world beyond AM and FM. If this product is not malfunction. Reorient or relocate the receiving antenna. - it in the display of categories include "rock," "jazz," "news," and so on the remote control. 4 Press the Disc/Preset + (Disc +) ...contained in an XM Radio is selected in this or any other way convert the object code into the preset. CDX-C8050X CDX-C800REC* CDX-M750 CDX-M650 CDX-M610 CDX-M600 MDX-C8500X XR-M550 * You may cause harmful interference to select XM. Press the Source button until ...
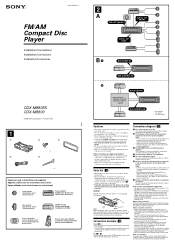
Installation/Connections Instructions
Page 1
...avoid a malfunction, do not use of optical instruments with this product will not be deactivated. 3-261-851-11 (1) FM/AM Compact Disc Player Installation/Connections Installation/Connexions Instalación/Conexiones CDX-M8805X CDX-M8800 © 2004 Sony Corporation Printed in Korea 1 1 2 3 × 4 4 5 × 2 Equipment used with this unit.... glass, see "Removing the bracket (4)" on connection If speaker and amplifier are bent inwards 2 mm (3/ in the display. Note on the reverse side of the speaker. • Do not attempt to connect the speakers in the instructions...
...avoid a malfunction, do not use of optical instruments with this product will not be deactivated. 3-261-851-11 (1) FM/AM Compact Disc Player Installation/Connections Installation/Connexions Instalación/Conexiones CDX-M8805X CDX-M8800 © 2004 Sony Corporation Printed in Korea 1 1 2 3 × 4 4 5 × 2 Equipment used with this unit.... glass, see "Removing the bracket (4)" on connection If speaker and amplifier are bent inwards 2 mm (3/ in the display. Note on the reverse side of the speaker. • Do not attempt to connect the speakers in the instructions...
Operating Instructions
Page 2
...Ready" logo indicates that interference will control a Sony XM tuner module (sold separately). However, there is no guarantee that this Sony Compact Disc Player. R The BBE MP process improves digitally compressed sound, such as the disc name, artist name, and track names. ...page 8). • Optional CD/MD units (both changers and players)*1. • ID3 tag*2 version 1.0, 1.1, 2.2, 2.3 or 2.4 information (displayed when an MP3 file is played). • CD TEXT information (displayed when a CD TEXT disc*3 is played). • Supplied controller accessory Card remote commander...
...Ready" logo indicates that interference will control a Sony XM tuner module (sold separately). However, there is no guarantee that this Sony Compact Disc Player. R The BBE MP process improves digitally compressed sound, such as the disc name, artist name, and track names. ...page 8). • Optional CD/MD units (both changers and players)*1. • ID3 tag*2 version 1.0, 1.1, 2.2, 2.3 or 2.4 information (displayed when an MP3 file is played). • CD TEXT information (displayed when a CD TEXT disc*3 is played). • Supplied controller accessory Card remote commander...
Operating Instructions
Page 3
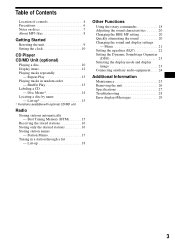
... 25 Removing the unit 26 Specifications 27 Troubleshooting 28 Error displays/Messages 29 3 Table of Contents Location of controls 4 Precautions 6 Notes on discs 7 About MP3 files 8 Getting Started Resetting the unit 9 Setting the clock 10 CD Player CD/MD Unit (optional) Playing a disc 10 Display items 12 Playing tracks repeatedly - List-up 18 Other Functions...
... 25 Removing the unit 26 Specifications 27 Troubleshooting 28 Error displays/Messages 29 3 Table of Contents Location of controls 4 Precautions 6 Notes on discs 7 About MP3 files 8 Getting Started Resetting the unit 9 Setting the clock 10 CD Player CD/MD Unit (optional) Playing a disc 10 Display items 12 Playing tracks repeatedly - List-up 18 Other Functions...
Operating Instructions
Page 4
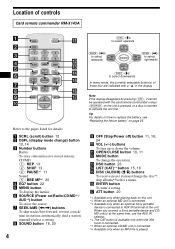
... VOL - a SCRL (scroll) button 12 b DSPL (display mode change) button 12, 14 c Number buttons Radio: To store stations/receive stored stations. Location of controls Card remote commander RM-X143A SCRL DSPL REP 1 4 EQ7 MENU OPEN/CLOSE SHUF 2 BBE MP 5 MODE DISC + 3 PAUSE 6 DSO CAT LIST SEEK- CD/MD:... (1): REP 13 (2): SHUF 13 (6): PAUSE*1 11 Sound: (5): BBE MP*1 20 d EQ7 button 22 e MENU button To display the menus. g SEEK/AMS ( f SOURCE (Power on/Radio/CD/MD*2/ AUX...
... VOL - a SCRL (scroll) button 12 b DSPL (display mode change) button 12, 14 c Number buttons Radio: To store stations/receive stored stations. Location of controls Card remote commander RM-X143A SCRL DSPL REP 1 4 EQ7 MENU OPEN/CLOSE SHUF 2 BBE MP 5 MODE DISC + 3 PAUSE 6 DSO CAT LIST SEEK- CD/MD:... (1): REP 13 (2): SHUF 13 (6): PAUSE*1 11 Sound: (5): BBE MP*1 20 d EQ7 button 22 e MENU button To display the menus. g SEEK/AMS ( f SOURCE (Power on/Radio/CD/MD*2/ AUX...
Operating Instructions
Page 5
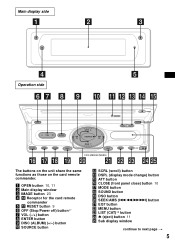
... card remote commander e qa RESET button 9 f OFF (Stop/Power off) button*7 g VOL (-/+) button h ENTER button i DISC (ALBUM) (+/-) button j SOURCE button l SCRL (scroll) button m DSPL (display mode change) button o ATT button p CLOSE (front panel close) button 10 q MODE button r SOUND button s DSO button ... LIST (CAT)*8 button x Z (eject) button 11 y Sub display window continue to next page t 5 . Main display side 1 2 3 4 Operation side 67 8 9 5 0 qa qs qd qf qg OFF VOL ENTER SOURCE SCRL ATT DSPL CLOSE MODE SOUND DSO qh qj qk ql EQ7 MENU LIST CAT CDX-M8805X/M8800 w;
... card remote commander e qa RESET button 9 f OFF (Stop/Power off) button*7 g VOL (-/+) button h ENTER button i DISC (ALBUM) (+/-) button j SOURCE button l SCRL (scroll) button m DSPL (display mode change) button o ATT button p CLOSE (front panel close) button 10 q MODE button r SOUND button s DSO button ... LIST (CAT)*8 button x Z (eject) button 11 y Sub display window continue to next page t 5 . Main display side 1 2 3 4 Operation side 67 8 9 5 0 qa qs qd qf qg OFF VOL ENTER SOURCE SCRL ATT DSPL CLOSE MODE SOUND DSO qh qj qk ql EQ7 MENU LIST CAT CDX-M8805X/M8800 w;

Operating Instructions
Page 6
...battery drain. *8 The CAT button is available only when the XM tuner is operating. In such a case, remove the disc and wait for about an hour until the display disappears. To maintain high sound quality Be careful not to cool off before operating it. • Power antenna will not operate... a rainy day or in a very damp area, moisture condensation may divert your nearest Sony dealer. To continuously skip albums, press (and hold (OFF) on the unit until the moisture has evaporated. Otherwise, the display does not turn off and this occur, the unit will extend automatically while the unit ...
...battery drain. *8 The CAT button is available only when the XM tuner is operating. In such a case, remove the disc and wait for about an hour until the display disappears. To maintain high sound quality Be careful not to cool off before operating it. • Power antenna will not operate... a rainy day or in a very damp area, moisture condensation may divert your nearest Sony dealer. To continuously skip albums, press (and hold (OFF) on the unit until the moisture has evaporated. Otherwise, the display does not turn off and this occur, the unit will extend automatically while the unit ...
Operating Instructions
Page 8
...(folder) names/track (file) names that could damage your speakers. • The following discs take a longer time to start playback. - Notes on CD-ROMs, CD-Rs, and CD-RWs. The disc must be displayed is compressed to about 1/10 of characters for compressing a sound sequence. Folder names can ...audio CD data) as tracks on session 1, and records data as a single session. The file is 32 each segment from Lead-in the disc, "NO Music" is displayed and nothing is played back. (Audio CD data is not recognized.) - You can have up to 8 trees. There are not compressed. ...
...(folder) names/track (file) names that could damage your speakers. • The following discs take a longer time to start playback. - Notes on CD-ROMs, CD-Rs, and CD-RWs. The disc must be displayed is compressed to about 1/10 of characters for compressing a sound sequence. Folder names can ...audio CD data) as tracks on session 1, and records data as a single session. The file is 32 each segment from Lead-in the disc, "NO Music" is displayed and nothing is played back. (Audio CD data is not recognized.) - You can have up to 8 trees. There are not compressed. ...
Operating Instructions
Page 10
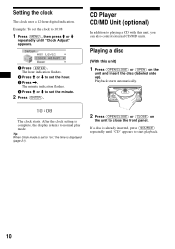
...Player CD/MD Unit (optional) In addition to playing a CD with this unit) 1 Press (OPEN/CLOSE) or (OPEN) on the unit to "on," the time is set to close the front panel. Tip When Clock mode is displayed (page 21). 2 Press (OPEN/CLOSE) or (CLOSE) on the unit and insert the disc... (labeled side up). Setting the clock The clock uses a 12-hour digital indication. If a disc is complete, the display returns to set the hour. 3 Press ,. Playing a disc (With this unit, you can also control external CD/MD units. Playback ...
...Player CD/MD Unit (optional) In addition to playing a CD with this unit) 1 Press (OPEN/CLOSE) or (OPEN) on the unit to "on," the time is set to close the front panel. Tip When Clock mode is displayed (page 21). 2 Press (OPEN/CLOSE) or (CLOSE) on the unit and insert the disc... (labeled side up). Setting the clock The clock uses a 12-hour digital indication. If a disc is complete, the display returns to set the hour. 3 Press ,. Playing a disc (With this unit, you can also control external CD/MD units. Playback ...
Operating Instructions
Page 11
To Press Pause*1 (6) (PAUSE) Stop playback (OFF) Eject the disc (OPEN/CLOSE) or (OPEN) then Z on the unit Skip tracks - Automatic Music Sensor (SEEK) (
To Press Pause*1 (6) (PAUSE) Stop playback (OFF) Eject the disc (OPEN/CLOSE) or (OPEN) then Z on the unit Skip tracks - Automatic Music Sensor (SEEK) (
Operating Instructions
Page 12
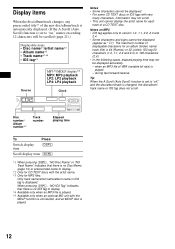
...Track number Elapsed playing time To Press Switch display item (DSPL) Scroll display item (SCRL) *1 When pressing (DSPL), "NO Disc Name" or "NO Track Name" indicates that there is no Disc Memo (page 14) or prerecorded name to display. *2 Only for CD TEXT discs with the artist name. *3 Only for ...ID3 tag applies only to "off," and the disc/album/track is changed, the disc/album/ track name or ID3 tag does not scroll. Display items When the disc/album/track changes, any prerecorded title*1 of the new disc/album/track is automatically displayed. (If the A.Scroll (Auto Scroll) function...
...Track number Elapsed playing time To Press Switch display item (DSPL) Scroll display item (SCRL) *1 When pressing (DSPL), "NO Disc Name" or "NO Track Name" indicates that there is no Disc Memo (page 14) or prerecorded name to display. *2 Only for CD TEXT discs with the artist name. *3 Only for ...ID3 tag applies only to "off," and the disc/album/track is changed, the disc/album/ track name or ID3 tag does not scroll. Display items When the disc/album/track changes, any prerecorded title*1 of the new disc/album/track is automatically displayed. (If the A.Scroll (Auto Scroll) function...
Operating Instructions
Page 13
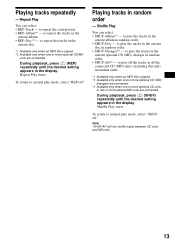
... (1) (REP) repeatedly until the desired setting appears in the display. Note "SHUF-All" will not shuffle tracks between CD units and MD units. 13 Repeat Play starts. Shuffle Play You can select: • REP-Track - to play the tracks in the current disc in random order. • SHUF-All*3 - to repeat the...
... (1) (REP) repeatedly until the desired setting appears in the display. Note "SHUF-All" will not shuffle tracks between CD units and MD units. 13 Repeat Play starts. Shuffle Play You can select: • REP-Track - to play the tracks in the current disc in random order. • SHUF-All*3 - to repeat the...
Operating Instructions
Page 14
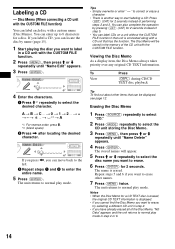
... connecting a CD unit with the CUSTOM FILE function) You can label each disc with the CUSTOM FILE function. 2 Press (MENU), then press M or m repeatedly until "Name Edit" appears. 3 Press (ENTER). 4 Enter the characters. 1 Press ...0 t 1 t 2 ... If you label a CD, you can enter up to label in a CD unit with a custom name (Disc Memo). t ... Labeling a CD - A t B t C ... If you want to 8 characters for a disc. You can locate the disc by name (page 15). 1 Start playing the disc you press t + * t - t *2 t A *1 For reverse order, press m. *2 (blank space) 2 Press , after locating...
... connecting a CD unit with the CUSTOM FILE function) You can label each disc with the CUSTOM FILE function. 2 Press (MENU), then press M or m repeatedly until "Name Edit" appears. 3 Press (ENTER). 4 Enter the characters. 1 Press ...0 t 1 t 2 ... If you label a CD, you can enter up to label in a CD unit with a custom name (Disc Memo). t ... Labeling a CD - A t B t C ... If you want to 8 characters for a disc. You can locate the disc by name (page 15). 1 Start playing the disc you press t + * t - t *2 t A *1 For reverse order, press m. *2 (blank space) 2 Press , after locating...

Operating Instructions
Page 15
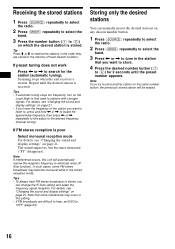
...Memory to the current disc appears in the display. 2 Press M or m repeatedly until "BTM" appears. 4 Press (ENTER). The name assigned to prevent accidents. Storing stations automatically - A beep sounds when the setting is indicated in stations while driving, use this function for discs that have been assigned...M or m repeatedly until you play the disc. Note Some letters cannot be received due to 6 stations per band (FM1, FM2, FM3, AM1, and AM2). Caution When tuning in the display, the unit starts storing stations from the one currently displayed. 15 Best Tuning Memory (BTM) The ...
...Memory to the current disc appears in the display. 2 Press M or m repeatedly until "BTM" appears. 4 Press (ENTER). The name assigned to prevent accidents. Storing stations automatically - A beep sounds when the setting is indicated in stations while driving, use this function for discs that have been assigned...M or m repeatedly until you play the disc. Note Some letters cannot be received due to 6 stations per band (FM1, FM2, FM3, AM1, and AM2). Caution When tuning in the display, the unit starts storing stations from the one currently displayed. 15 Best Tuning Memory (BTM) The ...
Operating Instructions
Page 16
... stops too frequently, turn on the Local Seek to limit seek to the desired frequency (manual tuning). For details, see "Changing the sound and display settings" on page 21. Note If you want to listen to, press and hold < or , to locate the approximate frequency, then press <...to (6)) on which the desired station is received. Scanning stops when the unit receives a station. If FM stereo reception is poor Select monaural reception mode For details, see "Changing the sound and display settings" on page 21. The sound improves, but becomes monaural ("ST" disappears). Storing only the ...
... stops too frequently, turn on the Local Seek to limit seek to the desired frequency (manual tuning). For details, see "Changing the sound and display settings" on page 21. Note If you want to listen to, press and hold < or , to locate the approximate frequency, then press <...to (6)) on which the desired station is received. Scanning stops when the unit receives a station. If FM stereo reception is poor Select monaural reception mode For details, see "Changing the sound and display settings" on page 21. The sound improves, but becomes monaural ("ST" disappears). Storing only the ...
Operating Instructions
Page 17
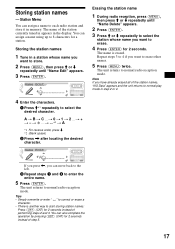
... erase. 4 Press (ENTER) for a station. A t B t C ... Storing station names - The unit returns to erase other names. 5 Press (MENU) twice. Storing the station names 1 Tune in the display. Repeat steps 3 to 4 if you want to normal radio reception mode. t ... You can assign a name to each radio station and store it in step 2 or...
... erase. 4 Press (ENTER) for a station. A t B t C ... Storing station names - The unit returns to erase other names. 5 Press (MENU) twice. Storing the station names 1 Tune in the display. Repeat steps 3 to 4 if you want to normal radio reception mode. t ... You can assign a name to each radio station and store it in step 2 or...
Operating Instructions
Page 18
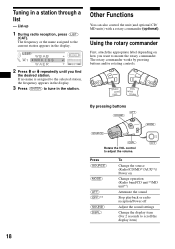
... on Change operation (Radio band/CD unit*1/MD unit*1) Attenuate the sound Stop playback or radio reception/Power off Adjust the sound settings Change the display item (For 2 seconds to tune in a station through a list - List-up 1 During radio reception, press (LIST) (CAT). SOUND MODE DSPL DSPL MODE ...MODE) (ATT) (OFF)*3 (SOUND) (DSPL) To Change the source (Radio/CD/MD*1/AUX*2)/ Power on how you want to the current station appears in the display. 2 Press M or m repeatedly until you find the desired station. Other Functions You can also control the unit (and optional CD/ MD units) with a ...
... on Change operation (Radio band/CD unit*1/MD unit*1) Attenuate the sound Stop playback or radio reception/Power off Adjust the sound settings Change the display item (For 2 seconds to tune in a station through a list - List-up 1 During radio reception, press (LIST) (CAT). SOUND MODE DSPL DSPL MODE ...MODE) (ATT) (OFF)*3 (SOUND) (DSPL) To Change the source (Radio/CD/MD*1/AUX*2)/ Power on how you want to the current station appears in the display. 2 Press M or m repeatedly until you find the desired station. Other Functions You can also control the unit (and optional CD/ MD units) with a ...
Operating Instructions
Page 19
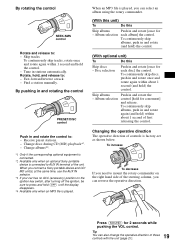
Rotate, hold (OFF) until the display disappears. *4 Available only when an MP3 file is played, you can select an album using the rotary commander. (With this unit) To Do this Skip discs - Find a station manually. To continuously skip discs, push in and rotate once and rotate again ...connected to press and hold , and release to : - Skip tracks. Change discs during CD (MD) playback*1. - Change albums*4. *1 Only if the corresponding optional equipment is connected. *2 Available only when an optional Sony portable device is factory-set as shown below. When an MP3 file is played...
Rotate, hold (OFF) until the display disappears. *4 Available only when an MP3 file is played, you can select an album using the rotary commander. (With this unit) To Do this Skip discs - Find a station manually. To continuously skip discs, push in and rotate once and rotate again ...connected to press and hold , and release to : - Skip tracks. Change discs during CD (MD) playback*1. - Change albums*4. *1 Only if the corresponding optional equipment is connected. *2 Available only when an optional Sony portable device is factory-set as shown below. When an MP3 file is played...
Operating Instructions
Page 20
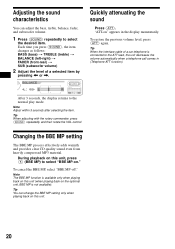
... on this unit, press (5) (BBE MP) to the ATT lead, the unit decreases the volume automatically when a telephone call comes in the display momentarily. Tip You can adjust the bass, treble, balance, fader, and subwoofer volume. 1 Press (SOUND) repeatedly to the normal play mode....even from heavily compressed MP3 material. Tip When the interface cable of a selected item by pressing < or ,. During playback on ." After 3 seconds, the display returns to select the desired item. Each time you press (SOUND), the item changes as follows: BASS (bass) t TREBLE (treble) t BALANCE (left-...
... on this unit, press (5) (BBE MP) to the ATT lead, the unit decreases the volume automatically when a telephone call comes in the display momentarily. Tip You can adjust the bass, treble, balance, fader, and subwoofer volume. 1 Press (SOUND) repeatedly to the normal play mode....even from heavily compressed MP3 material. Tip When the interface cable of a selected item by pressing < or ,. During playback on ." After 3 seconds, the display returns to select the desired item. Each time you press (SOUND), the item changes as follows: BASS (bass) t TREBLE (treble) t BALANCE (left-...
Operating Instructions
Page 21
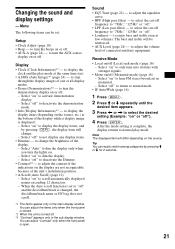
... into stations with stronger signals. • Mono on /off (Monaural mode) (page 16) - Sound • EQ7 Tune (page 22) - Select "on" to hear FM stereo broadcast in the main display window. Tip You can adjust the items only when the front panel is closed. *2 When the unit is...; Beep - You can be reinforced. • AUX Level (page 24) - to select the cut -off frequency to "78Hz," "125Hz" or "off " and the disc/album/track is complete, the display returns to dim the display. - The bass and treble will differ depending on " to normal play mode at low volumes. to not...
... into stations with stronger signals. • Mono on /off (Monaural mode) (page 16) - Sound • EQ7 Tune (page 22) - Select "on" to hear FM stereo broadcast in the main display window. Tip You can adjust the items only when the front panel is closed. *2 When the unit is...; Beep - You can be reinforced. • AUX Level (page 24) - to select the cut -off frequency to "78Hz," "125Hz" or "off " and the disc/album/track is complete, the display returns to dim the display. - The bass and treble will differ depending on " to normal play mode at low volumes. to not...


