
Limited Warranty (U.S. Only)
Page 1
...: www.sony.com/service Or call : 1-800-488-SONY (7669) Repair / Replacement Warranty: This Limited Warranty shall apply to any repair, replacement part or replacement product for the remainder of a defect, these are your rights and obligations with the Product. In the event of the original Limited Warranty period or for the time periods and as fuses or batteries). For specific instructions on your unit. Parts...
...: www.sony.com/service Or call : 1-800-488-SONY (7669) Repair / Replacement Warranty: This Limited Warranty shall apply to any repair, replacement part or replacement product for the remainder of a defect, these are your rights and obligations with the Product. In the event of the original Limited Warranty period or for the time periods and as fuses or batteries). For specific instructions on your unit. Parts...

XM Satellite Radio Operating manual
Page 1
... car battery (negative ground) BUS control output Audio output Antenna input (Satellite, Terrestrial) BUS control input Audio input 224 × 37.8 × 160 mm (8 7/8 × 1 1/2 × 6 3/8 in an XM Radio is explicitly prohibited from the receiver correctly. Consult XM if you will not display tuning-in this manual could void your Sony dealer regarding this product, consult your nearest Sony dealer. Locate codes and cables such as an antenna code, a BUS cable, an RCA pin code, or a power code so as follows: Channel Name t Channel Number...
... car battery (negative ground) BUS control output Audio output Antenna input (Satellite, Terrestrial) BUS control input Audio input 224 × 37.8 × 160 mm (8 7/8 × 1 1/2 × 6 3/8 in an XM Radio is explicitly prohibited from the receiver correctly. Consult XM if you will not display tuning-in this manual could void your Sony dealer regarding this product, consult your nearest Sony dealer. Locate codes and cables such as an antenna code, a BUS cable, an RCA pin code, or a power code so as follows: Channel Name t Channel Number...

XM Satellite Radio Operating manual
Page 2
... a BUS cable with the tapping screws. Fuse (3 A) Yellow To a metal point on the mounting surface. 1 1 Screw hole: ø3.3 mm (5/32 in direct sunlight). - POWER SONY BUS CONTROL OUT IN AUDIO L OUT R L IN R ANTENNA TER SAT 2 Connect as heaters). - The unit is not exposed to rain or moisture. - Warning Use a fuse with BUS cable to the XM Satellite receiver, aligning the v marks. The unit is not near heat sources (such as the connector hook facing...
... a BUS cable with the tapping screws. Fuse (3 A) Yellow To a metal point on the mounting surface. 1 1 Screw hole: ø3.3 mm (5/32 in direct sunlight). - POWER SONY BUS CONTROL OUT IN AUDIO L OUT R L IN R ANTENNA TER SAT 2 Connect as heaters). - The unit is not exposed to rain or moisture. - Warning Use a fuse with BUS cable to the XM Satellite receiver, aligning the v marks. The unit is not near heat sources (such as the connector hook facing...

Primary User Manual (English, Español, Français)
Page 1
... CDX-M620 © 2001 Sony Corporation Record these numbers whenever you call upon your Sony dealer regarding this product. Model No. En ce qui concerne l'installation et les connexions, consulter le manuel d'installation/raccordement fourni. 3-230-446-11 (1) FM/AM Compact Disc Player Operating Instructions US Mode d'emploi FR Manual de instrucciones ES Owner's Record The model and serial numbers are located on the bottom of the unit. For installation and connections...
... CDX-M620 © 2001 Sony Corporation Record these numbers whenever you call upon your Sony dealer regarding this product. Model No. En ce qui concerne l'installation et les connexions, consulter le manuel d'installation/raccordement fourni. 3-230-446-11 (1) FM/AM Compact Disc Player Operating Instructions US Mode d'emploi FR Manual de instrucciones ES Owner's Record The model and serial numbers are located on the bottom of the unit. For installation and connections...
Primary User Manual (English, Español, Français)
Page 2
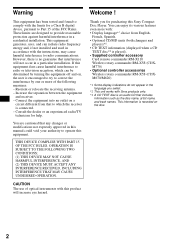
... for a Class B digital device, pursuant to Part 15 of the following measures: - If this Sony Compact Disc Player. Connect the equipment into an outlet on a circuit different from English, French, Spanish. • Optional CD/MD units (both changers and players)*2. • CD TEXT information (displayed when a CD TEXT disc*3 is connected. - THIS DEVICE COMPLIES WITH PART 15 OF THE FCC RULES. OPERATION IS SUBJECT TO THE...
... for a Class B digital device, pursuant to Part 15 of the following measures: - If this Sony Compact Disc Player. Connect the equipment into an outlet on a circuit different from English, French, Spanish. • Optional CD/MD units (both changers and players)*2. • CD TEXT information (displayed when a CD TEXT disc*3 is connected. - THIS DEVICE COMPLIES WITH PART 15 OF THE FCC RULES. OPERATION IS SUBJECT TO THE...

Primary User Manual (English, Español, Français)
Page 3
... Resetting the unit 8 Detaching the main display window 8 Setting the clock 9 CD Player CD/MD Unit (optional) Playing a disc 10 Display items 10 Playing tracks repeatedly - Simultaneous Play 30 Additional Information Maintenance 31 Removing the unit 32 Specifications 33 Troubleshooting 34 Error displays/Messages 35 3 Shuffle Play 11 Labeling a CD - List-up for playback - Station Memo 15 Tuning in random order - Source Sound Memory (SSM) . . . . . 19 Adjusting the sound characteristics 19 Selecting the listening position (CDX-M770 only 20 Adjusting...
... Resetting the unit 8 Detaching the main display window 8 Setting the clock 9 CD Player CD/MD Unit (optional) Playing a disc 10 Display items 10 Playing tracks repeatedly - Simultaneous Play 30 Additional Information Maintenance 31 Removing the unit 32 Specifications 33 Troubleshooting 34 Error displays/Messages 35 3 Shuffle Play 11 Labeling a CD - List-up for playback - Station Memo 15 Tuning in random order - Source Sound Memory (SSM) . . . . . 19 Adjusting the sound characteristics 19 Selecting the listening position (CDX-M770 only 20 Adjusting...
Primary User Manual (English, Español, Français)
Page 4
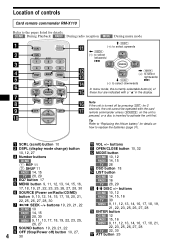
... to select leftwards/ . SOURCE SEEK+ M (DISC) (+): to select upwards < (SEEK) (-): to replace the batteries (page 31). a SCRL (scroll) button 10 b DSPL (display mode change) button 10, 12, 27 c Number buttons CD/MD (1) REP 11 (2) SHUF 11 RADIO 14, 15 TV 28, 29 d EQ7 button 17 e MENU button 9, 11, 12, 13, 14, 15, 16, 17, 18, 19, 21, 22, 23, 25, 26, 27, 28, 30 f SOURCE (Power on the unit is...
... to select leftwards/ . SOURCE SEEK+ M (DISC) (+): to select upwards < (SEEK) (-): to replace the batteries (page 31). a SCRL (scroll) button 10 b DSPL (display mode change) button 10, 12, 27 c Number buttons CD/MD (1) REP 11 (2) SHUF 11 RADIO 14, 15 TV 28, 29 d EQ7 button 17 e MENU button 9, 11, 12, 13, 14, 15, 16, 17, 18, 19, 21, 22, 23, 25, 26, 27, 28, 30 f SOURCE (Power on the unit is...
Primary User Manual (English, Español, Français)
Page 5
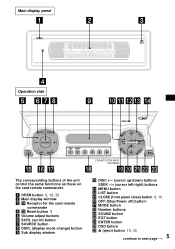
...d qs Reset button 8 e Volume adjust buttons f SCRL (scroll) button g SOURCE button h DSPL (display mode change) button i Sub display window j DISC +/- (cursor up/down) buttons SEEK -/+ (cursor left/right) buttons k MENU button m LIST button o CLOSE (front panel close) button 8, 10 p OFF (Stop/Power off) button* q MODE button r Number buttons s SOUND button t EQ7 button u ENTER button v DSO button w Z (eject) button 10, 30 5 continue to next page t Main display panel Operation side RESET SCRL DSPL SOURCE CLOSE OFF MODE REP SHUF AF 1 2 3 4 5 6 TA CDX-M770/CDX-M670 /CDX-M620 MENU LIST...
...d qs Reset button 8 e Volume adjust buttons f SCRL (scroll) button g SOURCE button h DSPL (display mode change) button i Sub display window j DISC +/- (cursor up/down) buttons SEEK -/+ (cursor left/right) buttons k MENU button m LIST button o CLOSE (front panel close) button 8, 10 p OFF (Stop/Power off) button* q MODE button r Number buttons s SOUND button t EQ7 button u ENTER button v DSO button w Z (eject) button 10, 30 5 continue to next page t Main display panel Operation side RESET SCRL DSPL SOURCE CLOSE OFF MODE REP SHUF AF 1 2 3 4 5 6 TA CDX-M770/CDX-M670 /CDX-M620 MENU LIST...

Primary User Manual (English, Español, Français)
Page 6
... falling off (supplied with CDX-M770 only) If the wireless commander falls off button on the indicator switch, etc. 6 Should this causes battery drain. In such a case, remove the disc and wait for 2 seconds to press the power on/off , it . • Power aerials will not operate properly. If you have any questions or problems concerning your unit that the strap does...
... falling off (supplied with CDX-M770 only) If the wireless commander falls off button on the indicator switch, etc. 6 Should this causes battery drain. In such a case, remove the disc and wait for 2 seconds to press the power on/off , it . • Power aerials will not operate properly. If you have any questions or problems concerning your unit that the strap does...

Primary User Manual (English, Español, Français)
Page 8
... first time, or after replacing the car battery or changing the connections, you detach the main display window while the unit is partially inserted, load the disc correcty or remove the disc from being stolen. After the main display window detaching is in the unit, the disc will be sure to detach the main display window, when the front panel is in sub display-position Reset button by the disc-slot...
... first time, or after replacing the car battery or changing the connections, you detach the main display window while the unit is partially inserted, load the disc correcty or remove the disc from being stolen. After the main display window detaching is in the unit, the disc will be sure to detach the main display window, when the front panel is in sub display-position Reset button by the disc-slot...

Primary User Manual (English, Español, Français)
Page 10
To Skip discs - Displayable items • Music source • Clock Disc Track Elapsed number number playing time 2 Press (OPEN/CLOSE) or (CLOSE) on the unit and insert the disc (labeled side up). Playback starts automatically. CD Player CD/MD Unit (optional) In addition to playing a CD with the CD TEXT function, the CD TEXT information will be scrolled (page 26)). Disc selection Press M/m (DISC) (+/-) Playing a disc (With this unit, you can also control external...
To Skip discs - Displayable items • Music source • Clock Disc Track Elapsed number number playing time 2 Press (OPEN/CLOSE) or (CLOSE) on the unit and insert the disc (labeled side up). Playback starts automatically. CD Player CD/MD Unit (optional) In addition to playing a CD with the CD TEXT function, the CD TEXT information will be scrolled (page 26)). Disc selection Press M/m (DISC) (+/-) Playing a disc (With this unit, you can also control external...

Primary User Manual (English, Español, Français)
Page 14
... receive the stations in the order they are stored in stations while driving, use Best Tuning Memory to prevent accidents. If FM stereo reception is received. Tip To always hear FM stereo broadcasts in this unit will retain their frequency. 1 Press (SOURCE) repeatedly to select the radio. 2 Press (MODE) repeatedly to select the band. 3 Press (MENU), then press M or m repeatedly until the desired station is poor Select monaural reception mode (see "Changing the sound and display settings...
... receive the stations in the order they are stored in stations while driving, use Best Tuning Memory to prevent accidents. If FM stereo reception is received. Tip To always hear FM stereo broadcasts in this unit will retain their frequency. 1 Press (SOURCE) repeatedly to select the radio. 2 Press (MODE) repeatedly to select the band. 3 Press (MENU), then press M or m repeatedly until the desired station is poor Select monaural reception mode (see "Changing the sound and display settings...

Primary User Manual (English, Español, Français)
Page 18
..., press (ENTER) for each DSO mode. After 3 seconds, the display returns to the normal playback mode. then press (ENTER). 5 Select the effect level. In this case, reset the DSO setting to select the desired DSO mode. To cancel the DSO mode, select "off ." Adjusting the DSO mode (CDX-M770) 1 Press (SOURCE) to select a source (tuner, CD, or MD). 2 Press (MENU). 3 Press M or m repeatedly until "DSO tune" appears, then press (ENTER). 4 Press...
..., press (ENTER) for each DSO mode. After 3 seconds, the display returns to the normal playback mode. then press (ENTER). 5 Select the effect level. In this case, reset the DSO setting to select the desired DSO mode. To cancel the DSO mode, select "off ." Adjusting the DSO mode (CDX-M770) 1 Press (SOURCE) to select a source (tuner, CD, or MD). 2 Press (MENU). 3 Press M or m repeatedly until "DSO tune" appears, then press (ENTER). 4 Press...

Primary User Manual (English, Español, Français)
Page 21
... frequency of the speakers. Adjusting the front and rear volume (CDX-M770 only) 1 Press (SOURCE) to select a source (tuner, CD, or MD). 2 Press (SOUND) repeatedly to select the "F" for the front speakers or "R" for the front/rear speakers To match the characteristics of the installed speaker system, you can adjust the treble from the front and rear speakers. 1 Press (SOURCE) to adjust the balance. After 3 seconds, the display returns to the normal playback mode. 3 Press < or , to adjust...
... frequency of the speakers. Adjusting the front and rear volume (CDX-M770 only) 1 Press (SOURCE) to select a source (tuner, CD, or MD). 2 Press (SOUND) repeatedly to select the "F" for the front speakers or "R" for the front/rear speakers To match the characteristics of the installed speaker system, you can adjust the treble from the front and rear speakers. 1 Press (SOURCE) to adjust the balance. After 3 seconds, the display returns to the normal playback mode. 3 Press < or , to adjust...

Primary User Manual (English, Español, Français)
Page 22
... and the cut-off frequency is complete, the display returns to the normal playback mode. Adjusting the volume of the subwoofer(s) 1 Press (SOURCE) to select a source (tuner, CD, or MD). 2 Press (SOUND) repeatedly until "SUB LPF" appears. 3 Press (ENTER). 3 Press < or , to adjust the volume. After the effect is disabled. 6 Press (ENTER). After 3 seconds, the display returns to adjust the volume. Level Adjusting the frequency of the subwoofer(s) (CDX-M770 only) To match...
... and the cut-off frequency is complete, the display returns to the normal playback mode. Adjusting the volume of the subwoofer(s) 1 Press (SOURCE) to select a source (tuner, CD, or MD). 2 Press (SOUND) repeatedly until "SUB LPF" appears. 3 Press (ENTER). 3 Press < or , to adjust the volume. After the effect is disabled. 6 Press (ENTER). After 3 seconds, the display returns to adjust the volume. Level Adjusting the frequency of the subwoofer(s) (CDX-M770 only) To match...

Primary User Manual (English, Español, Français)
Page 24
... the operative direction. Skip tracks. - Find a station manually. 24 Rev Nor Set the Rev/Nor-select switch to : - Receive preset stations. - By pressing buttons Turn the dial to change the direction of infrared rays. (RM-X5 only) (ATT) (SOUND) (SOURCE) (MODE) (DSPL) Rotate the VOL control to adjust the volume. (OFF) Press (SOURCE) (MODE) (ATT) (OFF)*2 (SOUND) (DSPL) To Change source (radio/CD/MD*1/TV*1) Change operation (radio band/CD unit/MD*1 unit/TV band*1) Attenuate sound Stop playback or radio reception Adjust the sound menu Change the display item...
... the operative direction. Skip tracks. - Find a station manually. 24 Rev Nor Set the Rev/Nor-select switch to : - Receive preset stations. - By pressing buttons Turn the dial to change the direction of infrared rays. (RM-X5 only) (ATT) (SOUND) (SOURCE) (MODE) (DSPL) Rotate the VOL control to adjust the volume. (OFF) Press (SOURCE) (MODE) (ATT) (OFF)*2 (SOUND) (DSPL) To Change source (radio/CD/MD*1/TV*1) Change operation (radio band/CD unit/MD*1 unit/TV band*1) Attenuate sound Stop playback or radio reception Adjust the sound menu Change the display item...

Primary User Manual (English, Español, Français)
Page 26
... Display mode on " to change the display pattern of the power amplifier to deactivate the Motion Display. • Dimmer - Select "on . - Changing the sound and display settings - to hear FM stereo broadcast in the display and activate Demo display. - Select "on ). After the mode setting is connected. • IF Auto/Wide (page 14) 1 Press (MENU). Functions only when SA is set to change the brightness of the unit's installation position. • A.Scrl (Auto Scroll) - to B-1 - to display the clock and the play mode. to turn the lights...
... Display mode on " to change the display pattern of the power amplifier to deactivate the Motion Display. • Dimmer - Select "on . - Changing the sound and display settings - to hear FM stereo broadcast in the display and activate Demo display. - Select "on ). After the mode setting is connected. • IF Auto/Wide (page 14) 1 Press (MENU). Functions only when SA is set to change the brightness of the unit's installation position. • A.Scrl (Auto Scroll) - to B-1 - to display the clock and the play mode. to turn the lights...
Primary User Manual (English, Español, Français)
Page 33
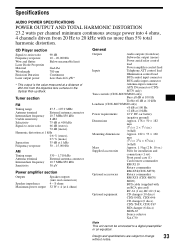
... Speaker outputs (sure seal connectors) 4 - 8 ohms 52 W × 4 (at 400 kHz Signal-to change 33 without notice. Tuner section FM Tuning range 87.5 - 107.9 MHz Antenna terminal External antenna connector Intermediate frequency 10.7 MHz/450 kHz Usable sensitivity 8 dBf Selectivity 75 dB at 4 ohms) General Outputs Audio outputs (front/rear) Subwoofer output (mono) Power aerial relay control lead Power amplifier control lead Inputs Telephone ATT control lead Illumination control lead BUS control input connector BUS audio input connector Antenna input connector AUX...
... Speaker outputs (sure seal connectors) 4 - 8 ohms 52 W × 4 (at 400 kHz Signal-to change 33 without notice. Tuner section FM Tuning range 87.5 - 107.9 MHz Antenna terminal External antenna connector Intermediate frequency 10.7 MHz/450 kHz Usable sensitivity 8 dBf Selectivity 75 dB at 4 ohms) General Outputs Audio outputs (front/rear) Subwoofer output (mono) Power aerial relay control lead Power amplifier control lead Inputs Telephone ATT control lead Illumination control lead BUS control input connector BUS audio input connector Antenna input connector AUX...

Primary User Manual (English, Español, Français)
Page 34
.... t Set the DSO mode to the power supply lead of a car's antenna booster. (Only when your unit. t Press (SOURCE) (or insert a disc) to playback a CD-R not designed for a 2-speaker system. The car does not have a relay box. The operation buttons do not appear in the display. • The clock display disappears if you may not play due to the unit. No beep sound. Dirty or defective disc. t Check the connection...
.... t Set the DSO mode to the power supply lead of a car's antenna booster. (Only when your unit. t Press (SOURCE) (or insert a disc) to playback a CD-R not designed for a 2-speaker system. The car does not have a relay box. The operation buttons do not appear in the display. • The clock display disappears if you may not play due to the unit. No beep sound. Dirty or defective disc. t Check the connection...
Primary User Manual (English, Español, Français)
Page 35
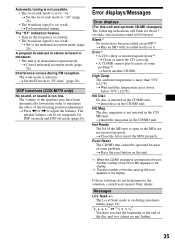
... down *2. NO Disc No disc is too low. t Insert the magazine in the CD/MD unit. t Close the lid or insert the MDs properly. The "ST" indication flashes. • Tune in the CD/MD unit. t Set the IF mode to adjust the balance. Error displays/Messages Error displays (For this unit and optional CD/MD changers) The following indications will be operated because of some problem*2. t Play an MD...
... down *2. NO Disc No disc is too low. t Insert the magazine in the CD/MD unit. t Close the lid or insert the MDs properly. The "ST" indication flashes. • Tune in the CD/MD unit. t Set the IF mode to adjust the balance. Error displays/Messages Error displays (For this unit and optional CD/MD changers) The following indications will be operated because of some problem*2. t Play an MD...


