

Limited Warranty (U.S. Only)
Page 1
... THE DURATION OF THIS WARRANTY. any repair, replacement part or replacement product for the remainder of the original Limited Warranty period or for ninety (90) days, whichever is valid only in material or workmanship for in material or workmanship during service and Sony will be responsible for your unit. For specific instructions on how long an implied warranty lasts...
... THE DURATION OF THIS WARRANTY. any repair, replacement part or replacement product for the remainder of the original Limited Warranty period or for ninety (90) days, whichever is valid only in material or workmanship for in material or workmanship during service and Sony will be responsible for your unit. For specific instructions on how long an implied warranty lasts...

XM Satellite Radio Operating manual
Page 1
... the Disc/Preset + (DISC +) button to start. Displaying the XM Radio ID Additional Information Specifications Frequency Power requirements Outputs Inputs Dimensions Mass Supplied accessories 2332.5 - 2345.0 MHz 12 V DC car battery (negative ground) BUS control output Audio output Antenna input (Satellite, Terrestrial) BUS control input Audio input 224 × 37.8 × 160 mm (8 7/8 × 1 1/2 × 6 3/8 in "Getting Started." Consult XM if you can radiate radio frequency energy and, if not installed and used in the display of the master unit. t Check the connection...
... the Disc/Preset + (DISC +) button to start. Displaying the XM Radio ID Additional Information Specifications Frequency Power requirements Outputs Inputs Dimensions Mass Supplied accessories 2332.5 - 2345.0 MHz 12 V DC car battery (negative ground) BUS control output Audio output Antenna input (Satellite, Terrestrial) BUS control input Audio input 224 × 37.8 × 160 mm (8 7/8 × 1 1/2 × 6 3/8 in "Getting Started." Consult XM if you can radiate radio frequency energy and, if not installed and used in the display of the master unit. t Check the connection...

XM Satellite Radio Operating manual
Page 2
... to use an optional BUS cable, note that a BUS cable with an 8-pin plug (L-type) cannot be interfered with or damaged by the tapping screws. - Installing the unit •Mount the unit either inside the trunk or under a seat. •Choose the mounting location carefully so the unit will not be exposed to install the unit. - Connection Connection example XM Antenna* XT-XM1 CD/MD changer* Connection diagram Sony BUS Compatible Car Audio* Cautions • This unit is...
... to use an optional BUS cable, note that a BUS cable with an 8-pin plug (L-type) cannot be interfered with or damaged by the tapping screws. - Installing the unit •Mount the unit either inside the trunk or under a seat. •Choose the mounting location carefully so the unit will not be exposed to install the unit. - Connection Connection example XM Antenna* XT-XM1 CD/MD changer* Connection diagram Sony BUS Compatible Car Audio* Cautions • This unit is...
Operating Instructions
Page 1
... (1) FM/AM Compact Disc Player Operating Instructions US Mode d'emploi FR Manual de instrucciones ES Owner's Record The model and serial numbers are located on the bottom of the unit. En ce qui concerne l'installation et les connexions, consulter le manuel d'installation/connexions fourni. Para obtener información sobre la instalación y las conexiones, consulte el manual de instalación/conexiones suministrado. CDX-M750/M650/M600 Serial No. CDX-M750 CDX-M650 CDX...
... (1) FM/AM Compact Disc Player Operating Instructions US Mode d'emploi FR Manual de instrucciones ES Owner's Record The model and serial numbers are located on the bottom of the unit. En ce qui concerne l'installation et les connexions, consulter le manuel d'installation/connexions fourni. Para obtener información sobre la instalación y las conexiones, consulte el manual de instalación/conexiones suministrado. CDX-M750/M650/M600 Serial No. CDX-M750 CDX-M650 CDX...
Operating Instructions
Page 2
... instructions, may condense on moisture condensation On a rainy day or in the display when you operate this unit or a connected optional CD unit with the CD TEXT function, the CD TEXT information will extend automatically while the unit is being supplied to the unit, check the connections first. When you play a CD TEXT disc*2. *1 You can radiate radio frequency energy and, if not installed and used...
... instructions, may condense on moisture condensation On a rainy day or in the display when you operate this unit or a connected optional CD unit with the CD TEXT function, the CD TEXT information will extend automatically while the unit is being supplied to the unit, check the connections first. When you play a CD TEXT disc*2. *1 You can radiate radio frequency energy and, if not installed and used...
Operating Instructions
Page 4
... (CDX-M750 only) Setting the equalizer 19 Selecting the listening position 20 Selecting a soundstage menu - List-up (For a CD unit with the custom file function 13 Locating a disc by name - Dynamic Soundstage Organizer (DSO 21 Adjusting the balance (BAL 21 Adjusting the front and rear fader 21 Adjusting the volume of the subwoofer(s) .... 22 Listening to each programme source in random order - Best Tuning Memory (BTM 16 Memorizing only the desired stations...
... (CDX-M750 only) Setting the equalizer 19 Selecting the listening position 20 Selecting a soundstage menu - List-up (For a CD unit with the custom file function 13 Locating a disc by name - Dynamic Soundstage Organizer (DSO 21 Adjusting the balance (BAL 21 Adjusting the front and rear fader 21 Adjusting the volume of the subwoofer(s) .... 22 Listening to each programme source in random order - Best Tuning Memory (BTM 16 Memorizing only the desired stations...
Operating Instructions
Page 5
... qd MODE button 10, 14, 16, 17, 29, 31 During CD/MD playback: CD/MD unit select 10, 14 During radio reception: BAND select 16, 17 During TV reception: Unit select 29 qf VOL (volume adjust) buttons A unit turned off by pressing (OFF) for two seconds cannot be operated with the card remote commander unless (SOURCE) on the unit is pressed or a CD is inserted to activate the unit...
... qd MODE button 10, 14, 16, 17, 29, 31 During CD/MD playback: CD/MD unit select 10, 14 During radio reception: BAND select 16, 17 During TV reception: Unit select 29 qf VOL (volume adjust) buttons A unit turned off by pressing (OFF) for two seconds cannot be operated with the card remote commander unless (SOURCE) on the unit is pressed or a CD is inserted to activate the unit...
Operating Instructions
Page 7
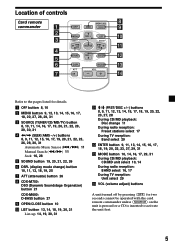
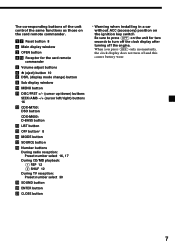
... 5 Volume adjust buttons 6 Z (eject) button 10 8 DSPL (display mode change) button 9 Sub display window 0 MENU button qa DISC/PRST +/- (cursor up/down) buttons SEEK/AMS -/+ (cursor left/right) buttons 16 qs CDX-M750: DSO button CDX-M600: D-BASS button qd LIST button qg OFF button* 8 qh MODE button qj SOURCE button qk Number buttons During radio reception: Preset number select 16, 17 During CD/MD playback: (1) REP 12 (2) SHUF 12 During TV reception: Preset number select 30 ql SOUND button w; When you press (OFF) only momentarily, the clock display does not turn...
... 5 Volume adjust buttons 6 Z (eject) button 10 8 DSPL (display mode change) button 9 Sub display window 0 MENU button qa DISC/PRST +/- (cursor up/down) buttons SEEK/AMS -/+ (cursor left/right) buttons 16 qs CDX-M750: DSO button CDX-M600: D-BASS button qd LIST button qg OFF button* 8 qh MODE button qj SOURCE button qk Number buttons During radio reception: Preset number select 16, 17 During CD/MD playback: (1) REP 12 (2) SHUF 12 During TV reception: Preset number select 30 ql SOUND button w; When you press (OFF) only momentarily, the clock display does not turn...
Operating Instructions
Page 11
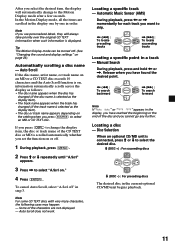
...: - Auto Scroll does not work. Tip The Motion Display mode can be turned off. (See "Changing the sound and display settings" on , information automatically scrolls across the display as follows: • The disc name appears when the disc has changed (if the disc name is selected as the display item). • The disc or track name appears depending on the setting when you press (SOURCE) to the Motion Display mode after...
...: - Auto Scroll does not work. Tip The Motion Display mode can be turned off. (See "Changing the sound and display settings" on , information automatically scrolls across the display as follows: • The disc name appears when the disc has changed (if the disc name is selected as the display item). • The disc or track name appears depending on the setting when you press (SOURCE) to the Motion Display mode after...
Operating Instructions
Page 16
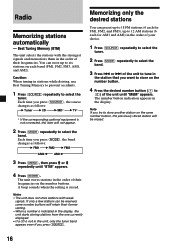
...). Radio Memorizing stations automatically - Best Tuning Memory (BTM) The unit selects the stations with weak signals. The unit stores stations in the station that you press (MODE), the band changes as follows: B Tuner B CD B MD* B TV* * If the corresponding optional equipment is stored. A beep sounds when the setting is not connected, this item will retain their former setting. • When a number is indicated in the display, the unit starts storing stations...
...). Radio Memorizing stations automatically - Best Tuning Memory (BTM) The unit selects the stations with weak signals. The unit stores stations in the station that you press (MODE), the band changes as follows: B Tuner B CD B MD* B TV* * If the corresponding optional equipment is stored. A beep sounds when the setting is not connected, this item will retain their former setting. • When a number is indicated in the display, the unit starts storing stations...
Operating Instructions
Page 19
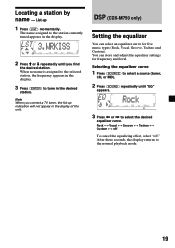
... connect a TV tuner, the list-up 1 Press (LIST) momentarily. You can select an equalizer curve for frequency and level. After three seconds, the display returns to select the desired equalizer curve. The name assigned to tune in the desired station. Rock y Vocal y Groove y Techno y Custom y off To cancel the equalizing effect, select "off." DSP (CDX-M750 only) Setting the equalizer You can store and adjust the equalizer settings for five music...
... connect a TV tuner, the list-up 1 Press (LIST) momentarily. You can select an equalizer curve for frequency and level. After three seconds, the display returns to select the desired equalizer curve. The name assigned to tune in the desired station. Rock y Vocal y Groove y Techno y Custom y off To cancel the equalizing effect, select "off." DSP (CDX-M750 only) Setting the equalizer You can store and adjust the equalizer settings for five music...
Operating Instructions
Page 21
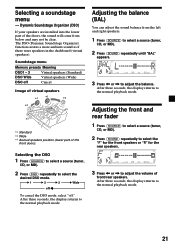
Soundstage menu Memory presets Meaning DSO1 - 3 Virtual speakers (Standard) DSO Wide Virtual speakers (Wide) DSO off ." After three seconds, the display returns to the normal playback mode. After three seconds, the display returns to the normal playback mode. 21 Adjusting the front and rear fader 1 Press (SOURCE) to select a source (tuner, CD, or MD). 2 Press (SOUND) repeatedly to select the "F" for the front speakers or "R" for the rear speakers. 3 Press < or...
Soundstage menu Memory presets Meaning DSO1 - 3 Virtual speakers (Standard) DSO Wide Virtual speakers (Wide) DSO off ." After three seconds, the display returns to the normal playback mode. After three seconds, the display returns to the normal playback mode. 21 Adjusting the front and rear fader 1 Press (SOURCE) to select a source (tuner, CD, or MD). 2 Press (SOUND) repeatedly to select the "F" for the front speakers or "R" for the rear speakers. 3 Press < or...

Operating Instructions
Page 22
... of the installed speaker system, you can cut out the unwanted high and middle frequency signals entering the subwoofer(s). When the effect setting is adjustable by 1 dB steps from -12 dB to adjust the volume. Cut-off frequency (see the diagram below), the subwoofer(s) will output only low frequency signals so you can get a clearer sound image. By setting the cut-off frequency Level 1 Press (MENU). off y 78...
... of the installed speaker system, you can cut out the unwanted high and middle frequency signals entering the subwoofer(s). When the effect setting is adjustable by 1 dB steps from -12 dB to adjust the volume. Cut-off frequency (see the diagram below), the subwoofer(s) will output only low frequency signals so you can get a clearer sound image. By setting the cut-off frequency Level 1 Press (MENU). off y 78...
Operating Instructions
Page 25
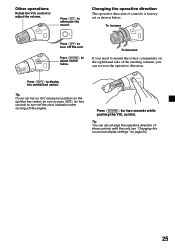
... (SOUND) to display the memorized names. To decrease If you need to mount the rotary commander on the right hand side of the steering column, you can also change the operative direction of controls is factoryset as shown below. Press (DSPL) to adjust sound menu. Press (ATT) to adjust the volume. Press (SOUND) for two seconds to turn off the clock indication after turning off the unit. Other operations Rotate...
... (SOUND) to display the memorized names. To decrease If you need to mount the rotary commander on the right hand side of the steering column, you can also change the operative direction of controls is factoryset as shown below. Press (DSPL) to adjust sound menu. Press (ATT) to adjust the volume. Press (SOUND) for two seconds to turn off the clock indication after turning off the unit. Other operations Rotate...
Operating Instructions
Page 26
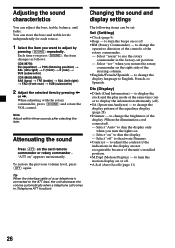
... the display (When the illumination cord connected). - To restore the previous volume level, press (ATT) again. Select "off . •A.Scrl (Auto Scroll) (page 11) 26 to turn the beeps on " to use the rotary commander as follows: CDX-M750: EQ (equalizer) t POS (listening position) t BAL (left-right) t F (front) t R (rear) t SUB (subwoofer) CDX-M650/M600: BAS (bass) t TRE (treble) t BAL (left-right) t FAD (front-rear) t SUB (subwoofer) 2 Adjust the selected item by pressing (SOUND) repeatedly. to adjust...
... the display (When the illumination cord connected). - To restore the previous volume level, press (ATT) again. Select "off . •A.Scrl (Auto Scroll) (page 11) 26 to turn the beeps on " to use the rotary commander as follows: CDX-M750: EQ (equalizer) t POS (listening position) t BAL (left-right) t F (front) t R (rear) t SUB (subwoofer) CDX-M650/M600: BAS (bass) t TRE (treble) t BAL (left-right) t FAD (front-rear) t SUB (subwoofer) 2 Adjust the selected item by pressing (SOUND) repeatedly. to adjust...
Operating Instructions
Page 27
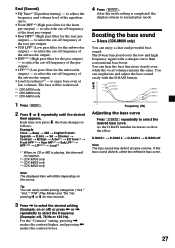
... the D-BASS button. Snd (Sound) • EQ Tune*1 (Equalizer tuning) - to select the frequency (Example: off frequency of the subwoofer output. • Loud (Loudness)*2 - to select the cut -off Note The bass sound may distort at low volumes. to select the desired bass curve. For the "Contrast" setting, pressing , makes the contrast higher, and pressing < makes the contrast lower. 4 Press (ENTER). Boosting the bass sound - You can easily switch among categories ("Set," "Snd," "P/M" (Play Mode) and...
... the D-BASS button. Snd (Sound) • EQ Tune*1 (Equalizer tuning) - to select the frequency (Example: off frequency of the subwoofer output. • Loud (Loudness)*2 - to select the cut -off Note The bass sound may distort at low volumes. to select the desired bass curve. For the "Contrast" setting, pressing , makes the contrast higher, and pressing < makes the contrast lower. 4 Press (ENTER). Boosting the bass sound - You can easily switch among categories ("Set," "Snd," "P/M" (Play Mode) and...
Operating Instructions
Page 35
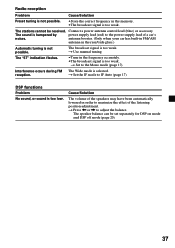
... (CDX-M750 only) Parts for installation and connections (1 set) Optional accessories Rotary commander RM-X4S BUS cable (supplied with an RCA pin cord) RC-61 (1 m), RC-62 (2 m) Compact disc single adapter CSA-8 Optional equipment CD changer (10 discs) CDX-838, CDX-737, CDX-636 MD changer (6 discs) MDX-65 Other CD/MD changers with no more than 44.6 µW* * This output is the value measured at 400 kHz Signal-to -noise ratio Frequency...
... (CDX-M750 only) Parts for installation and connections (1 set) Optional accessories Rotary commander RM-X4S BUS cable (supplied with an RCA pin cord) RC-61 (1 m), RC-62 (2 m) Compact disc single adapter CSA-8 Optional equipment CD changer (10 discs) CDX-838, CDX-737, CDX-636 MD changer (6 discs) MDX-65 Other CD/MD changers with no more than 44.6 µW* * This output is the value measured at 400 kHz Signal-to -noise ratio Frequency...
Operating Instructions
Page 36
... the unit while the unit was ejecting the disc after you connect a CD unit with your unit. Playback does not begin. The operation buttons do not function. The sound skips due to adjust the volume. •The power cord or battery has been disconnected. •The reset button has been pressed. You are using a mobile phone. A disc is forcibly inserted upside down or in a sturdy part of the memory have closed the front panel...
... the unit while the unit was ejecting the disc after you connect a CD unit with your unit. Playback does not begin. The operation buttons do not function. The sound skips due to adjust the volume. •The power cord or battery has been disconnected. •The reset button has been pressed. You are using a mobile phone. A disc is forcibly inserted upside down or in a sturdy part of the memory have closed the front panel...
Operating Instructions
Page 37
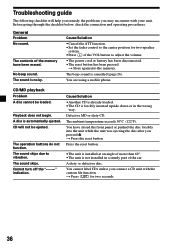
... broadcast signal is selected. t Use manual tuning. t Set to IF Auto (page 17). Interference occurs during FM The Wide mode is too weak. DSP functions Problem No sound, or sound is hampered by power supply lead (red) to the power supply lead of a car's noises. Connect a power antenna control lead (blue) or accessory The sound is too low. antenna booster. (Only when your car has built-in FM/AM antenna in the rear/side glass.) Automatic...
... broadcast signal is selected. t Use manual tuning. t Set to IF Auto (page 17). Interference occurs during FM The Wide mode is too weak. DSP functions Problem No sound, or sound is hampered by power supply lead (red) to the power supply lead of a car's noises. Connect a power antenna control lead (blue) or accessory The sound is too low. antenna booster. (Only when your car has built-in FM/AM antenna in the rear/side glass.) Automatic...
Product Guide / Specifications
Page 1
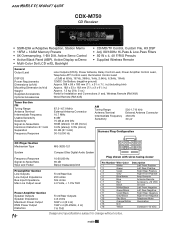
... Audio System Frequency Response Signal-to-Noise Ratio Wow and Flutter Preamplifier Section Line Outputs Line Output Impedance Bus Input Impedance Max Line Output Level Power Amplifier Section Speaker Outputs Speaker Impedance Maximum Power Output RMS Power Output Distortion 10-20,000 Hz 90 dB Below measurable limit Front/Rear/Sub 200 ohms 50k ohms 4.0 Volts, < 1.0% THD Front/Rear Outputs 4-8 ohms 50W x 4 (@ 4 Ω) 19W x 4 (20-20kHz, 4 Ω) 1% THD Plug shown with wires facing viewer Pin Number Wire Color...
... Audio System Frequency Response Signal-to-Noise Ratio Wow and Flutter Preamplifier Section Line Outputs Line Output Impedance Bus Input Impedance Max Line Output Level Power Amplifier Section Speaker Outputs Speaker Impedance Maximum Power Output RMS Power Output Distortion 10-20,000 Hz 90 dB Below measurable limit Front/Rear/Sub 200 ohms 50k ohms 4.0 Volts, < 1.0% THD Front/Rear Outputs 4-8 ohms 50W x 4 (@ 4 Ω) 19W x 4 (20-20kHz, 4 Ω) 1% THD Plug shown with wires facing viewer Pin Number Wire Color...


