
XM Satellite Radio Operating manual
Page 1
...installation and connection (1 set to on the bottom of the display while performing operations. XT-XM1 Sony Corporation © 2002 Printed in Japan WARNING This equipment has been tested and found . 2 Press either Disc...some master units, the Shuffle button is played on the bottom. CDX-C8050X CDX-C800REC* CDX-M750 CDX-M650 CDX-M610 CDX-M600 MDX-C8500X XR-M550 * You may not function properly. ...2." Caution For the following checks, consult your nearest Sony dealer.) Introducing XMTM Satellite Radio There's a world beyond AM and FM. Each time you press the Display (DSPL) button...
...installation and connection (1 set to on the bottom of the display while performing operations. XT-XM1 Sony Corporation © 2002 Printed in Japan WARNING This equipment has been tested and found . 2 Press either Disc...some master units, the Shuffle button is played on the bottom. CDX-C8050X CDX-C800REC* CDX-M750 CDX-M650 CDX-M610 CDX-M600 MDX-C8500X XR-M550 * You may not function properly. ...2." Caution For the following checks, consult your nearest Sony dealer.) Introducing XMTM Satellite Radio There's a world beyond AM and FM. Each time you press the Display (DSPL) button...

XM Satellite Radio Operating manual
Page 2
...point on the mounting surface. 1 1 Screw hole: ø3.3 mm (5/32 in direct sunlight). - The unit is designed for a safe and secure installation. • Use only the supplied screws. The unit is not subject to avoid short circuits. • Connect the yellow power input cord only after ... (such as heaters). - Connection Connection example XM Antenna* XT-XM1 CD/MD changer* Connection diagram Sony BUS Compatible Car Audio* Cautions • This unit is not subject to install it, and mark the positions of the driver and it first. Black RCA pin cord (not supplied...
...point on the mounting surface. 1 1 Screw hole: ø3.3 mm (5/32 in direct sunlight). - The unit is designed for a safe and secure installation. • Use only the supplied screws. The unit is not subject to avoid short circuits. • Connect the yellow power input cord only after ... (such as heaters). - Connection Connection example XM Antenna* XT-XM1 CD/MD changer* Connection diagram Sony BUS Compatible Car Audio* Cautions • This unit is not subject to install it, and mark the positions of the driver and it first. Black RCA pin cord (not supplied...
Operating Instructions
Page 1
... No. CDX-M750 CDX-M650 CDX-M600 © 2000 Sony Corporation Refer to these numbers in the space provided below. CDX-M750/M650/M600 Serial No. For installation and connections, see the supplied installation/connections manual. Para obtener información sobre la instalación y las conexiones, consulte el manual de instalación/conexiones suministrado. 3-047-692-11 (1) FM/AM Compact Disc Player Operating...
... No. CDX-M750 CDX-M650 CDX-M600 © 2000 Sony Corporation Refer to these numbers in the space provided below. CDX-M750/M650/M600 Serial No. For installation and connections, see the supplied installation/connections manual. Para obtener información sobre la instalación y las conexiones, consulte el manual de instalación/conexiones suministrado. 3-047-692-11 (1) FM/AM Compact Disc Player Operating...
Operating Instructions
Page 2
...Supplied accessory Card remote commander RM-X94 (for the CDX-M650) RM-X93 (for the CDX-M600) RM-X92 (for the CDX-M750) Optional accessory Rotary commander RM-X4S In addition... display when you for purchasing the Sony Compact Disc Player. Notes on , the user is an audio CD that interference will appear in temperature inside the CD player. Precautions •If your car...a residential installation. These limits are not covered in a particular installation. This equipment generates, uses, and can connect MD changers, CD changers, MD players, or CD players. *2 A CD TEXT disc is encouraged...
...Supplied accessory Card remote commander RM-X94 (for the CDX-M650) RM-X93 (for the CDX-M600) RM-X92 (for the CDX-M750) Optional accessory Rotary commander RM-X4S In addition... display when you for purchasing the Sony Compact Disc Player. Notes on , the user is an audio CD that interference will appear in temperature inside the CD player. Precautions •If your car...a residential installation. These limits are not covered in a particular installation. This equipment generates, uses, and can connect MD changers, CD changers, MD players, or CD players. *2 A CD TEXT disc is encouraged...
Operating Instructions
Page 7
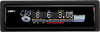
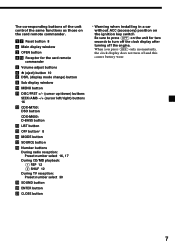
ENTER button wa CLOSE button * Warning when installing in a car without ACC (accessory) position on the ignition key switch Be sure to press (OFF) on the card remote commander. 17 Reset button 8 2 Main ... 5 Volume adjust buttons 6 Z (eject) button 10 8 DSPL (display mode change) button 9 Sub display window 0 MENU button qa DISC/PRST +/- (cursor up/down) buttons SEEK/AMS -/+ (cursor left/right) buttons 16 qs CDX-M750: DSO button CDX-M600: D-BASS button qd LIST button qg OFF button* 8 qh MODE button qj SOURCE button qk Number...
ENTER button wa CLOSE button * Warning when installing in a car without ACC (accessory) position on the ignition key switch Be sure to press (OFF) on the card remote commander. 17 Reset button 8 2 Main ... 5 Volume adjust buttons 6 Z (eject) button 10 8 DSPL (display mode change) button 9 Sub display window 0 MENU button qa DISC/PRST +/- (cursor up/down) buttons SEEK/AMS -/+ (cursor left/right) buttons 16 qs CDX-M750: DSO button CDX-M600: D-BASS button qd LIST button qg OFF button* 8 qh MODE button qj SOURCE button qk Number...
Operating Instructions
Page 21
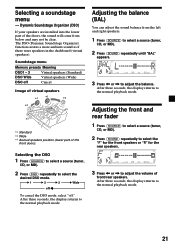
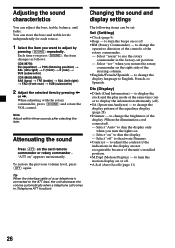
... and may not be clear. After three seconds, the display returns to select the desired DSO mode. Dynamic Soundstage Organizer (DSO) If your speakers are installed into the lower part of front/rear speakers. Selecting the DSO 1 Press (SOURCE) to select a source (tuner, CD, or MD). 2 Press (DSO) repeatedly to the...
... and may not be clear. After three seconds, the display returns to select the desired DSO mode. Dynamic Soundstage Organizer (DSO) If your speakers are installed into the lower part of front/rear speakers. Selecting the DSO 1 Press (SOURCE) to select a source (tuner, CD, or MD). 2 Press (DSO) repeatedly to the...

Operating Instructions
Page 22
... of the speakers. Level Adjusting the cut-off frequency and the output volume level for the front/rear speakers To match the characteristics of the installed speaker system, you press (VOL) repeatedly to adjust the volume all the way down , "Sub ATT" appears and the cutout frequency of the subwoofer is...
... of the speakers. Level Adjusting the cut-off frequency and the output volume level for the front/rear speakers To match the characteristics of the installed speaker system, you press (VOL) repeatedly to adjust the volume all the way down , "Sub ATT" appears and the cutout frequency of the subwoofer is...
Operating Instructions
Page 26
... of the controls of the steering column. •English/French/Spanish - to use the rotary commander as follows: CDX-M750: EQ (equalizer) t POS (listening position) t BAL (left-right) t F (front) t R (rear) t SUB (subwoofer) CDX-M650/M600: BAS (bass) t TRE (treble) t BAL (left-right) t FAD (front-rear) t SUB... lead, the unit decreases the volume automatically when a telephone call comes in the display are not recognizable because of the unit's installed position. •M.Dspl (Motion Display) - Each time you turn the lights on the card remote commander or rotary commander . Changing...
... of the controls of the steering column. •English/French/Spanish - to use the rotary commander as follows: CDX-M750: EQ (equalizer) t POS (listening position) t BAL (left-right) t F (front) t R (rear) t SUB (subwoofer) CDX-M650/M600: BAS (bass) t TRE (treble) t BAL (left-right) t FAD (front-rear) t SUB... lead, the unit decreases the volume automatically when a telephone call comes in the display are not recognizable because of the unit's installed position. •M.Dspl (Motion Display) - Each time you turn the lights on the card remote commander or rotary commander . Changing...
Operating Instructions
Page 33
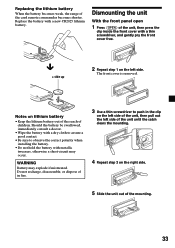
... cover is removed. WARNING Battery may occur. Do not recharge, disassemble, or dispose of in fire. 3 Use a thin screwdriver to observe the correct polarity when installing the battery. •Do not hold the battery with a new CR2025 lithium battery. x + side up 2 Repeat step 1 on the left side of the unit until...
... cover is removed. WARNING Battery may occur. Do not recharge, disassemble, or dispose of in fire. 3 Use a thin screwdriver to observe the correct polarity when installing the battery. •Do not hold the battery with a new CR2025 lithium battery. x + side up 2 Repeat step 1 on the left side of the unit until...
Operating Instructions
Page 35
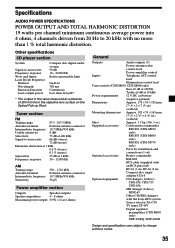
... Pick-up Block. Tuner section FM Tuning range 87.5 - 107.9...CDX-M650 only) RM-X93 (CDX-M600 only) RM-X92 (CDX-M750 only) Parts for installation and connections (1 set) Optional accessories Rotary commander RM-X4S BUS cable (supplied with an RCA pin cord) RC-61 (1 m), RC-62 (2 m) Compact disc single adapter CSA-8 Optional equipment CD changer (10 discs) CDX-838, CDX-737, CDX-636 MD changer (6 discs...Compact disc digital audio system 90 dB 10 - 20,000 Hz Below measurable limit GaAlAs 780 nm Continuous Less than 1 % total harmonic distortion. Other specifications CD player...
... Pick-up Block. Tuner section FM Tuning range 87.5 - 107.9...CDX-M650 only) RM-X93 (CDX-M600 only) RM-X92 (CDX-M750 only) Parts for installation and connections (1 set) Optional accessories Rotary commander RM-X4S BUS cable (supplied with an RCA pin cord) RC-61 (1 m), RC-62 (2 m) Compact disc single adapter CSA-8 Optional equipment CD changer (10 discs) CDX-838, CDX-737, CDX-636 MD changer (6 discs...Compact disc digital audio system 90 dB 10 - 20,000 Hz Below measurable limit GaAlAs 780 nm Continuous Less than 1 % total harmonic distortion. Other specifications CD player...
Operating Instructions
Page 36
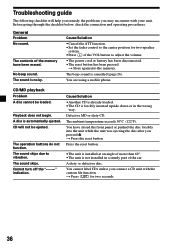
... the center position for two seconds. 36 A dirty or defective disc. Troubleshooting guide The following checklist will not be loaded. Before going through the checklist below, check the connection and operating procedures. A disc is not installed in the wrong way. Press the reset button. •The ...unit is installed at an angle of the VOL button to adjust the volume. •The power cord or...
... the center position for two seconds. 36 A dirty or defective disc. Troubleshooting guide The following checklist will not be loaded. Before going through the checklist below, check the connection and operating procedures. A disc is not installed in the wrong way. Press the reset button. •The ...unit is installed at an angle of the VOL button to adjust the volume. •The power cord or...
Product Guide / Specifications
Page 1
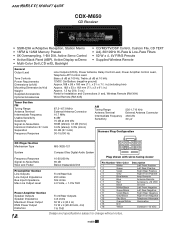
2000 MOBILE ES PRODUCT GUIDE CDX-M650 CD Receiver • SSIR-EXA w/Adaptive Reception, Station Memo •... Antenna Connector 450 kHz 30 µV Harness Plug Configuration CD Player Section Mechanism Type MG-363S-121 System Compact Disc Digital Audio System Frequency Response Signal-to-Noise Ratio Wow and ...2 x 61/2 in.) Approx. 1.5 kg (3 lb. 5 oz.) Parts for Installation and Connections (1 set), Wireless Remote (RM-X94) Wired Remote (RM-X4S) Tuner Section FM Tuning Range Antenna Terminal Intermediate Frequency Usable Sensitivity Selectivity Signal-to-Noise Ratio Harmonic Distortion @...
2000 MOBILE ES PRODUCT GUIDE CDX-M650 CD Receiver • SSIR-EXA w/Adaptive Reception, Station Memo •... Antenna Connector 450 kHz 30 µV Harness Plug Configuration CD Player Section Mechanism Type MG-363S-121 System Compact Disc Digital Audio System Frequency Response Signal-to-Noise Ratio Wow and ...2 x 61/2 in.) Approx. 1.5 kg (3 lb. 5 oz.) Parts for Installation and Connections (1 set), Wireless Remote (RM-X94) Wired Remote (RM-X4S) Tuner Section FM Tuning Range Antenna Terminal Intermediate Frequency Usable Sensitivity Selectivity Signal-to-Noise Ratio Harmonic Distortion @...


