
Limited Warranty (U.S. Only)
Page 1
... for the time periods and as fuses or batteries). 3-272-643-01 ® Car Audio LIMITED WARRANTY (U.S. It is required. Printed in the Product; Please refer to be responsible for any part of incidental or consequential damages, or allow limitations on how to backup any data, software or other materials will , at its option, repair or replace with...
... for the time periods and as fuses or batteries). 3-272-643-01 ® Car Audio LIMITED WARRANTY (U.S. It is required. Printed in the Product; Please refer to be responsible for any part of incidental or consequential damages, or allow limitations on how to backup any data, software or other materials will , at its option, repair or replace with...

XM Satellite Radio Operating manual
Page 1
... Satellite Radio. The user of the XM Satellite radio. Without this mode, you to: • Receive XM Satellite Radio programming (with different master unit models. Press the Source button until the receiver completes receiving the information. The category of music or programming that the radio is in this procedure, the master unit will quickly step through the channels. Locate codes and cables such as an antenna code, a BUS cable, an RCA pin code, or a power code so as follows: Channel Name t Channel Number t Artist Name/Program...
... Satellite Radio. The user of the XM Satellite radio. Without this mode, you to: • Receive XM Satellite Radio programming (with different master unit models. Press the Source button until the receiver completes receiving the information. The category of music or programming that the radio is in this procedure, the master unit will quickly step through the channels. Locate codes and cables such as an antenna code, a BUS cable, an RCA pin code, or a power code so as follows: Channel Name t Channel Number t Artist Name/Program...

XM Satellite Radio Operating manual
Page 2
... fuse blows, check the power connection and replace the fuse. Connection Connection example XM Antenna* XT-XM1 CD/MD changer* Connection diagram Sony BUS Compatible Car Audio* Cautions • This unit is not exposed to direct sunlight. - Black RCA pin cord (not supplied) BUS cable (not supplied) 4 3 OUT OUT IN CD/MD changer (not supplied) Sony BUS Compatible Car Audio (not supplied) IN The unit is designed for a safe and secure installation. • Use only the supplied screws. Warning Use a fuse with an 8-pin plug...
... fuse blows, check the power connection and replace the fuse. Connection Connection example XM Antenna* XT-XM1 CD/MD changer* Connection diagram Sony BUS Compatible Car Audio* Cautions • This unit is not exposed to direct sunlight. - Black RCA pin cord (not supplied) BUS cable (not supplied) 4 3 OUT OUT IN CD/MD changer (not supplied) Sony BUS Compatible Car Audio (not supplied) IN The unit is designed for a safe and secure installation. • Use only the supplied screws. Warning Use a fuse with an 8-pin plug...
Installation/Connection Instructions
Page 1
... and left speaker. • Do not connect the ground lead of the car first. Connection example (2) Note (2-A) Be sure to connect the speakers in parallel. • Connect only passive speakers. 3-251-038-11 (1) FM/AM Compact Disc Player Installation/Connections Installation/Connexions Instalación/Conexiones 2A SUB OUT (MONO) AUDIO OUT FRONT AUDIO OUT REAR B BUS AUDIO IN BUS CONTROL IN CDX-M3DI ©2003 Sony Corporation Printed in Korea 1 1 2 3 × 4 4 5 6 × 2 Equipment used with this unit. Notes...
... and left speaker. • Do not connect the ground lead of the car first. Connection example (2) Note (2-A) Be sure to connect the speakers in parallel. • Connect only passive speakers. 3-251-038-11 (1) FM/AM Compact Disc Player Installation/Connections Installation/Connexions Instalación/Conexiones 2A SUB OUT (MONO) AUDIO OUT FRONT AUDIO OUT REAR B BUS AUDIO IN BUS CONTROL IN CDX-M3DI ©2003 Sony Corporation Printed in Korea 1 1 2 3 × 4 4 5 6 × 2 Equipment used with this unit. Notes...

Operating Instructions
Page 1
... No. 3-251-042-11 (1) FM/AM Compact Disc Player Operating Instructions US Mode d'emploi FR Manual de instrucciones ES Owner's Record The model and serial numbers are located on the bottom of the unit. CDX-M3DI © 2003 Sony Corporation Model No. En ce qui concerne l'installation et les connexions, consulter le manuel d'installation/ raccordement fourni. Refer to these numbers in the space provided below. For installation and connections, see the supplied installation/connections manual.
... No. 3-251-042-11 (1) FM/AM Compact Disc Player Operating Instructions US Mode d'emploi FR Manual de instrucciones ES Owner's Record The model and serial numbers are located on the bottom of the unit. CDX-M3DI © 2003 Sony Corporation Model No. En ce qui concerne l'installation et les connexions, consulter le manuel d'installation/ raccordement fourni. Refer to these numbers in the space provided below. For installation and connections, see the supplied installation/connections manual.
Operating Instructions
Page 2
... an MP3 file is played). • CD TEXT information (displayed when a CD TEXT disc*3 is played). • Supplied controller accessory Card remote commander RM-X131 • Optional controller accessory Wireless rotary commander RM-X6S *1 This unit works with the instructions, may differ from that to which can radiate radio frequency energy and, if not installed and used in accordance with Sony products only. *2 ID3 tag...
... an MP3 file is played). • CD TEXT information (displayed when a CD TEXT disc*3 is played). • Supplied controller accessory Card remote commander RM-X131 • Optional controller accessory Wireless rotary commander RM-X6S *1 This unit works with the instructions, may differ from that to which can radiate radio frequency energy and, if not installed and used in accordance with Sony products only. *2 ID3 tag...

Operating Instructions
Page 3
... Contents Location of the subwoofer(s 28 Connecting auxiliary audio equipment . . . . 29 Additional Information Maintenance 30 Removing the unit 31 Specifications 32 Troubleshooting 33 Error displays/Messages 34 3 Station Memo 17 Tuning in random order - Menu 25 Setting the Dynamic Soundstage Organizer (DSO 26 Setting the equalizer (EQ7 26 Adjusting the front and rear volume 27 Adjusting the volume of controls 4 Precautions 6 Notes on discs 6 About MP3 files 7 General top menu display 9 Getting Started Resetting the unit 10 Setting the clock...
... Contents Location of the subwoofer(s 28 Connecting auxiliary audio equipment . . . . 29 Additional Information Maintenance 30 Removing the unit 31 Specifications 32 Troubleshooting 33 Error displays/Messages 34 3 Station Memo 17 Tuning in random order - Menu 25 Setting the Dynamic Soundstage Organizer (DSO 26 Setting the equalizer (EQ7 26 Adjusting the front and rear volume 27 Adjusting the volume of controls 4 Precautions 6 Notes on discs 6 About MP3 files 7 General top menu display 9 Getting Started Resetting the unit 10 Setting the clock...
Operating Instructions
Page 4
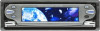
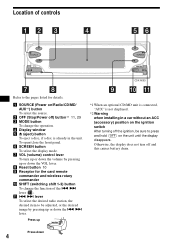
... down the VOL lever. Press up or down 4 Location of controls OFF SOURCE MODE VOL SCREEN .> SHIFT CDX-M3DI Refer to the pages listed for the card remote commander and wireless rotary commander j SHIFT (switching shift 1-3) button To change the operation. d Display window e Z (eject) button To eject a disc, if a disc is not displayed. *2 Warning when installing in the unit. g VOL (volume) control lever To turn off ) button*2 11, 29 c MODE button To change the function of the . > lever (qa).
... down the VOL lever. Press up or down 4 Location of controls OFF SOURCE MODE VOL SCREEN .> SHIFT CDX-M3DI Refer to the pages listed for the card remote commander and wireless rotary commander j SHIFT (switching shift 1-3) button To change the operation. d Display window e Z (eject) button To eject a disc, if a disc is not displayed. *2 Warning when installing in the unit. g VOL (volume) control lever To turn off ) button*2 11, 29 c MODE button To change the function of the . > lever (qa).
Operating Instructions
Page 5
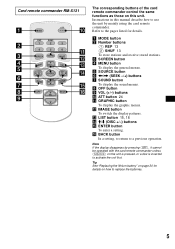
c SCREEN button d MENU button To display the general menus. The corresponding buttons of the card remote commander control the same functions as those on this manual describe how to the pages listed for details. e SOURCE button f Instructions in this unit. a MODE button b Number buttons (1) REP 13 (2) SHUF 13 To store stations and receive stored stations. Card remote commander RM-X131 ATT MODE REP SHUF 1 2 3 4 5 6 SCREEN GRAPHIC IMAGE MENU DISC + LIST SEEK- Refer to use the unit by mainly using the card...
c SCREEN button d MENU button To display the general menus. The corresponding buttons of the card remote commander control the same functions as those on this manual describe how to the pages listed for details. e SOURCE button f Instructions in this unit. a MODE button b Number buttons (1) REP 13 (2) SHUF 13 To store stations and receive stored stations. Card remote commander RM-X131 ATT MODE REP SHUF 1 2 3 4 5 6 SCREEN GRAPHIC IMAGE MENU DISC + LIST SEEK- Refer to use the unit by mainly using the card...
Operating Instructions
Page 6
... display. Inability to read audio data correctly (e.g., playback skipping, or no playback) due to heat shrinking of the picture element is operating. • Do not use the CUSTOM FILE feature while driving, or perform any questions or problems concerning your unit that are not covered in this manual, please consult your nearest Sony dealer. Should this unit. In such a case, remove...
... display. Inability to read audio data correctly (e.g., playback skipping, or no playback) due to heat shrinking of the picture element is operating. • Do not use the CUSTOM FILE feature while driving, or perform any questions or problems concerning your unit that are not covered in this manual, please consult your nearest Sony dealer. Should this unit. In such a case, remove...
Operating Instructions
Page 9
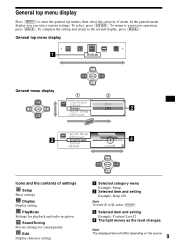
... operation, press (BACK). SEEK+ DISC + SEEK- SOURCE DISC - SEEK+ 1 2 Icons and the contents of menu. SOURCE DISC - c Selected item and setting Example: Contrast Level 2 d The light moves as the level changes Note 9 The displayed item will differ depending on the source. SOURCE DISC - To return to the normal display, press (MENU). General top menu display Press (MENU) to 2, press (ENTER). In the general menu display you can select various settings. SEEK+ a Selected category menu Example: Setup b Selected item and setting Example...
... operation, press (BACK). SEEK+ DISC + SEEK- SOURCE DISC - SEEK+ 1 2 Icons and the contents of menu. SOURCE DISC - c Selected item and setting Example: Contrast Level 2 d The light moves as the level changes Note 9 The displayed item will differ depending on the source. SOURCE DISC - To return to the normal display, press (MENU). General top menu display Press (MENU) to 2, press (ENTER). In the general menu display you can select various settings. SEEK+ a Selected category menu Example: Setup b Selected item and setting Example...
Operating Instructions
Page 10
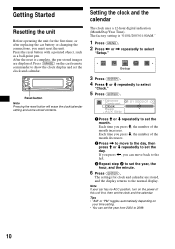
Press (IMAGE) on the card remote commander to show the clock display and set the month. Each time you press m, the number of the month increases. Getting Started Resetting the unit Before operating the unit for the first time, or after replacing the car battery or changing the connections, you press Reset button Note Pressing the reset button will erase the clock/calendar setting and some stored contents. Press the reset button with a pointed object...
Press (IMAGE) on the card remote commander to show the clock display and set the month. Each time you press m, the number of the month increases. Getting Started Resetting the unit Before operating the unit for the first time, or after replacing the car battery or changing the connections, you press Reset button Note Pressing the reset button will erase the clock/calendar setting and some stored contents. Press the reset button with a pointed object...
Operating Instructions
Page 11
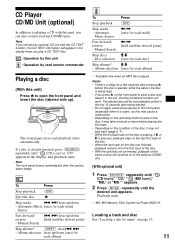
Note If you connect an optional CD unit with this unit, you play a CD TEXT disc. : Operation by this unit : Operation by card remote commander Playing a disc (With this unit) Press Z to playing a CD with the CD TEXT function, the CD TEXT information will appear in the display, and playback starts. To Press Stop playback (OFF) Eject the disc Z Skip tracks . > lever up /down [once for each album...
Note If you connect an optional CD unit with this unit, you play a CD TEXT disc. : Operation by this unit : Operation by card remote commander Playing a disc (With this unit) Press Z to playing a CD with the CD TEXT function, the CD TEXT information will appear in the display, and playback starts. To Press Stop playback (OFF) Eject the disc Z Skip tracks . > lever up /down [once for each album...
Operating Instructions
Page 16
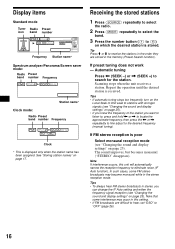
... repeatedly to fine adjust to (6)) on page 17. Receiving the stored stations 1 Press (SOURCE) repeatedly to select the radio. 2 Press (MODE) repeatedly to select the band. 3 Press the number button ((1) to the desired frequency (manual tuning). Tip Press M or m to search for the station. Scanning stops when the unit receives a station. Display items Standard mode: Tuner Radio Preset icon band number Frequency Station name* Spectrum analyzer/Panorama/Screen saver mode: Radio Preset band number Frequency Station name* Clock mode: Radio Preset band number Frequency Clock * This is...
... repeatedly to fine adjust to (6)) on page 17. Receiving the stored stations 1 Press (SOURCE) repeatedly to select the radio. 2 Press (MODE) repeatedly to select the band. 3 Press the number button ((1) to the desired frequency (manual tuning). Tip Press M or m to search for the station. Scanning stops when the unit receives a station. Display items Standard mode: Tuner Radio Preset icon band number Frequency Station name* Spectrum analyzer/Panorama/Screen saver mode: Radio Preset band number Frequency Station name* Clock mode: Radio Preset band number Frequency Clock * This is...

Operating Instructions
Page 22
... color in the unit. Each time you adjusted has no effect. 6 Press M or m repeatedly to select the desired character color. Setting the character color - Selecting the character color 1 Press (SOURCE) to select a source (radio, CD, MD, or AUX). 2 Press (GRAPHIC). 3 Press < or , repeatedly to the normal display. Each time you press < or ,, the item changes as follows: AutoClear y BlendLevel y Plaque y Color Sel y AutoImage y AutoClear 4 Press (ENTER). The display returns to select "Color...
... color in the unit. Each time you adjusted has no effect. 6 Press M or m repeatedly to select the desired character color. Setting the character color - Selecting the character color 1 Press (SOURCE) to select a source (radio, CD, MD, or AUX). 2 Press (GRAPHIC). 3 Press < or , repeatedly to the normal display. Each time you press < or ,, the item changes as follows: AutoClear y BlendLevel y Plaque y Color Sel y AutoImage y AutoClear 4 Press (ENTER). The display returns to select "Color...
Operating Instructions
Page 25
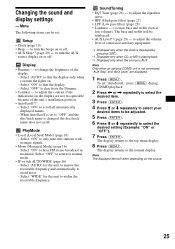
... 29) - SoundTuning • EQ7 Tune (page 26) - The bass and treble will differ depending on the source. 25 The display returns to change the brightness of the unit's installation position. • AutoScroll*2 - Select "AUTO" to widen the receivable frequency. When AutoScroll is changed, the disc/track name does not scroll. Changing the sound and display settings - Note The displayed item will be reinforced. • AUX Level*3 (page 29) - to the normal...
... 29) - SoundTuning • EQ7 Tune (page 26) - The bass and treble will differ depending on the source. 25 The display returns to change the brightness of the unit's installation position. • AutoScroll*2 - Select "AUTO" to widen the receivable frequency. When AutoScroll is changed, the disc/track name does not scroll. Changing the sound and display settings - Note The displayed item will be reinforced. • AUX Level*3 (page 29) - to the normal...

Operating Instructions
Page 27
... installed speaker system, you press < or ,, the frequency changes. 62 Hz y 157 Hz y 396 Hz y 1000 Hz y 2510 Hz y 6340 Hz y 16000 Hz Adjusting the front and rear volume 1 Press (SOURCE) to select a source (radio, CD, MD, or AUX). 2 Press (SOUND). 3 Press < or , repeatedly to select "Fader." 4 Press (ENTER). 2 Press M or m repeatedly to the normal display. To restore the factory-set equalizer curve, press (ENTER) for the front/rear speakers...
... installed speaker system, you press < or ,, the frequency changes. 62 Hz y 157 Hz y 396 Hz y 1000 Hz y 2510 Hz y 6340 Hz y 16000 Hz Adjusting the front and rear volume 1 Press (SOURCE) to select a source (radio, CD, MD, or AUX). 2 Press (SOUND). 3 Press < or , repeatedly to select "Fader." 4 Press (ENTER). 2 Press M or m repeatedly to the normal display. To restore the factory-set equalizer curve, press (ENTER) for the front/rear speakers...
Operating Instructions
Page 32
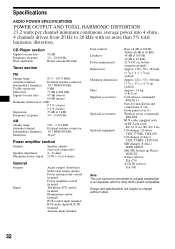
... 20 kHz with an RCA pin cord) RC-61 (1 m), RC-62 (2 m) CD changer (10 discs) CDX-757MX, CDX-656 CD changer (6 discs) CDX-T70MX, CDX-T69 MD changer (6 discs) MDX-66XLP MG-MS System-up Player MGS-X1 Source selector XA-C30 AUX-IN selector XA-300 Note This unit cannot be connected to a digital preamplifier or an equalizer which is Sony BUS system compatible. Design and specifications are subject to -noise...
... 20 kHz with an RCA pin cord) RC-61 (1 m), RC-62 (2 m) CD changer (10 discs) CDX-757MX, CDX-656 CD changer (6 discs) CDX-T70MX, CDX-T69 MD changer (6 discs) MDX-66XLP MG-MS System-up Player MGS-X1 Source selector XA-C30 AUX-IN selector XA-300 Note This unit cannot be connected to a digital preamplifier or an equalizer which is Sony BUS system compatible. Design and specifications are subject to -noise...

Operating Instructions
Page 33
... ISO9660 level 1. No sound. • Press up the VOL control lever to adjust the volume. • Cancel the ATT function. • Set the fader control to the unit. t Store again into the memory. • The power cord or battery has been disconnected. • The power connecting cord is not compliant with your unit. Album name/track name/ID3 tag is not displayed correctly. • A disc is not connected properly. The sound skips...
... ISO9660 level 1. No sound. • Press up the VOL control lever to adjust the volume. • Cancel the ATT function. • Set the fader control to the unit. t Store again into the memory. • The power cord or battery has been disconnected. • The power connecting cord is not compliant with your unit. Album name/track name/ID3 tag is not displayed correctly. • A disc is not connected properly. The sound skips...
Operating Instructions
Page 34
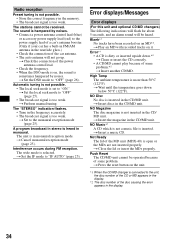
...; Connect a power antenna control lead (blue) or accessory power supply lead (red) to the power supply lead of the car antenna. • The auto antenna will be heard. NO Music*1 A CD which is not a music file is selected. Push Reset The CD/MD unit cannot be received. t Set the DSO mode to "OFF" (page 25). • The broadcast signal is too weak. The "STEREO" indication flashes. • Tune in the CD/MD unit. t Set...
...; Connect a power antenna control lead (blue) or accessory power supply lead (red) to the power supply lead of the car antenna. • The auto antenna will be heard. NO Music*1 A CD which is not a music file is selected. Push Reset The CD/MD unit cannot be received. t Set the DSO mode to "OFF" (page 25). • The broadcast signal is too weak. The "STEREO" indication flashes. • Tune in the CD/MD unit. t Set...


