
Limited Warranty (U.S. Only)
Page 1
... provided for in material or workmanship for the time periods and as fuses or batteries). For specific instructions on how to obtain warranty service for your product, Visit Sony's Web Site: www.sony.com/service Or call : 1-800-488-SONY (7669) Repair / Replacement Warranty: This Limited Warranty shall apply to you. Any parts or product replaced under this Limited Warranty, "refurbished" means a product or...
... provided for in material or workmanship for the time periods and as fuses or batteries). For specific instructions on how to obtain warranty service for your product, Visit Sony's Web Site: www.sony.com/service Or call : 1-800-488-SONY (7669) Repair / Replacement Warranty: This Limited Warranty shall apply to you. Any parts or product replaced under this Limited Warranty, "refurbished" means a product or...

Installation/Connection Instructions
Page 1
...-11 (1) FM/AM Compact Disc Player Installation/Connections Installation/Connexions Equipment used in illustrations (not supplied) Appareils utilisés dans les illustrations (non fournis) Front speaker Haut-parleur avant Power amplifier Amplificateur de puissance Rear speaker Haut-parleur arrière Rotary commander RM-X4S Satellite de commande RM-X4S 2 AUDIO OUT REAR CDX-L600X Sony Corporation © 2002 Printed in Korea 1 1 4 2 3 × 4 × 2 5 Cautions • This unit is designed...
...-11 (1) FM/AM Compact Disc Player Installation/Connections Installation/Connexions Equipment used in illustrations (not supplied) Appareils utilisés dans les illustrations (non fournis) Front speaker Haut-parleur avant Power amplifier Amplificateur de puissance Rear speaker Haut-parleur arrière Rotary commander RM-X4S Satellite de commande RM-X4S 2 AUDIO OUT REAR CDX-L600X Sony Corporation © 2002 Printed in Korea 1 1 4 2 3 × 4 × 2 5 Cautions • This unit is designed...
Operating Instructions
Page 1
For installation and connections, see the supplied installation/connections manual. 3-237-612-11 (1) FM/AM Compact Disc Player Operating Instructions US Mode d'emploi FR Owner's Record The model and serial numbers are located on the bottom of the unit. Record these numbers whenever you call upon your Sony dealer regarding this product. En ce qui concerne l'installation et les connexions, consulter le manuel d'installation/raccordement fourni. Model No. CDX-L600X Serial No. CDX-L600X © 2002 Sony Corporation Refer to these numbers in the space provided below.
For installation and connections, see the supplied installation/connections manual. 3-237-612-11 (1) FM/AM Compact Disc Player Operating Instructions US Mode d'emploi FR Owner's Record The model and serial numbers are located on the bottom of the unit. Record these numbers whenever you call upon your Sony dealer regarding this product. En ce qui concerne l'installation et les connexions, consulter le manuel d'installation/raccordement fourni. Model No. CDX-L600X Serial No. CDX-L600X © 2002 Sony Corporation Refer to these numbers in the space provided below.
Operating Instructions
Page 2
... (displayed when a CD TEXT disc* is played). •Supplied controller accessories Card remote commander RM-X114 •Optional controller accessories Rotary commander RM-X4S * A CD TEXT disc is connected. - Warning This equipment has been tested and found to comply with the limits for purchasing this Sony Compact Disc Player. CAUTION The use of the FCC Rules. Consult the dealer or an experienced radio/ TV...
... (displayed when a CD TEXT disc* is played). •Supplied controller accessories Card remote commander RM-X114 •Optional controller accessories Rotary commander RM-X4S * A CD TEXT disc is connected. - Warning This equipment has been tested and found to comply with the limits for purchasing this Sony Compact Disc Player. CAUTION The use of the FCC Rules. Consult the dealer or an experienced radio/ TV...
Operating Instructions
Page 3
... Tuning Memory (BTM 11 Receiving the stored stations 11 Storing only the desired stations 12 Storing station names - "My Best sound Position (MBP 17 Setting the equalizer 17 Additional Information Maintenance 18 Removing the unit 19 Specifications 20 Troubleshooting 21 Error displays/Messages 22 3 Menu 16 Selecting the sound position - Repeat Play 10 Playing tracks in random order - Station Memo 12 Locating a station by name - List-up 13 Other Functions Using the rotary commander 14 Adjusting...
... Tuning Memory (BTM 11 Receiving the stored stations 11 Storing only the desired stations 12 Storing station names - "My Best sound Position (MBP 17 Setting the equalizer 17 Additional Information Maintenance 18 Removing the unit 19 Specifications 20 Troubleshooting 21 Error displays/Messages 22 3 Menu 16 Selecting the sound position - Repeat Play 10 Playing tracks in random order - Station Memo 12 Locating a station by name - List-up 13 Other Functions Using the rotary commander 14 Adjusting...
Operating Instructions
Page 4
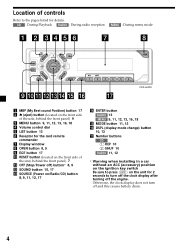
... clock display after turning off the engine. CD : During Playback RADIO : During radio reception MENU : During menu mode CDX-L600X 1 MBP (My Best sound Position) button 17 2 Z (eject) button (located on the front side of the unit, behind the front panel) 7 qa OFF (Stop/Power off) button* 8, 9 qs SOUND button 15, 17 qd SOURCE (Power on/Radio/CD) button 8, 9, 11, 12, 17 qf ENTER button RADIO 13 MENU 9, 11, 12, 13, 16, 18 qg MODE button 11, 12 qh DSPL (display mode change) button...
... clock display after turning off the engine. CD : During Playback RADIO : During radio reception MENU : During menu mode CDX-L600X 1 MBP (My Best sound Position) button 17 2 Z (eject) button (located on the front side of the unit, behind the front panel) 7 qa OFF (Stop/Power off) button* 8, 9 qs SOUND button 15, 17 qd SOURCE (Power on/Radio/CD) button 8, 9, 11, 12, 17 qf ENTER button RADIO 13 MENU 9, 11, 12, 13, 16, 18 qg MODE button 11, 12 qh DSPL (display mode change) button...
Operating Instructions
Page 5
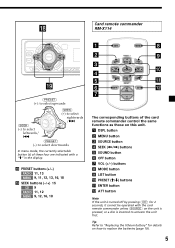
..., 12 MENU 9, 12, 16, 18 DSPL MODE PRESET + MENU DISC + LIST SEEK- SOURCE SOUND OFF DISC - PRESET - + VOL - Card remote commander RM-X114 (PRESET) (+): to select upwards (SEEK) (-): to select leftwards/ . (SEEK) (+):to select rightwards /> (PRESET) (-): to select downwards In menu mode, the currently selectable button (s) of the card remote commander control the same functions as those on this unit. 1 DSPL button 2 MENU button 3 SOURCE button 4 SEEK ( SEEK+ ENTER ATT The corresponding buttons of these four are indicated with a "M" in the display.
..., 12 MENU 9, 12, 16, 18 DSPL MODE PRESET + MENU DISC + LIST SEEK- SOURCE SOUND OFF DISC - PRESET - + VOL - Card remote commander RM-X114 (PRESET) (+): to select upwards (SEEK) (-): to select leftwards/ . (SEEK) (+):to select rightwards /> (PRESET) (-): to select downwards In menu mode, the currently selectable button (s) of the card remote commander control the same functions as those on this unit. 1 DSPL button 2 MENU button 3 SOURCE button 4 SEEK ( SEEK+ ENTER ATT The corresponding buttons of these four are indicated with a "M" in the display.
Operating Instructions
Page 6
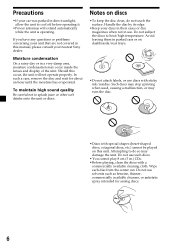
... Sony dealer. Do not use discs with special shapes (heart-shaped discs, octagonal discs, etc.) cannot be played on discs •To keep the disc clean, do so may occur inside the lenses and display of the unit. If you have any questions or problems concerning your unit that are not covered in this occur, the unit will extend automatically while the unit is operating...
... Sony dealer. Do not use discs with special shapes (heart-shaped discs, octagonal discs, etc.) cannot be played on discs •To keep the disc clean, do so may occur inside the lenses and display of the unit. If you have any questions or problems concerning your unit that are not covered in this occur, the unit will extend automatically while the unit is operating...
Operating Instructions
Page 7
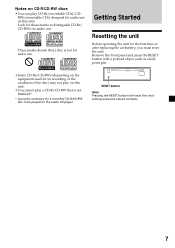
RWs (rewritable CDs) designed for the first time or after replacing the car battery, you must reset the unit. Getting Started Resetting the unit Before operating the unit for audio use on the audio CD player. Notes on this unit. Look for these marks to be played on this unit. •You cannot play CD-Rs (recordable CDs)/CD- Remove the front panel and press the RESET button with a pointed object, such as...
RWs (rewritable CDs) designed for the first time or after replacing the car battery, you must reset the unit. Getting Started Resetting the unit Before operating the unit for audio use on the audio CD player. Notes on this unit. Look for these marks to be played on this unit. •You cannot play CD-Rs (recordable CDs)/CD- Remove the front panel and press the RESET button with a pointed object, such as...
Operating Instructions
Page 11
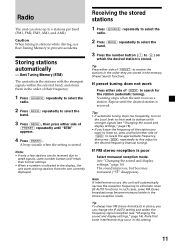
... monaural while in stations while driving, use Best Tuning Memory to prevent accidents. Radio The unit can be received due to weak signals, some number buttons will automatically narrow the reception frequency to eliminate noise (IF AUTO function). If FM stereo reception is stored. Note If interference occurs, this setting. 11 Storing stations automatically - Best Tuning Memory (BTM) The unit selects the stations with stronger signals (see "Changing the sound and display settings," page 16). •...
... monaural while in stations while driving, use Best Tuning Memory to prevent accidents. Radio The unit can be received due to weak signals, some number buttons will automatically narrow the reception frequency to eliminate noise (IF AUTO function). If FM stereo reception is stored. Note If interference occurs, this setting. 11 Storing stations automatically - Best Tuning Memory (BTM) The unit selects the stations with stronger signals (see "Changing the sound and display settings," page 16). •...

Operating Instructions
Page 12
... chosen number button. 1 Press (SOURCE) repeatedly to select the radio. 2 Press (MODE) repeatedly to select the band. 3 Press either side of (PRESET) repeatedly until "MEM" appears. t 0 t 1 t 2 ... t * ... Storing only the desired stations You can manually preset the desired stations on the same number button, the previously stored station will be erased. t _*2 t A *1 For reverse order, press the (-) side of (PRESET). *2 (blank space) 2 Press the (+) side of (SEEK) after locating...
... chosen number button. 1 Press (SOURCE) repeatedly to select the radio. 2 Press (MODE) repeatedly to select the band. 3 Press either side of (PRESET) repeatedly until "MEM" appears. t 0 t 1 t 2 ... t * ... Storing only the desired stations You can manually preset the desired stations on the same number button, the previously stored station will be erased. t _*2 t A *1 For reverse order, press the (-) side of (PRESET). *2 (blank space) 2 Press the (+) side of (SEEK) after locating...
Operating Instructions
Page 14
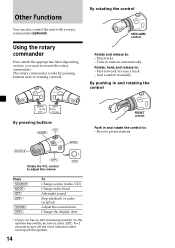
... (SOURCE) (MODE) (ATT) (OFF)* (SOUND) (DSPL) To Change source (radio/CD) Change radio band Attenuate sound Stop playback or radio reception Adjust the sound menu Change the display item * If your car has no ACC (accessory) position on how you want to mount the rotary commander. find a station manually. Using the rotary commander First, attach the appropriate label depending on the ignition key switch, be sure to press (OFF) for 2 seconds to : - Receive preset stations. Tune...
... (SOURCE) (MODE) (ATT) (OFF)* (SOUND) (DSPL) To Change source (radio/CD) Change radio band Attenuate sound Stop playback or radio reception Adjust the sound menu Change the display item * If your car has no ACC (accessory) position on how you want to mount the rotary commander. find a station manually. Using the rotary commander First, attach the appropriate label depending on the ignition key switch, be sure to press (OFF) for 2 seconds to : - Receive preset stations. Tune...
Operating Instructions
Page 16
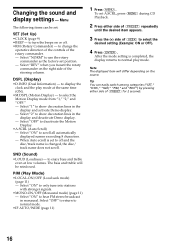
... commander as the factory-set : SET (Set Up) •CLOCK (page 9) •BEEP - Select "NORM" to change the operative direction of the controls of the steering column. to normal mode. •IF AUTO/WIDE (page 11) 1 Press (MENU). When Auto scroll is set A.SCRL, press (MENU) during CD Playback. 2 Press either side of (SEEK) to hear FM stereo broadcast in the display and deactivate Demo display. - The bass and treble will differ depending...
... commander as the factory-set : SET (Set Up) •CLOCK (page 9) •BEEP - Select "NORM" to change the operative direction of the controls of the steering column. to normal mode. •IF AUTO/WIDE (page 11) 1 Press (MENU). When Auto scroll is set A.SCRL, press (MENU) during CD Playback. 2 Press either side of (SEEK) to hear FM stereo broadcast in the display and deactivate Demo display. - The bass and treble will differ depending...

Operating Instructions
Page 18
...), the item changes. 4 Select the desired frequency and level. 1 Press either side of (PRESET) to prevent this could damage the unit. When the effect setting is adjustable by 1 dB steps from -10 dB to select the desired equalizer curve, then press (ENTER). The volume level is complete, the normal playback mode appears. If the fuse blows, check the power connection and replace the fuse. Adjusting the equalizer curve 1 Press (MENU). 2 Press...
...), the item changes. 4 Select the desired frequency and level. 1 Press either side of (PRESET) to prevent this could damage the unit. When the effect setting is adjustable by 1 dB steps from -10 dB to select the desired equalizer curve, then press (ENTER). The volume level is complete, the normal playback mode appears. If the fuse blows, check the power connection and replace the fuse. Adjusting the equalizer curve 1 Press (MENU). 2 Press...
Operating Instructions
Page 19
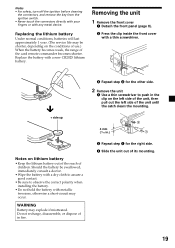
... the connectors, and remove the key from the ignition switch. • Never touch the connectors directly with your fingers or with a thin screwdriver. Replacing the lithium battery Under normal conditions, batteries will last approximately 1 year. (The service life may be swallowed, immediately consult a doctor. •Wipe the battery with a new CR2025 lithium battery. Removing the unit 1 Remove the front cover 1 Detach the front panel (page...
... the connectors, and remove the key from the ignition switch. • Never touch the connectors directly with your fingers or with a thin screwdriver. Replacing the lithium battery Under normal conditions, batteries will last approximately 1 year. (The service life may be swallowed, immediately consult a doctor. •Wipe the battery with a new CR2025 lithium battery. Removing the unit 1 Remove the front cover 1 Detach the front panel (page...
Operating Instructions
Page 20
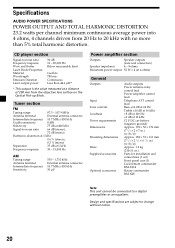
... mm (7 1/4 × 2 1/8 × 6 3/8 in.) (w/h/d) Approx. 1.2 kg (2 lb 10 oz.) Parts for installation and connections (1 set) Front panel case (1) Card remote commander RM-X114 Rotary commander RM-X4S Note This unit cannot be connected to change without notice. 20 Specifications AUDIO POWER SPECIFICATIONS POWER OUTPUT AND TOTAL HARMONIC DISTORTION 23.2 watts per channel minimum continuous average power into 4 ohms, 4 channels driven from the objective lens surface on the Optical...
... mm (7 1/4 × 2 1/8 × 6 3/8 in.) (w/h/d) Approx. 1.2 kg (2 lb 10 oz.) Parts for installation and connections (1 set) Front panel case (1) Card remote commander RM-X114 Rotary commander RM-X4S Note This unit cannot be connected to change without notice. 20 Specifications AUDIO POWER SPECIFICATIONS POWER OUTPUT AND TOTAL HARMONIC DISTORTION 23.2 watts per channel minimum continuous average power into 4 ohms, 4 channels driven from the objective lens surface on the Optical...
Operating Instructions
Page 21
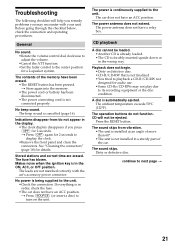
... not play due to display the clock. •Remove the front panel and clean the connectors. If everything is being supplied to the unit. The power is automatically ejected. A disc is continuously supplied to the unit. •Check the connection. The operation buttons do not appear in order, check the fuse. •The car does not have been erased. •The RESET button has been pressed. The sound skips...
... not play due to display the clock. •Remove the front panel and clean the connectors. If everything is being supplied to the unit. The power is automatically ejected. A disc is continuously supplied to the unit. •Check the connection. The operation buttons do not appear in order, check the fuse. •The car does not have been erased. •The RESET button has been pressed. The sound skips...
Operating Instructions
Page 22
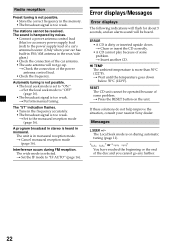
... the RESET button on during FM reception. The unit is in monaural. t Set the IF mode to the power supply lead of some problem. The sound is hampered by noises. •Connect a power antenna control lead (blue) or accessory power supply lead (red) to "IF AUTO" (page 16). If these solutions do not help improve the situation, consult your car has built-in FM/AM antenna in the rear/side glass...
... the RESET button on during FM reception. The unit is in monaural. t Set the IF mode to the power supply lead of some problem. The sound is hampered by noises. •Connect a power antenna control lead (blue) or accessory power supply lead (red) to "IF AUTO" (page 16). If these solutions do not help improve the situation, consult your car has built-in FM/AM antenna in the rear/side glass...
Product Guide / Specifications
Page 1
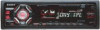
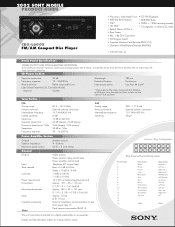
... GaAlAs Wavelength Emission Duration Laser output power 780 nm Continuous Less than 5% total harmonic distortion. Design and Specifications subject to a digital preamplifier or an equalizer. 2002 SONY MOBILE PRODUCT GUIDE CDX-L600X FM/AM Compact Disc Player • Flip-down, Detachable Face • CD-RW Playback • MBP (My Best Position) • SSIR-EXA Tuner • EQ7 • 18FM + 12AM memory presets • CD TEXT®...
... GaAlAs Wavelength Emission Duration Laser output power 780 nm Continuous Less than 5% total harmonic distortion. Design and Specifications subject to a digital preamplifier or an equalizer. 2002 SONY MOBILE PRODUCT GUIDE CDX-L600X FM/AM Compact Disc Player • Flip-down, Detachable Face • CD-RW Playback • MBP (My Best Position) • SSIR-EXA Tuner • EQ7 • 18FM + 12AM memory presets • CD TEXT®...
Product Guide / Specifications
Page 2
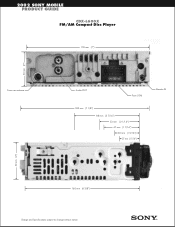
2002 SONY MOBILE PRODUCT GUIDE CDX-L600X FM/AM Compact Disc Player 178 mm (7”) 50 mm (2”) From car antenna Audio OUT Fuse (10A) 180 mm (7 1/8”) 88 mm (3 7/16”) 53 mm ( 2 1/16”) 47 mm (1 7/16”) 33 mm (1 5/16”) 27 mm (1 1/16”) Remote IN 50 mm (2”) 160 mm (6 3/8”) Design and Specifications subject to change without notice.
2002 SONY MOBILE PRODUCT GUIDE CDX-L600X FM/AM Compact Disc Player 178 mm (7”) 50 mm (2”) From car antenna Audio OUT Fuse (10A) 180 mm (7 1/8”) 88 mm (3 7/16”) 53 mm ( 2 1/16”) 47 mm (1 7/16”) 33 mm (1 5/16”) 27 mm (1 1/16”) Remote IN 50 mm (2”) 160 mm (6 3/8”) Design and Specifications subject to change without notice.


