Sony CDX-L450X - Fm/am Compact Disc Player Research
Related Manual Pages


Similar Questions

Sony Cdx L600x Faceplate - Fm Am Compact Disc Player?
Good day. Do you sell the Sony CDX L600X Faceplate - Fm am Compact Disc Player?
Good day. Do you sell the Sony CDX L600X Faceplate - Fm am Compact Disc Player?
(Posted by nstatham 7 years ago)

How To Install Sony Car Stereo Wiring Cdx-gt550ui
(Posted by sfitisaed 10 years ago)

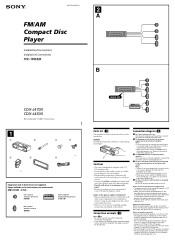
Installation And Wiring Diagram For Fm/am Disc Player Cdx-gt710 Sony
Wiring and installation manual or diagram
Wiring and installation manual or diagram
(Posted by toddsmith 11 years ago)