
Limited Warranty (U.S. Only)
Page 1
For purposes of this Limited Warranty, "refurbished" means a product or part that such data, software, or other materials will be responsible for the time periods and as fuses or batteries). any such software is valid only in the United States. Instructions: To obtain warranty service, you must deliver the product, freight prepaid, in material or workmanship for any...
For purposes of this Limited Warranty, "refurbished" means a product or part that such data, software, or other materials will be responsible for the time periods and as fuses or batteries). any such software is valid only in the United States. Instructions: To obtain warranty service, you must deliver the product, freight prepaid, in material or workmanship for any...
Installation/Connections
Page 1
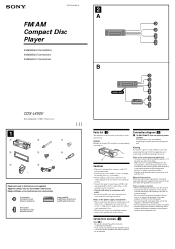
... V DC operation only. • Do not get the wires under a screw, or caught in moving parts (e.g. Caution Handle the bracket 1 carefully to connect the speakers in parallel. • Connect only passive speakers. 3-227-644-31 (2) 2 A FM/AM Compact Disc Player Installation/Connections Installation/Connexions Instalación/ Conexiones B AUDIO OUT CDX-L450V Sony Corporation © 2001 Printed in Korea 1 1 2 3 4 5 6 × 2 7 8 × 2 Equipment used with this unit. seat railing). • Before making connections, disconnect...
... V DC operation only. • Do not get the wires under a screw, or caught in moving parts (e.g. Caution Handle the bracket 1 carefully to connect the speakers in parallel. • Connect only passive speakers. 3-227-644-31 (2) 2 A FM/AM Compact Disc Player Installation/Connections Installation/Connexions Instalación/ Conexiones B AUDIO OUT CDX-L450V Sony Corporation © 2001 Printed in Korea 1 1 2 3 4 5 6 × 2 7 8 × 2 Equipment used with this unit. seat railing). • Before making connections, disconnect...
Installations/Connexions
Page 2
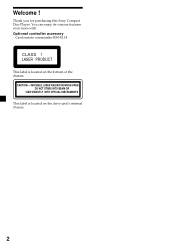
Welcome ! CAUTION INVISIBLE LASER RADIATION WHEN OPEN DO NOT STARE INTO BEAM OR VIEW DIRECTLY WITH OPTICAL INSTRUMENTS This label is located on the drive unit's internal chassis. 2 Thank you for purchasing this Sony Compact Disc Player. You can enjoy its various features even more with: Optional controller accessory Card remote commander RM-X114 CLASS 1 LASER PRODUCT This label is located on the bottom of the chassis.
Welcome ! CAUTION INVISIBLE LASER RADIATION WHEN OPEN DO NOT STARE INTO BEAM OR VIEW DIRECTLY WITH OPTICAL INSTRUMENTS This label is located on the drive unit's internal chassis. 2 Thank you for purchasing this Sony Compact Disc Player. You can enjoy its various features even more with: Optional controller accessory Card remote commander RM-X114 CLASS 1 LASER PRODUCT This label is located on the bottom of the chassis.

Installations/Connexions
Page 3
... Location of controls 4 Precautions 6 Notes on discs 6 Getting Started Resetting the unit 7 Detaching the front panel 8 Setting the clock 9 CD Player Playing a disc 9 Display items 10 Playing tracks repeatedly - D-bass 14 Additional Information Maintenance 15 Removing the unit 16 Specifications 17 Troubleshooting 18 Error displays 19 3 Repeat Play 10 Playing tracks in random order - Best Tuning Memory (BTM 11 Receiving the stored stations 12 Storing only the desired stations 12 Other Functions Adjusting the sound characteristics 13 Quickly attenuating the sound...
... Location of controls 4 Precautions 6 Notes on discs 6 Getting Started Resetting the unit 7 Detaching the front panel 8 Setting the clock 9 CD Player Playing a disc 9 Display items 10 Playing tracks repeatedly - D-bass 14 Additional Information Maintenance 15 Removing the unit 16 Specifications 17 Troubleshooting 18 Error displays 19 3 Repeat Play 10 Playing tracks in random order - Best Tuning Memory (BTM 11 Receiving the stored stations 12 Storing only the desired stations 12 Other Functions Adjusting the sound characteristics 13 Quickly attenuating the sound...
Installations/Connexions
Page 4
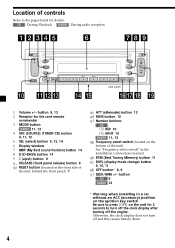
... Display window MBP (My Best sound Position) button 14 D (D-BASS) button 14 (eject) button 9 RELEASE (front panel release) button 8 RESET button (located on the front side of the unit, behind the front panel) 7 ATT (attenuate) button 13 SENS button 12 Number buttons CD REP 10 SHUF 10 RADIO 11, 12 Frequency select switch (located on the unit for 2 seconds to the pages listed for details. button CD 9 RADIO 12 * Warning when installing in the installation/connections manual. BTM (Best Tuning Memory) button 11 DSPL (display mode change) button...
... Display window MBP (My Best sound Position) button 14 D (D-BASS) button 14 (eject) button 9 RELEASE (front panel release) button 8 RESET button (located on the front side of the unit, behind the front panel) 7 ATT (attenuate) button 13 SENS button 12 Number buttons CD REP 10 SHUF 10 RADIO 11, 12 Frequency select switch (located on the unit for 2 seconds to the pages listed for details. button CD 9 RADIO 12 * Warning when installing in the installation/connections manual. BTM (Best Tuning Memory) button 11 DSPL (display mode change) button...

Installations/Connexions
Page 5
... button MENU button* SOURCE button SEEK ( / ) buttons SOUND button (used as those on how to activate the unit first. Note If the unit is turned off by pressing for 2 seconds, it cannot be operated with the card remote commander unless on the unit is pressed, or a disc is inserted to replace the batteries (page 15). 5 SOUND OFF SOURCE DISC - Card remote commander RM-X114 (optional) The corresponding buttons of the card remote commander control the same functions...
... button MENU button* SOURCE button SEEK ( / ) buttons SOUND button (used as those on how to activate the unit first. Note If the unit is turned off by pressing for 2 seconds, it cannot be operated with the card remote commander unless on the unit is pressed, or a disc is inserted to replace the batteries (page 15). 5 SOUND OFF SOURCE DISC - Card remote commander RM-X114 (optional) The corresponding buttons of the card remote commander control the same functions...
Installations/Connexions
Page 6
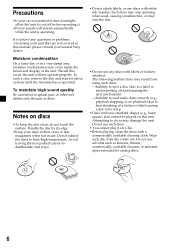
... inside the lenses and display of a sticker or label causing a disc to do not touch the surface. Wipe each disc from using such discs: -Inability to eject a disc (due to a label or sticker peeling off before operating it. •Power aerials will not operate properly. Moisture condensation On a rainy day or in use any questions or problems concerning your unit that are not...
... inside the lenses and display of a sticker or label causing a disc to do not touch the surface. Wipe each disc from using such discs: -Inability to eject a disc (due to a label or sticker peeling off before operating it. •Power aerials will not operate properly. Moisture condensation On a rainy day or in use any questions or problems concerning your unit that are not...
Installations/Connexions
Page 7
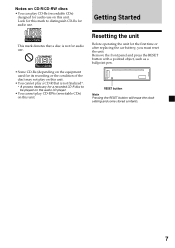
... unit Before operating the unit for this mark to be played on the audio CD player. •You cannot play CD-RWs (rewritable CDs) on this unit. Notes on CD-R/CD-RW discs •You can play CD-Rs (recordable CDs) designed for audio use . RESET button Note Pressing the RESET button will erase the clock setting and some stored contents. 7 Look for the first time or after replacing the car battery...
... unit Before operating the unit for this mark to be played on the audio CD player. •You cannot play CD-RWs (rewritable CDs) on this unit. Notes on CD-R/CD-RW discs •You can play CD-Rs (recordable CDs) designed for audio use . RESET button Note Pressing the RESET button will erase the clock setting and some stored contents. 7 Look for the first time or after replacing the car battery...

Installations/Connexions
Page 8
... the front panel to turn the ignition switch to the OFF position without removing the front panel, the caution alarm will beep for 2 seconds to avoid car battery drain. 2 Press you connect an optional amplifier and do not use the supplied front panel case. 8 Tip When carrying the front panel with you detach the panel while the unit is still turned on, the power will be...
... the front panel to turn the ignition switch to the OFF position without removing the front panel, the caution alarm will beep for 2 seconds to avoid car battery drain. 2 Press you connect an optional amplifier and do not use the supplied front panel case. 8 Tip When carrying the front panel with you detach the panel while the unit is still turned on, the power will be...
Installations/Connexions
Page 9
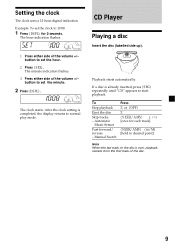
The hour indication flashes. The clock starts. If a disc is completed, the display returns to normal play mode. To Stop playback Eject the disc Skip tracks - Example: To set the hour. Press . Press either side of the volume +/- CD Player Playing a disc Insert the disc (labelled side up). Automatic Music Sensor Fast-forward/ reverse - After the clock setting is already inserted, press repeatedly until "CD" appears to 10...
The hour indication flashes. The clock starts. If a disc is completed, the display returns to normal play mode. To Stop playback Eject the disc Skip tracks - Example: To set the hour. Press . Press either side of the volume +/- CD Player Playing a disc Insert the disc (labelled side up). Automatic Music Sensor Fast-forward/ reverse - After the clock setting is already inserted, press repeatedly until "CD" appears to 10...

Installations/Connexions
Page 10
Display items When the disc/track changes, any prerecorded data of the new disc/track is automatically displayed. To return to normal play mode, press (SHUF) again. 10 Playing tracks in the display. Shuffle Play starts. Music source Displayable items • Clock • Elapsed playing time Track number To Switch display item Press Playing tracks repeatedly - Repeat Play starts. Repeat Play The current track will repeat itself when it reaches the end. During...
Display items When the disc/track changes, any prerecorded data of the new disc/track is automatically displayed. To return to normal play mode, press (SHUF) again. 10 Playing tracks in the display. Shuffle Play starts. Music source Displayable items • Clock • Elapsed playing time Track number To Switch display item Press Playing tracks repeatedly - Repeat Play starts. Repeat Play The current track will repeat itself when it reaches the end. During...
Installations/Connexions
Page 11
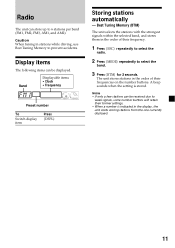
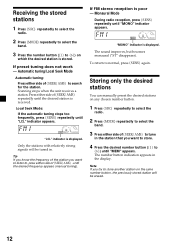
.... Notes • If only a few stations can be displayed. Band Displayable items • Clock • Frequency Preset number To Switch display item Press Storing stations automatically - The unit stores stations in the order of their frequency. 1 Press radio. A beep sounds when the setting is indicated in stations while driving, use Best Tuning Memory to prevent accidents. repeatedly to select the 2 Press band. Best Tuning Memory (BTM) The unit selects the stations with the strongest signals within the...
.... Notes • If only a few stations can be displayed. Band Displayable items • Clock • Frequency Preset number To Switch display item Press Storing stations automatically - The unit stores stations in the order of their frequency. 1 Press radio. A beep sounds when the setting is indicated in stations while driving, use Best Tuning Memory to prevent accidents. repeatedly to select the 2 Press band. Best Tuning Memory (BTM) The unit selects the stations with the strongest signals within the...
Installations/Connexions
Page 12
... to store another station on any chosen number button. 1 Press radio. Only the stations with relatively strong signals will be tuned in the display. repeatedly to select the 3 Press the number button ( to ) until the desired station is displayed. Scanning stops when the unit receives a station. repeatedly to search for the station. If preset tuning does not work - Press either side of until the desired frequency appears (manual tuning). "LCL" indicator is...
... to store another station on any chosen number button. 1 Press radio. Only the stations with relatively strong signals will be tuned in the display. repeatedly to select the 3 Press the number button ( to ) until the desired station is displayed. Scanning stops when the unit receives a station. repeatedly to search for the station. If preset tuning does not work - Press either side of until the desired frequency appears (manual tuning). "LCL" indicator is...

Installations/Connexions
Page 13
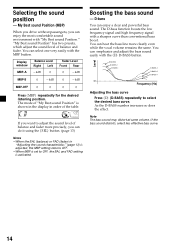
... bass, treble, balance, and fader. 1 Select the item you press , the item changes as follows: BAS (bass) TRE (treble) BAL (left-right) FAD (front-rear) 2 Adjust the selected item by pressing repeatedly. Note Adjust within 3 seconds after selecting the item. To restore the previous volume level, press again. Canceling the beep sound Press while pressing down. Quickly attenuating the sound Press . Note If you connect an optional power amplifier...
... bass, treble, balance, and fader. 1 Select the item you press , the item changes as follows: BAS (bass) TRE (treble) BAL (left-right) FAD (front-rear) 2 Adjust the selected item by pressing repeatedly. Note Adjust within 3 seconds after selecting the item. To restore the previous volume level, press again. Canceling the beep sound Press while pressing down. Quickly attenuating the sound Press . Note If you connect an optional power amplifier...
Installations/Connexions
Page 14
... Frequency (Hz) Adjusting the bass curve Press (D-BASS) repeatedly to adjust the sound level of balance and fader more clearly even while the vocal volume remains the same. As the D-BASS number increases so does the effect. If the bass sound distorts, select less effective bass curve. 14 The mode of "My Best sound Position" is shown in the display in "Adjusting the sound characteristics" (page 13) is adjusted, the MBP setting...
... Frequency (Hz) Adjusting the bass curve Press (D-BASS) repeatedly to adjust the sound level of balance and fader more clearly even while the vocal volume remains the same. As the D-BASS number increases so does the effect. If the bass sound distorts, select less effective bass curve. 14 The mode of "My Best sound Position" is shown in the display in "Adjusting the sound characteristics" (page 13) is adjusted, the MBP setting...
Installations/Connexions
Page 15
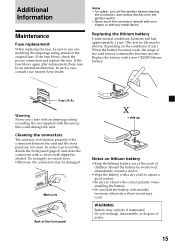
... card remote commander becomes shorter. WARNING Battery may not function properly if the connectors between the unit and the front panel are not clean. Notes • For safety, turn off the ignition before cleaning the connectors, and remove the key from the ignition switch. • Never touch the connectors directly with your nearest Sony dealer. Replace the battery with any metal device. Fuse (10 A) Warning Never use a fuse with...
... card remote commander becomes shorter. WARNING Battery may not function properly if the connectors between the unit and the front panel are not clean. Notes • For safety, turn off the ignition before cleaning the connectors, and remove the key from the ignition switch. • Never touch the connectors directly with your nearest Sony dealer. Replace the battery with any metal device. Fuse (10 A) Warning Never use a fuse with...

Installations/Connexions
Page 16
Slide the unit out of the unit until the catch clears the mounting. 4 mm Repeat step for the right side. Press the clip inside the front cover with a thin screwdriver. Removing the unit 1 Remove the front cover Detach the front panel (page 8). Repeat step for the other side. 2 Remove the unit Use a thin screwdriver to push in the clip on the left side of the unit, then pull out the left side of its mounting. 16
Slide the unit out of the unit until the catch clears the mounting. 4 mm Repeat step for the right side. Press the clip inside the front cover with a thin screwdriver. Removing the unit 1 Remove the front cover Detach the front panel (page 8). Repeat step for the other side. 2 Remove the unit Use a thin screwdriver to push in the clip on the left side of the unit, then pull out the left side of its mounting. 16
Installations/Connexions
Page 17
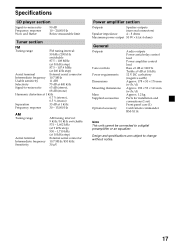
... Optional accessory Audio outputs Power aerial relay control lead Power amplifier control lead Bass ±9 dB at 100 Hz Treble ±9 dB at 10 kHz 12 V DC car battery (negative earth) Approx. 178 × 50 × 176 mm (w/h/d) Approx. 182 × 53 × 161 mm (w/h/d) Approx. 1.2 kg Parts for installation and connections (1 set) Front panel case (1) Card remote commander RM-X114 Note This unit cannot be connected to change without...
... Optional accessory Audio outputs Power aerial relay control lead Power amplifier control lead Bass ±9 dB at 100 Hz Treble ±9 dB at 10 kHz 12 V DC car battery (negative earth) Approx. 178 × 50 × 176 mm (w/h/d) Approx. 182 × 53 × 161 mm (w/h/d) Approx. 1.2 kg Parts for installation and connections (1 set) Front panel case (1) Card remote commander RM-X114 Note This unit cannot be connected to change without...

Installations/Connexions
Page 18
... disc. Radio reception Preset tuning is not possible. •Store the correct frequency in the memory. •The broadcast signal is in amplifier. Before going through the checklist below, check the connection and operating procedures. Press again for audio use. •Some CD-Rs may encounter with the car's accessory power connector. If everything is being supplied to the monaural reception mode (page 12). The sound...
... disc. Radio reception Preset tuning is not possible. •Store the correct frequency in the memory. •The broadcast signal is in amplifier. Before going through the checklist below, check the connection and operating procedures. Press again for audio use. •Some CD-Rs may encounter with the car's accessory power connector. If everything is being supplied to the monaural reception mode (page 12). The sound...
Installations/Connexions
Page 19
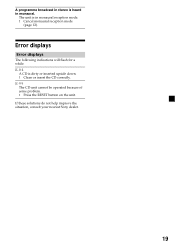
The unit is in monaural. A CD is dirty or inserted upside down. The CD unit cannot be operated because of some problem. Error displays Error displays The following indications will flash for a while. If these solutions do not help improve the situation, consult your nearest Sony dealer. 19 Cancel monaural reception mode (page 12). Clean or insert the CD correctly. Press the RESET button on the unit. A programme broadcast in stereo is heard in monaural reception mode.
The unit is in monaural. A CD is dirty or inserted upside down. The CD unit cannot be operated because of some problem. Error displays Error displays The following indications will flash for a while. If these solutions do not help improve the situation, consult your nearest Sony dealer. 19 Cancel monaural reception mode (page 12). Clean or insert the CD correctly. Press the RESET button on the unit. A programme broadcast in stereo is heard in monaural reception mode.


