
Limited Warranty (U.S. Only)
Page 1
...to state. Any parts or product replaced under this product against defects in exchange for the time periods and as fuses or batteries). 3-272-643-01 ® Car Audio LIMITED WARRANTY (U.S. ...number has been altered or removed from the original date of purchase of the product ("Labor Warranty"), Sony will not be lost or reformatted during ordinary consumer use , acts of God, misuse, limitations of technology, or modification of Sony. For specific instructions on your rights and obligations with the Product. In the event of protection to the software. Parts...
...to state. Any parts or product replaced under this product against defects in exchange for the time periods and as fuses or batteries). 3-272-643-01 ® Car Audio LIMITED WARRANTY (U.S. ...number has been altered or removed from the original date of purchase of the product ("Labor Warranty"), Sony will not be lost or reformatted during ordinary consumer use , acts of God, misuse, limitations of technology, or modification of Sony. For specific instructions on your rights and obligations with the Product. In the event of protection to the software. Parts...
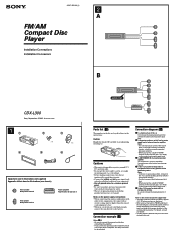
Installation/Connection Instructions
Page 1
... on the control and power supply leads • The power antenna control lead (blue) supplies +12 V DC when you connect an optional power amplifier and do not use of antenna booster amplifier Notes • It is not necessary to connect this unit in combination with other leads have been connected. • Run all times. For details, consult your fingers. 3-237-525-11 (1) 2 A FM/AM Compact Disc Player Installation/Connections Installation/Connexions B CDX-L300 Sony Corporation ©...
... on the control and power supply leads • The power antenna control lead (blue) supplies +12 V DC when you connect an optional power amplifier and do not use of antenna booster amplifier Notes • It is not necessary to connect this unit in combination with other leads have been connected. • Run all times. For details, consult your fingers. 3-237-525-11 (1) 2 A FM/AM Compact Disc Player Installation/Connections Installation/Connexions B CDX-L300 Sony Corporation ©...
Installation/Connection Instructions
Page 3
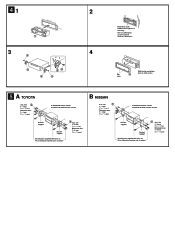
... max. 5 × 8 mm (7/32 × / 11 32 po.) to dashboard/center console au tableau de bord/console centrale Bracket Support Bracket Support Existing parts supplied with your car Pièces existantes fournies avec la voiture 2 max. size 5 × 8 mm (7/32 × / 11 32 in .) Dimension...; 8 mm (7/32 × / 11 32 po.) to dashboard/center console au tableau de bord/console centrale Bracket Support Bracket Support Existing parts supplied with your car Pièces existantes fournies avec la voiture 2 max. Plier ces griffes pour assurer une prise correcte si nécessaire...
... max. 5 × 8 mm (7/32 × / 11 32 po.) to dashboard/center console au tableau de bord/console centrale Bracket Support Bracket Support Existing parts supplied with your car Pièces existantes fournies avec la voiture 2 max. size 5 × 8 mm (7/32 × / 11 32 in .) Dimension...; 8 mm (7/32 × / 11 32 po.) to dashboard/center console au tableau de bord/console centrale Bracket Support Bracket Support Existing parts supplied with your car Pièces existantes fournies avec la voiture 2 max. Plier ces griffes pour assurer une prise correcte si nécessaire...
Operating Instructions (primary manual)
Page 1
Refer to these numbers whenever you call upon your Sony dealer regarding this product. For installation and connections, see the supplied installation/connections manual. Model No. 3-237-526-11 (1) FM/AM Compact Disc Player Operating Instructions US Mode d'emploi FR Owner's Record The model and serial numbers are located on the bottom of the unit. CDX-L300 Serial No. CDX-L300 2002 Sony Corporation En ce qui concerne l'installation et les connexions, consulter le manuel d'installation/connexions fourni. Record the serial number in the space provided below.
Refer to these numbers whenever you call upon your Sony dealer regarding this product. For installation and connections, see the supplied installation/connections manual. Model No. 3-237-526-11 (1) FM/AM Compact Disc Player Operating Instructions US Mode d'emploi FR Owner's Record The model and serial numbers are located on the bottom of the unit. CDX-L300 Serial No. CDX-L300 2002 Sony Corporation En ce qui concerne l'installation et les connexions, consulter le manuel d'installation/connexions fourni. Record the serial number in the space provided below.
Operating Instructions (primary manual)
Page 2
... been tested and found to comply with the limits for a Class B digital device, pursuant to which can enjoy its various features. Increase the separation between the equipment and receiver. - Consult the dealer or an experienced radio/ TV technician for purchasing this manual could void your authority to provide reasonable protection against harmful interference in this Sony Compact Disc Player.
... been tested and found to comply with the limits for a Class B digital device, pursuant to which can enjoy its various features. Increase the separation between the equipment and receiver. - Consult the dealer or an experienced radio/ TV technician for purchasing this manual could void your authority to provide reasonable protection against harmful interference in this Sony Compact Disc Player.
Operating Instructions (primary manual)
Page 3
... Tuning Memory (BTM 9 Storing only the desired stations 9 Receiving the stored stations 10 Other Functions Adjusting the sound characteristics 11 Quickly attenuating the sound 11 Canceling the beep sound 11 Selecting the sound position - My Best sound Position (MBP 12 Boosting the bass sound - D-bass 12 Additional Information Maintenance 13 Removing the unit 13 Specifications 15 Troubleshooting 16 Error displays 17 3 Table of Contents Location of controls 4 Precautions 5 Notes on discs 5 Getting Started Resetting the unit 6 Setting the clock...
... Tuning Memory (BTM 9 Storing only the desired stations 9 Receiving the stored stations 10 Other Functions Adjusting the sound characteristics 11 Quickly attenuating the sound 11 Canceling the beep sound 11 Selecting the sound position - My Best sound Position (MBP 12 Boosting the bass sound - D-bass 12 Additional Information Maintenance 13 Removing the unit 13 Specifications 15 Troubleshooting 16 Error displays 17 3 Table of Contents Location of controls 4 Precautions 5 Notes on discs 5 Getting Started Resetting the unit 6 Setting the clock...
Operating Instructions (primary manual)
Page 4
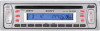
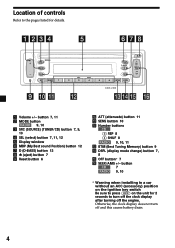
SOURCE SRC MODE SEL ATT SENS DISC 1 2 MBP D-BASS D SEEK AMS OFF REP SHUF BL SKIP ATA MTL 3 4 5 6 BTM DSPL CDX-L300 1 Volume +/- ATT (attenuate) button 11 qa SENS button 10 qs Number buttons CD (3) REP 8 (4) SHUF 8 RADIO 9, 10, 11 qd BTM (Best Tuning Memory) button 9 qf DSPL (display mode change) button 7, 8 qg OFF button* 7 qh SEEK/AMS +/- button CD 7 RADIO 9, 10 * Warning when installing in a car without an ACC (accessory) position on the ignition key switch Be...
SOURCE SRC MODE SEL ATT SENS DISC 1 2 MBP D-BASS D SEEK AMS OFF REP SHUF BL SKIP ATA MTL 3 4 5 6 BTM DSPL CDX-L300 1 Volume +/- ATT (attenuate) button 11 qa SENS button 10 qs Number buttons CD (3) REP 8 (4) SHUF 8 RADIO 9, 10, 11 qd BTM (Best Tuning Memory) button 9 qf DSPL (display mode change) button 7, 8 qg OFF button* 7 qh SEEK/AMS +/- button CD 7 RADIO 9, 10 * Warning when installing in a car without an ACC (accessory) position on the ignition key switch Be...
Operating Instructions (primary manual)
Page 5
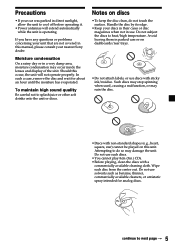
... unit is operating. Wipe each disc from the center out. Notes on dashboards/rear trays. • Do not attach labels, or use such discs. • You cannot play 8cm (3in.) CDs. • Before playing, clean the discs with non-standard shapes (e.g., heart, square, star) cannot be played on this manual, please consult your unit that are not covered in parked cars or on discs...
... unit is operating. Wipe each disc from the center out. Notes on dashboards/rear trays. • Do not attach labels, or use such discs. • You cannot play 8cm (3in.) CDs. • Before playing, clean the discs with non-standard shapes (e.g., heart, square, star) cannot be played on this manual, please consult your unit that are not covered in parked cars or on discs...
Operating Instructions (primary manual)
Page 6
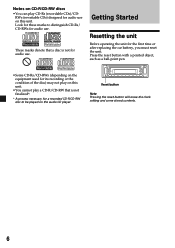
... reset button will erase the clock setting and some stored contents. 6 Notes on this unit. •You cannot play a CD-R/CD-RW that a disc is not finalized*. * A process necessary for a recorded CD-R/CD-RW disc to distinguish CD-Rs/ CD-RWs for audio use on CD-R/CD-RW discs •You can play on this unit. Look for the first time or after replacing the car battery...
... reset button will erase the clock setting and some stored contents. 6 Notes on this unit. •You cannot play a CD-R/CD-RW that a disc is not finalized*. * A process necessary for a recorded CD-R/CD-RW disc to distinguish CD-Rs/ CD-RWs for audio use on CD-R/CD-RW discs •You can play on this unit. Look for the first time or after replacing the car battery...
Operating Instructions (primary manual)
Page 7
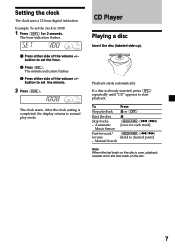
... of the volume +/- To Stop playback Eject the disc Skip tracks - Automatic Music Sensor Fast-forward/ reverse - The clock starts. After the clock setting is completed, the display returns to start playback. Playback starts automatically. button to set the minute. 2 Press (DSPL). If a disc is over, playback restarts from the first track of the volume +/- Setting the clock The clock uses a 12-hour digital indication. Manual Search...
... of the volume +/- To Stop playback Eject the disc Skip tracks - Automatic Music Sensor Fast-forward/ reverse - The clock starts. After the clock setting is completed, the display returns to start playback. Playback starts automatically. button to set the minute. 2 Press (DSPL). If a disc is over, playback restarts from the first track of the volume +/- Setting the clock The clock uses a 12-hour digital indication. Manual Search...
Operating Instructions (primary manual)
Page 9
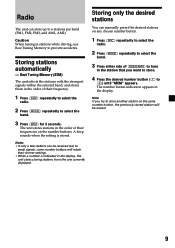
... desired number button ((1) to prevent accidents. Caution When tuning in the display. The number button indication appears in stations while driving, use Best Tuning Memory to (6)) until "MEM" appears. A beep sounds when the setting is indicated in the order of their frequency. 1 Press (SRC) repeatedly to select the radio. 2 Press (MODE) repeatedly to 6 stations per band (FM1, FM2, FM3, and AM1, AM2). Radio The unit can store up to select the...
... desired number button ((1) to prevent accidents. Caution When tuning in the display. The number button indication appears in stations while driving, use Best Tuning Memory to (6)) until "MEM" appears. A beep sounds when the setting is indicated in the order of their frequency. 1 Press (SRC) repeatedly to select the radio. 2 Press (MODE) repeatedly to 6 stations per band (FM1, FM2, FM3, and AM1, AM2). Radio The unit can store up to select the...

Operating Instructions (primary manual)
Page 10
... will be tuned in. Tip If you know the frequency of the station you want to listen to search for the station. If FM stereo reception is displayed. Scanning stops when the unit receives a station. Monaural Mode During radio reception, press (SENS) repeatedly until the desired station is displayed. Receiving the stored stations 1 Press (SRC) repeatedly to select the radio. 2 Press (MODE) repeatedly to select the band. 3 Press the number button ((1) to...
... will be tuned in. Tip If you know the frequency of the station you want to listen to search for the station. If FM stereo reception is displayed. Scanning stops when the unit receives a station. Monaural Mode During radio reception, press (SENS) repeatedly until the desired station is displayed. Receiving the stored stations 1 Press (SRC) repeatedly to select the radio. 2 Press (MODE) repeatedly to select the band. 3 Press the number button ((1) to...

Operating Instructions (primary manual)
Page 11
... you connect an optional power amplifier and do not use the built-in the display. To restore the previous volume level, press (ATT) again. The bass and treble levels can adjust the bass, treble, balance, and fader. Quickly attenuating the sound Press (ATT). button. The "ATT" indicator appears in amplifier, the beep sound will be stored independently for each source. 1 Select the item you press (SEL), the item changes as follows: BAS (bass) t TRE (treble) t BAL...
... you connect an optional power amplifier and do not use the built-in the display. To restore the previous volume level, press (ATT) again. The bass and treble levels can adjust the bass, treble, balance, and fader. Quickly attenuating the sound Press (ATT). button. The "ATT" indicator appears in amplifier, the beep sound will be stored independently for each source. 1 Select the item you press (SEL), the item changes as follows: BAS (bass) t TRE (treble) t BAL...

Operating Instructions (primary manual)
Page 12
... of balance and fader. The D-bass function boosts the low frequency signal and high frequency signal with the MBP button. Level D.BASS-3 D.BASS-2 D.BASS-1 D.BASS-3 D.BASS-2 D.BASS-1 0dB Frequency (Hz) Adjusting the bass curve Press (D) (D-BASS) repeatedly to OFF, the BAL and FAD setting is shown in the display in "Adjusting the sound characteristics" is adjusted, the MBP setting returns OFF. • When MBP is set to select the desired bass curve. Boosting the bass sound - As the D-BASS number...
... of balance and fader. The D-bass function boosts the low frequency signal and high frequency signal with the MBP button. Level D.BASS-3 D.BASS-2 D.BASS-1 D.BASS-3 D.BASS-2 D.BASS-1 0dB Frequency (Hz) Adjusting the bass curve Press (D) (D-BASS) repeatedly to OFF, the BAL and FAD setting is shown in the display in "Adjusting the sound characteristics" is adjusted, the MBP setting returns OFF. • When MBP is set to select the desired bass curve. Boosting the bass sound - As the D-BASS number...

Operating Instructions (primary manual)
Page 13
... replacement, there may be sure to use a fuse with the unit as this could damage the unit. 10 mm (13/32 in.) 90° 13 continue to next page t Repeat on the original fuse. In such a case, consult your nearest Sony dealer. Additional Information Maintenance Fuse replacement When replacing the fuse, be an internal malfunction. If the fuse blows, check the power connection and replace...
... replacement, there may be sure to use a fuse with the unit as this could damage the unit. 10 mm (13/32 in.) 90° 13 continue to next page t Repeat on the original fuse. In such a case, consult your nearest Sony dealer. Additional Information Maintenance Fuse replacement When replacing the fuse, be an internal malfunction. If the fuse blows, check the power connection and replace...

Operating Instructions (primary manual)
Page 15
... 1 kHz 0.7 % (stereo), 0.5 % (mono) Separation 33 dB at 1 kHz Frequency response 30 - 15,000 Hz AM Tuning range Antenna terminal Intermediate frequency Sensitivity 530 - 1,710 kHz External antenna connector 10.7 MHz/450 kHz 30 µV Power amplifier section Outputs Speaker outputs (sure seal connectors) Speaker impedance 4 - 8 ohms Maximum power output 45 W × 4 (at 4 ohms) General Outputs Tone controls Power requirements Dimensions Mounting dimensions Mass Supplied accessory Audio output Power antenna relay control lead Power amplifier control lead Bass ±10...
... 1 kHz 0.7 % (stereo), 0.5 % (mono) Separation 33 dB at 1 kHz Frequency response 30 - 15,000 Hz AM Tuning range Antenna terminal Intermediate frequency Sensitivity 530 - 1,710 kHz External antenna connector 10.7 MHz/450 kHz 30 µV Power amplifier section Outputs Speaker outputs (sure seal connectors) Speaker impedance 4 - 8 ohms Maximum power output 45 W × 4 (at 4 ohms) General Outputs Tone controls Power requirements Dimensions Mounting dimensions Mass Supplied accessory Audio output Power antenna relay control lead Power amplifier control lead Bass ±10...
Operating Instructions (primary manual)
Page 16
... sound. • Adjust the volume with volume + button. • Cancel the ATT function. • Set the fader control to the monaural reception mode. The power antenna does not have an ACC position. Press the reset button. Radio reception Preset tuning is hampered by noises. • Connect a power antenna control lead (blue) or accessory power supply lead (red) to turn on the unit. t Set to the center position for 2 seconds. t Store again into the memory. • The power cord or battery...
... sound. • Adjust the volume with volume + button. • Cancel the ATT function. • Set the fader control to the monaural reception mode. The power antenna does not have an ACC position. Press the reset button. Radio reception Preset tuning is hampered by noises. • Connect a power antenna control lead (blue) or accessory power supply lead (red) to turn on the unit. t Set to the center position for 2 seconds. t Store again into the memory. • The power cord or battery...
Operating Instructions (primary manual)
Page 17
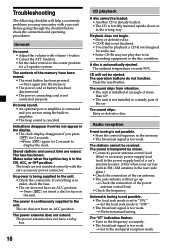
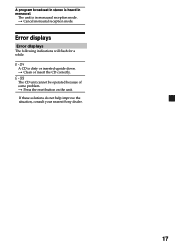
E-04 A CD is in monaural. If these solutions do not help improve the situation, consult your nearest Sony dealer. 17 The unit is dirty or inserted upside down. t Press the reset button on the unit. A program broadcast in stereo is heard in monaural reception mode. Error displays Error displays The following indications will flash for a while. t Clean or insert the CD correctly. t Cancel monaural reception mode. E-99 The CD unit cannot be operated because of some problem.
E-04 A CD is in monaural. If these solutions do not help improve the situation, consult your nearest Sony dealer. 17 The unit is dirty or inserted upside down. t Press the reset button on the unit. A program broadcast in stereo is heard in monaural reception mode. Error displays Error displays The following indications will flash for a while. t Clean or insert the CD correctly. t Cancel monaural reception mode. E-99 The CD unit cannot be operated because of some problem.
Product Guide / Specifications
Page 1
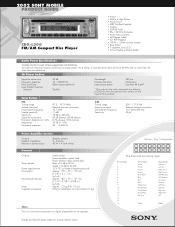
2002 SONY MOBILE PRODUCT GUIDE CDX-L300 FM/AM Compact Disc Player • Preout • 45W x 4 High Power • Fixed mount • MBP (My Best Position) • D-Bass • SSIR-EX Tuner • 8fs, 1-Bit D/A Converter • Active Servo Control • 60 Degree Install • CD-RW Playback • 18FM + 12AM memory presets • Rear Preout • 7-segment, blue LCD • Active Display w/Demo Mode Audio Power Specifications POWER OUTPUT AND TOTAL HARMONIC DISTORTION 22 watts per channel minimum continuous...
2002 SONY MOBILE PRODUCT GUIDE CDX-L300 FM/AM Compact Disc Player • Preout • 45W x 4 High Power • Fixed mount • MBP (My Best Position) • D-Bass • SSIR-EX Tuner • 8fs, 1-Bit D/A Converter • Active Servo Control • 60 Degree Install • CD-RW Playback • 18FM + 12AM memory presets • Rear Preout • 7-segment, blue LCD • Active Display w/Demo Mode Audio Power Specifications POWER OUTPUT AND TOTAL HARMONIC DISTORTION 22 watts per channel minimum continuous...
Product Guide / Specifications
Page 2
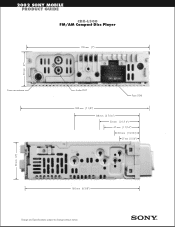
2002 SONY MOBILE PRODUCT GUIDE CDX-L300 FM/AM Compact Disc Player 178 mm (7”) 50 mm (2”) From car antenna Audio OUT Fuse (10A) 180 mm (7 1/8”) 88 mm (3 7/16”) 53 mm ( 2 1/16”) 47 mm (1 7/16”) 33 mm (1 5/16”) 27 mm (1 1/16”) 50 mm (2”) 160 mm (6 3/8”) Design and Specifications subject to change without notice.
2002 SONY MOBILE PRODUCT GUIDE CDX-L300 FM/AM Compact Disc Player 178 mm (7”) 50 mm (2”) From car antenna Audio OUT Fuse (10A) 180 mm (7 1/8”) 88 mm (3 7/16”) 53 mm ( 2 1/16”) 47 mm (1 7/16”) 33 mm (1 5/16”) 27 mm (1 1/16”) 50 mm (2”) 160 mm (6 3/8”) Design and Specifications subject to change without notice.


