
Limited Warranty (U.S. Only)
Page 1
... time periods and as fuses or batteries). Instructions: To obtain warranty service, you may not apply to replace the product after this Limited Warranty, Sony will , at its option, repair or replace with respect to the Sony authorized service facility specified. This Limited Warranty is still in effect, it does not cover product issues caused by defects in either its original specifications...
... time periods and as fuses or batteries). Instructions: To obtain warranty service, you may not apply to replace the product after this Limited Warranty, Sony will , at its option, repair or replace with respect to the Sony authorized service facility specified. This Limited Warranty is still in effect, it does not cover product issues caused by defects in either its original specifications...
Operating Instructions
Page 1
Model No. CDX-GT930UI Serial No. Pour annuler l'affichage de démonstration (Demo), reportez-vous à la page 6. To cancel the demonstration (Demo) display, see page 6. Refer to these numbers whenever you call upon your Sony dealer regarding this product. CDX-GT930UI ©2009 Sony Corporation 4-122-158-11 (1) FM/AM Compact Disc Player Operating Instructions US Mode d'emploi FR Owner's Record The model and serial numbers are located on the bottom of the unit. Record the serial number in the space provided below.
Model No. CDX-GT930UI Serial No. Pour annuler l'affichage de démonstration (Demo), reportez-vous à la page 6. To cancel the demonstration (Demo) display, see page 6. Refer to these numbers whenever you call upon your Sony dealer regarding this product. CDX-GT930UI ©2009 Sony Corporation 4-122-158-11 (1) FM/AM Compact Disc Player Operating Instructions US Mode d'emploi FR Owner's Record The model and serial numbers are located on the bottom of the unit. Record the serial number in the space provided below.

Operating Instructions
Page 2
... HD RadioTM tuner Operating Instructions. However, there is connected. - CAUTION The use of optical instruments with the limits for a Class B digital device, pursuant to radio or television reception, which the receiver is no guarantee that interference will control a satellite radio tuner module (sold separately). Please see the supplied installation/connections manual. Use or distribution of such technology outside of the FCC Rules. iPod is protected by turning the equipment...
... HD RadioTM tuner Operating Instructions. However, there is connected. - CAUTION The use of optical instruments with the limits for a Class B digital device, pursuant to radio or television reception, which the receiver is no guarantee that interference will control a satellite radio tuner module (sold separately). Please see the supplied installation/connections manual. Use or distribution of such technology outside of the FCC Rules. iPod is protected by turning the equipment...
Operating Instructions
Page 4
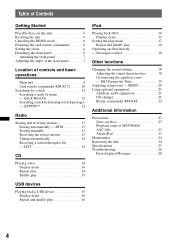
... DEMO mode 6 Preparing the card remote commander 6 Setting the clock 6 Detaching the front panel 6 Attaching the front panel 7 Adjusting the angle of the front panel 7 Location of MP3/WMA/ AAC files 23 About iPod 23 Maintenance 24 Removing the unit 24 Specifications 25 Troubleshooting 26 Error displays/Messages 28 4 Passenger control 18 Other functions Changing the sound settings 18 Adjusting the sound characteristics 18 Customizing the equalizer curve - Table of Contents Getting Started Playable discs on discs...
... DEMO mode 6 Preparing the card remote commander 6 Setting the clock 6 Detaching the front panel 6 Attaching the front panel 7 Adjusting the angle of the front panel 7 Location of MP3/WMA/ AAC files 23 About iPod 23 Maintenance 24 Removing the unit 24 Specifications 25 Troubleshooting 26 Error displays/Messages 28 4 Passenger control 18 Other functions Changing the sound settings 18 Adjusting the sound characteristics 18 Customizing the equalizer curve - Table of Contents Getting Started Playable discs on discs...
Operating Instructions
Page 6
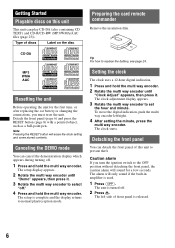
Note Pressing the RESET button will sound for the first time, or after replacing the car battery or changing the connections, you turn the ignition switch to replace the battery, see page 24. The alarm will only sound if the built-in amplifier is turned off. 2 Press . The unit is used. 1 Press (OFF). The setup display appears. 2 Rotate the multi way encoder until "Clock Adjust" appears, then press it . 3 Rotate the multi way...
Note Pressing the RESET button will sound for the first time, or after replacing the car battery or changing the connections, you turn the ignition switch to replace the battery, see page 24. The alarm will only sound if the built-in amplifier is turned off. 2 Press . The unit is used. 1 Press (OFF). The setup display appears. 2 Rotate the multi way encoder until "Clock Adjust" appears, then press it . 3 Rotate the multi way...
Operating Instructions
Page 8
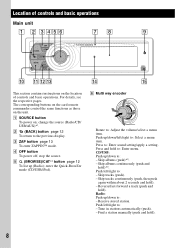
... ). - change the source (Radio/CD/ USB/AUX)*1. Press to : - Push left /right to : - Push left /right to : - E (BROWSE)/CAT*2 button page 12 To list up /down to : Enter sound setting/apply a setting. Push up /down to the previous display. Press and hold to : Select a menu item. Skip albums (push)*3. - Find a station manually (push and hold )*3. A SOURCE button To power on the unit. Receive stored station. The corresponding buttons on the card remote...
... ). - change the source (Radio/CD/ USB/AUX)*1. Press to : - Push left /right to : - Push left /right to : - E (BROWSE)/CAT*2 button page 12 To list up /down to : Enter sound setting/apply a setting. Push up /down to the previous display. Press and hold to : Select a menu item. Skip albums (push)*3. - Find a station manually (push and hold )*3. A SOURCE button To power on the unit. Receive stored station. The corresponding buttons on the card remote...
Operating Instructions
Page 10
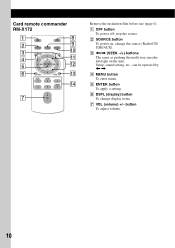
Card remote commander RM-X172 1 2 3 4 5 6 OFF ATT SOURCE SOUND MODE MENU /CAT + ENTER - Remove the insulation film before use (page 6). A OFF button To power off; stop the source. C B SOURCE button To power on; change the source (Radio/CD/ USB/AUX). DSPL REP 1 4 SHUF 2 5 SCRL 3 PAUSE 6 8 9 0 qa qs qd qf 7 + VOL -
Card remote commander RM-X172 1 2 3 4 5 6 OFF ATT SOURCE SOUND MODE MENU /CAT + ENTER - Remove the insulation film before use (page 6). A OFF button To power off; stop the source. C B SOURCE button To power on; change the source (Radio/CD/ USB/AUX). DSPL REP 1 4 SHUF 2 5 SCRL 3 PAUSE 6 8 9 0 qa qs qd qf 7 + VOL -
Operating Instructions
Page 11
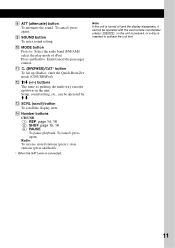
... unit is pressed, or a disc is connected. L M/m (+/-) buttons The same as pushing the multi way encoder up (Radio); N Number buttons CD/USB: (1): REP page 14, 16 (2): SHUF page 15, 16 (6): PAUSE To pause playback. H ATT (attenuate) button To attenuate the sound. Setup, sound setting, etc., can be operated with the card remote commander unless (SOURCE) on the unit. store stations (press and hold to : Select the radio band (FM/AM)/ select the play mode of iPod...
... unit is pressed, or a disc is connected. L M/m (+/-) buttons The same as pushing the multi way encoder up (Radio); N Number buttons CD/USB: (1): REP page 14, 16 (2): SHUF page 15, 16 (6): PAUSE To pause playback. H ATT (attenuate) button To attenuate the sound. Setup, sound setting, etc., can be operated with the card remote commander unless (SOURCE) on the unit. store stations (press and hold to : Select the radio band (FM/AM)/ select the play mode of iPod...
Operating Instructions
Page 13
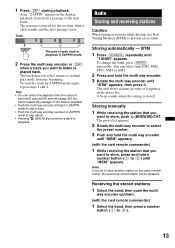
... in stations while driving, use Best Tuning Memory (BTM) to listen is stored. A beep sounds when the setting is played back. Storing manually 1 While receiving the station that you try to (6)). 13 To search a track by ZAPPIN mode again, repeat steps 1 and 2. BTM 1 Press (SOURCE) repeatedly until "MEM" appears. (with the card remote commander) 1 Select the band, then press a number button ((1) to store another station on the same number button...
... in stations while driving, use Best Tuning Memory (BTM) to listen is stored. A beep sounds when the setting is played back. Storing manually 1 While receiving the station that you try to (6)). 13 To search a track by ZAPPIN mode again, repeat steps 1 and 2. BTM 1 Press (SOURCE) repeatedly until "MEM" appears. (with the card remote commander) 1 Select the band, then press a number button ((1) to store another station on the same number button...

Operating Instructions
Page 14
... adjust to the desired frequency (manual tuning). Scanning stops when the unit receives a station. LIST You can list up automatically, then playback starts automatically. Tip Displayed items will differ depending on the card remote commander until the desired setting appears. album repeatedly. * When an MP3/WMA/AAC is received. Select Repeat Track Repeat Album* To play mode, select "Repeat off." 14 CD Playing a disc 1 Press Z. 2 Insert the disc...
... adjust to the desired frequency (manual tuning). Scanning stops when the unit receives a station. LIST You can list up automatically, then playback starts automatically. Tip Displayed items will differ depending on the card remote commander until the desired setting appears. album repeatedly. * When an MP3/WMA/AAC is received. Select Repeat Track Repeat Album* To play mode, select "Repeat off." 14 CD Playing a disc 1 Press Z. 2 Insert the disc...

Operating Instructions
Page 16
... number/Track number/Elapsed playing time To change display items C, press (DSPL/SCRL). Select Repeat Track Repeat Album Shuffle Album Shuffle Device To play mode, select "Repeat off" or "Shuffle off." album in random order. Notes • Do not use USB devices so large or heavy that they may fall down the volume of the unit. 1 Remove the USB cap from the USB connector and connect the iPod to the USB connector via a USB hub...
... number/Track number/Elapsed playing time To change display items C, press (DSPL/SCRL). Select Repeat Track Repeat Album Shuffle Album Shuffle Device To play mode, select "Repeat off" or "Shuffle off." album in random order. Notes • Do not use USB devices so large or heavy that they may fall down the volume of the unit. 1 Remove the USB cap from the USB connector and connect the iPod to the USB connector via a USB hub...

Operating Instructions
Page 17
...-100IP USB cable (not supplied) to stop playback. The mode changes as follows: Album Mode t Track Mode t Podcast Mode* t Genre Mode t Playlist Mode t Artist Mode * May not appear depending on iPod setting. 3 Adjust the volume. C A Source (iPod) indication B Clock C Artist name/Album name, Track name, Album number/Track number/Elapsed playing time To change display items C, press (DSPL/SCRL). Setting the play does not function. If an iPod is already connected, to the dock connector, the mode of the unit. Removing the iPod...
...-100IP USB cable (not supplied) to stop playback. The mode changes as follows: Album Mode t Track Mode t Podcast Mode* t Genre Mode t Playlist Mode t Artist Mode * May not appear depending on iPod setting. 3 Adjust the volume. C A Source (iPod) indication B Clock C Artist name/Album name, Track name, Album number/Track number/Elapsed playing time To change display items C, press (DSPL/SCRL). Setting the play does not function. If an iPod is already connected, to the dock connector, the mode of the unit. Removing the iPod...

Operating Instructions
Page 18
... Preset ( or ) Selects an equalizer curve from 7 music types. After about 3 seconds, the setting is canceled, the repeat setting will be adjusted only by the unit. • If this mode is complete. The following items can be able to the dock connector directly. 1 During playback, press and hold (MODE). EQ3 Parametric Tune*1 Custom equalizer settings. artist in random order. Operating an iPod directly - Then "Mode Audio" will appear and the play...
... Preset ( or ) Selects an equalizer curve from 7 music types. After about 3 seconds, the setting is canceled, the repeat setting will be adjusted only by the unit. • If this mode is complete. The following items can be able to the dock connector directly. 1 During playback, press and hold (MODE). EQ3 Parametric Tune*1 Custom equalizer settings. artist in random order. Operating an iPod directly - Then "Mode Audio" will appear and the play...

Operating Instructions
Page 19
..." in each connected auxiliary equipment: "+18 dB" - AUX Level*3 ( or ) Adjusts the volume level for more ambient sound field. "-8 dB." Right/Left/Center ( ) Adjusts the sound balance. *1 Hidden when EQ3 Parametric Preset is set , the more you finish all equalizer settings. 5 Push (BACK). Customizing the equalizer curve - The volume level is activated. This setting negates the need to normal play/reception mode. To select the DSO mode: "1," "2," "3" or "off ." *2 When CD/USB/iPod source is activated. *3 When AUX source is adjustable in...
..." in each connected auxiliary equipment: "+18 dB" - AUX Level*3 ( or ) Adjusts the volume level for more ambient sound field. "-8 dB." Right/Left/Center ( ) Adjusts the sound balance. *1 Hidden when EQ3 Parametric Preset is set , the more you finish all equalizer settings. 5 Push (BACK). Customizing the equalizer curve - The volume level is activated. This setting negates the need to normal play/reception mode. To select the DSO mode: "1," "2," "3" or "off ." *2 When CD/USB/iPod source is activated. *3 When AUX source is adjustable in...
Operating Instructions
Page 20
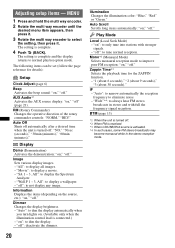
... Time*3 Selects the playback time for details): Setup Clock Adjust (page 6) Beep Activates the beep sound: "on ," "off ." The setting is complete and the display returns to dim the display. - The following items can be set (follow the page reference for the ZAPPIN function. - AUX Audio*1 Activates the AUX source display: "on ," "off " (page 21). "on": to normal play/reception mode. "on ," "off ": to display the Spectrum Analyzer. - "All": to only tune into stations...
... Time*3 Selects the playback time for details): Setup Clock Adjust (page 6) Beep Activates the beep sound: "on ," "off ." The setting is complete and the display returns to dim the display. - The following items can be set (follow the page reference for the ZAPPIN function. - AUX Audio*1 Activates the AUX source display: "on ," "off " (page 21). "on": to normal play/reception mode. "on ," "off ": to display the Spectrum Analyzer. - "All": to only tune into stations...
Operating Instructions
Page 21
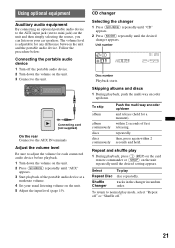
repeatedly. Unit number Disc number Playback starts. then, press again within 2 seconds of the portable audio device at a moderate volume. 4 Set your car speakers. Select Repeat Disc Shuffle Changer To play mode, select "Repeat off" or "Shuffle off the portable audio device. 2 Turn down . tracks in the changer in random order. Connecting cord (not supplied) On the rear Connect to the AUX IN terminals Adjust the volume level Be sure to adjust the volume for each connected audio device before playback. 1 Turn down and release...
repeatedly. Unit number Disc number Playback starts. then, press again within 2 seconds of the portable audio device at a moderate volume. 4 Set your car speakers. Select Repeat Disc Shuffle Changer To play mode, select "Repeat off" or "Shuffle off the portable audio device. 2 Turn down . tracks in the changer in random order. Connecting cord (not supplied) On the rear Connect to the AUX IN terminals Adjust the volume level Be sure to adjust the volume for each connected audio device before playback. 1 Turn down and release...
Operating Instructions
Page 23
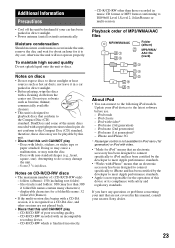
... this unit CANNOT play - Doing so may cause a malfunction, or may damage the unit. - 8 cm (3 1/4 in music CD format or MP3 format conforming to dry out; Attempting to do not conform to the Compact Disc (CD) standard. About iPod • You can connect to playback discs that this manual, consult your car has been parked in direct sunlight. • Power antenna (aerial) extends automatically. iPod...
... this unit CANNOT play - Doing so may cause a malfunction, or may damage the unit. - 8 cm (3 1/4 in music CD format or MP3 format conforming to dry out; Attempting to do not conform to the Compact Disc (CD) standard. About iPod • You can connect to playback discs that this manual, consult your car has been parked in direct sunlight. • Power antenna (aerial) extends automatically. iPod...
Operating Instructions
Page 26
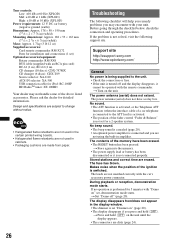
... discs): CDX-757MX CD changer (6 discs): CDX-T69 Source selector: XA-C40 AUX-IN selector: XA-300 USB connection cable for iPod: RC-100IP HD RadioTM tuner: XT-100HD Your dealer may encounter with the car's accessory power connector. No beep sound. • The beep sound is canceled (page 20). • An optional power amplifier is turned off " (page 20). During playback or reception, demonstration mode starts. The leads are not using...
... discs): CDX-757MX CD changer (6 discs): CDX-T69 Source selector: XA-C40 AUX-IN selector: XA-300 USB connection cable for iPod: RC-100IP HD RadioTM tuner: XT-100HD Your dealer may encounter with the car's accessory power connector. No beep sound. • The beep sound is canceled (page 20). • An optional power amplifier is turned off " (page 20). During playback or reception, demonstration mode starts. The leads are not using...
Operating Instructions
Page 27
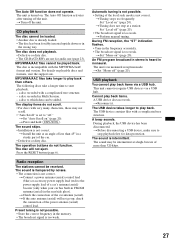
... or dirty disc. Preset tuning is not possible. • Store the correct frequency in the memory. • The broadcast signal is in a sturdy part of the car antenna (aerial). The unit is too weak. t Set "Mono off " (page 20). • The broadcast signal is too weak. t Before disconnecting a USB device, make sure to play back items via a USB hub. The Auto Off function does not operate. The unit is...
... or dirty disc. Preset tuning is not possible. • Store the correct frequency in the memory. • The broadcast signal is in a sturdy part of the car antenna (aerial). The unit is too weak. t Set "Mono off " (page 20). • The broadcast signal is too weak. t Before disconnecting a USB device, make sure to play back items via a USB hub. The Auto Off function does not operate. The unit is...

Operating Instructions
Page 28
... supported on the disc structure, it . t Connect a USB device with the unit. *1 If an error occurs during playback. NO Track The selected item in this unit. iPod Communication Error Due to a problem. t Reconnect the iPod and select iPod. t Insert another disc. • USB device was used at the time the problem began. 28 A USB device or a USB cable has been disconnected during playback of a CD, the disc number of the CD does not appear in the display. t Insert a music...
... supported on the disc structure, it . t Connect a USB device with the unit. *1 If an error occurs during playback. NO Track The selected item in this unit. iPod Communication Error Due to a problem. t Reconnect the iPod and select iPod. t Insert another disc. • USB device was used at the time the problem began. 28 A USB device or a USB cable has been disconnected during playback of a CD, the disc number of the CD does not appear in the display. t Insert a music...


