
Limited Warranty (U.S. Only)
Page 1
.... This Limited Warranty only covers product issues caused by any part of protection to state. This Limited Warranty does not cover Sony products sold AS IS or WITH ALL FAULTS or consumables (such as set forth below is provided "AS IS" unless expressly provided for...time periods and as fuses or batteries). For specific instructions on how long an implied warranty lasts, so the above limitations or exclusions may have other materials will , at its option, repair or replace with the Product. It is invalid if the factory-applied serial number has been altered or removed...
.... This Limited Warranty only covers product issues caused by any part of protection to state. This Limited Warranty does not cover Sony products sold AS IS or WITH ALL FAULTS or consumables (such as set forth below is provided "AS IS" unless expressly provided for...time periods and as fuses or batteries). For specific instructions on how long an implied warranty lasts, so the above limitations or exclusions may have other materials will , at its option, repair or replace with the Product. It is invalid if the factory-applied serial number has been altered or removed...
Operating Instructions
Page 1
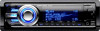
Record the serial number in the space provided below. Model No. Refer to these numbers whenever you call upon your Sony dealer regarding this product. CDX-GT730UI Serial No. CDX-GT730UI ©2008 Sony Corporation To cancel the demonstration (Demo) display, see page 6. Pour annuler l'affichage de démonstration (Demo), reportez-vous à la page 6. 4-125-268-11 (1) FM/AM Compact Disc Player Operating Instructions US Mode d'emploi FR Owner's Record The model and serial numbers are located on the bottom of the unit.
Record the serial number in the space provided below. Model No. Refer to these numbers whenever you call upon your Sony dealer regarding this product. CDX-GT730UI Serial No. CDX-GT730UI ©2008 Sony Corporation To cancel the demonstration (Demo) display, see page 6. Pour annuler l'affichage de démonstration (Demo), reportez-vous à la page 6. 4-125-268-11 (1) FM/AM Compact Disc Player Operating Instructions US Mode d'emploi FR Owner's Record The model and serial numbers are located on the bottom of the unit.
Operating Instructions
Page 2
... any changes or modifications not expressly approved in this manual could void your nearest authorized Sony dealer for help. iPhone is prohibited without a license from Microsoft or an authorized Microsoft subsidiary. 2 You are cautioned that this product is a trademark of optical instruments with the limits for a Class B digital device, pursuant to the HD RadioTM tuner Operating Instructions. For installation and connections...
... any changes or modifications not expressly approved in this manual could void your nearest authorized Sony dealer for help. iPhone is prohibited without a license from Microsoft or an authorized Microsoft subsidiary. 2 You are cautioned that this product is a trademark of optical instruments with the limits for a Class B digital device, pursuant to the HD RadioTM tuner Operating Instructions. For installation and connections...
Operating Instructions
Page 4
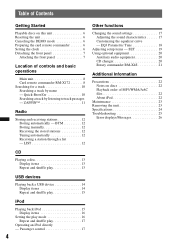
... Removing the unit 23 Specifications 24 Troubleshooting 25 Error displays/Messages 26 CD Playing a disc 13 Display items 13 Repeat and shuffle play 13 USB devices Playing back a USB device 14 Display items 14 Repeat and shuffle play 15 iPod Playing back iPod 15 Display items 16 Setting the play mode 16 Repeat and shuffle play 17 Operating an iPod directly - Quick-BrowZer 10 Searching a track by name - LIST 12 Other functions Changing the sound settings 17 Adjusting the sound characteristics 17 Customizing the equalizer...
... Removing the unit 23 Specifications 24 Troubleshooting 25 Error displays/Messages 26 CD Playing a disc 13 Display items 13 Repeat and shuffle play 13 USB devices Playing back a USB device 14 Display items 14 Repeat and shuffle play 15 iPod Playing back iPod 15 Display items 16 Setting the play mode 16 Repeat and shuffle play 17 Operating an iPod directly - Quick-BrowZer 10 Searching a track by name - LIST 12 Other functions Changing the sound settings 17 Adjusting the sound characteristics 17 Customizing the equalizer...
Operating Instructions
Page 6
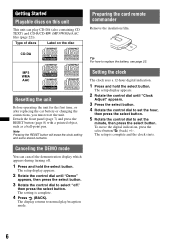
... select button. Canceling the DEMO mode You can play /reception mode. 6 The display returns to set the minute, then press the select button. Type of discs Label on this unit This unit can cancel the demonstration display which appears during turning off ." MP3 WMA AAC Resetting the unit Before operating the unit for the first time, or after replacing the car battery or changing the connections, you must reset the unit. Note Pressing the RESET button will erase the clock setting...
... select button. Canceling the DEMO mode You can play /reception mode. 6 The display returns to set the minute, then press the select button. Type of discs Label on this unit This unit can cancel the demonstration display which appears during turning off ." MP3 WMA AAC Resetting the unit Before operating the unit for the first time, or after replacing the car battery or changing the connections, you must reset the unit. Note Pressing the RESET button will erase the clock setting...

Operating Instructions
Page 8
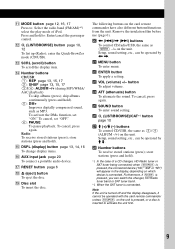
... enter ZAPPIN™ mode. Location of controls and basic operations. For details, see the respective pages. B (BACK) button page 10 To return to the USB device. Radio: To tune in stations automatically (press); qa qs Front panel removed qj qd qk ql RESET Card remote commander RM-X172 1 3 w; The corresponding buttons on the card remote commander control the same functions as those on the unit. stop the source. change the source (Radio/CD/ USB/AUX)*1.
... enter ZAPPIN™ mode. Location of controls and basic operations. For details, see the respective pages. B (BACK) button page 10 To return to the USB device. Radio: To tune in stations automatically (press); qa qs Front panel removed qj qd qk ql RESET Card remote commander RM-X172 1 3 w; The corresponding buttons on the card remote commander control the same functions as those on the unit. stop the source. change the source (Radio/CD/ USB/AUX)*1.
Operating Instructions
Page 9
... (display) button page 13, 14, 16 To change display items. P AUX input jack page 20 To connect a portable audio device. Q RESET button page 6 R Z (eject) button To eject the disc. Remove the insulation film before use (page 6). wg SOUND button To enter sound setting. To cancel, press again. w buttons To control CD/radio/USB, the same as (SEEK) -/+ on the card remote commander have also different buttons/functions from the unit. button To adjust volume. Setup, sound setting, etc., can be operated by < ,. when (SOURCE) is pressed, the connected device...
... (display) button page 13, 14, 16 To change display items. P AUX input jack page 20 To connect a portable audio device. Q RESET button page 6 R Z (eject) button To eject the disc. Remove the insulation film before use (page 6). wg SOUND button To enter sound setting. To cancel, press again. w buttons To control CD/radio/USB, the same as (SEEK) -/+ on the card remote commander have also different buttons/functions from the unit. button To adjust volume. Setup, sound setting, etc., can be operated by < ,. when (SOURCE) is pressed, the connected device...
Operating Instructions
Page 12
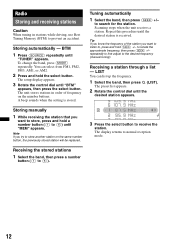
... select button. The setup display appears. 3 Rotate the control dial until "TUNER" appears. Storing manually 1 While receiving the station that you want to listen to (6)) until "MEM" appears. Receiving the stored stations 1 Select the band, then press a number button ((1) to search for the station. to (6)). Repeat this procedure until the desired station appears. 3 Press the select button to normal reception mode. 12 to the desired frequency (manual tuning). repeatedly to fine adjust to locate...
... select button. The setup display appears. 3 Rotate the control dial until "TUNER" appears. Storing manually 1 While receiving the station that you want to listen to (6)) until "MEM" appears. Receiving the stored stations 1 Select the band, then press a number button ((1) to search for the station. to (6)). Repeat this procedure until the desired station appears. 3 Press the select button to normal reception mode. 12 to the desired frequency (manual tuning). repeatedly to fine adjust to locate...

Operating Instructions
Page 14
... Connect the USB device after starting the engine. A B C D A Source B Clock C Track name, Artist name, Album name D EQ3 Parametric Preset/DM+ Advanced/ ZAPPIN/Repeat/Shuffle 2 Connect the USB device to stop playback. If you remove your USB device, visit the support site. A B When using a cable, use USB devices so large or heavy that they may fall down due to connect. E A Source B Clock E Artist name, Album name, Track name, Album number, Track number, Elapsed playing time 14 Display...
... Connect the USB device after starting the engine. A B C D A Source B Clock C Track name, Artist name, Album name D EQ3 Parametric Preset/DM+ Advanced/ ZAPPIN/Repeat/Shuffle 2 Connect the USB device to stop playback. If you remove your USB device, visit the support site. A B When using a cable, use USB devices so large or heavy that they may fall down due to connect. E A Source B Clock E Artist name, Album name, Track name, Album number, Track number, Elapsed playing time 14 Display...
Operating Instructions
Page 15
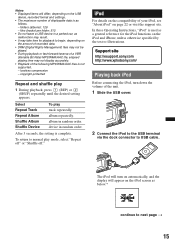
... MENU . > The iPod will turn down the volume of the unit. 1 Slide the USB cover. 2 Connect the iPod to the USB terminal via the dock connector to begin, depending on the iPod and iPhone, unless otherwise specified by the text or illustrations. iPod For details on the compatibility of displayable data is as below.* continue to normal play mode, select "Repeat off" or "Shuffle off." In these Operating Instructions, "iPod" is used...
... MENU . > The iPod will turn down the volume of the unit. 1 Slide the USB cover. 2 Connect the iPod to the USB terminal via the dock connector to begin, depending on the iPod and iPhone, unless otherwise specified by the text or illustrations. iPod For details on the compatibility of displayable data is as below.* continue to normal play mode, select "Repeat off" or "Shuffle off." In these Operating Instructions, "iPod" is used...

Operating Instructions
Page 16
... the mode set by iPhone itself. If an iPod is changed, its item number appears momentarily. The mode changes as follows: Resuming Mode t Album Mode t Track Mode t Podcast Mode* t Genre Mode t Playlist Mode t Artist Mode * May not appear depending on the iPod start playback press (SOURCE) repeatedly until "USB" or "iPod" appears. * If the iPod was played back in the passenger control last time, this unit changes to avoid sudden loud sound after a call . A B C D A Source (iPod) indication B Clock C Track...
... the mode set by iPhone itself. If an iPod is changed, its item number appears momentarily. The mode changes as follows: Resuming Mode t Album Mode t Track Mode t Podcast Mode* t Genre Mode t Playlist Mode t Artist Mode * May not appear depending on the iPod start playback press (SOURCE) repeatedly until "USB" or "iPod" appears. * If the iPod was played back in the passenger control last time, this unit changes to avoid sudden loud sound after a call . A B C D A Source (iPod) indication B Clock C Track...

Operating Instructions
Page 17
... and hold to "Resuming Mode." Level Adjusts the subwoofer volume: "+10dB" - Notes • The volume can be adjusted only by rotating the control dial again, further parameters can operate an iPod connected to operate the iPod directly. Subwoofer Tune & LPF Phase Selects the phase (effective only when LPF is on the setting, by the unit. • If this mode is complete and the display returns to normal play 1 During playback, press (1) (REP...
... and hold to "Resuming Mode." Level Adjusts the subwoofer volume: "+10dB" - Notes • The volume can be adjusted only by rotating the control dial again, further parameters can operate an iPod connected to operate the iPod directly. Subwoofer Tune & LPF Phase Selects the phase (effective only when LPF is on the setting, by the unit. • If this mode is complete and the display returns to normal play 1 During playback, press (1) (REP...

Operating Instructions
Page 18
... of affected frequencies) with this function. "Left:15." "-8 dB." Balance Adjusts the sound balance: "Right:15"- Tip Other 6 music types are also adjustable. 18 EQ3 Parametric Tune "Custom" of EQ3 Parametric Preset. 1 Select a source, then press and hold the select button. 2 Rotate the control dial to make your own equalizer settings. The setting is set equalizer curve, select "Initialize" and "Yes" in each connected auxiliary equipment: "+18 dB"- You can adjust the equalizer center frequency, volume level and bandwidth...
... of affected frequencies) with this function. "Left:15." "-8 dB." Balance Adjusts the sound balance: "Right:15"- Tip Other 6 music types are also adjustable. 18 EQ3 Parametric Tune "Custom" of EQ3 Parametric Preset. 1 Select a source, then press and hold the select button. 2 Rotate the control dial to make your own equalizer settings. The setting is set equalizer curve, select "Initialize" and "Yes" in each connected auxiliary equipment: "+18 dB"- You can adjust the equalizer center frequency, volume level and bandwidth...
Operating Instructions
Page 19
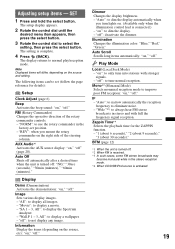
... Mode) - "on ": to only tune into stations with full the frequency signal reception. "Wide"*3: to display a movie. - Zappin Time*4 Selects the playback time for details): Setup Clock Adjust (page 6) Beep Activates the beep sound: "on," "off ": to dim the display automatically when you mount the rotary commander on . (Available only when the illumination control lead is activated. 19 The following items can be set position. - "REV": when you turn lights...
... Mode) - "on ": to only tune into stations with full the frequency signal reception. "Wide"*3: to display a movie. - Zappin Time*4 Selects the playback time for details): Setup Clock Adjust (page 6) Beep Activates the beep sound: "on," "off ": to dim the display automatically when you mount the rotary commander on . (Available only when the illumination control lead is activated. 19 The following items can be set position. - "REV": when you turn lights...

Operating Instructions
Page 20
... 2 seconds of the portable audio device at a moderate volume. 4 Set your car speakers. To return to use a straight type plug. Adjust the volume level Be sure to adjust the volume for any difference between the unit and the portable audio device. CD changer Selecting the changer 1 Press (SOURCE) repeatedly until "CD" appears. 2 Press (MODE) repeatedly until the desired setting appears. within 2 seconds and hold for a moment). Select Repeat Disc Shuffle Changer To play 1 During playback, press...
... 2 seconds of the portable audio device at a moderate volume. 4 Set your car speakers. To return to use a straight type plug. Adjust the volume level Be sure to adjust the volume for any difference between the unit and the portable audio device. CD changer Selecting the changer 1 Press (SOURCE) repeatedly until "CD" appears. 2 Press (MODE) repeatedly until the desired setting appears. within 2 seconds and hold for a moment). Select Repeat Disc Shuffle Changer To play 1 During playback, press...

Operating Instructions
Page 21
... need to mount the rotary commander on the rotary commander require a different operation from the unit. • ATT (attenuate) button To attenuate the sound. on the unit (rotate, or rotate and hold). • DSPL (display) button To change display items. To decrease If you can reverse the operative direction. 1 While pushing the VOL control, press and hold (SEL). 21 To cancel, press again. • PRESET/DISC control CD/USB...
... need to mount the rotary commander on the rotary commander require a different operation from the unit. • ATT (attenuate) button To attenuate the sound. on the unit (rotate, or rotate and hold). • DSPL (display) button To change display items. To decrease If you can reverse the operative direction. 1 While pushing the VOL control, press and hold (SEL). 21 To cancel, press again. • PRESET/DISC control CD/USB...
Operating Instructions
Page 22
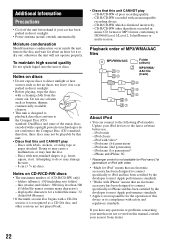
... this manual, consult your nearest Sony dealer. 22 displayable characters for the operation of the music discs encoded with copyright protection technologies do so may not be playable by the developer to the Compact Disc (CD) standard. CD-R/CD-RW of MP3/WMA/AAC files MP3/WMA/AAC Folder (album) MP3/WMA/ AAC file (track) About iPod • You can connect...
... this manual, consult your nearest Sony dealer. 22 displayable characters for the operation of the music discs encoded with copyright protection technologies do so may not be playable by the developer to the Compact Disc (CD) standard. CD-R/CD-RW of MP3/WMA/AAC files MP3/WMA/AAC Folder (album) MP3/WMA/ AAC file (track) About iPod • You can connect...

Operating Instructions
Page 24
... 4 ohms) General Outputs: Audio outputs terminal (front/rear) Subwoofer output terminal (mono) Power antenna (aerial) relay control terminal Power amplifier control terminal Inputs: Remote controller input terminal Antenna (aerial) input terminal Telephone ATT control terminal Illumination control terminal BUS control input terminal BUS audio input terminal AUX input jack (stereo mini jack) USB signal input terminal Tone controls: Low: ±10 dB at 60 Hz (XPLOD) Mid: ±10 dB at 1 kHz (XPLOD) High: ±10 dB at 10 kHz (XPLOD) Power requirements: 12 V DC car battery (negative ground...
... 4 ohms) General Outputs: Audio outputs terminal (front/rear) Subwoofer output terminal (mono) Power antenna (aerial) relay control terminal Power amplifier control terminal Inputs: Remote controller input terminal Antenna (aerial) input terminal Telephone ATT control terminal Illumination control terminal BUS control input terminal BUS audio input terminal AUX input jack (stereo mini jack) USB signal input terminal Tone controls: Low: ±10 dB at 60 Hz (XPLOD) Mid: ±10 dB at 1 kHz (XPLOD) High: ±10 dB at 10 kHz (XPLOD) Power requirements: 12 V DC car battery (negative ground...
Operating Instructions
Page 25
... set "Dimmer on " set, demonstration mode starts. If no operation is incompatible with a Sony MP3 compatible CD changer, or this unit. The Auto Off function activates after turning off the unit. t Set "Auto Scroll on the unit until the display appears. • The connectors are dirty (page 23). Press the RESET button (page 6). t Press and hold (OFF). t Connect the portable audio device to next page t 25 The disc is performed for 5 minutes with the car's accessory power connector. a disc...
... set "Dimmer on " set, demonstration mode starts. If no operation is incompatible with a Sony MP3 compatible CD changer, or this unit. The Auto Off function activates after turning off the unit. t Set "Auto Scroll on the unit until the display appears. • The connectors are dirty (page 23). Press the RESET button (page 6). t Press and hold (OFF). t Connect the portable audio device to next page t 25 The disc is performed for 5 minutes with the car's accessory power connector. a disc...
Operating Instructions
Page 26
... when your car has built-in FM/AM antenna (aerial) in the CD changer. Set the DSO mode to a problem. The unit is in the frequency accurately. • The broadcast signal is not supported. t Set "Mono off " (page 17). t Before disconnecting a USB device, make sure to remove the disc. t Insert another disc. • USB device was not automatically recognized. NO Device (SOURCE) is connected, storing an SAT radio channel into a preset failed. Not Supported The connected USB device is...
... when your car has built-in FM/AM antenna (aerial) in the CD changer. Set the DSO mode to a problem. The unit is in the frequency accurately. • The broadcast signal is not supported. t Set "Mono off " (page 17). t Before disconnecting a USB device, make sure to remove the disc. t Insert another disc. • USB device was not automatically recognized. NO Device (SOURCE) is connected, storing an SAT radio channel into a preset failed. Not Supported The connected USB device is...


