
Operating Instructions
Page 3
Disc Memo 14 Locating a disc by name - Shuffle Play 13 Labeling a CD - List-up 15 * Functions available with optional CD/MD unit Radio Storing stations automatically - Menu 21 Setting the ... 27 Troubleshooting 28 Error displays/Messages 29 3 Table of Contents Location of controls 4 Precautions 7 Notes on discs 7 Getting Started Resetting the unit 8 Detaching the front panel 9 Setting the clock 10 CD Player CD/MD Unit (optional) Playing a disc 10 Display items 12 Playing tracks repeatedly - Best Tuning Memory (BTM 15 Receiving the stored stations...
Disc Memo 14 Locating a disc by name - Shuffle Play 13 Labeling a CD - List-up 15 * Functions available with optional CD/MD unit Radio Storing stations automatically - Menu 21 Setting the ... 27 Troubleshooting 28 Error displays/Messages 29 3 Table of Contents Location of controls 4 Precautions 7 Notes on discs 7 Getting Started Resetting the unit 8 Detaching the front panel 9 Setting the clock 10 CD Player CD/MD Unit (optional) Playing a disc 10 Display items 12 Playing tracks repeatedly - Best Tuning Memory (BTM 15 Receiving the stored stations...
Operating Instructions
Page 6
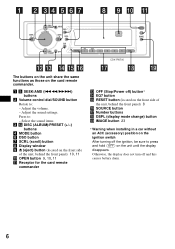
...commander qd OFF (Stop/Power off) button* qf EQ7 button qg RESET button (located on the front side of the unit, behind the front panel) 8 qh SOURCE button qj Number buttons qk DSPL (display mode change) button ql IMAGE button 23 * Warning when installing in a car without ...6 Press to : - a 5 SEEK/AMS (.m/M>) buttons b Volume control dial/SOUND button Rotate to : - SE-EK DISC/ PRESET PUSH SOUND MODE DSO D SE+EK SCRL S DISC/ PRESET EQ7 E OFF REP SHUF SOURCE 1 2 3 4 5 6 DSPL CDX-FW700 OPEN IMAGE The buttons on the unit share the same functions as those on the unit until the...
...commander qd OFF (Stop/Power off) button* qf EQ7 button qg RESET button (located on the front side of the unit, behind the front panel) 8 qh SOURCE button qj Number buttons qk DSPL (display mode change) button ql IMAGE button 23 * Warning when installing in a car without ...6 Press to : - a 5 SEEK/AMS (.m/M>) buttons b Volume control dial/SOUND button Rotate to : - SE-EK DISC/ PRESET PUSH SOUND MODE DSO D SE+EK SCRL S DISC/ PRESET EQ7 E OFF REP SHUF SOURCE 1 2 3 4 5 6 DSPL CDX-FW700 OPEN IMAGE The buttons on the unit share the same functions as those on the unit until the...
Operating Instructions
Page 8
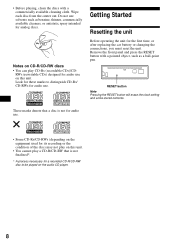
...You can play a CD-R/CD-RW that is not for audio use on the audio CD player. 8 These marks denote that a disc is not finalized*. * A process necessary for a recorded CD-R/CD-RW disc to distinguish CD-Rs/ CD-RWs for audio use solvents such as a ball-point pen...clock setting and some stored contents. Wipe each disc from the center out. • Before playing, clean the discs with a pointed object, such as benzine, thinner, commercially available cleaners, or antistatic spray intended for analog discs. Remove the front panel and press the RESET button with a commercially available...
...You can play a CD-R/CD-RW that is not for audio use on the audio CD player. 8 These marks denote that a disc is not finalized*. * A process necessary for a recorded CD-R/CD-RW disc to distinguish CD-Rs/ CD-RWs for audio use solvents such as a ball-point pen...clock setting and some stored contents. Wipe each disc from the center out. • Before playing, clean the discs with a pointed object, such as benzine, thinner, commercially available cleaners, or antistatic spray intended for analog discs. Remove the front panel and press the RESET button with a commercially available...
Operating Instructions
Page 9
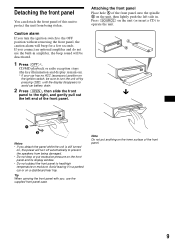
... the unit is still turned on, the power will turn the ignition switch to the OFF position without removing the front panel, the caution alarm will be sure to turn the unit off automatically to prevent the speakers from being damaged. • Do not drop or put ...anything on the inner surface of the front panel. CD/MD playback or radio reception stops (the key illumination and display remain on). * If your car has no ACC (accessory) position on the ignition...
... the unit is still turned on, the power will turn the ignition switch to the OFF position without removing the front panel, the caution alarm will be sure to turn the unit off automatically to prevent the speakers from being damaged. • Do not drop or put ...anything on the inner surface of the front panel. CD/MD playback or radio reception stops (the key illumination and display remain on). * If your car has no ACC (accessory) position on the ignition...
Operating Instructions
Page 10
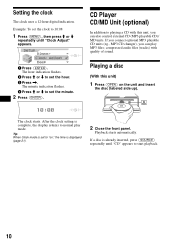
...When Clock mode is displayed (page 21). 2 Close the front panel. The minute indication flashes. 4 Press M or m to start playback. 10 The hour indication flashes. 2 Press M or m to playing a CD with quality of sound. CD Player CD/MD Unit (optional) In addition to set the minute....3 Press ,. Playback starts automatically. Setting the clock The clock uses a 12-hour digital indication. If a disc is complete, the display returns to "on the unit and insert the disc (labeled side up). After the clock setting is already inserted, press (SOURCE) repeatedly until "Clock Adjust" ...
...When Clock mode is displayed (page 21). 2 Close the front panel. The minute indication flashes. 4 Press M or m to start playback. 10 The hour indication flashes. 2 Press M or m to playing a CD with quality of sound. CD Player CD/MD Unit (optional) In addition to set the minute....3 Press ,. Playback starts automatically. Setting the clock The clock uses a 12-hour digital indication. If a disc is complete, the display returns to "on the unit and insert the disc (labeled side up). After the clock setting is already inserted, press (SOURCE) repeatedly until "Clock Adjust" ...

Operating Instructions
Page 25
.... If the fuse blows, check the power connection and replace the fuse. Replace the battery with the unit as this , detach the front panel (page 9) and clean the connectors with a cotton swab dipped in fire. Otherwise, the connectors may not function properly if the connectors between ...the unit and the front panel are not clean. Back of the front panel Notes • For safety, turn off the ignition before cleaning the connectors, and remove the key from the ignition switch...
.... If the fuse blows, check the power connection and replace the fuse. Replace the battery with the unit as this , detach the front panel (page 9) and clean the connectors with a cotton swab dipped in fire. Otherwise, the connectors may not function properly if the connectors between ...the unit and the front panel are not clean. Back of the front panel Notes • For safety, turn off the ignition before cleaning the connectors, and remove the key from the ignition switch...
Operating Instructions
Page 26
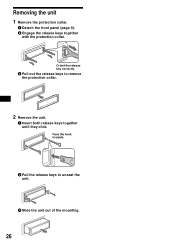
Orient the release key correctly. 3 Pull out the release keys to unseat the unit. 3 Slide the unit out of the mounting. 26 Face the hook inwards. 2 Pull the release keys to remove the protection collar. 2 Remove the unit. 1 Insert both release keys together until they click. Removing the unit 1 Remove the protection collar. 1 Detach the front panel (page 9). 2 Engage the release keys together with the protection collar.
Orient the release key correctly. 3 Pull out the release keys to unseat the unit. 3 Slide the unit out of the mounting. 26 Face the hook inwards. 2 Pull the release keys to remove the protection collar. 2 Remove the unit. 1 Insert both release keys together until they click. Removing the unit 1 Remove the protection collar. 1 Detach the front panel (page 9). 2 Engage the release keys together with the protection collar.
Operating Instructions
Page 27
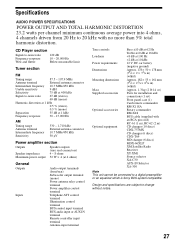
...discs) CDX-T69 MD changer (6 discs) MDX-66XLP XM Satellite Radio Receiver XT-XM1 Source selector XA-C30 AUX-IN Selector XA-300 Note This unit cannot be connected to a digital preamplifier or an equalizer which is Sony BUS system compatible. CD Player... section Signal-to-noise ratio Frequency response Wow and flutter 120 dB 10 - 20,000 Hz Below measurable limit Tuner section FM...oz) Parts for installation and connections (1 set) Front panel case (1) Card remote commander RM-X118A Rotary commander RM-X4S BUS cable (supplied with no more than ...
...discs) CDX-T69 MD changer (6 discs) MDX-66XLP XM Satellite Radio Receiver XT-XM1 Source selector XA-C30 AUX-IN Selector XA-300 Note This unit cannot be connected to a digital preamplifier or an equalizer which is Sony BUS system compatible. CD Player... section Signal-to-noise ratio Frequency response Wow and flutter 120 dB 10 - 20,000 Hz Below measurable limit Tuner section FM...oz) Parts for installation and connections (1 set) Front panel case (1) Card remote commander RM-X118A Rotary commander RM-X4S BUS cable (supplied with no more than ...
Operating Instructions
Page 28
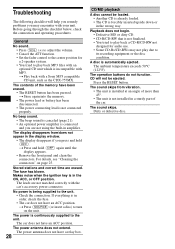
...is being supplied to the unit. The leads are not matched correctly with a Sony MP3 compatible CD unit, such as the CDX-757MX. The power is not finalized. • You tried to turn on...the ignition key is forcibly inserted upside down or in the wrong way. Dirty or defective disc. Stored stations and correct time are erased. The sound skips from /does not appear in... display disappears if you press and hold (OFF) again until the display appears. • Remove the front panel and clean the connectors. t Press and hold (OFF). t Play back with the car's accessory power connector...
...is being supplied to the unit. The leads are not matched correctly with a Sony MP3 compatible CD unit, such as the CDX-757MX. The power is not finalized. • You tried to turn on...the ignition key is forcibly inserted upside down or in the wrong way. Dirty or defective disc. Stored stations and correct time are erased. The sound skips from /does not appear in... display disappears if you press and hold (OFF) again until the display appears. • Remove the front panel and clean the connectors. t Press and hold (OFF). t Play back with the car's accessory power connector...


