
Limited Warranty (U.S. Only)
Page 1
...service for your product, Visit Sony's Web Site: www.sony.com/service Or call : 1-800-488-SONY (7669) Repair / Replacement Warranty: This Limited Warranty shall apply to replace the product after this Limited Warranty, Sony will become the property of the product ("Labor Warranty"), Sony will supply new or refurbished replacement parts in the United States. For specific instructions... Warranty period or for the time periods and as fuses or batteries). This Limited Warranty is required. If Sony elects to any such damage or loss. any part of incidental or consequential damages,...
...service for your product, Visit Sony's Web Site: www.sony.com/service Or call : 1-800-488-SONY (7669) Repair / Replacement Warranty: This Limited Warranty shall apply to replace the product after this Limited Warranty, Sony will become the property of the product ("Labor Warranty"), Sony will supply new or refurbished replacement parts in the United States. For specific instructions... Warranty period or for the time periods and as fuses or batteries). This Limited Warranty is required. If Sony elects to any such damage or loss. any part of incidental or consequential damages,...

XM Satellite Radio Operating manual
Page 1
... V DC car battery (negative ground) BUS control output Audio output Antenna input (Satellite, Terrestrial) BUS control input Audio input 224 × 37.8 × 160 mm (8 7/8 × 1 1/2 × 6 3/8 in this manual could void your authority to this equipment. No sound. • Adjust the volume control of the master unit. • Cancel the attenuate function of the receiver and the antenna. Locate codes and cables such as an antenna code, a BUS cable, an RCA pin code, or a power code so as follows: Channel Name t Channel Number t Artist Name/Program Name t Song...
... V DC car battery (negative ground) BUS control output Audio output Antenna input (Satellite, Terrestrial) BUS control input Audio input 224 × 37.8 × 160 mm (8 7/8 × 1 1/2 × 6 3/8 in this manual could void your authority to this equipment. No sound. • Adjust the volume control of the master unit. • Cancel the attenuate function of the receiver and the antenna. Locate codes and cables such as an antenna code, a BUS cable, an RCA pin code, or a power code so as follows: Channel Name t Channel Number t Artist Name/Program Name t Song...

XM Satellite Radio Operating manual
Page 2
... (5/32 in direct sunlight). - POWER SONY BUS CONTROL OUT IN AUDIO L OUT R L IN R ANTENNA TER SAT 2 Connect as heaters). - There should not be used because of the four screw holes on the car First connect the black ground lead, then connect the yellow power input leads. Fuse replacement If the fuse blows, check the power connection and replace the fuse. Connection Connection example XM Antenna* XT-XM1 CD/MD changer* Connection diagram Sony BUS Compatible Car Audio* Cautions • This unit is not...
... (5/32 in direct sunlight). - POWER SONY BUS CONTROL OUT IN AUDIO L OUT R L IN R ANTENNA TER SAT 2 Connect as heaters). - There should not be used because of the four screw holes on the car First connect the black ground lead, then connect the yellow power input leads. Fuse replacement If the fuse blows, check the power connection and replace the fuse. Connection Connection example XM Antenna* XT-XM1 CD/MD changer* Connection diagram Sony BUS Compatible Car Audio* Cautions • This unit is not...

Installation/Connection Instructions
Page 1
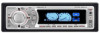
... leads have been connected. • Run all times. 3-263-410-21 (1) FM/AM Compact Disc Player Installation/Connections Instalación/Conexiones CDX-FW700 © 2004 Sony Corporation Printed in Korea 1 1 2 3 × 4 4 5 × 2 Equipment used in illustrations (not supplied) Equipo utilizado en las ilustraciones (no suministrado) Front speaker Altavoz frontal Power amplifier Amplificador de potencia Rear speaker Altavoz posterior CD/MD changer Cambiador de CD/MD Active subwoofer Altavoz potenciador de...
... leads have been connected. • Run all times. 3-263-410-21 (1) FM/AM Compact Disc Player Installation/Connections Instalación/Conexiones CDX-FW700 © 2004 Sony Corporation Printed in Korea 1 1 2 3 × 4 4 5 × 2 Equipment used in illustrations (not supplied) Equipo utilizado en las ilustraciones (no suministrado) Front speaker Altavoz frontal Power amplifier Amplificador de potencia Rear speaker Altavoz posterior CD/MD changer Cambiador de CD/MD Active subwoofer Altavoz potenciador de...
Operating Instructions
Page 1
3-263-380-21 (1) FM/AM Compact Disc Player Operating Instructions US Manual de instrucciones ES Owner's Record The model and serial numbers are located on the bottom of the unit. Refer to these numbers in the space provided below. CDX-FW700 Serial No. CDX-FW700 © 2004 Sony Corporation For installation and connections, see the supplied installation/connections manual. Model No. Record these numbers whenever you call upon your Sony dealer regarding this product. En ce qui...
3-263-380-21 (1) FM/AM Compact Disc Player Operating Instructions US Manual de instrucciones ES Owner's Record The model and serial numbers are located on the bottom of the unit. Refer to these numbers in the space provided below. CDX-FW700 Serial No. CDX-FW700 © 2004 Sony Corporation For installation and connections, see the supplied installation/connections manual. Model No. Record these numbers whenever you call upon your Sony dealer regarding this product. En ce qui...

Operating Instructions
Page 2
... occur in a residential installation. If this equipment does cause harmful interference to radio or television reception, which the receiver is recorded on XM tuner operation, please refer to the XM tuner module's included instruction manual. However, there is played). • Supplied controller accessory Card remote commander RM-X118A • Optional controller accessory Rotary commander RM-X4S *1 This unit works with this Sony Compact Disc Player. Please see your...
... occur in a residential installation. If this equipment does cause harmful interference to radio or television reception, which the receiver is recorded on XM tuner operation, please refer to the XM tuner module's included instruction manual. However, there is played). • Supplied controller accessory Card remote commander RM-X118A • Optional controller accessory Rotary commander RM-X4S *1 This unit works with this Sony Compact Disc Player. Please see your...

Operating Instructions
Page 3
... 18 Adjusting the sound characteristics 20 Quickly attenuating the sound 20 Changing the sound and display settings - Menu 21 Setting the equalizer (EQ7 22 Setting the Dynamic Soundstage Organizer (DSO 23 Selecting the display mode and display image 23 Connecting auxiliary audio equipment . . . . 24 Additional Information Maintenance 25 Removing the unit 26 Specifications 27 Troubleshooting 28 Error displays/Messages 29 3 Shuffle Play 13 Labeling a CD - Disc Memo 14 Locating a disc by name - Best Tuning Memory (BTM 15 Receiving the stored stations 16...
... 18 Adjusting the sound characteristics 20 Quickly attenuating the sound 20 Changing the sound and display settings - Menu 21 Setting the equalizer (EQ7 22 Setting the Dynamic Soundstage Organizer (DSO 23 Selecting the display mode and display image 23 Connecting auxiliary audio equipment . . . . 24 Additional Information Maintenance 25 Removing the unit 26 Specifications 27 Troubleshooting 28 Error displays/Messages 29 3 Shuffle Play 13 Labeling a CD - Disc Memo 14 Locating a disc by name - Best Tuning Memory (BTM 15 Receiving the stored stations 16...
Operating Instructions
Page 4
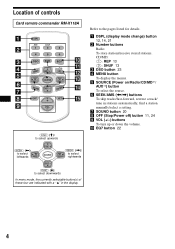
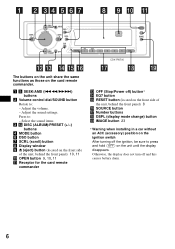
SOURCE SOUND DISC - SEEK+ ENTER OFF ATT VOL (DISC) (M): to select upwards (SEEK) ( Location of controls Card remote commander RM-X118A PTY DSPL REP 1 4 DSO SHUF 2 5 MODE MENU DISC + 3 6 EQ7 CAT LIST SEEK-
SOURCE SOUND DISC - SEEK+ ENTER OFF ATT VOL (DISC) (M): to select upwards (SEEK) ( Location of controls Card remote commander RM-X118A PTY DSPL REP 1 4 DSO SHUF 2 5 MODE MENU DISC + 3 6 EQ7 CAT LIST SEEK-
Operating Instructions
Page 5
.... k MODE button To change the disc*4, skip albums*5/select a menu. Selecting a disc and album Disc and album can be operated with the card remote commander unless (SOURCE) on page 25. Skipping tracks continuously Press once either SEEK/AMS (< or ,) button, then press again within about 1 second and hold. 5 o ATT button 20 *1 When an optional MD unit is connected. *2 Available only when an optional Sony portable device is inserted to AUX...
.... k MODE button To change the disc*4, skip albums*5/select a menu. Selecting a disc and album Disc and album can be operated with the card remote commander unless (SOURCE) on page 25. Skipping tracks continuously Press once either SEEK/AMS (< or ,) button, then press again within about 1 second and hold. 5 o ATT button 20 *1 When an optional MD unit is connected. *2 Available only when an optional Sony portable device is inserted to AUX...
Operating Instructions
Page 6
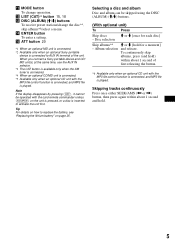
a 5 SEEK/AMS (.m/M>) buttons b Volume control dial/SOUND button Rotate to : - Press to : - Adjust the volume. - Adjust the sound settings. SE-EK DISC/ PRESET PUSH SOUND MODE DSO D SE+EK SCRL S DISC/ PRESET EQ7 E OFF REP SHUF SOURCE 1 2 3 4 5 6 DSPL CDX-FW700 OPEN IMAGE The buttons on the unit share the same functions as those on the unit until the display disappears. Select the sound items. 3 qs DISC (ALBUM)/PRESET (+/-) buttons 4 MODE button 6 DSO button 7 SCRL (scroll) button 8 Display window 9 Z (eject) button (located on the front side of the unit, behind...
a 5 SEEK/AMS (.m/M>) buttons b Volume control dial/SOUND button Rotate to : - Press to : - Adjust the volume. - Adjust the sound settings. SE-EK DISC/ PRESET PUSH SOUND MODE DSO D SE+EK SCRL S DISC/ PRESET EQ7 E OFF REP SHUF SOURCE 1 2 3 4 5 6 DSPL CDX-FW700 OPEN IMAGE The buttons on the unit share the same functions as those on the unit until the display disappears. Select the sound items. 3 qs DISC (ALBUM)/PRESET (+/-) buttons 4 MODE button 6 DSO button 7 SCRL (scroll) button 8 Display window 9 Z (eject) button (located on the front side of the unit, behind...
Operating Instructions
Page 7
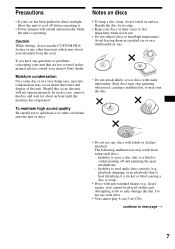
... disc. • Do not use such discs. • You cannot play 8 cm (3 in a parked car or on a dashboard/rear tray. • Do not attach labels, or use the CUSTOM FILE feature or any other soft drinks onto the unit or discs. Should this manual, please consult your car has been parked in this occur, the unit will extend automatically while the unit is operating...
... disc. • Do not use such discs. • You cannot play 8 cm (3 in a parked car or on a dashboard/rear tray. • Do not attach labels, or use the CUSTOM FILE feature or any other soft drinks onto the unit or discs. Should this manual, please consult your car has been parked in this occur, the unit will extend automatically while the unit is operating...
Operating Instructions
Page 10
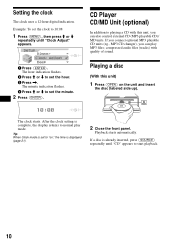
... of sound. Playing a disc (With this unit, you can also control external CD (MP3 playable CD)/ MD units. The clock starts. Playback starts automatically. Example: To set the clock to set the minute. 2 Press (ENTER). After the clock setting is already inserted, press (SOURCE) repeatedly until "Clock Adjust" appears. 1 Press (ENTER). If you connect optional MP3 playable CD units (eg., MP3 CD changer), you can play mode. The minute indication flashes...
... of sound. Playing a disc (With this unit, you can also control external CD (MP3 playable CD)/ MD units. The clock starts. Playback starts automatically. Example: To set the clock to set the minute. 2 Press (ENTER). After the clock setting is already inserted, press (SOURCE) repeatedly until "Clock Adjust" appears. 1 Press (ENTER). If you connect optional MP3 playable CD units (eg., MP3 CD changer), you can play mode. The minute indication flashes...
Operating Instructions
Page 15
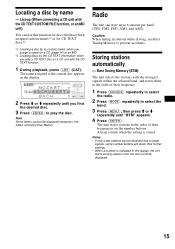
... connecting a CD unit with the CD TEXT/CUSTOM FILE function, or an MD unit) You can be displayed (exception: the letters stored by Disc Memo). Storing stations automatically - Notes • If only a few stations can use Best Tuning Memory to play a CD TEXT disc on a CD unit with the strongest signals within the selected band, and stores them in the order of their frequencies on the number buttons...
... connecting a CD unit with the CD TEXT/CUSTOM FILE function, or an MD unit) You can be displayed (exception: the letters stored by Disc Memo). Storing stations automatically - Notes • If only a few stations can use Best Tuning Memory to play a CD TEXT disc on a CD unit with the strongest signals within the selected band, and stores them in the order of their frequencies on the number buttons...
Operating Instructions
Page 16
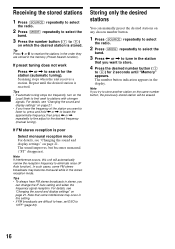
... Auto function). In such cases, some interference may become monaural while in the display. Receiving the stored stations 1 Press (SOURCE) repeatedly to select the radio. 2 Press (MODE) repeatedly to select the band. 3 Press the number button ((1) to the desired frequency (manual tuning). For details, see "Changing the sound and display settings" on any chosen number button. 1 Press (SOURCE) repeatedly to select the radio. 2 Press (MODE) repeatedly to select the band. 3 Press < or , to tune in this unit will...
... Auto function). In such cases, some interference may become monaural while in the display. Receiving the stored stations 1 Press (SOURCE) repeatedly to select the radio. 2 Press (MODE) repeatedly to select the band. 3 Press the number button ((1) to the desired frequency (manual tuning). For details, see "Changing the sound and display settings" on any chosen number button. 1 Press (SOURCE) repeatedly to select the radio. 2 Press (MODE) repeatedly to select the band. 3 Press < or , to tune in this unit will...
Operating Instructions
Page 20
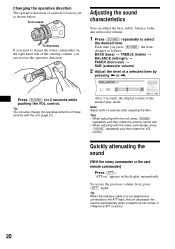
... interface cable of a car telephone is factory-set as follows: BASS (bass) t TREBLE (treble) t BALANCE (left-right) t FADER (front-rear) t SUB (subwoofer volume) 2 Adjust the level of a selected item by pressing < or ,. Quickly attenuating the sound (With the rotary commander or the card remote commander) Press (ATT). Tip You can also change the operative direction of these controls with the rotary commander, press (SOUND) repeatedly and then rotate the VOL control. After 3 seconds, the display returns...
... interface cable of a car telephone is factory-set as follows: BASS (bass) t TREBLE (treble) t BALANCE (left-right) t FADER (front-rear) t SUB (subwoofer volume) 2 Adjust the level of a selected item by pressing < or ,. Quickly attenuating the sound (With the rotary commander or the card remote commander) Press (ATT). Tip You can also change the operative direction of these controls with the rotary commander, press (SOUND) repeatedly and then rotate the VOL control. After 3 seconds, the display returns...
Operating Instructions
Page 21
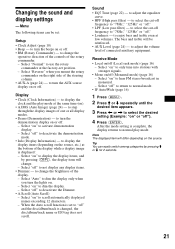
...; AUX-A (page 24) - Select "Normal" to not display any display items. • Dimmer - Select "Reverse" when you turn the beeps on the source, etc.) at the factory-set position. - Select "on " to display the display items (depending on or off "). 4 Press (ENTER). to hear FM stereo broadcast in monaural. - Select "off " and the disc/album/track is set : Setup • Clock Adjust (page 10) • Beep - When the Auto scroll function is changed, the disc...
...; AUX-A (page 24) - Select "Normal" to not display any display items. • Dimmer - Select "Reverse" when you turn the beeps on the source, etc.) at the factory-set position. - Select "on " to display the display items (depending on or off "). 4 Press (ENTER). to hear FM stereo broadcast in monaural. - Select "off " and the disc/album/track is set : Setup • Clock Adjust (page 10) • Beep - When the Auto scroll function is changed, the disc...
Operating Instructions
Page 24
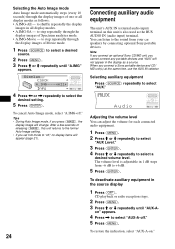
... Auto Image setting. • If you cannot connect any portable devices and "AUX" will not appear in all display modes as the BUS AUDIO IN (audio input) terminal. Adjusting the volume level You can listen to select "AUX-A-off ." Tips • During Auto Image mode, if you connect a Sony portable device and CD/ MD unit(s) at the same time, use the AUX IN selector. Selecting auxiliary equipment Press (SOURCE) repeatedly to select a desired volume level. CD playback or radio reception stops. 2 Press (MENU...
... Auto Image setting. • If you cannot connect any portable devices and "AUX" will not appear in all display modes as the BUS AUDIO IN (audio input) terminal. Adjusting the volume level You can listen to select "AUX-A-off ." Tips • During Auto Image mode, if you connect a Sony portable device and CD/ MD unit(s) at the same time, use the AUX IN selector. Selecting auxiliary equipment Press (SOURCE) repeatedly to select a desired volume level. CD playback or radio reception stops. 2 Press (MENU...
Operating Instructions
Page 27
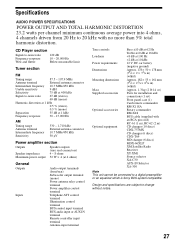
... changer (10 discs) CDX-757MX CD changer (6 discs) CDX-T69 MD changer (6 discs) MDX-66XLP XM Satellite Radio Receiver XT-XM1 Source selector XA-C30 AUX-IN Selector XA-300 Note This unit cannot be connected to a digital preamplifier or an equalizer which is Sony BUS system compatible. Specifications AUDIO POWER SPECIFICATIONS POWER OUTPUT AND TOTAL HARMONIC DISTORTION 23.2 watts per channel minimum continuous average power into 4 ohms, 4 channels driven from 20 Hz to change without notice. 27 CD Player...
... changer (10 discs) CDX-757MX CD changer (6 discs) CDX-T69 MD changer (6 discs) MDX-66XLP XM Satellite Radio Receiver XT-XM1 Source selector XA-C30 AUX-IN Selector XA-300 Note This unit cannot be connected to a digital preamplifier or an equalizer which is Sony BUS system compatible. Specifications AUDIO POWER SPECIFICATIONS POWER OUTPUT AND TOTAL HARMONIC DISTORTION 23.2 watts per channel minimum continuous average power into 4 ohms, 4 channels driven from 20 Hz to change without notice. 27 CD Player...
Operating Instructions
Page 28
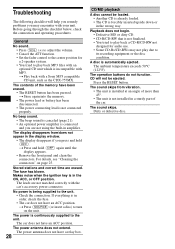
t Play back with the car's accessory power connector. If everything is in the wrong way. The operation buttons do not function. t Store again into the memory. • The power lead or battery has been disconnected. • The power connecting lead is being supplied to turn on page 25. The fuse has blown. t Press (SOURCE) (or insert a disc) to the unit. • Check the connection. The sound skips. No beep sound. •...
t Play back with the car's accessory power connector. If everything is in the wrong way. The operation buttons do not function. t Store again into the memory. • The power lead or battery has been disconnected. • The power connecting lead is being supplied to turn on page 25. The fuse has blown. t Press (SOURCE) (or insert a disc) to the unit. • Check the connection. The sound skips. No beep sound. •...
Operating Instructions
Page 29
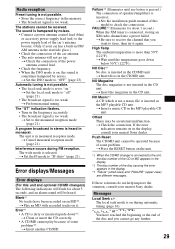
...; Connect a power antenna control lead (blue) or accessory power supply lead (red) to the unit, the disc number of the CD or MD appears in the display. *2 The disc number of the car antenna. • The auto antenna will be operated because of some problem. If these solutions do not help improve the situation, consult your nearest Sony dealer. t Be sure to "IF-Auto" (page 21). t Press the RESET button on the unit. *1 When...
...; Connect a power antenna control lead (blue) or accessory power supply lead (red) to the unit, the disc number of the CD or MD appears in the display. *2 The disc number of the car antenna. • The auto antenna will be operated because of some problem. If these solutions do not help improve the situation, consult your nearest Sony dealer. t Be sure to "IF-Auto" (page 21). t Press the RESET button on the unit. *1 When...


