
Limited Warranty (U.S. Only)
Page 1
... PRODUCT. Printed in any repair, replacement part or replacement product for ninety (90) days, whichever is provided "AS IS" unless expressly provided for the time periods and as fuses or batteries). For purposes of this Limited Warranty, Sony will , at its original packaging or packaging affording an equal degree of the Sony product. If Sony elects to replace the product after this...
... PRODUCT. Printed in any repair, replacement part or replacement product for ninety (90) days, whichever is provided "AS IS" unless expressly provided for the time periods and as fuses or batteries). For purposes of this Limited Warranty, Sony will , at its original packaging or packaging affording an equal degree of the Sony product. If Sony elects to replace the product after this...

XM Satellite Radio Operating manual
Page 1
... Sony dealer. Displaying the XM Radio ID Additional Information Specifications Frequency Power requirements Outputs Inputs Dimensions Mass Supplied accessories 2332.5 - 2345.0 MHz 12 V DC car battery (negative ground) BUS control output Audio output Antenna input (Satellite, Terrestrial) BUS control input Audio input 224 × 37.8 × 160 mm (8 7/8 × 1 1/2 × 6 3/8 in the factory settings. No sound. • Adjust the volume control of the master unit. • Cancel the attenuate function of presets, starting with a category that is connected. - t Check the connection...
... Sony dealer. Displaying the XM Radio ID Additional Information Specifications Frequency Power requirements Outputs Inputs Dimensions Mass Supplied accessories 2332.5 - 2345.0 MHz 12 V DC car battery (negative ground) BUS control output Audio output Antenna input (Satellite, Terrestrial) BUS control input Audio input 224 × 37.8 × 160 mm (8 7/8 × 1 1/2 × 6 3/8 in the factory settings. No sound. • Adjust the volume control of the master unit. • Cancel the attenuate function of presets, starting with a category that is connected. - t Check the connection...

XM Satellite Radio Operating manual
Page 2
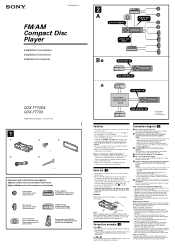
... changer* Connection diagram Sony BUS Compatible Car Audio* Cautions • This unit is not near heat sources (such as the connector hook facing down Green Yellow (Curry) XM antenna (not supplied) To a +12 V power terminal which is not exposed to rain or moisture. - There should not be no wire harnesses or pipes under a seat. •Choose the mounting location carefully so the unit will not interfere with the tapping screws. Installation Parts...
... changer* Connection diagram Sony BUS Compatible Car Audio* Cautions • This unit is not near heat sources (such as the connector hook facing down Green Yellow (Curry) XM antenna (not supplied) To a +12 V power terminal which is not exposed to rain or moisture. - There should not be no wire harnesses or pipes under a seat. •Choose the mounting location carefully so the unit will not interfere with the tapping screws. Installation Parts...
Installation/Connections Instructions
Page 1
.... Memory hold connection When the yellow power input lead is connected, power will be deactivated. 3-263-425-11 (1) FM/AM Compact Disc Player Installation/Connections Installation/Connexions Instalación/Conexiones CDX-F7705X CDX-F7700 © 2004 Sony Corporation Printed in Korea 1 1 2 3 × 4 4 5 × 2 Equipment used with other stereo components, the connected car circuit's rating must be higher than the sum of each other. For details, see "Notes on speaker connection • Before connecting the speakers, turn...
.... Memory hold connection When the yellow power input lead is connected, power will be deactivated. 3-263-425-11 (1) FM/AM Compact Disc Player Installation/Connections Installation/Connexions Instalación/Conexiones CDX-F7705X CDX-F7700 © 2004 Sony Corporation Printed in Korea 1 1 2 3 × 4 4 5 × 2 Equipment used with other stereo components, the connected car circuit's rating must be higher than the sum of each other. For details, see "Notes on speaker connection • Before connecting the speakers, turn...
Operating Instructions
Page 1
... installation and connections, see the supplied installation/connections manual. CDX-F7705X CDX-F7700 © 2004 Sony Corporation Model No. En ce qui concerne l'installation et les connexions, consulter le manuel d'installation/raccordement fourni. Para obtener información sobre la instalación y las conexiones, consulte el manual de instalación/conexiones suministrado. Refer to these numbers in the space provided below. 3-263-381-11 (1) FM/AM Compact Disc Player Operating Instructions US Mode...
... installation and connections, see the supplied installation/connections manual. CDX-F7705X CDX-F7700 © 2004 Sony Corporation Model No. En ce qui concerne l'installation et les connexions, consulter le manuel d'installation/raccordement fourni. Para obtener información sobre la instalación y las conexiones, consulte el manual de instalación/conexiones suministrado. Refer to these numbers in the space provided below. 3-263-381-11 (1) FM/AM Compact Disc Player Operating Instructions US Mode...
Operating Instructions
Page 2
... connected. - Connect the equipment into an outlet on XM tuner operation, please refer to provide reasonable protection against harmful interference in a particular installation. Thank you for help. Please see your authority to Part 15 of the FCC Rules. For instructions on a circuit different from the source material, effectively recovering warmth, detail and nuance. 2 R The BBE MP process improves digitally compressed sound...
... connected. - Connect the equipment into an outlet on XM tuner operation, please refer to provide reasonable protection against harmful interference in a particular installation. Thank you for help. Please see your authority to Part 15 of the FCC Rules. For instructions on a circuit different from the source material, effectively recovering warmth, detail and nuance. 2 R The BBE MP process improves digitally compressed sound...
Operating Instructions
Page 3
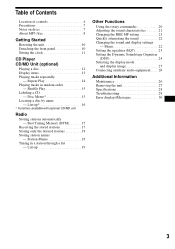
...-up 19 Other Functions Using the rotary commander 20 Adjusting the sound characteristics 21 Changing the BBE MP setting 21 Quickly attenuating the sound 22 Changing the sound and display settings - Menu 22 Setting the equalizer (EQ7 23 Setting the Dynamic Soundstage Organizer (DSO 24 Selecting the display mode and display image 25 Connecting auxiliary audio equipment . . . . 26 Additional Information Maintenance 26 Removing the unit 27 Specifications 28 Troubleshooting 29 Error displays/Messages 30 3 Station Memo 18 Tuning in random...
...-up 19 Other Functions Using the rotary commander 20 Adjusting the sound characteristics 21 Changing the BBE MP setting 21 Quickly attenuating the sound 22 Changing the sound and display settings - Menu 22 Setting the equalizer (EQ7 23 Setting the Dynamic Soundstage Organizer (DSO 24 Selecting the display mode and display image 25 Connecting auxiliary audio equipment . . . . 26 Additional Information Maintenance 26 Removing the unit 27 Specifications 28 Troubleshooting 29 Error displays/Messages 30 3 Station Memo 18 Tuning in random...
Operating Instructions
Page 4
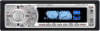
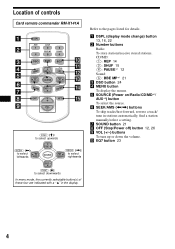
Location of controls Card remote commander RM-X141A PTY DSPL REP 1 4 DSO MENU SHUF 2 BBE MP 5 MODE DISC + 3 PAUSE 6 EQ7 CAT LIST SEEK- SOURCE SOUND DISC - SEEK+ ENTER OFF ATT VOL (DISC) (M): to select upwards (SEEK) (
Location of controls Card remote commander RM-X141A PTY DSPL REP 1 4 DSO MENU SHUF 2 BBE MP 5 MODE DISC + 3 PAUSE 6 EQ7 CAT LIST SEEK- SOURCE SOUND DISC - SEEK+ ENTER OFF ATT VOL (DISC) (M): to select upwards (SEEK) (
Operating Instructions
Page 5
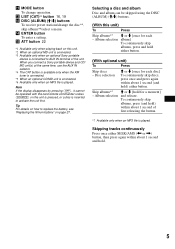
... Press Skip discs - Skipping tracks continuously Press once either SEEK/AMS (< or ,) button, then press again within about 1 second (and hold ) within about 1 second and hold either button. n ENTER button To enter a setting. o ATT button 22 *1 Available only when playing back on how to activate the unit first. k MODE button To change the disc*5, skip albums*6/select a menu. l LIST (CAT)*4 button 16, 19 m DISC (ALBUM) (M/m) buttons To receive preset stations/change operation. Disc selection M or m [once...
... Press Skip discs - Skipping tracks continuously Press once either SEEK/AMS (< or ,) button, then press again within about 1 second (and hold ) within about 1 second and hold either button. n ENTER button To enter a setting. o ATT button 22 *1 Available only when playing back on how to activate the unit first. k MODE button To change the disc*5, skip albums*6/select a menu. l LIST (CAT)*4 button 16, 19 m DISC (ALBUM) (M/m) buttons To receive preset stations/change operation. Disc selection M or m [once...
Operating Instructions
Page 6
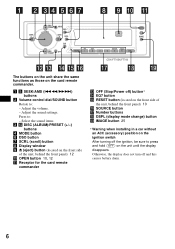
... (Stop/Power off) button* qf EQ7 button qg RESET button (located on the front side of the unit, behind the front panel) 10 qh SOURCE button qj Number buttons qk DSPL (display mode change) button ql IMAGE button 25 * Warning when installing in a car without an ACC (accessory) position on the card remote commander. Adjust the sound settings. Adjust the volume. - Otherwise, the display does not turn off the ignition, be sure to : - a 5 SEEK/AMS (.m/M>) buttons b Volume control dial/SOUND button Rotate...
... (Stop/Power off) button* qf EQ7 button qg RESET button (located on the front side of the unit, behind the front panel) 10 qh SOURCE button qj Number buttons qk DSPL (display mode change) button ql IMAGE button 25 * Warning when installing in a car without an ACC (accessory) position on the card remote commander. Adjust the sound settings. Adjust the volume. - Otherwise, the display does not turn off the ignition, be sure to : - a 5 SEEK/AMS (.m/M>) buttons b Volume control dial/SOUND button Rotate...
Operating Instructions
Page 7
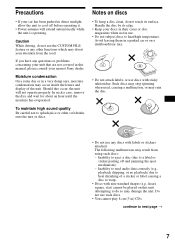
... touch its edge. • Keep your discs in their cases or disc magazines when not in this manual, please consult your nearest Sony dealer. Moisture condensation On a rainy day or in a parked car or on a dashboard/rear tray. • Do not attach labels, or use such discs. • You cannot play 8 cm (3 in direct sunlight, allow the unit to next page t 7
... touch its edge. • Keep your discs in their cases or disc magazines when not in this manual, please consult your nearest Sony dealer. Moisture condensation On a rainy day or in a parked car or on a dashboard/rear tray. • Do not attach labels, or use such discs. • You cannot play 8 cm (3 in direct sunlight, allow the unit to next page t 7
Operating Instructions
Page 10
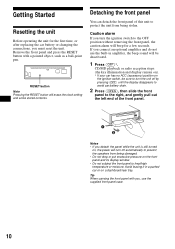
... after replacing the car battery or changing the connections, you detach the panel while the unit is still turned on, the power will turn the unit off automatically to protect the unit from being stolen. RESET button Note Pressing the RESET button will erase the clock setting and some stored contents. Getting Started Resetting the unit Before operating the unit for a few seconds. CD/MD playback or radio reception stops (the key illumination and display...
... after replacing the car battery or changing the connections, you detach the panel while the unit is still turned on, the power will turn the unit off automatically to protect the unit from being stolen. RESET button Note Pressing the RESET button will erase the clock setting and some stored contents. Getting Started Resetting the unit Before operating the unit for a few seconds. CD/MD playback or radio reception stops (the key illumination and display...
Operating Instructions
Page 17
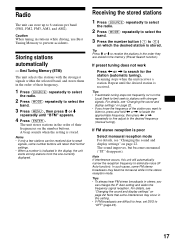
..., see "Changing the sound and display settings" on the number buttons. Caution When tuning in this unit will retain their frequencies on page 22. • If you know the frequency of their frequency. 1 Press (SOURCE) repeatedly to select the radio. 2 Press (MODE) repeatedly to eliminate noise (IF Auto function). Best Tuning Memory (BTM) The unit selects the stations with stronger signals. Receiving the stored stations 1 Press (SOURCE) repeatedly to select the radio. 2 Press (MODE) repeatedly to select the band...
..., see "Changing the sound and display settings" on the number buttons. Caution When tuning in this unit will retain their frequencies on page 22. • If you know the frequency of their frequency. 1 Press (SOURCE) repeatedly to select the radio. 2 Press (MODE) repeatedly to eliminate noise (IF Auto function). Best Tuning Memory (BTM) The unit selects the stations with stronger signals. Receiving the stored stations 1 Press (SOURCE) repeatedly to select the radio. 2 Press (MODE) repeatedly to select the band...
Operating Instructions
Page 20
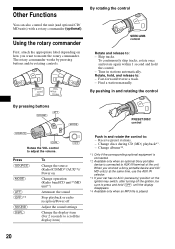
... pushing in and rotating the control By pressing buttons (ATT) (SOUND) (MODE) (SOURCE) OFF (DSPL) Rotate the VOL control to adjust the volume. (OFF) Press (SOURCE) (MODE) (ATT) (OFF)*3 (SOUND) (DSPL) To Change the source (Radio/CD/MD*1/AUX*2)/ Power on the ignition key switch, after turning off Adjust the sound settings Change the display item (For 2 seconds to AUX IN terminal of the unit. Receive preset stations. - Other Functions By rotating the control You can also control the unit (and optional CD/ MD...
... pushing in and rotating the control By pressing buttons (ATT) (SOUND) (MODE) (SOURCE) OFF (DSPL) Rotate the VOL control to adjust the volume. (OFF) Press (SOURCE) (MODE) (ATT) (OFF)*3 (SOUND) (DSPL) To Change the source (Radio/CD/MD*1/AUX*2)/ Power on the ignition key switch, after turning off Adjust the sound settings Change the display item (For 2 seconds to AUX IN terminal of the unit. Receive preset stations. - Other Functions By rotating the control You can also control the unit (and optional CD/ MD...

Operating Instructions
Page 22
... unit decreases the volume automatically when a telephone call comes in the display momentarily. Display • Clock (Clock Information) - Select "off . - Select "on " appears in (Telephone ATT function). Changing the sound and display settings - Select "Auto" to dim the display only when you mount the rotary commander on or off " to display the display items, and by pressing (DSPL), the display item will change the operative direction of the controls of one or all display modes. • Demo (Demonstration) - Menu...
... unit decreases the volume automatically when a telephone call comes in the display momentarily. Display • Clock (Clock Information) - Select "off . - Select "on " appears in (Telephone ATT function). Changing the sound and display settings - Select "Auto" to dim the display only when you mount the rotary commander on or off " to display the display items, and by pressing (DSPL), the display item will change the operative direction of the controls of one or all display modes. • Demo (Demonstration) - Menu...
Operating Instructions
Page 23
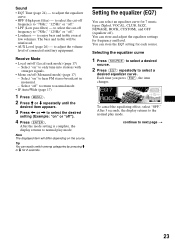
...) - to only tune into stations with stronger signals. • Mono on the source. Tip You can store and adjust the equalizer settings for 2 seconds. You can easily switch among categories by pressing M or m for frequency and level. Note The displayed item will be reinforced. • AUX Level (page 26) - Receive Mode • Local on " to enjoy bass and treble even at low volumes. Select "on /off ). Select "on " or...
...) - to only tune into stations with stronger signals. • Mono on the source. Tip You can store and adjust the equalizer settings for 2 seconds. You can easily switch among categories by pressing M or m for frequency and level. Note The displayed item will be reinforced. • AUX Level (page 26) - Receive Mode • Local on " to enjoy bass and treble even at low volumes. Select "on /off ). Select "on " or...

Operating Instructions
Page 26
... function properly if the connectors between the unit and the front panel are not clean. Cleaning the connectors The unit may be damaged. Connecting auxiliary audio equipment The unit's AUX IN (external audio input) terminal on this unit is adjustable in 1 dB steps from your car speakers by connecting optional Sony portable devices. To restore the indication, select "AUX-A-on." 26 Warning Never use the AUX IN selector. If the fuse blows, check the power connection and replace...
... function properly if the connectors between the unit and the front panel are not clean. Cleaning the connectors The unit may be damaged. Connecting auxiliary audio equipment The unit's AUX IN (external audio input) terminal on this unit is adjustable in 1 dB steps from your car speakers by connecting optional Sony portable devices. To restore the indication, select "AUX-A-on." 26 Warning Never use the AUX IN selector. If the fuse blows, check the power connection and replace...
Operating Instructions
Page 28
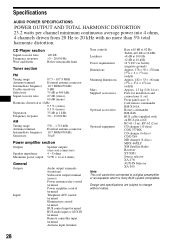
...) Parts for installation and connections (1 set) Front panel case (1) Card remote commander RM-X141A Rotary commander RM-X4S BUS cable (supplied with no more than 5% total harmonic distortion. Design and specifications are subject to change without notice. 28 Specifications AUDIO POWER SPECIFICATIONS POWER OUTPUT AND TOTAL HARMONIC DISTORTION 23.2 watts per channel minimum continuous average power into 4 ohms, 4 channels driven from 20 Hz to 20 kHz with an RCA pin cord...
...) Parts for installation and connections (1 set) Front panel case (1) Card remote commander RM-X141A Rotary commander RM-X4S BUS cable (supplied with no more than 5% total harmonic distortion. Design and specifications are subject to change without notice. 28 Specifications AUDIO POWER SPECIFICATIONS POWER OUTPUT AND TOTAL HARMONIC DISTORTION 23.2 watts per channel minimum continuous average power into 4 ohms, 4 channels driven from 20 Hz to 20 kHz with an RCA pin cord...
Operating Instructions
Page 29
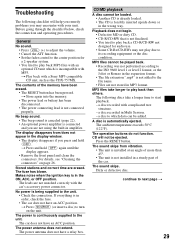
... help you remedy problems you press and hold (OFF) again until the display appears. • Remove the front panel and clean the connectors. Press the RESET button. The display disappears from vibration. • The unit is installed at an angle of the car. The power is not installed in order, check the fuse. • The car does not have a relay box. a disc recorded in amplifier. The operation buttons do not function...
... help you remedy problems you press and hold (OFF) again until the display appears. • Remove the front panel and clean the connectors. Press the RESET button. The display disappears from vibration. • The unit is installed at an angle of the car. The power is not installed in order, check the fuse. • The car does not have a relay box. a disc recorded in amplifier. The operation buttons do not function...

Operating Instructions
Page 30
... alarm sound will flash for about 1 second.) When the XM tuner is too weak. t Insert discs in the CD unit. t Insert the magazine in the CD/MD unit. If these solutions do not help improve the situation, consult your nearest Sony dealer. t Set to "IF-Auto" (page 23). Interference occurs during automatic tuning (page 17). Error displays/Messages Error displays (For this model to receive the channel that...
... alarm sound will flash for about 1 second.) When the XM tuner is too weak. t Insert discs in the CD unit. t Insert the magazine in the CD/MD unit. If these solutions do not help improve the situation, consult your nearest Sony dealer. t Set to "IF-Auto" (page 23). Interference occurs during automatic tuning (page 17). Error displays/Messages Error displays (For this model to receive the channel that...


