
Limited Warranty (U.S. Only)
Page 1
... ordinary consumer use , acts of God, misuse, limitations of technology, or modification of the Sony product. it does not cover any repair, replacement part or replacement product for the remainder of a defect, these are your unit. This Limited Warranty is longer. For specific instructions on your exclusive remedies. If Sony elects to the Sony authorized service facility specified. Any parts or product replaced under...
... ordinary consumer use , acts of God, misuse, limitations of technology, or modification of the Sony product. it does not cover any repair, replacement part or replacement product for the remainder of a defect, these are your unit. This Limited Warranty is longer. For specific instructions on your exclusive remedies. If Sony elects to the Sony authorized service facility specified. Any parts or product replaced under...

XM Satellite Radio Operating manual
Page 1
.... Receiving a stored channel • Press either Seek button to copy, decompile, disassemble, reverse engineer or manipulate any problem persist after turning the XM on . Press the Disc/Preset + (DISC +) button to the operating instructions of categories include "rock," "jazz," "news," and so on and select "setup 2." Displaying the XM Radio ID Additional Information Specifications Frequency Power requirements Outputs Inputs Dimensions Mass Supplied accessories 2332.5 - 2345.0 MHz 12 V DC car battery (negative ground) BUS control output Audio output Antenna input (Satellite...
.... Receiving a stored channel • Press either Seek button to copy, decompile, disassemble, reverse engineer or manipulate any problem persist after turning the XM on . Press the Disc/Preset + (DISC +) button to the operating instructions of categories include "rock," "jazz," "news," and so on and select "setup 2." Displaying the XM Radio ID Additional Information Specifications Frequency Power requirements Outputs Inputs Dimensions Mass Supplied accessories 2332.5 - 2345.0 MHz 12 V DC car battery (negative ground) BUS control output Audio output Antenna input (Satellite...

XM Satellite Radio Operating manual
Page 2
... the power connection and replace the fuse. Black RCA pin cord (not supplied) BUS cable (not supplied) 4 3 OUT OUT IN CD/MD changer (not supplied) Sony BUS Compatible Car Audio (not supplied) IN Installation Parts list The numbers in the list are going to install the unit. - The unit is not exposed to excessive dust or dirt. - Use of a higher amperage fuse may be no wire harnesses or pipes under a seat. •Choose the mounting location...
... the power connection and replace the fuse. Black RCA pin cord (not supplied) BUS cable (not supplied) 4 3 OUT OUT IN CD/MD changer (not supplied) Sony BUS Compatible Car Audio (not supplied) IN Installation Parts list The numbers in the list are going to install the unit. - The unit is not exposed to excessive dust or dirt. - Use of a higher amperage fuse may be no wire harnesses or pipes under a seat. •Choose the mounting location...
Installation/Connections Instructions
Page 1
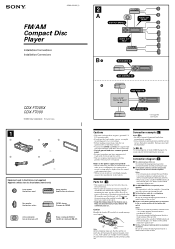
... energized in moving parts (e.g. 3-263-410-11 (1) FM/AM Compact Disc Player Installation/Connections Installation/Connexions CDX-F7005X CDX-F7000 © 2004 Sony Corporation Printed in Korea 1 1 2 3 × 4 4 5 × 2 Equipment used in illustrations (not supplied) Appareils utilisés dans les illustrations (non fournis) Front speaker Haut-parleur avant Power amplifier Amplificateur de puissance Rear speaker Haut-parleur arrière CD/MD changer Changeur de CD/MD Active subwoofer Caisson de...
... energized in moving parts (e.g. 3-263-410-11 (1) FM/AM Compact Disc Player Installation/Connections Installation/Connexions CDX-F7005X CDX-F7000 © 2004 Sony Corporation Printed in Korea 1 1 2 3 × 4 4 5 × 2 Equipment used in illustrations (not supplied) Appareils utilisés dans les illustrations (non fournis) Front speaker Haut-parleur avant Power amplifier Amplificateur de puissance Rear speaker Haut-parleur arrière CD/MD changer Changeur de CD/MD Active subwoofer Caisson de...
Operating Instructions (primary manual)
Page 1
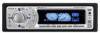
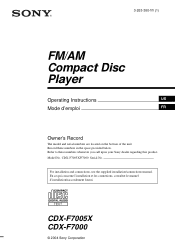
... (1) FM/AM Compact Disc Player Operating Instructions US Mode d'emploi FR Owner's Record The model and serial numbers are located on the bottom of the unit. Record these numbers whenever you call upon your Sony dealer regarding this product. En ce qui concerne l'installation et les connexions, consulter le manuel d'installation/raccordement fourni. CDX-F7005X/F7000 Serial No. Refer to these numbers in the space provided below. For installation and connections...
... (1) FM/AM Compact Disc Player Operating Instructions US Mode d'emploi FR Owner's Record The model and serial numbers are located on the bottom of the unit. Record these numbers whenever you call upon your Sony dealer regarding this product. En ce qui concerne l'installation et les connexions, consulter le manuel d'installation/raccordement fourni. CDX-F7005X/F7000 Serial No. Refer to these numbers in the space provided below. For installation and connections...
Operating Instructions (primary manual)
Page 2
... or relocate the receiving antenna. - Increase the separation between the equipment and receiver. - You are designed to provide reasonable protection against harmful interference in a particular installation. Please see your authority to operate this equipment. Welcome ! You can radiate radio frequency energy and, if not installed and used in this manual could void your nearest authorized Sony dealer for purchasing this Sony Compact Disc Player. The "XM...
... or relocate the receiving antenna. - Increase the separation between the equipment and receiver. - You are designed to provide reasonable protection against harmful interference in a particular installation. Please see your authority to operate this equipment. Welcome ! You can radiate radio frequency energy and, if not installed and used in this manual could void your nearest authorized Sony dealer for purchasing this Sony Compact Disc Player. The "XM...
Operating Instructions (primary manual)
Page 3
... Selecting the display mode and display image 23 Connecting auxiliary audio equipment . . . . 24 Additional Information Maintenance 25 Removing the unit 26 Specifications 27 Troubleshooting 28 Error displays/Messages 29 3 Station Memo 17 Tuning in random order - Table of Contents Location of controls 4 Precautions 7 Notes on discs 7 Getting Started Resetting the unit 8 Detaching the front panel 9 Setting the clock 10 CD Player CD/MD Unit (optional) Playing a disc 10 Display items 12 Playing tracks repeatedly - Best Tuning Memory (BTM 15 Receiving the stored stations...
... Selecting the display mode and display image 23 Connecting auxiliary audio equipment . . . . 24 Additional Information Maintenance 25 Removing the unit 26 Specifications 27 Troubleshooting 28 Error displays/Messages 29 3 Station Memo 17 Tuning in random order - Table of Contents Location of controls 4 Precautions 7 Notes on discs 7 Getting Started Resetting the unit 8 Detaching the front panel 9 Setting the clock 10 CD Player CD/MD Unit (optional) Playing a disc 10 Display items 12 Playing tracks repeatedly - Best Tuning Memory (BTM 15 Receiving the stored stations...
Operating Instructions (primary manual)
Page 4
SEEK+ ENTER OFF ATT VOL (DISC) (M): to select upwards (SEEK) ( SOURCE SOUND DISC - Location of controls Card remote commander RM-X118A PTY DSPL REP 1 4 DSO SHUF 2 5 MODE MENU DISC + 3 6 EQ7 CAT LIST SEEK-
SEEK+ ENTER OFF ATT VOL (DISC) (M): to select upwards (SEEK) ( SOURCE SOUND DISC - Location of controls Card remote commander RM-X118A PTY DSPL REP 1 4 DSO SHUF 2 5 MODE MENU DISC + 3 6 EQ7 CAT LIST SEEK-
Operating Instructions (primary manual)
Page 5
... "Replacing the lithium battery" on the unit is pressed, or a disc is inserted to AUX IN terminal of first releasing the button. *6 Available only when an optional CD unit with the MP3 file control function is connected, and MP3 file is played. k MODE button To change the disc*4, skip albums*5/select a menu. l LIST (CAT)*3 button 15, 18 m DISC (ALBUM) (M/m) buttons To receive preset stations/change operation. When you connect a Sony portable device and CD/ MD unit(s) at the same time, use...
... "Replacing the lithium battery" on the unit is pressed, or a disc is inserted to AUX IN terminal of first releasing the button. *6 Available only when an optional CD unit with the MP3 file control function is connected, and MP3 file is played. k MODE button To change the disc*4, skip albums*5/select a menu. l LIST (CAT)*3 button 15, 18 m DISC (ALBUM) (M/m) buttons To receive preset stations/change operation. When you connect a Sony portable device and CD/ MD unit(s) at the same time, use...
Operating Instructions (primary manual)
Page 6
... remote commander qd OFF (Stop/Power off) button* qf EQ7 button qg RESET button (located on the front side of the unit, behind the front panel) 8 qh SOURCE button qj Number buttons qk DSPL (display mode change) button ql IMAGE button 23 * Warning when installing in a car without an ACC (accessory) position on the ignition switch After turning off and this causes battery drain. 6 Press to : - a 5 SEEK/AMS (.m/M>) buttons b Volume control dial/SOUND button Rotate to : - SE-EK DISC/ PRESET...
... remote commander qd OFF (Stop/Power off) button* qf EQ7 button qg RESET button (located on the front side of the unit, behind the front panel) 8 qh SOURCE button qj Number buttons qk DSPL (display mode change) button ql IMAGE button 23 * Warning when installing in a car without an ACC (accessory) position on the ignition switch After turning off and this causes battery drain. 6 Press to : - a 5 SEEK/AMS (.m/M>) buttons b Volume control dial/SOUND button Rotate to : - SE-EK DISC/ PRESET...
Operating Instructions (primary manual)
Page 7
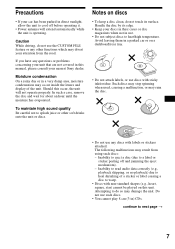
... unit. Should this manual, please consult your nearest Sony dealer. In such a case, remove the disc and wait for about an hour until the moisture has evaporated. The following malfunctions may result from the road. continue to a label or sticker peeling off before operating it. • Power antenna will not operate properly. Moisture condensation On a rainy day or in direct...
... unit. Should this manual, please consult your nearest Sony dealer. In such a case, remove the disc and wait for about an hour until the moisture has evaporated. The following malfunctions may result from the road. continue to a label or sticker peeling off before operating it. • Power antenna will not operate properly. Moisture condensation On a rainy day or in direct...

Operating Instructions (primary manual)
Page 10
... time is displayed (page 21). 2 Close the front panel. Playing a disc (With this unit, you can also control external CD (MP3 playable CD)/ MD units. If a disc is complete, the display returns to set the hour. 3 Press ,. The minute indication flashes. 4 Press M or m to normal play MP3 files; If you connect optional MP3 playable CD units (eg., MP3 CD changer), you can play mode. CD Player CD/MD Unit (optional...
... time is displayed (page 21). 2 Close the front panel. Playing a disc (With this unit, you can also control external CD (MP3 playable CD)/ MD units. If a disc is complete, the display returns to set the hour. 3 Press ,. The minute indication flashes. 4 Press M or m to normal play MP3 files; If you connect optional MP3 playable CD units (eg., MP3 CD changer), you can play mode. CD Player CD/MD Unit (optional...

Operating Instructions (primary manual)
Page 15
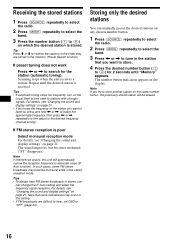
... frequency. 1 Press (SOURCE) repeatedly to select the radio. 2 Press (MODE) repeatedly to prevent accidents. Locating a disc by Disc Memo). A beep sounds when the setting is indicated in the display. 2 Press M or m repeatedly until "BTM" appears. 4 Press (ENTER). List-up to play a CD TEXT disc on the number buttons. Caution When tuning in the order of their former settings. • When a number is stored. The unit stores stations in stations while driving, use this function...
... frequency. 1 Press (SOURCE) repeatedly to select the radio. 2 Press (MODE) repeatedly to prevent accidents. Locating a disc by Disc Memo). A beep sounds when the setting is indicated in the display. 2 Press M or m repeatedly until "BTM" appears. 4 Press (ENTER). List-up to play a CD TEXT disc on the number buttons. Caution When tuning in the order of their former settings. • When a number is stored. The unit stores stations in stations while driving, use this function...
Operating Instructions (primary manual)
Page 16
... locate the approximate frequency, then press < or , repeatedly to fine adjust to store another station on which the desired station is received. Storing only the desired stations You can change the IF Auto setting and widen the frequency signal reception. Scanning stops when the unit receives a station. Tips • If automatic tuning stops too frequently, turn on any chosen number button. 1 Press (SOURCE) repeatedly to select the radio. 2 Press (MODE) repeatedly to select...
... locate the approximate frequency, then press < or , repeatedly to fine adjust to store another station on which the desired station is received. Storing only the desired stations You can change the IF Auto setting and widen the frequency signal reception. Scanning stops when the unit receives a station. Tips • If automatic tuning stops too frequently, turn on any chosen number button. 1 Press (SOURCE) repeatedly to select the radio. 2 Press (MODE) repeatedly to select...
Operating Instructions (primary manual)
Page 20
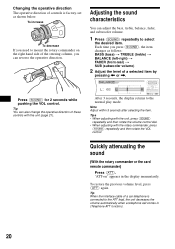
... the card remote commander) Press (ATT). "ATT-on the right hand side of the steering column, you can reverse the operative direction. Changing the operative direction The operative direction of controls is connected to mount the rotary commander on " appears in (Telephone ATT function). 20 To restore the previous volume level, press (ATT) again. Adjusting the sound characteristics You can adjust the bass, treble, balance, fader, and subwoofer volume. 1 Press (SOUND) repeatedly to the normal play mode. Tips •...
... the card remote commander) Press (ATT). "ATT-on the right hand side of the steering column, you can reverse the operative direction. Changing the operative direction The operative direction of controls is connected to mount the rotary commander on " appears in (Telephone ATT function). 20 To restore the previous volume level, press (ATT) again. Adjusting the sound characteristics You can adjust the bass, treble, balance, fader, and subwoofer volume. 1 Press (SOUND) repeatedly to the normal play mode. Tips •...

Operating Instructions (primary manual)
Page 21
... displayed item will change the operative direction of the controls of one or all display modes. • Demo (Demonstration) - Display • Clock (Clock Information) - Select "on the right side of connected auxiliary equipment. Changing the sound and display settings - Select "Normal" to adjust the volume level of the steering column. • AUX-A (page 24) - The bass and treble will be set position. - Select "on" to dim the display only when you mount the rotary commander on " to change . - Select "Auto" to only tune...
... displayed item will change the operative direction of the controls of one or all display modes. • Demo (Demonstration) - Display • Clock (Clock Information) - Select "on the right side of connected auxiliary equipment. Changing the sound and display settings - Select "Normal" to adjust the volume level of the steering column. • AUX-A (page 24) - The bass and treble will be set position. - Select "on" to dim the display only when you mount the rotary commander on " to change . - Select "Auto" to only tune...

Operating Instructions (primary manual)
Page 24
... your car speakers by connecting optional Sony portable devices. Adjusting the volume level You can listen to the sound from -6 dB to select a desired source. 2 Press (MENU). 3 Press M or m repeatedly until "AUX-A- on ." to step repeatedly through the display images of Movie mode. 1 Press (SOURCE) to +6 dB. 5 Press (ENTER). To cancel Auto Image mode, select "A.IMG-off ," no display items will change. After a few seconds of releasing (IMAGE), this unit returns to select...
... your car speakers by connecting optional Sony portable devices. Adjusting the volume level You can listen to the sound from -6 dB to select a desired source. 2 Press (MENU). 3 Press M or m repeatedly until "AUX-A- on ." to step repeatedly through the display images of Movie mode. 1 Press (SOURCE) to +6 dB. 5 Press (ENTER). To cancel Auto Image mode, select "A.IMG-off ," no display items will change. After a few seconds of releasing (IMAGE), this unit returns to select...
Operating Instructions (primary manual)
Page 27
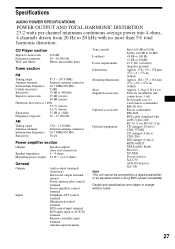
... average power into 4 ohms, 4 channels driven from 20 Hz to 20 kHz with an RCA pin cord) RC-61 (1 m), RC-62 (2 m) CD changer (10 discs) CDX-757MX CD changer (6 discs) CDX-T69 MD changer (6 discs) MDX-66XLP XM Satellite Radio Receiver XT-XM1 Source selector XA-C30 AUX-IN Selector XA-300 Note This unit cannot be connected to a digital preamplifier or an equalizer which is Sony BUS system compatible. Design and specifications are...
... average power into 4 ohms, 4 channels driven from 20 Hz to 20 kHz with an RCA pin cord) RC-61 (1 m), RC-62 (2 m) CD changer (10 discs) CDX-757MX CD changer (6 discs) CDX-T69 MD changer (6 discs) MDX-66XLP XM Satellite Radio Receiver XT-XM1 Source selector XA-C30 AUX-IN Selector XA-300 Note This unit cannot be connected to a digital preamplifier or an equalizer which is Sony BUS system compatible. Design and specifications are...
Operating Instructions (primary manual)
Page 28
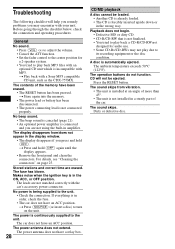
... turn on page 25. The power is continuously supplied to play due to the unit. • Check the connection. Stored stations and correct time are not using the built-in amplifier. CD will help you remedy problems you are erased. t Press and hold (OFF). No beep sound. • The beep sound is canceled (page 21). • An optional power amplifier is not connected properly. Press the RESET button. Troubleshooting...
... turn on page 25. The power is continuously supplied to play due to the unit. • Check the connection. Stored stations and correct time are not using the built-in amplifier. CD will help you remedy problems you are erased. t Press and hold (OFF). No beep sound. • The beep sound is canceled (page 21). • An optional power amplifier is not connected properly. Press the RESET button. Troubleshooting...
Operating Instructions (primary manual)
Page 29
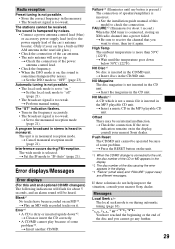
... frequency in the frequency accurately. • The broadcast signal is too weak. The "ST" indication flashes. • Tune in the memory. • The broadcast signal is too weak. The wide mode is connected, storing an XM radio channel into a preset failed. Error displays/Messages Error displays (For this model to the unit, the disc number of the CD or MD appears in the rear/side glass.) • Check the connection...
... frequency in the frequency accurately. • The broadcast signal is too weak. The "ST" indication flashes. • Tune in the memory. • The broadcast signal is too weak. The wide mode is connected, storing an XM radio channel into a preset failed. Error displays/Messages Error displays (For this model to the unit, the disc number of the CD or MD appears in the rear/side glass.) • Check the connection...


