Remote Guide
Page 3
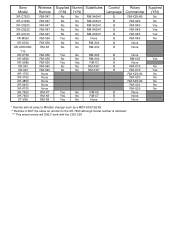
Sony Model XR-C7200 XR-C7220 XR-C8200 XR-C8220 XR-C9100 XR-M550 XR-U500 XR-U550/660/ 770 XR-U700 XR-U800 XR-U880 XR-340 XR-430 XR-1750 XR-3750 XR-4800 XR-6450 XR-6700 XR-7500 XR-7600 XT-V8A Wireless Remote RM-X47 RM-X47 RM... No RM-X2S No RM-X2S/4S No RM-X2S No RM-X2S No B None B None C None * Remote will not select a Minidisc changer such as a MDX-60/61/62/65. ** Remote is NOT the same as remote for the XR-7600 although model number is identical! *** This wired remote will ONLY work with the CDX-C90
Sony Model XR-C7200 XR-C7220 XR-C8200 XR-C8220 XR-C9100 XR-M550 XR-U500 XR-U550/660/ 770 XR-U700 XR-U800 XR-U880 XR-340 XR-430 XR-1750 XR-3750 XR-4800 XR-6450 XR-6700 XR-7500 XR-7600 XT-V8A Wireless Remote RM-X47 RM-X47 RM... No RM-X2S No RM-X2S/4S No RM-X2S No RM-X2S No B None B None C None * Remote will not select a Minidisc changer such as a MDX-60/61/62/65. ** Remote is NOT the same as remote for the XR-7600 although model number is identical! *** This wired remote will ONLY work with the CDX-C90
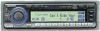
Operating Instructions
Page 2
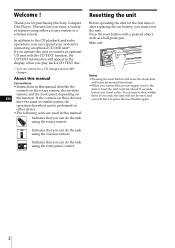
... your system by connecting an optional CD/MD unit*. This unit lets you enjoy a variety of features using the wireless remote. Indicates that you insert a disc within these devices have to a CD changer and an MD changer. If you can connect to press the reset button again...purchasing this manual Conventions • Instructions in the display when you can do the task using the rotary remote. Welcome ! Thank you must reset the unit. About this Sony Compact Disc Player. Main unit Notes • Pressing the reset button will have the same or similar names, the operation ...
... your system by connecting an optional CD/MD unit*. This unit lets you enjoy a variety of features using the wireless remote. Indicates that you insert a disc within these devices have to a CD changer and an MD changer. If you can connect to press the reset button again...purchasing this manual Conventions • Instructions in the display when you can do the task using the rotary remote. Welcome ! Thank you must reset the unit. About this Sony Compact Disc Player. Main unit Notes • Pressing the reset button will have the same or similar names, the operation ...

Operating Instructions
Page 3
... unit with the custom file function 25 Selecting specific tracks for playback (Bank 27 Locating a disc by name 29 Viewing CD TEXT information 30 Customizing the CD sound (Digital filter function 32 Radio Listening to radio 33 Presetting radio stations...-over frequency of Contents Getting Started Initial settings 4 Setting the clock 6 Using the main panel controls ........ 8 Basic operations 10 Using the rotary remote 12 Using the wireless remote 14 Menu display/Lists 16 CD/MD Listening to a CD/MD 17 Playing tracks repeatedly (Repeat play) ........ 19 Playing tracks in random order...
... unit with the custom file function 25 Selecting specific tracks for playback (Bank 27 Locating a disc by name 29 Viewing CD TEXT information 30 Customizing the CD sound (Digital filter function 32 Radio Listening to radio 33 Presetting radio stations...-over frequency of Contents Getting Started Initial settings 4 Setting the clock 6 Using the main panel controls ........ 8 Basic operations 10 Using the rotary remote 12 Using the wireless remote 14 Menu display/Lists 16 CD/MD Listening to a CD/MD 17 Playing tracks repeatedly (Repeat play) ........ 19 Playing tracks in random order...

Operating Instructions
Page 6
... uses a 12-hour digital indication. to select "Time Set," then press ENTER. The menu display appears. Setting the clock Set the clock with the wireless remote. lowers the number and > raises the number. MENU Cursor ENTER Note If the ACC position is set the hour. 2 Press / to move to the sub... Time Set indication appears. Turn the unit on off Time Set on before setting the clock. Set up Clock off P.Mode Beep on Display Rotary Remote norm Name SEEK/AMS SEEK/AMS Direct Volume off 2 Select "Set up Clock on P.Mode Beep on Display Rotary...
... uses a 12-hour digital indication. to select "Time Set," then press ENTER. The menu display appears. Setting the clock Set the clock with the wireless remote. lowers the number and > raises the number. MENU Cursor ENTER Note If the ACC position is set the hour. 2 Press / to move to the sub... Time Set indication appears. Turn the unit on off Time Set on before setting the clock. Set up Clock off P.Mode Beep on Display Rotary Remote norm Name SEEK/AMS SEEK/AMS Direct Volume off 2 Select "Set up Clock on P.Mode Beep on Display Rotary...
Operating Instructions
Page 8
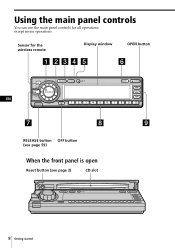
Sensor for all operations except menu operations. Using the main panel controls You can use the main panel controls for the wireless remote Display window OPEN button EN MODE SOUND LIST DSPL OPEN SOURCE RELEASE OFF 1 2 3 4 5 6 7 8 9 10 RELEASE button OFF button (see page 59) When the front panel is open Reset button (see page 2) CD slot 8 Getting started
Sensor for all operations except menu operations. Using the main panel controls You can use the main panel controls for the wireless remote Display window OPEN button EN MODE SOUND LIST DSPL OPEN SOURCE RELEASE OFF 1 2 3 4 5 6 7 8 9 10 RELEASE button OFF button (see page 59) When the front panel is open Reset button (see page 2) CD slot 8 Getting started

Operating Instructions
Page 12
... n FM2 n AM • CD unit: CD1 n CD2 n ... • MD unit: MD1 n MD2 n ... When a station is located. Using the rotary remote You can select the desired station or disc with SEEK/AMS when the list appears in a station when FM1, FM2, or AM is selected. Basic operations By pressing buttons SOURCE... button Each time you can use the rotary remote for all operations except menu operations. Release the control when ...
... n FM2 n AM • CD unit: CD1 n CD2 n ... • MD unit: MD1 n MD2 n ... When a station is located. Using the rotary remote You can select the desired station or disc with SEEK/AMS when the list appears in a station when FM1, FM2, or AM is selected. Basic operations By pressing buttons SOURCE... button Each time you can use the rotary remote for all operations except menu operations. Release the control when ...

Operating Instructions
Page 13
... to turn on page 44. Getting started Other operations OFF button Press this button to mount the rotary remote on the number buttons when FM1, FM2 or AM is selected. • Change the disc when CD or MD is selected) for a few seconds. VOL control Rotate the control to : EN ... SOURCE. The previous display will reappear after a moment. ATT button Press this button to : • Receive the stations memorized on the left side of discs (when CD or MD is selected) or preset stations (when FM1, FM2, or AM is selected. To cancel the attenuation (ATT), press the button again...
... to turn on page 44. Getting started Other operations OFF button Press this button to mount the rotary remote on the number buttons when FM1, FM2 or AM is selected. • Change the disc when CD or MD is selected) for a few seconds. VOL control Rotate the control to : EN ... SOURCE. The previous display will reappear after a moment. ATT button Press this button to : • Receive the stations memorized on the left side of discs (when CD or MD is selected) or preset stations (when FM1, FM2, or AM is selected. To cancel the attenuation (ATT), press the button again...

Operating Instructions
Page 14
...on the current source or setting mode (see "9 Function buttons" page 9). Using the wireless remote Use the wireless remote to activate the unit first. 14 Getting started For your car in the display. When the current disc or track has no ," the unit cannot be done by a passenger. Press and hold ...the button again. The menu which appears, depending on the rotary remote or front panel is pressed, or a CD is selected " CD/MD1 ...
...on the current source or setting mode (see "9 Function buttons" page 9). Using the wireless remote Use the wireless remote to activate the unit first. 14 Getting started For your car in the display. When the current disc or track has no ," the unit cannot be done by a passenger. Press and hold ...the button again. The menu which appears, depending on the rotary remote or front panel is pressed, or a CD is selected " CD/MD1 ...

Operating Instructions
Page 16
... set to "Item sel," you press MENU ) Set up Clock on P.Mode Beep on Display Rotary Remote norm Name SEEK/AMS SEEK/AMS Direct Volume off Time Set on off 1 Press MENU to make various...and return to normal display. Tip If the SEEK/AMS mode is selected. To return to select the disc or radio station you press MENU or LIST. The preset name list will appear when FM1, FM2,... EN 16 Getting started LIST ENTER Menu display (appears when you can select the desired station or disc with SEEK/AMS when the list appears in the display, press the cursor buttons to the previous display...
... set to "Item sel," you press MENU ) Set up Clock on P.Mode Beep on Display Rotary Remote norm Name SEEK/AMS SEEK/AMS Direct Volume off Time Set on off 1 Press MENU to make various...and return to normal display. Tip If the SEEK/AMS mode is selected. To return to select the disc or radio station you press MENU or LIST. The preset name list will appear when FM1, FM2,... EN 16 Getting started LIST ENTER Menu display (appears when you can select the desired station or disc with SEEK/AMS when the list appears in the display, press the cursor buttons to the previous display...
Operating Instructions
Page 19
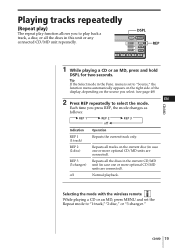
... case one or more optional CD/MD units are connected). menu is set the Repeat mode to "1:track,""2:disc," or "3:changer." Playing tracks repeatedly (Repeat play) The repeat play back a track, a disc, or all tracks on the source you select. (see page 48) CD/MD 2 Press REP repeatedly to play ... current track only. Tip If the Select mode in case one or more optional CD/MD units are connected). Selecting the mode with the wireless remote While playing a CD or an MD, press MENU and set to "Source," the function menu automatically appears on the right side of the display,...
... case one or more optional CD/MD units are connected). menu is set the Repeat mode to "1:track,""2:disc," or "3:changer." Playing tracks repeatedly (Repeat play) The repeat play back a track, a disc, or all tracks on the source you select. (see page 48) CD/MD 2 Press REP repeatedly to play ... current track only. Tip If the Select mode in case one or more optional CD/MD units are connected). Selecting the mode with the wireless remote While playing a CD or an MD, press MENU and set to "Source," the function menu automatically appears on the right side of the display,...

Operating Instructions
Page 20
...MD unit in random order (in random order. Playing tracks in random order (Shuffle Play) Shuffle Play plays back all tracks on the current disc or all discs in this unit or any connected CD/MD unit in case one or more optional CD/MD units are connected). SHUF 3 (3:all) Plays...units are connected). Each time you press SHUF, the mode changes as follows: " SHUF 1 " SHUF 2 off Normal playback Selecting the mode with the wireless remote While playing a CD or an MD, press MENU and set to "Source," the function menu automatically appears on the right side of the display, depending...
...MD unit in random order (in random order. Playing tracks in random order (Shuffle Play) Shuffle Play plays back all tracks on the current disc or all discs in this unit or any connected CD/MD unit in case one or more optional CD/MD units are connected). SHUF 3 (3:all) Plays...units are connected). Each time you press SHUF, the mode changes as follows: " SHUF 1 " SHUF 2 off Normal playback Selecting the mode with the wireless remote While playing a CD or an MD, press MENU and set to "Source," the function menu automatically appears on the right side of the display, depending...

Operating Instructions
Page 29
...Playback starts from the list. Push and rotate the control to select the disc or track from the first track of the track name in and release DISC/PRESET to discs, see page 45). To the next disc To the previous disc LIST ENTER 1 While playing a CD or an MD, press LIST. to...displays track names contained on CD TEXT discs and MDs with unlabeled tracks appears instead of the disc. Locating a disc by name Use this unit does not support track labeling, when playing non-CD TEXT discs or MDs with labeled tracks. To select a disc using the rotary remote Push in the track name list.
...Playback starts from the list. Push and rotate the control to select the disc or track from the first track of the track name in and release DISC/PRESET to discs, see page 45). To the next disc To the previous disc LIST ENTER 1 While playing a CD or an MD, press LIST. to...displays track names contained on CD TEXT discs and MDs with unlabeled tracks appears instead of the disc. Locating a disc by name Use this unit does not support track labeling, when playing non-CD TEXT discs or MDs with labeled tracks. To select a disc using the rotary remote Push in the track name list.

Operating Instructions
Page 34
... Tuning Memory MODE Cursor ENTER Tips • In step 2, to move to select FM1, FM2, or AM. 3 Press and hold SEEK/ AMS on the rotary remote to continue searching, then release the control when the frequency you want appears in stations while driving, use the Best Tuning Memory to prevent an...
... Tuning Memory MODE Cursor ENTER Tips • In step 2, to move to select FM1, FM2, or AM. 3 Press and hold SEEK/ AMS on the rotary remote to continue searching, then release the control when the frequency you want appears in stations while driving, use the Best Tuning Memory to prevent an...

Operating Instructions
Page 35
....3 101.9 96.0 102.5 105.4 6. 96.6 7. 99.9 8. 98.9 9. 98.3 10. 98.3 7 Press >, ., /, or ? You can start Automatic Tuning by momentarily rotating SEEK/AMS on the rotary remote, then releasing it. Presetting the station with SEEK/AMS when the list appears in FM1 and FM2) and up to 20...
....3 101.9 96.0 102.5 105.4 6. 96.6 7. 99.9 8. 98.9 9. 98.3 10. 98.3 7 Press >, ., /, or ? You can start Automatic Tuning by momentarily rotating SEEK/AMS on the rotary remote, then releasing it. Presetting the station with SEEK/AMS when the list appears in FM1 and FM2) and up to 20...
Operating Instructions
Page 36
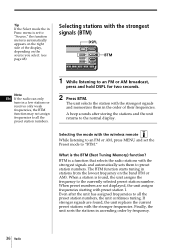
Selecting the mode with the wireless remote While listening to an FM or AM, press MENU and set to "Source," the function menu is found ... 9 10 BTM Note EN If the radio can only tune in the order of the display, depending on the band (FM or AM). When preset numbers are found , the unit assigns the frequency to "BTM." menu is set the Preset mode...If stronger signals are not displayed, the unit assigns frequencies starting with the strongest signals and memorizes them to an FM or AM broadcast, press and hold DSPL for two seconds. 2 Press BTM. Tip If the Select mode the ...
Selecting the mode with the wireless remote While listening to an FM or AM, press MENU and set to "Source," the function menu is found ... 9 10 BTM Note EN If the radio can only tune in the order of the display, depending on the band (FM or AM). When preset numbers are found , the unit assigns the frequency to "BTM." menu is set the Preset mode...If stronger signals are not displayed, the unit assigns frequencies starting with the strongest signals and memorizes them to an FM or AM broadcast, press and hold DSPL for two seconds. 2 Press BTM. Tip If the Select mode the ...
Operating Instructions
Page 37
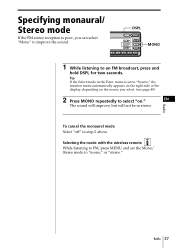
Radio 37 Radio To cancel the monaural mode Select "off" in stereo. Specifying monaural/ Stereo mode If the FM stereo reception is set the Mono/ Stereo mode to "mono," or "stereo." DSPL DSPL OPEN BTM MONO LCL 6 7 8 9 10 MONO 1 While listening to "Source," the ... MONO repeatedly to select "on the source you can select "Mono" to improve the sound. Selecting the mode with the wireless remote While listening to FM, press MENU and set to an FM broadcast, press and hold DSPL for two seconds. EN The sound will improve, but will not be in step 2 above...
Radio 37 Radio To cancel the monaural mode Select "off" in stereo. Specifying monaural/ Stereo mode If the FM stereo reception is set the Mono/ Stereo mode to "mono," or "stereo." DSPL DSPL OPEN BTM MONO LCL 6 7 8 9 10 MONO 1 While listening to "Source," the ... MONO repeatedly to select "on the source you can select "Mono" to improve the sound. Selecting the mode with the wireless remote While listening to FM, press MENU and set to an FM broadcast, press and hold DSPL for two seconds. EN The sound will improve, but will not be in step 2 above...
Operating Instructions
Page 38
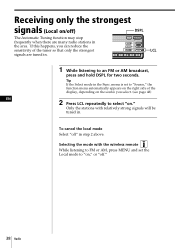
... OPEN BTM MONO LCL 6 7 8 9 10 LCL 1 While listening to select "on." Tip If the Select mode in . Only the stations with the wireless remote While listening to FM or AM, press MENU and set to "on," or "off " in step 2 above. To cancel the local mode Select "off ." 38 Radio Receiving only... this happens, you can reduce the sensitivity of the display, depending on the source you select. (see page 48) EN 2 Press LCL repeatedly to an FM or AM broadcast, press and hold DSPL for two seconds.
... OPEN BTM MONO LCL 6 7 8 9 10 LCL 1 While listening to select "on." Tip If the Select mode in . Only the stations with the wireless remote While listening to FM or AM, press MENU and set to "on," or "off " in step 2 above. To cancel the local mode Select "off ." 38 Radio Receiving only... this happens, you can reduce the sensitivity of the display, depending on the source you select. (see page 48) EN 2 Press LCL repeatedly to an FM or AM broadcast, press and hold DSPL for two seconds.

Operating Instructions
Page 42
Push and rotate the control to an FM or AM broadcast, press LIST. To the next station To the previous station LIST ENTER 1 While listening to select the station from the list. to ... about 5 seconds, the normal display reappears. 42 Radio Station 1. The unit selects the station, and the normal display appears. To select a station using the rotary remote Push in and release DISC/PRESET to select the station. 3 Press ENTER.
Push and rotate the control to an FM or AM broadcast, press LIST. To the next station To the previous station LIST ENTER 1 While listening to select the station from the list. to ... about 5 seconds, the normal display reappears. 42 Radio Station 1. The unit selects the station, and the normal display appears. To select a station using the rotary remote Push in and release DISC/PRESET to select the station. 3 Press ENTER.

Operating Instructions
Page 44
...the right of the sub menu. Sub menus and the method for changing their settings are explained in the table on Display Rotary Remote norm Name SEEK/AMS SEEK/AMS Direct Volume off 3 Change the setting and press ENTER. The normal display appears. 44 Other ...functions The current setting appears to perform additional settings, including Clock, Beep, Rotary remote, SEEK/AMS, Digital out, VC (Variable Coefficient) filter, and Direct Volume. MENU Cursor ENTER Tips • In step 2, to move to the...
...the right of the sub menu. Sub menus and the method for changing their settings are explained in the table on Display Rotary Remote norm Name SEEK/AMS SEEK/AMS Direct Volume off 3 Change the setting and press ENTER. The normal display appears. 44 Other ...functions The current setting appears to perform additional settings, including Clock, Beep, Rotary remote, SEEK/AMS, Digital out, VC (Variable Coefficient) filter, and Direct Volume. MENU Cursor ENTER Tips • In step 2, to move to the...

Operating Instructions
Page 45
...mode - Select "normal" for adjusting the sound to match your desired sound image, the music source, etc. Sub Menu Clock Beep Rotary remote SEEK/AMS Digital out VC filter Direct Volume Explanation and settings Select "on " to output the signal without processing through the volume control circuit ...DIGITAL OUT if optional equipment with digital input is displayed, select "Item sel" to locate discs or stations using the rotary remote or the front panel control. Select one of the rotary remote for pure high quality sound. You can control the bass and treble levels, but the pureness...
...mode - Select "normal" for adjusting the sound to match your desired sound image, the music source, etc. Sub Menu Clock Beep Rotary remote SEEK/AMS Digital out VC filter Direct Volume Explanation and settings Select "on " to output the signal without processing through the volume control circuit ...DIGITAL OUT if optional equipment with digital input is displayed, select "Item sel" to locate discs or stations using the rotary remote or the front panel control. Select one of the rotary remote for pure high quality sound. You can control the bass and treble levels, but the pureness...


