Instruction Manual
Page 3
...Hand-look quilt stitch 38 - 39 Straight stitch with FUTURA Multi hoop 94 - 101 Control panel when embroidering 102 - 103 Helpful messages when embroidering 104 - 105 4. PREPARATION FOR EMBROIDERY SEWING Before attaching embroidery unit 64 - 67 Attaching embroidery foot, Inserting the bobbin, Threading the top thread, ...112 - 113 Special accessories 114 - 115 Helpful messages 116 - 117 For European version Sewing machine Dimensions: 567 mm × 240 mm × 317 mm Mass of the equipment: 10.8 kg Embroidery unit Dimensions: 504 mm × 411 mm × 141 mm Mass of software 78...
...Hand-look quilt stitch 38 - 39 Straight stitch with FUTURA Multi hoop 94 - 101 Control panel when embroidering 102 - 103 Helpful messages when embroidering 104 - 105 4. PREPARATION FOR EMBROIDERY SEWING Before attaching embroidery unit 64 - 67 Attaching embroidery foot, Inserting the bobbin, Threading the top thread, ...112 - 113 Special accessories 114 - 115 Helpful messages 116 - 117 For European version Sewing machine Dimensions: 567 mm × 240 mm × 317 mm Mass of the equipment: 10.8 kg Embroidery unit Dimensions: 504 mm × 411 mm × 141 mm Mass of software 78...
Instruction Manual
Page 8
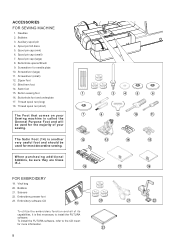
... 13. Bobbins 21. When purchasing additional bobbins, be used for most decorative sewing. To install the FUTURA software, refer to install the FUTURA software. ACCESSORIES FOR SEWING MACHINE 1. Thread spool net (long) 18. Embroidery software CD 19 To utilize the embroidery function and all of your sewing. Screwdriver for more information. 8 2 3 4 5 6 8 9 10 11 13 14 15 17 18...
... 13. Bobbins 21. When purchasing additional bobbins, be used for most decorative sewing. To install the FUTURA software, refer to install the FUTURA software. ACCESSORIES FOR SEWING MACHINE 1. Thread spool net (long) 18. Embroidery software CD 19 To utilize the embroidery function and all of your sewing. Screwdriver for more information. 8 2 3 4 5 6 8 9 10 11 13 14 15 17 18...
Instruction Manual
Page 24
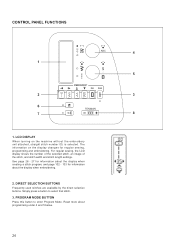
...3. See page 26 - 27 for information about the display when creating a stitch program, and page 102 - 103 for regular sewing, programming and embroidering. Simply press a button to enter Program Mode. LCD DISPLAY When turning on the display changes for information about...24 Read more about the display when embroidering. 2. CONTROL PANEL FUNCTIONS 4 1 5 2 3 6 7 8 1. The information on the machine without the embroidery unit attached, straight stitch number 00, is selected. DIRECT SELECTION BUTTONS Frequently used stitches are available by the direct selection buttons.
...3. See page 26 - 27 for information about the display when creating a stitch program, and page 102 - 103 for regular sewing, programming and embroidering. Simply press a button to enter Program Mode. LCD DISPLAY When turning on the display changes for information about...24 Read more about the display when embroidering. 2. CONTROL PANEL FUNCTIONS 4 1 5 2 3 6 7 8 1. The information on the machine without the embroidery unit attached, straight stitch number 00, is selected. DIRECT SELECTION BUTTONS Frequently used stitches are available by the direct selection buttons.
Instruction Manual
Page 64
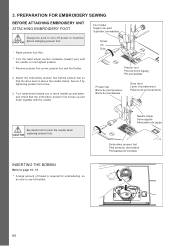
... presseur Barra de prensatelas Drive lever Levier d'entraînement Palanca de accionamiento Be careful not to machine CAUTION before changing presser foot. * Raise presser foot lifter. 3. PREPARATION FOR EMBROIDERY SEWING BEFORE ATTACHING EMBROIDERY UNIT ATTACHING EMBROIDERY FOOT Foot holder Support du pied Sujetador prensatelas Always be sure to move needle up and down , and...
... presseur Barra de prensatelas Drive lever Levier d'entraînement Palanca de accionamiento Be careful not to machine CAUTION before changing presser foot. * Raise presser foot lifter. 3. PREPARATION FOR EMBROIDERY SEWING BEFORE ATTACHING EMBROIDERY UNIT ATTACHING EMBROIDERY FOOT Foot holder Support du pied Sujetador prensatelas Always be sure to move needle up and down , and...
Instruction Manual
Page 68
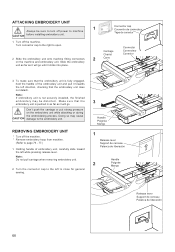
... Conector 3. Don't push the carriage or put strong pressure on the machine and embroidery unit. REMOVING EMBROIDERY UNIT * Turn off the machine. Turn the connector cap to the left direction, checking that the embroidery unit is pushed in as far as it will go until it will... as far as it clicks into place. Carriage Chariot 2. Make sure that the embroidery unit does not detach. Turn off the machine. * Remove embroidery hoop from machine. (Refer to close for general sewing. 3 Handle Poignée Mango 1 Release lever Support de cerceau Palanca de liberación Handle...
... Conector 3. Don't push the carriage or put strong pressure on the machine and embroidery unit. REMOVING EMBROIDERY UNIT * Turn off the machine. Turn the connector cap to the left direction, checking that the embroidery unit is pushed in as far as it will go until it will... as far as it clicks into place. Carriage Chariot 2. Make sure that the embroidery unit does not detach. Turn off the machine. * Remove embroidery hoop from machine. (Refer to close for general sewing. 3 Handle Poignée Mango 1 Release lever Support de cerceau Palanca de liberación Handle...
Instruction Manual
Page 80
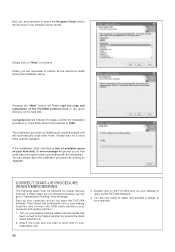
...during the installation set-up the FUTURA Software. 4. Please wait for the software will be followed for proper start the copy and installation of available space on the hard disk. Boot up protocol. Next attach the embroidery unit to your sewing machine and connect the USB cable between ...your computer, but do not open up . You are not followed precisely, you will finally start -up your computer and sewing machine. 1. Now you are prompted to select the...
...during the installation set-up the FUTURA Software. 4. Please wait for the software will be followed for proper start the copy and installation of available space on the hard disk. Boot up protocol. Next attach the embroidery unit to your sewing machine and connect the USB cable between ...your computer, but do not open up . You are not followed precisely, you will finally start -up your computer and sewing machine. 1. Now you are prompted to select the...
Instruction Manual
Page 82
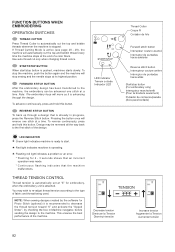
... and bobbin thread every time the machine stops at "E" for embroidery, when the embroidery unit is pushed, machines starts slowly. REVERSE STITCH BUTTON To back up through the design. LED indicator Témoin a diode Indicador LED LED INDICATOR Green light indicates machine is ready to the machine. NOTE: When sewing designs created by checking the box...
... and bobbin thread every time the machine stops at "E" for embroidery, when the embroidery unit is pushed, machines starts slowly. REVERSE STITCH BUTTON To back up through the design. LED indicator Témoin a diode Indicador LED LED INDICATOR Green light indicates machine is ready to the machine. NOTE: When sewing designs created by checking the box...

Instruction Manual
Page 94
...in the FUTURA software that will allow embroidery data which is larger than a single embroidery hoop to be sent to the machine to stitch out, while making it easy to re-hoop the fabric so that each other . See Fig. 1. If the fabric is too large for the hoop, it and sew accordingly. Mark...perfect 90 degree angles. A single hoop appears on cross lines that is slightly askew, this system will therefore sew the design to re-hoop the fabric with #1 in up exactly. This embroidery data may be a single design that have been marked onto the fabric. The Multi-Hoop feature splits the ...
...in the FUTURA software that will allow embroidery data which is larger than a single embroidery hoop to be sent to the machine to stitch out, while making it easy to re-hoop the fabric so that each other . See Fig. 1. If the fabric is too large for the hoop, it and sew accordingly. Mark...perfect 90 degree angles. A single hoop appears on cross lines that is slightly askew, this system will therefore sew the design to re-hoop the fabric with #1 in up exactly. This embroidery data may be a single design that have been marked onto the fabric. The Multi-Hoop feature splits the ...

Instruction Manual
Page 96
... the hoop there is built into the hoop, aligning cross lines of data 1 within the guide line markings of the hoop there are referred to Machine" tool on the inner hoop. These marks are markings which indicates the exact center of the first hoop section). 4. Fig. 3 Fig. 3 Fig. 3 Fig.... the fabric as the design parts flow out of the hoop. Guide lines are two sets of the embroidery data that is a Center Hoop line which together define the maximum sewing area for Multiple Hooping. Set fabric and stabilizer into the software. (Additional numbered hoops will appear as ...
... the hoop there is built into the hoop, aligning cross lines of data 1 within the guide line markings of the hoop there are referred to Machine" tool on the inner hoop. These marks are markings which indicates the exact center of the first hoop section). 4. Fig. 3 Fig. 3 Fig. 3 Fig.... the fabric as the design parts flow out of the hoop. Guide lines are two sets of the embroidery data that is a Center Hoop line which together define the maximum sewing area for Multiple Hooping. Set fabric and stabilizer into the software. (Additional numbered hoops will appear as ...
Instruction Manual
Page 102
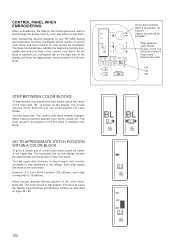
... color block, press the center of the first stitch in the design. GO TO APPROXIMATE STITCH POSITION WITHIN A COLOR BLOCK To go to your FUTURA sewing and embroidery machine, the display shows number of current color block and total number of the display will show the approximate current position in the color block. "BL...
... color block, press the center of the first stitch in the design. GO TO APPROXIMATE STITCH POSITION WITHIN A COLOR BLOCK To go to your FUTURA sewing and embroidery machine, the display shows number of current color block and total number of the display will show the approximate current position in the color block. "BL...
Instruction Manual
Page 106
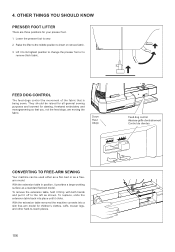
... THINGS YOU SHOULD KNOW PRESSER FOOT LIFTER There are moving the fabric. bed or as shown. With the extension table removed the machine converts into place until it provides a large working surface as a flat- To replace, slide the extension table back into a slim free... Haut Abajo Feed dog control Abaisse-griffe d'entraînement Control de dientes CONVERTING TO FREE-ARM SEWING Your machine can be raised for all general sewing purposes and lowered for darning, freehand embroidery and monogramming so that is being sewn. FEED DOG CONTROL The feed dogs control the movement of ...
... THINGS YOU SHOULD KNOW PRESSER FOOT LIFTER There are moving the fabric. bed or as shown. With the extension table removed the machine converts into place until it provides a large working surface as a flat- To replace, slide the extension table back into a slim free... Haut Abajo Feed dog control Abaisse-griffe d'entraînement Control de dientes CONVERTING TO FREE-ARM SEWING Your machine can be raised for all general sewing purposes and lowered for darning, freehand embroidery and monogramming so that is being sewn. FEED DOG CONTROL The feed dogs control the movement of ...


