Instruction Manual
Page 3
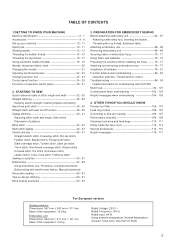
... version Sewing machine Dimensions: 567 mm × 240 mm × 317 mm Mass of the equipment: 10.8 kg Embroidery unit Dimensions: 504 mm × 411 mm × 141 mm Mass of patterns Blind stitch 42 - 43 Multi-stitch zigzag 42 - 43 Stretch stitches 44 - 51 Straight stretch stitch, Overedge stitch, Ric-rac stitch, Feather stitch, Blanket stitch, Honeycomb stitch, Slant overedge stitch, Turkish stitch...
... version Sewing machine Dimensions: 567 mm × 240 mm × 317 mm Mass of the equipment: 10.8 kg Embroidery unit Dimensions: 504 mm × 411 mm × 141 mm Mass of patterns Blind stitch 42 - 43 Multi-stitch zigzag 42 - 43 Stretch stitches 44 - 51 Straight stretch stitch, Overedge stitch, Ric-rac stitch, Feather stitch, Blanket stitch, Honeycomb stitch, Slant overedge stitch, Turkish stitch...
Instruction Manual
Page 24
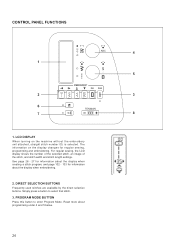
... machine without the embroidery unit attached, straight stitch number 00, is selected. CONTROL PANEL FUNCTIONS 4 1 5 2 3 6 7 8 1. Simply press a button to enter Program Mode. Read more about the display when embroidering. 2. PROGRAM MODE BUTTON Press this button to select that stitch. 3. For regular sewing, the LCD display shows the number of the selected stitch, an image of the stitch...
... machine without the embroidery unit attached, straight stitch number 00, is selected. CONTROL PANEL FUNCTIONS 4 1 5 2 3 6 7 8 1. Simply press a button to enter Program Mode. Read more about the display when embroidering. 2. PROGRAM MODE BUTTON Press this button to select that stitch. 3. For regular sewing, the LCD display shows the number of the selected stitch, an image of the stitch...
Instruction Manual
Page 82
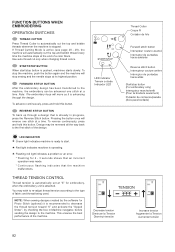
...and hold this button. If Thread Cutting Mode is stopped. FORWARD STITCH BUTTON After the embroidery design has been transferred to the machine, the embroidery can be reversed all the way back to the first stitch of a color block. LED indicator Témoin a diode ...stitch button Interrupteur couture arrière interruptor de puntadas hacia atrás Start/stop sewing and the needle stops at a time. This ensures the best performance of fabric and thread being used. To stop the machine, push the button again and the machine will stop button (For embroidery...
...and hold this button. If Thread Cutting Mode is stopped. FORWARD STITCH BUTTON After the embroidery design has been transferred to the machine, the embroidery can be reversed all the way back to the first stitch of a color block. LED indicator Témoin a diode ...stitch button Interrupteur couture arrière interruptor de puntadas hacia atrás Start/stop sewing and the needle stops at a time. This ensures the best performance of fabric and thread being used. To stop the machine, push the button again and the machine will stop button (For embroidery...

Instruction Manual
Page 94
...as í lo requieren los datos de diseño. These lines will now be used to set the fabric into the hoop and will therefore sew the design to the alignment of the fabric. Por favor Note: una línea delgada es muy importante para la precisión del resultado ...marquage Línea de cruce Cross line Ligne de marquage. Multi-Hoop Multi-Hooping is a special feature in the FUTURA software that will allow embroidery data which is larger than a single embroidery hoop to be sent to the machine to stitch out, while making it easy to re-hoop the fabric so that each other .
...as í lo requieren los datos de diseño. These lines will now be used to set the fabric into the hoop and will therefore sew the design to the alignment of the fabric. Por favor Note: una línea delgada es muy importante para la precisión del resultado ...marquage Línea de cruce Cross line Ligne de marquage. Multi-Hoop Multi-Hooping is a special feature in the FUTURA software that will allow embroidery data which is larger than a single embroidery hoop to be sent to the machine to stitch out, while making it easy to re-hoop the fabric so that each other .
Instruction Manual
Page 102
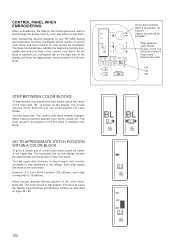
..., press OK. As the block is shown on the control panel are used to your FUTURA sewing and embroidery machine, the display shows number of current color block and total number of the first stitch in the color block, press OK. The current color block number changes. Turn the upper...step equals one tenth of the current color block. CONTROL PANEL WHEN EMBROIDERING When embroidering, the dials on the display. The hoop moves to stitch position Allez à la position de couture Vaya a la posición de puntada Step between the transferred color blocks, press the center...
..., press OK. As the block is shown on the control panel are used to your FUTURA sewing and embroidery machine, the display shows number of current color block and total number of the first stitch in the color block, press OK. The current color block number changes. Turn the upper...step equals one tenth of the current color block. CONTROL PANEL WHEN EMBROIDERING When embroidering, the dials on the display. The hoop moves to stitch position Allez à la position de couture Vaya a la posición de puntada Step between the transferred color blocks, press the center...


