Singer XL-400 FUTURA Support and Manuals
Get Help and Manuals for this Singer item
View All Support Options Below
Free Singer XL-400 FUTURA manuals!
Problems with Singer XL-400 FUTURA?
Ask a Question
Free Singer XL-400 FUTURA manuals!
Problems with Singer XL-400 FUTURA?
Ask a Question
Most Recent Singer XL-400 FUTURA Questions

Flashing Amber Lights Saying Pc. Has Worked Great And No Cant Get Dezigns.
(Posted by bonnierae4 8 years ago)
Singer XL-400 FUTURA Videos

Singer Futura XL 400 Reviews | Singer Futura 400 Discount | Singer XL-400 Futura
Duration: 2:07
Total Views: 433
Duration: 2:07
Total Views: 433
Singer XL 400 Futura Sewing Machine
Duration: 1:08
Total Views: 372
Duration: 1:08
Total Views: 372
Singer XL-400 Futura Embroidery Machine Software Demo
Duration: 6:53
Total Views: 20,009
Duration: 6:53
Total Views: 20,009
Popular Singer XL-400 FUTURA Manual Pages
Instruction Manual - Page 2
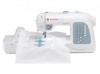
...servicing adjustments mentioned in the instruction manual." 19. "Switch the sewing machine off or unplug the appliance when leaving it has been dropped or damaged, or dropped into water. "Always unplug sewing machine from the electrical outlet when removing covers, lubricating, or when making any opening." 8. Moving parts-To machine."
This appliance complies with this sewing machine...
Instruction Manual - Page 5

...stabilizer 66 - 69 Preparing the machine before installing the hoop -------- 70 - 71 Attaching and removing embroidery hoop 70 - 71 Installation of software 72 - 75 Operation switches when embroidery unit is attached ----- 76 - 77 Operation switches, Thread tension control Troubleshooting 78 - 87 Helpful information for embroidering with hard-to free-arm sewing 98 - 99 Performance checklist...
Instruction Manual - Page 12
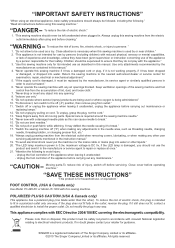
...into the cord socket (1) and your machine the first time. NOTE: In sewing mode, the machine can be disconnected from needle plate area before using sewing machine only.
Spool Bobine Carrete
Felt disc...When servicing the machine, or when changing needles or lights, etc., the machine must be operated either
with a spool cap to wipe off any surplus oil from the power supply. Set ...
Instruction Manual - Page 24

... stitching is recommended for buttonholes to adjust the tension control.
Helpful Hint: A slight adjustment to remove the foot. 2.
Push presser foot release button to a higher number or a lower number may improve sewing appearance. Do this, however, only after you do not need to set at E. Make all adjustments with the foot holder. 3.
ADJUSTING...
Instruction Manual - Page 28

... be activated if it is to locate each manual adjustment point, the LED will blink 3 times in red beyond the potential adjustment range. At each of the potential adjustments. Stitch length and width/needle position controls
*Auto/Default settings Your sewing machine will produce most of your preference. When a pattern is selected, it is...
Instruction Manual - Page 30
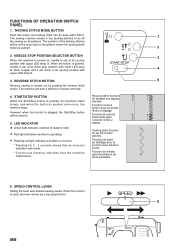
... flashing indicates that the machine malfunctions. SPEED CONTROL LEVER
Sliding the lever sets desired sewing speed. START/STOP BUTTON
When the Start/Stop button is pushed, the machine starts slowly, and when... BUTTON
3
When the machine is turned on, needle is operating.
Flashing red light indicates a problem or an error. * Flashing for tie-off
1
the sewing on all patterns. LED...
Instruction Manual - Page 34
... aid for all types of the fabric, stop button F. Start/stop the sewing machine. Stitch length control I J
4
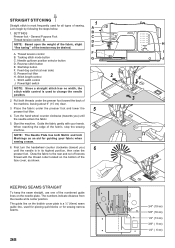
NOTE: Since a straight stitch has no width, the
stitch width control is a ¼" (6mm) seam guide line, used for piecing quilt blocks or for sewing narrow seams.
32
3/4" (19 mm) 5/8" (16 mm) 1/2" (13 mm) 3/8" ( 9 mm) 1/4" ( 6 mm) Power...
Instruction Manual - Page 36

Helpful Hint: Slight adjusting of the needle position to sew closer to the piping may be accomplished with desired top stitching color.
2. Thread bobbin with the Stitch Width Control. Set the stitich length at 4 (maximum).
5. To sew down the right side, attach left side of zipper foot to presser foot holder so that the needle...
Instruction Manual - Page 38

... stabilizer to help avoid stitches puckering the fabric. Use a backing of thread being used for satin stitching. Under side Côté de dessous Reverso
Top side Côté de dessus Cara
ADJUSTING STITCH WIDTH AND LENGTH
is values set automatically when pattern (No. 03) is the selection range when setting the value manually. Slightly...
Instruction Manual - Page 40

... fully
to the left. If it does
A
not, adjust the guide (B) on the right side of the fabric. S
- Regular blind stitch for soft, stretchable fabrics
1. NOTE: For a narrower or wider blind hem, first manually adjust the length and width controls to sew blind hem. NOTE: It takes practice to your desired length and...
Instruction Manual - Page 74
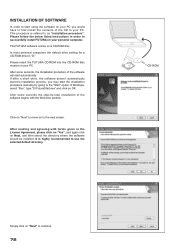
...-ROM disc.
Please follow the below listed instructions in your PC. The FUTURA software comes on to the next screen.
CD-ROM
Simply click on OK.
If after a short while, the software doesn't automatically start the installation process, you may start the installation procedure manually by -step installation of the software begins with terms given in the License Agreement...
Instruction Manual - Page 76

... your embroidery unit.
3. Next attach the embroidery unit to your machine. Turn on your computer and then follow steps 1 through 4 above.
74
The installation procedure is . If the installation utility identifies a lack of the FUTURA software files to the given directory on "Next" to 100%. You are now ready to select and transmit a design to your sewing machine and...
Instruction Manual - Page 78
... hacia atrás
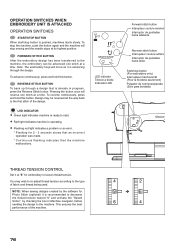
Start/stop sewing and the needle stops at "E" for embroidery to the type of the machine.
76
Note: The embroidery hoop will move as it at its... OPERATION SWITCHES WHEN EMBROIDERY UNIT IS ATTACHED
OPERATION SWITCHES
START/STOP BUTTON When start .
Red light indicates machine is operating.
Flashing red light indicates a problem or an error. * Flashing for...
Instruction Manual - Page 84

... stitches without any thread (blank stitches) before it automatically stops.
The hoop will move back one stitch at a time. Restart the embroidery machine and continue embroidering. HELPFUL INFORMATION FOR EMBROIDERING WITH FUTURA
1. Computer screen says thread is broken, machine lights are missing
If the embroidery machine detects that the thread is not in the thread tension. If...
Instruction Manual - Page 100

...as a standard flat-bed model. To replace, slide the extension table back into a slim free-arm model for children's clothes, ...model. FEED DOG CONTROL
The feed dogs control the movement of the fabric that you, not the feed dogs, are three positions for darning, freehand embroidery... the machine converts into place until it to its highest position to change the presser foot or to sew. 2....
Singer XL-400 FUTURA Reviews
We have not received any reviews for Singer yet.