Singer 3323S Talent Support and Manuals
Get Help and Manuals for this Singer item
View All Support Options Below
Free Singer 3323S Talent manuals!
Problems with Singer 3323S Talent?
Ask a Question
Free Singer 3323S Talent manuals!
Problems with Singer 3323S Talent?
Ask a Question
Popular Singer 3323S Talent Manual Pages
Instruction Manual - Page 2

... electrical outlet when removing covers, lubricating, or when making any other user servicing adjustments mentioned in the instruction manual. 11.
Do not allow to break. 9. Special care is damaged, it must be followed, including the following: Read all instructions before using this sewing machine. The wrong plate can cause the needle to ensure that is not...
Instruction Manual - Page 6
...
Machine Basics Principle Parts of the Machine...2/4 Connecting Machine to Power Source ...6 Two Step Presser Foot Lifter ...8 Accessories ...9
Threading the Machine Winding the Bobbin...11 Inserting the Bobbin ...13 Threading the Upper Thread ...15 Automatic Needle Threader ...17 Raising the Bobbin Thread ...19 Thread Tension...21
Sewing How to Choose Your Pattern ...23 Stitch Width Dial & Stitch...
Instruction Manual - Page 30

... available on page 31.
Pattern Selector Dial
ABCDE FGH I JK
ABCDE FGH I JK
S1
23 The blue indicates that the stitch is a stretch stitch pattern, and information on how to sew these stretch patterns is on the machine. Stitch Width Dial c. a
b
c
d
a. Stitches in the bottom row of the diagram are indicated on the Pattern Selector Dial in...
Instruction Manual - Page 32

... longer stitch length when sewing heavier weight fabrics or when using a finer needle or thread.
2
25
4 3 2 1 0.5 "6". (1) The Stitch Width Dial is also the control for zigzag stitching is full left. Neat zig-zag stitches are usually achieved at "3" or below. (2)
Dense zig-zag stitches are called satin stitches. (2)
1
Function of stitch length dial while zig-zag stitching
Set the Pattern...
Instruction Manual - Page 34

EN Sewing Straight Stitch
To begin sewing, set the machine for straight stitch. (1) Place the fabric under the presser foot with the fabric edge lined up with the desired seam guide line on the needle plate. (2) Lower the presser foot lifter, and then step on the foot controller to start sewing. (3)
1
2
3
27
Instruction Manual - Page 38

EN Choosing Stretch Stitch Patterns
The Stretch Stitch Patterns are two examples:
Straight Stretch Stitch (1)
Set the Pattern Selector Dial to between "3" and "6". To select these stitches, turn the Stitch Length Dial to stretch and hardwearing seams.
The machine sews two stitches forward and one stitch backwards. Ric Rac (2)
1
Set the Pattern Selector Dial to the desired pattern. Though ...
Instruction Manual - Page 40

... to sew slowly on the right of the folded fabric.
Blind hem for heavier weight fabrics. Generally, a narrower stitch is used for lighter weight fabrics, and a wider stitch is completed and press. 2
Note:
To make sure the machine settings are normally sewn with the range shown on curtains, trousers, skirts, etc. Blind hem for part number...
Instruction Manual - Page 42

... fabric (a) with the
tailor's chalk, attach the buttonhole foot, and set the Pattern Selector Dial to " ". Lower the presser foot and start the machine. 7. Once sewing is done in the order (D). 8. Sew a test first to " ". While lightly holding the upper thread, start sewing.
*Set the stitch width to match the diameter of the gimp thread.
4. Using tailor...
Instruction Manual - Page 44

... with about 10 stitches. EN Sewing on Buttons
Install the darning plate. (1) Change the all purpose foot to the button sewing foot. (2) Set the stitch length to check that the needle goes cleanly into the left and right holes of the button. Set the machine for straight stitch again, then sew a few securing stitches to finish. Adjust the stitch width, as illustrated...
Instruction Manual - Page 46

....
- Setting stitch length to a longer setting will help produce more gathering is required, loosen the upper thread tension to gather more of straight stitches.
- Remove the presser foot shank. (1)
- Attach the gathering foot.
- Pull the lower thread to below 2 so that the lower thread lies on the under side of the material. EN Gathering
- Sew...
Instruction Manual - Page 48

A darning hoop is accomplished without the sewing machine internal feed system. Stippling: Set the machine for easier sewing and better results. Note: Free motion darning is recommended for straight stitch. It is controlled by 90° and sew over previous stitching.
Movement of the fabric is necessary to right. Press the darning/ embroidery foot on firmly from left to...
Instruction Manual - Page 50

...Feed Foot Accessory
Always try to sew first without the Even Feed Foot accessory which should fit into the presser foot bar. Your sewing machine offers excellent stitch quality on your left to raise ... is easier to guide the fabric and you have a better view of the seam when using the standard, regular foot on a wide range of fabrics from your machine.
iv) Replace and tighten (clockwise...
Instruction Manual - Page 52

... feeding.
1 Run machine slowly and start sewing from the below of
the side cutter fits the presser shank (e) and is secured in place. b a
c
d
e
g
f
2
Note: The side cutter can only be used with the regular zigzag stitch or the overlock stitches.
2~3 cm
3
4
45 Adjust the stitch width and the stitch length according to slide aside. Guide the fabric...
Instruction Manual - Page 58

...double knits. Replace needle often (approximately every other garment ) and/ or at first thread breakage or skipped stitches.
51
leathers ...
SINGER® 2020 Standard sharp needles. Natural and synthetic woven fabrics, polyester blends.
For best sewing ...EN Needle/ Fabric/ Thread Chart
NEEDLE, FABRIC, THREAD SELECTION GUIDE
NEEDLE SIZE 9-11 (70-80)
FABRICS
Lightweight fabrics-thin ...
Instruction Manual - Page 63
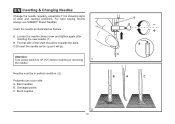
... towards the back.
Attention:
Turn power switch to off ("O") before inserting or removing
1
the needle.
The flat side of wear and causing problems. For best sewing results always use SINGER® Brand Needles. Damaged points C. Insert the needle as illustrated as it is showing signs of the shaft should be in perfect condition...
Singer 3323S Talent Reviews
We have not received any reviews for Singer yet.