Singer 1512 PROMISE Support and Manuals
Get Help and Manuals for this Singer item

View All Support Options Below
Free Singer 1512 PROMISE manuals!
Problems with Singer 1512 PROMISE?
Ask a Question
Free Singer 1512 PROMISE manuals!
Problems with Singer 1512 PROMISE?
Ask a Question
Most Recent Singer 1512 PROMISE Questions

Drawing Up Bobbin Thread
We cannnot get wheel on top rt to turn toward us to draw up bobbin thread. Help! This is brand new m...
We cannnot get wheel on top rt to turn toward us to draw up bobbin thread. Help! This is brand new m...
(Posted by louannbenware 7 years ago)

How To Thread The Machine
(Posted by Longue 9 years ago)

Popular Singer 1512 PROMISE Manual Pages
Instruction Manual - Page 2

... the supply cord that they have been given supervision or instruction concerning use bent needles. 8. An appliance should never be used as contained in . 2. Switch the sewing machine off the machine or unplug when the machine is damaged, it
must be replaced by a person responsible for its service agent or a similar qualified person in this appliance only...
Instruction Manual - Page 6

EN List of contents
Machine Basics Principle Parts of the Machine ...9/11 Connecting Machine to Power Source ...13 Two Step Presser Foot Lifter ...15 Accessories ...16
Threading the Machine Winding the Bobbin ...18 Inserting the Bobbin ...20 Threading the Upper Thread ...22 Raising the Bobbin Thread ...24 Thread Tension...26
Sewing How to Choose Your Pattern ...28 Sewing Straight Stitch ...30...
Instruction Manual - Page 9
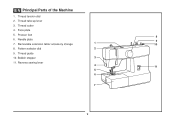
Face plate
5. Needle plate
9
7. Thread guide
10. Thread take-up lever
3. Removable extension table/ accessory storage
1
10
8. Thread cutter
4. Bobbin stopper
3
11. Pattern selector dial
2
9. Reverse sewing lever
4
11
5
6
7
9 EN Principal Parts of the Machine
1. Thread tension dial
2. Presser foot 8
6.
Instruction Manual - Page 13

... the plug in the outlet, reverse the plug. Foot control The foot control pedal regulates the sewing speed. (3)
Attention: Consult a qualified electrician if in doubt of electric shock, this plug is...appropriate polarized outlet. (2)
Attention: Unplug power cord when machine is not in use . To reduce the risk of how to connect machine to install the proper outlet. If it does not
fit fully ...
Instruction Manual - Page 22

... correctly as by not doing so several sewing problems could result. - Draw thread from spool through the slotted eye of the take-up left through the thread guide to the rear beyond the needle eye....(5) During this movement pass thread from front to hold the thread between the spool and thread guide. - Trim thread to descend. EN Threading the Upper Thread
This is a simple operation but...
Instruction Manual - Page 26

... up. Normal thread tension for zig zag and decorative sewing. C. Normal thread tension for straight stitch sewing. For all decorative sewing you do not need to good sewing.
- B. Turn
dial to lower number. Turn
dial to higher number. Lower thread tension
The bobbin tension has been set correctly at the factory, so you will be less...
Instruction Manual - Page 30
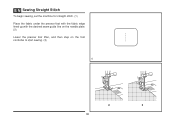
EN Sewing Straight Stitch
To begin sewing, set the machine for straight stitch. (1) Place the fabric under the presser foot with the fabric edge lined up with the desired seam guide line on the needle plate. (2) Lower the presser foot lifter, and then step on the foot controller to start sewing. (3)
1
2
3
30
Instruction Manual - Page 32

... reverse stitches. Release the lever and the machine will sew forward again. (1)
A
Removing the Work
Turn the handwheel toward you (counterclockwise) to bring
the thread take up lever to its highest position and the needle begins to cut. (3)
32
2 B
3 Guide the threads to the side of a seam, press down to descend, raise the...
Instruction Manual - Page 38

... then sew through the back two holes.
3
4
38 EN Sewing on Buttons
Install the darning plate. (1) Change the all purpose foot to button sewing foot. (2)
Position the work , then tie off manually. Set the Pattern...a darning needle on top of the
1
2
button and sew. (4)
For buttons with about 10 stitches. (3)
Bring the thread tails to check if the needle goes into the right and left hole of ...
Instruction Manual - Page 40

... (to secure
the threads). (5)
First row: Always work by the operator. Stippling: Set the machine for easier sewing and better results.
1
2
Note: Free motion darning is accomplished without the sewing machine internal feed system.
Using the optional darning/ embroidery foot will help guide you as you sew, in a meandering fashion to create small curving lines to coordinate...
Instruction Manual - Page 46

EN Needle/ Fabric/ Thread Chart
NEEDLE, FABRIC, THREAD SELECTION GUIDE
NEEDLE SIZE 9-11 (70-80)
FABRICS
Lightweight fabrics-thin cottons, voile, ... vinyl, upholstery. (Leaves smaller hole than standard large needle.)
Note : 1. SINGER® 2032 Leather needles. 12 (80) to medium).
For best sewing results always use the same thread on natural woven fabrics for best
Heavyweight fabrics-...
Instruction Manual - Page 49

... darning plate must be used. For normal sewing, remove the darning plate. EN Darning Plate
For certain types of darning/embroidery foot)
49 Install the darning plate as an optional accessory from authorized SINGER® retailers. (See page 16 for part number of work, (e.g. For free-motion sewing it is recommended to use a darning/embroidery...
Instruction Manual - Page 51

The flat side of wear and causing problems. For best sewing results always use SINGER® Brand Needles. Attention:
1
Turn power switch to off ("O") before inserting or...Insert the needle as illustrated as it is showing signs of the shaft should be in perfect condition. (2)
Problems can occur with: A. Bent needles B. C/D.Insert the needle as far up as follows:
A. Damaged points ...
Instruction Manual - Page 53

... Bulb
Disconnect the machine from the power supply by removing the plug from the main socket! Replace bulb with same type rated 10 watts (110-120V area) or 15 watts (220-240V area).
- Loosen screw (A) as illustrated. (1) -
Unscrew the bulb and install a new one (C). (3) - Should there be any problem, consult your authorized SINGER®
retailer...
Instruction Manual - Page 55

.... 1. Replace the needle. Wrong needle size for the fabric. 4. The thread tension is not threaded correctly. 2. The needle size must suit the fabric and thread. 4. Select a better quality thread. 2. The thread is too tight. 3. Lower thread breaks
1.
Select a larger needle. 4. Check and attach correctly. 1. Correct the thread tension. 1. EN Troubleshooting Guide
Problem Upper thread...
Singer 1512 PROMISE Reviews
We have not received any reviews for Singer yet.