Get support for Singer XL-550 Futura

Singer XL-550 Futura Support Question

Singer XL-550 Futura Support Question

Find answers below for this question about Singer XL-550 Futura.
Need a Singer XL-550 Futura manual? We have 1 online manual for this item!
Question posted by Loltmanmurphy on August 26th, 2023

The Usb Cable Hooked Up To The Sewing Machine From The Computer Keeps Saying The

The person who posted this question about this Singer product did not include a detailed explanation. Please use the "Request More Information" button to the right if more details would help you to answer this question.

Current Answers

Answer #1: Posted by SonuKumar on August 26th, 2023 11:34 PM
This answer was accepted by the poster of the original question.
SonuKumar

Member since:
May 9th, 2021

Points: 16,620,300
1,100
points
https://www.manualslib.com/manual/739440/Singer-Futura-Xl-550.html

or

The error message "Transmission Pending" on the Singer XL-550 Futura sewing machine means that the machine is not receiving the embroidery design from the computer. There are a few things you can check to troubleshoot this problem:

Make sure that the USB cable is properly connected to both the machine and the computer.

Make sure that the software is compatible with the machine.

Try restarting the machine and the computer.

If you are still having trouble, contact Singer customer support.

Here are some additional tips for troubleshooting the "Transmission Pending" error:

Make sure that the USB cable is not damaged.

Try using a different USB cable.

Try connecting the machine to a different USB port on the computer.

Try updating the software.

If you are using a USB hub, try connecting the machine directly to the computer.

If you have checked all of these things and the machine is still giving the "Transmission Pending" error, then you may need to take it to a qualified technician for further diagnosis.

Here are some of the possible causes of the "Transmission Pending" error:

A problem with the USB cable.

A problem with the software.

A problem with the machine itself.

If the USB cable is damaged, it will not be able to transmit data between the machine and the computer. If the software is not compatible with the machine, it will not be able to communicate with the machine. And if there is a problem with the machine itself, it will not be able to receive the embroidery design from the computer.

If you are not sure what is causing the problem, you can try contacting Singer customer support for help. They will be able to help you troubleshoot the problem and find a solution.


Please respond to my effort to provide you with the best possible solution by using the "Acceptable Solution" and/or the "Helpful" buttons when the answer has proven to be helpful.

Regards,
Sonu
Your search handyman for all e-support needs!!

Related Singer XL-550 Futura Manual Pages

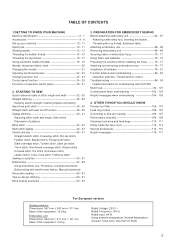
Instruction Manual - Page 3

... Keeping seams straight, Inserting zippers and piping Hand-look quilt stitch 38 - 39 Straight stitch with hard-to free-arm sewing 106 - 107 Performance checklist 108 - 109 Cleaning hook area and feed dogs 110 - 111 Oiling inside the face cover 112 - 113 Special accessories 114 - 115 Helpful messages 116 - 117 For European version Sewing machine...
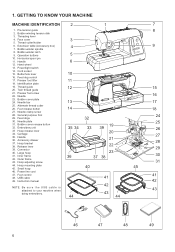
Instruction Manual - Page 6

...33 Hoop release lever 34. Handle 36. Connector 40. Small hoop 40 45 46. USB cable 49. Presser foot screw 22. Foot release button 14 18 27. Needle plate 25... 8. Bobbin cover plate 24. Feed dogs 32 24 30. Accessory drawer 37. GETTING TO KNOW YOUR MACHINE MACHINE IDENTIFICATION 2 1 7 1. Bobbin winding tension disk 3. Operation buttons 5 10. Presser foot lifter 11 ...
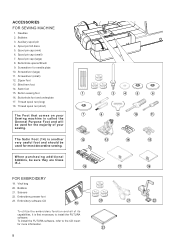
Instruction Manual - Page 8

...Sewing machine is called the General Purpose Foot and will be sure they are Class I5 J. 16 FOR EMBROIDERY 19. Scissors 22. To install the FUTURA software, refer to install the FUTURA... needle plate 10. Vinyl bag 20. Bobbins 21. Bobbins 3. Auxiliary spool pin 4. ACCESSORIES FOR SEWING MACHINE 1. Screwdriver for more information. 8 2 3 4 5 6 8 9 10 11 13 14 ...
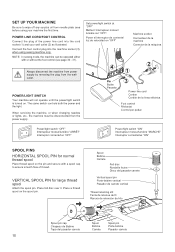
Instruction Manual - Page 10

...Connect the foot control plug into the cord socket (1) and your machine the first time. NOTE: In sewing mode, the machine can be disconnected from the walloutlet. The same switch controls both ... machine socket Connecteur de la machine Conector de la máquina 4 1 2 Pin Butée Pasador 3 Power line cord Cordon Cordón de la linea eléctrica Foot control Rhéostat XL-550-...
Instruction Manual - Page 22

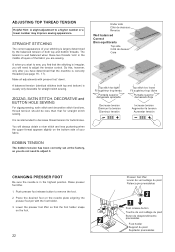
... highest position. Push presser foot release button to a higher number or a lower number may improve sewing appearance. ADJUSTING TOP THREAD TENSION Helpful Hint: A slight adjustment to remove the foot. 2. The ...determined by the balanced tension of your fabric. If, when you start to sew, you find that the machine is correctly threaded (see page 16 - 17). BOBBIN TENSION The bobbin tension...
Instruction Manual - Page 24

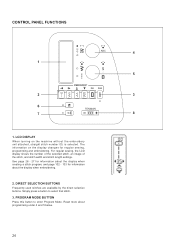
... a button to enter Program Mode. For regular sewing, the LCD display shows the number of the selected stitch, an image of the stitch, and stitch width and stitch length settings. Read more about the display when embroidering. 2. CONTROL PANEL FUNCTIONS 4 1 5 2 3 6 7 8 1. The information on the machine without the embroidery unit attached, straight stitch...
Instruction Manual - Page 26

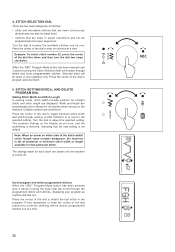
...as it will be programmed into longer sequences. Press repeatedly or keep the center of the dial five times and then turn ,...and can be stitched out. Default numbers are saved until the machine is set to toggle between stitch width and stitch length setting...AND DELETE PROGRAM DIAL Setting Stitch Width and Stitch Length In sewing mode, stitch width (needle position for straight stitch) and ...
Instruction Manual - Page 28

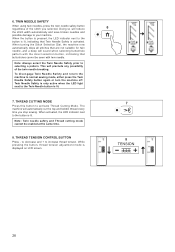
... time. 8. This will sound when selecting buttonhole pattern with twin needle. The machine will reduce the stitch width automatically and save broken needles and possible damage to the button ...Needle Safety and return the machine to increase thread tension. to decrease and + to normal sewing mode, either press the Twin Needle Safety button again or turn the machine off. When activated, the...
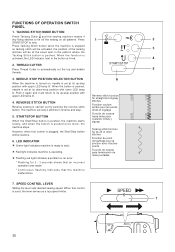
Instruction Manual - Page 30

... with upper LED lamp lit. 4. TACKING STITCH MODE BUTTON Press Tacking Stitch and the sewing machine makes 4 tiny fixing stitches to the button is set at the exact spot in reverse...stop position with upper LED lamp lit. THREAD CUTTER Press Thread Cutter to sew. NEEDLE STOP POSITION SELECTOR BUTTON When the machine is turned on all patterns. When the button is pushed, needle is...
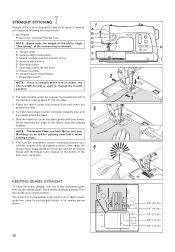
Instruction Manual - Page 36

Start/stop the sewing machine. Thread tension control button I 4 2. Draw the fabric to change the needle position. Tacking stitch mode button C. H I . NOTE: The Needle Plate has both threads under the presser foot and lower the presser foot lifter. 5 4. KEEPING SEAMS STRAIGHT To keep the seam straight, use one of the face cover, as an aid...
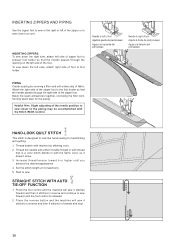
Instruction Manual - Page 38

... until you achieve the desired appearance. 4. Helpful Hint: Slight adjusting of the zipper foot. Press the foot control and the machine will sew 4 stitches in reverse and then 4 stitches in with desired top stitching color. 2. Attach the right side of the zipper foot to the foot holder so ...
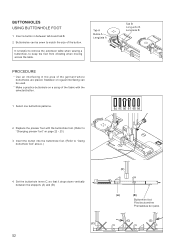
Instruction Manual - Page 52

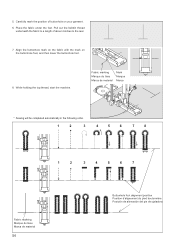
...size of the garment where buttonholes are placed. It is helpful to remove the extension table when sewing a buttonhole, to "Using buttonhole foot" above.) 4. Insert a button in the area of... between tab A and tab B. 2. Insert the button into the buttonhole foot. (Refer to keep the foot from vibrating when moving across the table. Stabilizer or regular interfacing can be used. ...
Instruction Manual - Page 54

... fabric with the mark on your garment. 6. Fabric marking Marque du tissu Marca de material mark Marque Marca * Sewing will be completed automatically in the following order. 1 2 3 4 5 6 7 8 1 2 3 4 ... ojaladora Place the fabric under the foot. While holding the top thread, start the machine. Carefully mark the position of about 4 inches to a length of buttonhole on the...
Instruction Manual - Page 56

Place the fabric between the under the foot and tie off extra length. Sew buttonhole so that zigzag stitches cover the cord. CORDED BUTTONHOLES Hook filler cord (crochet thread or buttonhole twist) over the spur and pull both ends of the buttonhole. 9. Be careful not to open up the fabric ...
Instruction Manual - Page 58

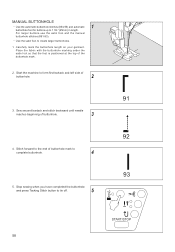
... the foot is positioned at the top of buttonhole. 3 4. Stop sewing when you have completed the buttonhole and press Tacking Stitch button to create larger buttonholes. 1.... end of buttonhole mark to form first bartack and left side of buttonhole. 2 3. Start the machine to complete buttonhole. 4 5. MANUAL BUTTONHOLE * Use the automatic buttonhole stitches (#94-99) and automatic 1 ...
Instruction Manual - Page 80

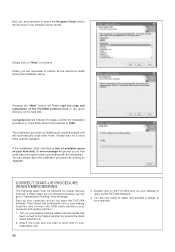
... steps must be stored. Next attach the embroidery unit to your sewing machine and connect the USB cable between your embroidery unit. 3. Attach the hoop that you plan to work with the...where the shortcut for the software will finally start -up the FUTURA Software. 4. If the installation utility identifies a lack of the FUTURA software files to the given directory on "Cancel". Now you ...
Instruction Manual - Page 108

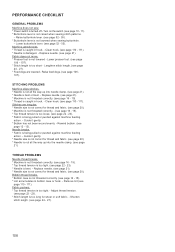
... the needle clamp. (see page 21). * Needle is not raised when sewing stitch patterns. - PERFORMANCE CHECKLIST GENERAL PROBLEMS Machine does not sew. * Power switch is caught in hook. - Turn on the switch. (see page 110 - 111). Machine jams/knocks. * Thread is turned off.- Clean hook. (see page 106 - 107). Raise feed dogs. (see page 110 - 111...
Instruction Manual - Page 110

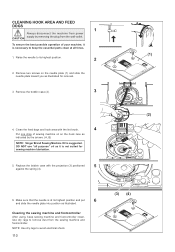
... sure that the needle is at all purpose" oil as illustrated for sewing machine lubrication. 5. DO NOT use "all times. (1) 1. Cleaning the sewing machine and footcontroller After using, keep the essential parts clean at its highest position. 2 2. Clean the feed dogs and hook area with the projection (3) positioned 5 against the spring (4). (2) (A) (B) 6. To ensure the best...
Instruction Manual - Page 112

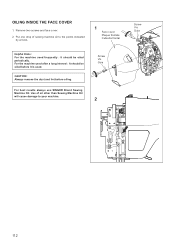
... the dust and lint before it is used frequently : It should be oiled before oiling.  For best results always use SINGER Brand Sewing Machine Oil. Put one drop of oil other than Sewing Machine Oil will cause damage to the points indicated by arrows. 1 Face cover Plaque frontale Cubierta frontal Helpful Hints : For the...
Instruction Manual - Page 120

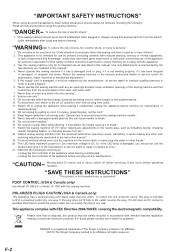
... presser foot, etc." 18. "To avoid electrical shock never put the machine nor the mains cable or mains plug into water or other user servicing adjustments mentioned in a ... to avoid a hazard." 6. Keep ventilation openings of the sewing machine and foot control free from all instructions before carrying out any opening." 8. "This sewing machine should not use of injury, ...

Similar Questions

Lost Embroidery Software And Usb Cable
I have lost the usb cable and the software to install embroidery functions. Where can I purchase rep...
(Posted by tlowe8 7 years ago)
Software Futura Xl-400 And Usb Cable
How can I get Futura XL-400 software to work. Currently, I cannot open software because the (I think...
(Posted by idesktype 10 years ago)
My Singer Xl-550 New Machine Misplaced The Cd Of The Manual.
Dont know what to do with cotton in the bobin when sewing.
(Posted by amedahh 10 years ago)
My Futura Xl550 Will Sew With Foot Pedal But Won't Work With Automatic Button Th
Singer futura xl550 looks as though everything is fine but I can't use the back stitch thread cutter...
(Posted by lnmboutique 10 years ago)
Will The Xl 550 Sew Leather?
(Posted by Anonymous-124276 10 years ago)
Ask a New Question
Use the box below to post a new question about this Singer product .
Points & Prizes
  • You can earn points for nearly everything you do on HelpOwl.com
  • You can trade in those points for gift cards at leading retailers such as Amazon.com and Walmart
  • It's that simple!
See How it Works
Create a Free Account

Singer Manuals

Find free Singer XL-550 Futura manuals and user guides available at ManualOwl.com. Try out our unique manual viewer allowing you to interact with manuals from directly within your browser!

Singer Reviews

View thousands of Singer user reviews and customer ratings available at ReviewOwl.com.

Contact Information

Complete Singer customer service contact information including steps to reach representatives, hours of operation, customer support links and more from ContactHelp.com.

Scoreboard Ratings

See detailed Singer customer service rankings, employee comments and much more from our sister site.