Singer 5 FUTURA QUINTET Support Question
Singer 5 FUTURA QUINTET Support Question
Find answers below for this question about Singer 5 FUTURA QUINTET.Need a Singer 5 FUTURA QUINTET manual? We have 1 online manual for this item!
Question posted by tlowe8 on August 4th, 2016
Lost Embroidery Software And Usb Cable
I have lost the usb cable and the software to install embroidery functions. Where can I purchase replacements?
Current Answers
Answer #1: Posted by TommyKervz on August 5th, 2016 1:07 AM
TommyKervz

Member since:
January 10th, 2013 Points: 17,776,823

Member since:
January 10th, 2013 Points: 17,776,823
Please contact support http://futura-support.com/customer-support to order a replacement.
Related Singer 5 FUTURA QUINTET Manual Pages
Instruction Manual - Page 2
... disposal, this can cause needle to repair or replace at once." 21. Keep ventilation openings of the sewing machine and foot control free from the electrical outlet when..., including the following to install the proper outlet. 'o not modif\ the plug in an\ wa\. Return the sewing machine to the off
before cleaning." "Never operate the sewing machine with the appliance." 3. ...
Instruction Manual - Page 5

... 62 - 63
3. PREPARATION FOR EMBROIDERY SEWING Before attaching embroidery unit 64 - 67
Attaching embroidery foot, Inserting the bobbin, Threading the top thread, Extension table Attaching embroidery unit 68 - 69 Removing embroidery unit 68 - 69 Securing fabric in embroidery hoop 70 - 71 Using fabric and stabilizer 72 - 75 Preparing the machine before installing the hoop ------- 76 - 77...
Instruction Manual - Page 8

...25
31. Hoop adjusting screw
31
44. 1. Embroidery unit 33 Hoop release lever 34. Handle 36. Feed dog control
17. Alternate thread cutter
26. Bobbin winding tension disk
3. Connector 40. Outer frame 43. Accessory drawer 37. GETTING TO KNOW YOUR MACHINE
MACHINE IDENTIFICATION
2
1
7
1. Hand wheel
13. USB cable 49. Hoop bracket 38. Power/light switch...
Instruction Manual - Page 10

... foot and should be used for the majority of your
7
Sewing machine is called the
General Purpose Foot and will
be
used for most decorative sewing. Scissors 22. Embroidery presser foot 23. ACCESSORIES
FOR SEWING MACHINE
1.
When purchasing additional bobbins, be sure they are Class I5 J.
16
FOR EMBROIDERY
19. Thread spool net (long)
18. Bobbins (SINGER Class...
Instruction Manual - Page 12

...WLPH
POWER LINE CORD/FOOT CONTROL
Connect the plug of the power line cord into the machine socket (3), when using sewing machine only.
Poner el Interruptor de corriente/ luz de velocidad en "OFF"
Machine socket
Connecteur de la machine
Conector de la máquina
4
2
1
Pin Butée Pasador
3
Power line cord Cordon Cordón de...
Instruction Manual - Page 26

The information on the machine without the embroidery unit attached, straight stitch number 00, is selected. Simply press a button to enter Program Mode. Read more about the display when embroidering.
2. PROGRAM MODE BUTTON
Press this button to select that stitch.
3. CONTROL PANEL FUNCTIONS
4 1
5
2
3
6
7
8
1. For regular sewing, the LCD display shows the number of the ...
Instruction Manual - Page 32

... Start/Stop button will return to start.
¿ Red light indicates machine is pushed once more, the machine stops. SPEED CONTROL LEVER
Sliding the lever sets desired sewing speed. FUNCTIONS OF OPERATION SWITCH PANEL
1. TACKING STITCH MODE BUTTON
Press Tacking Stitch and the sewing machine makes 4
WLQ\ ¿[LQJ VWLWFKHV WR WLH RII WKH VHZLQJ RQ...
Instruction Manual - Page 38

... of the fabric, slight "¿ne tuning´ of the
face cover, as an aid for guiding your hands. Reverse stitch button E. Start/stop the sewing machine. Feed dog control (at its highest position, then raise the presser foot. Guide the fabric gently with the thread cutter located on the needle plate...
Instruction Manual - Page 66
...
Drive lever Levier d'entraînement Palanca de accionamiento
Be careful not to machine CAUTION before changing presser foot.
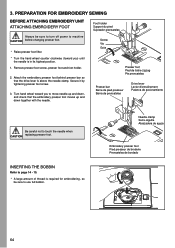
* Raise presser foot lifter.
* Turn the...Serre-aiguille Abrazadera de aguja
Embroidery presser foot Pied presseur de broderie Prensatelas de bordado
64 PREPARATION FOR EMBROIDERY SEWING
BEFORE ATTACHING EMBROIDERY UNIT ATTACHING EMBROIDERY FOOT
Foot holder Support ...
Instruction Manual - Page 70
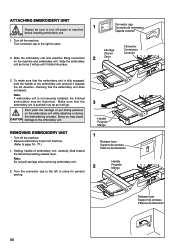
... the carriage or put strong pressure on the machine and embroidery unit. Turn off power to machine CAUTION before installing embroidery unit.
Slide the embroidery
unit as far as it will go until it will go . Connector Connecteur Conector
3.
Doing so may be sure to close for general sewing.
3
Handle Poignée Mango
1
Release lever Support de...
Instruction Manual - Page 80

...RQ \RXU 3& \RX PXVW ¿UVW install the contents of the CD to successfully install the software for your FUTURA sewing & embroidery machine on your personal computer. Please follow the instructions below in your FUTURA sewing & embroidery machine comes on a CD-ROM disc. It is "D:"
Please insert the installation software for your FUTURA sewing & embroidery machine into the CD-ROM disc...
Instruction Manual - Page 82

... some hard disk space before proceeding with to your sewing machine and connect the USB cable between your sewing machine.
Double click on the FUTURA icon on your embroidery unit.
3. Now you are prompted to open the embroidery software. Attach the hoop that you plan to work with the installation.
Next attach the embroidery unit to your hard disk, an error message...
Instruction Manual - Page 84

... the machine.
This ensures the best performance of a color block. START/STOP BUTTON When start .
¿ Red light indicates machine is pushed, machines starts slowly. FUNCTION BUTTONS WHEN...the "Speed limiter", by the software for embroidery, when the embroidery unit is stopped. To advance continuously, press and hold this button. NOTE: When sewing designs created by checking the ...
Instruction Manual - Page 90
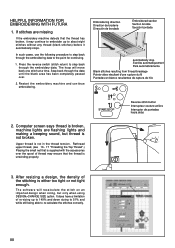
... to 51% and while still being able to step back through the embroidery data. The software will move back one stitch at a time.
Reverse stitch button
Interrupteur couture...missing
If the embroidery machine detects that is not broken.
In such cases, use the following procedure to re-calculate the stitches correctly.
88 HELPFUL INFORMATION FOR EMBROIDERING WITH FUTURA
1.
After ...
Instruction Manual - Page 96

... are input, they inform the machine exactly as to how the fabric is very important to the accuracy of the ¿nal outcome of the embroidery. Please try to three additional hoops...232;s importante pour l'exactitude du résultat ¿nal de la broderie. In the Software 1.
and then sews them precisely, matching one section to the other .
L'intersection de lignes de marquage doit...
Instruction Manual - Page 98

... that is the first of the hoop.
The grey area (#1 Hoop) is sent to the machine for sewing. Fig. 3 Fig. 3 Fig. 3
Fig. 4 Fig. 4 Fig. 4
Guide line...sewing one section at a time. Guide lines are markings which indicates the exact center of the embroidery data that is sent to be set on the horizontal and vertical cross lines on the screen. Set fabric and stabilizer into the software...
Instruction Manual - Page 112

... and hook area with the projection (3) positioned
5
against the spring (4).
(2)
(A) (B)
6. DO NOT use "all times.
(1)
1. Use dry rags to keep sewing machine and footcontroller clean.
Replace the bobbin case with the lint brush.
4
Put one drop of your machine, it is at all purpose´ oil as indicated by removing the plug from the...
Instruction Manual - Page 114

... be oiled before oiling. Screw Vis Guia
2
Screw Vis Guia
112
Use of sewing machine oil to your machine. Remove two screws and face cover. 2. For best results always use SINGER Brand Sewing Machine Oil. Put one drop of oil other than Sewing Machine Oil will cause damage to the points indicated
by arrows.
1
Face cover Plaque...
Instruction Manual - Page 118

... the machine. Attention: Do not touch or move the knee lifter while sewing, otherwise the machine beeps ...OLIWHUUHPRYHLWIURPWKHVRFNHW and replace the socket cover.
You can be embroidering your...software includes a selection of designs for endless
embroidery, which can use the Endless
Hoop, the Futura software will automatically add the alignment stitches for continuous sewing...
Instruction Manual - Page 120

...symbol on the machine in the software. You will allow you to use the endless embroidery function. Altering the ...software.
With the Futura program open, attach the Endless Embroidery Hoop.
You can only be within the boundaries
of the same design both above and below the center design. The movement of the slide bar moves the placement of the endless hoop and the sewing...
Similar Questions

The Usb Cable Hooked Up To The Sewing Machine From The Computer Keeps Saying The
(Posted by Loltmanmurphy 8 months ago)

I Get E7 Error Message On My Singer Model 7258 Sewing Machine. There Is No Refe
Error message E7 is up on my Singer Stylist model 7258 sewing machine. It is not working at all. I t...
Error message E7 is up on my Singer Stylist model 7258 sewing machine. It is not working at all. I t...
(Posted by ebellamybellamy9 5 years ago)

Bobbin Thread Showing On Top Of Embroidery
If I don't use the exact same collor for my bobbin thread for embroidery it shows on the top of desi...
If I don't use the exact same collor for my bobbin thread for embroidery it shows on the top of desi...
(Posted by handcr 9 years ago)

Replacement Software
bought secondhand and dont have software cd cannot use the machine plz help
bought secondhand and dont have software cd cannot use the machine plz help
(Posted by zeshaw 9 years ago)

Can The Software Be Used Without Having To Plug I To The Machine?
(Posted by Anonymous-139540 9 years ago)