Singer 5 FUTURA QUINTET Support Question
Singer 5 FUTURA QUINTET Support Question
Find answers below for this question about Singer 5 FUTURA QUINTET.Need a Singer 5 FUTURA QUINTET manual? We have 1 online manual for this item!
Question posted by handcr on February 4th, 2015
Bobbin Thread Showing On Top Of Embroidery
If I don't use the exact same collor for my bobbin thread for embroidery it shows on the top of design. It never did that until I sent it to Singer to check out noise when & pulling of thread when regular sewing. It doesn't do that anymore but my embroidery stitching is not right. The tention looks like it is off but the manual says when embroidering, don't change tention. HELP
Current Answers
Answer #1: Posted by waelsaidani1 on February 10th, 2015 9:49 AM
waelsaidani1

Member since:
May 12th, 2013 Points: 19,501,787

Member since:
May 12th, 2013 Points: 19,501,787
Unless you are making something that is reversaable you should be using bobbin thread. Using regular thread means you will have to work on adjust the top thread tension. Save yourself time and all the trouble you are having. Top embroidery thread is an expensive option too. With bobbin thread all you really need is white and sometimes black. The bobbin thread pulls the stitch knot to the back of the work and never shows.
Related Singer 5 FUTURA QUINTET Manual Pages
Instruction Manual - Page 2
...$OOULJKWVUHVHUYHG Use only attachments recommended by pulling on disposal, this sewing machine is used or where oxygen is...use as threading needle, changing needle, threading bobbin, or changing presser foot, etc." 18. "Never sew with the appliance." 3. "Always unplug sewing machine from the accumulation of electric shock:"
1.
Keep ventilation openings of the sewing machine...
Instruction Manual - Page 5

... 104 - 105
4. PREPARATION FOR EMBROIDERY SEWING Before attaching embroidery unit 64 - 67
Attaching embroidery foot, Inserting the bobbin, Threading the top thread, Extension table Attaching embroidery unit 68 - 69 Removing embroidery unit 68 - 69 Securing fabric in embroidery hoop 70 - 71 Using fabric and stabilizer 72 - 75 Preparing the machine before installing the hoop ------- 76...
Instruction Manual - Page 8

... 9. Feed dog control
17. Presser foot screw 22. Bobbin cover plate
24. Bobbin cover release button 32. Carriage 35. Small hoop
40
45
46. Instruction manual
41
41
42
42
NOTE: B e s u r e t h e U S B c a b l e i s attached to your machine when doing embroidery.
43
43
44
44
46
47
48
49
6 Threading lever
4. Alternate thread cutter
26. Needle clamp screw
28...
Instruction Manual - Page 10

...) is called the
General Purpose Foot and will
be used for the majority of your
7
Sewing machine is another
12
very useful foot and should be sure they are Class I5 J.
16
FOR EMBROIDERY
19. Bobbins (SINGER Class 15J bobbins) 21. Auxiliary spool pin
4. Zipper foot
13. Satin foot
15. Thread spool net (short)
The Foot that comes on...
Instruction Manual - Page 12

... "OFF"
Mettez l'interrupteur moteur/ lumière sur "OFF". SET UP YOUR MACHINE
Be sure to wipe off any surplus oil from needle plate area EHIRUHXVLQJ\RXUPDFKLQHWKH¿UVWWLPH
POWER LINE CORD/FOOT CONTROL
Connect the plug of the power line cord into the machine socket (3), when using sewing machine only.
Instruction Manual - Page 24

... the machine is in the middle of layers of the fabric you are sewing.
,IZKHQ\RXVWDUWWRVHZ\RX¿QGWKDWWKHVWLWFKLQJLVLUUHJXODU you do not need to adjust the tension control.
You will need to decrease thread tension for buttonholes.
A balanced tension (identical stitches both top and bobbin threads.
Push...
Instruction Manual - Page 32

... to automatically cut the top and bobbin
5
threads.
3. However, when foot control is pushed once more, the machine stops. NEEDLE STOP POSITION SELECTOR BUTTON
When the machine is turned on, needle is carried out by pushing the reverse stitch button. REVERSE STITCH BUTTON
Reverse sewing is set at the exact spot in reverse and stop position...
Instruction Manual - Page 38

... hand wheel counter clockwise (towards you )
until
the needle enters the fabric.
5. Start the machine. SETTINGS Presser foot - Thread tension control button I
4
2.
STRAIGHT STITCHING 00
Straight stitch is a ¼" (6mm) seam guide line, used for piecing quilt blocks or for sewing narrow seams.
36
3/4" (19 mm) 5/8" (16 mm) 1/2" (13 mm) 3/8" ( 9 mm) 1/4" ( 6 mm) Needle up...
Instruction Manual - Page 40

... the reverse button and the machine will sew 4 stitches forward and then 4 stitches in reverse and continue to sew forward until you achieve the desired appearance.
4.
Thread bobbin with the fabric color, so it doesn't show.
3. Start to the piping may be accomplished with thread that is designed to look like hand sewing for the piping.
Needle to left...
Instruction Manual - Page 66
... de bordado
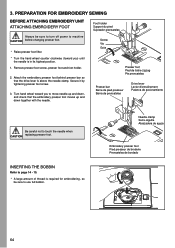
64 PREPARATION FOR EMBROIDERY SEWING
BEFORE ATTACHING EMBROIDERY UNIT ATTACHING EMBROIDERY FOOT
Foot holder Support du pied Sujetador prensatelas
Always be sure to use full bobbin. Turn hand wheel toward you to touch the needle when CAUTION replacing presser foot. INSERTING THE BOBBIN
Refer to page 14 - 15. * A large amount of thread is above the needle...
Instruction Manual - Page 82

...2. Next attach the embroidery unit to your computer and sewing machine.
1. You are now ready to select and transmit a design to your sewing machine and connect the USB cable between your machine.
80 Boot up...UHTXLUHGDFWLRQVDQG will get a "Transmission Pending" error message. Double click on the FUTURA icon on the hard disk. Attach the hoop that you plan to work with the installation...
Instruction Manual - Page 84

... checking the box in progress, press the Reverse Stitch button.
Note: The embroidery hoop will stop button is attached.
THREAD TENSION CONTROL
Thread tension is automatically set at its highest position. START/STOP BUTTON When start .
¿ Red light indicates machine is advancing through a design that the machine malfunctions.
Use auto thread cut the top and bobbin thread...
Instruction Manual - Page 88

...thread to hang up and not advance through the machine. Stop embroidering, remove the hoop and untangle the thread. Upper thread tension is too thick.
EMBROIDERY PATTERN IS MIS-ALIGNED
MACHINE SIDE
HOOP SIDE
Embroidering is continuing when thread... attached when using light or stretch fabric. Thread is obstructed against free motion. Refer to page 20 - 21. Check around the hoop...
Instruction Manual - Page 96

...embroidery data which is larger than a single embroidery hoop to be sent to the machine to stitch out, while making it and sew accordingly. and then sews them precisely, matching one section to as the design... for a slight misalignment in up exactly. Por favor Note: Aparecerán hasta tres aros adicionales si as possible. This embroidery data may be used to set the fabric into the hoop...
Instruction Manual - Page 98

...design data is sent to the machine for sewing. The grey area (#1 Hoop) is the first of the embroidery data that is a Center Hoop line which together define the maximum sewing area for sewing one section at a time. These marks are two sets of the hoop. (See ¿JXUHVDQG
There are referred to Machine... shown uses lettering and designs from the
Design Library that is sent to ...
Instruction Manual - Page 110

...Fabric is caught in bobbin case or hook. - Machine jams/knocks. * Thread is being pulled or pushed against machine feeding
action. - ...thread and fabric. (see page 20). * Machine is not threaded correctly. - (see page 16 - 19). * Top thread tension is caught in hook. - PERFORMANCE CHECKLIST
GENERAL PROBLEMS Machine does not sew. * Power switch is bent or blunt. - Rewind bobbin...
Instruction Manual - Page 112

...
Put one drop of your machine, it is not suited for removal.
3. Cleaning the sewing machine and footcontroller
After using, keep the essential parts clean at its highest position.
2
2. CLEANING HOOK AREA AND FEED DOGS
1
Always disconnect the machine from power
CAUTION supply by the arrows. (A, B)
NOTE: Singer Brand Sewing Machine Oil is suggested.
Remove the bobbin case (2).
3
4.
Instruction Manual - Page 114

... : It should be oiled periodically. For best results always use SINGER Brand Sewing Machine Oil. Put one drop of oil other than Sewing Machine Oil will cause damage to the points indicated
by arrows.
1
Face cover Plaque frontale Cubierta frontal
Helpful Hints : For the machine used . Use of sewing machine oil to your machine.
OILING INSIDE THE FACE COVER
1. CAUTION: Always remove...
Instruction Manual - Page 116

... machine. When using twin-needles, the stitch width should never be used to back.
2. Doing so will preclude any possibility of a Singer ...bobbin thread as for pin tucks, double top stitching and decorative sewing. Pull the three threads together under it easily. NOTE on each needle from front to thread the twin needle. Always select the Twin Needle Mode prior to the back of the machine...
Instruction Manual - Page 126

... and resume sewing. If this is not possible, due to the type of design you lower the embroidery speed. ‡ Be sure to deactivate the Thread Cutter Mode when doing endless embroidery. Remove the bobbin cover plate and empty bobbin. Lower the presser foot lifter. Remove the hoop from the machine with the endless hoop clamp, use Forward/Reverse...
Similar Questions

Lost Embroidery Software And Usb Cable
I have lost the usb cable and the software to install embroidery functions. Where can I purchase rep...
I have lost the usb cable and the software to install embroidery functions. Where can I purchase rep...
(Posted by tlowe8 7 years ago)

My Bobbin Thread Is Going All Loopy And Making Quite A Mess. What's Up?
when sewing my bobbin thread seems to be going crazy. It gets loopy and it all ends up being a knott...
when sewing my bobbin thread seems to be going crazy. It gets loopy and it all ends up being a knott...
(Posted by Lsiragus 9 years ago)

Thread When Sewing Doesn't Catch Bobbin Thread, What Do I Do?
How do I fix this problem? When I pull the thread it was only the spool thread.
How do I fix this problem? When I pull the thread it was only the spool thread.
(Posted by arcand1772 9 years ago)
How Do I Thread My Singer Esteem Ii 2273. I Can't Find The Manual
(Posted by Jkmeenan14 9 years ago)

Can The Software Be Used Without Having To Plug I To The Machine?
(Posted by Anonymous-139540 9 years ago)