Instruction Manual
Page 3
... Rated Frequency: 50 Hz Rated input: 64 W Using ambient temperature: Normal temperature Acoustic noise level: less than 70 db(A) 3 STARTING TO SEW Quick reference table of stitch length and width ---------- 32 - 35 Straight stitching 36 - 39 Keeping seams straight, Inserting zippers and piping Hand-...106 - 107 Feed dog control 106 - 107 Converting to -sew fabrics, Manual buttonhole Decorative sewing 60 - 61 Tips on a button 50 - 51 Buttonholes 52 - 59 Using buttonhole foot, Procedure, Corded buttonholes Buttonholing with FUTURA Multi hoop 94 - 101 Control panel when embroidering 102 - ...
... Rated Frequency: 50 Hz Rated input: 64 W Using ambient temperature: Normal temperature Acoustic noise level: less than 70 db(A) 3 STARTING TO SEW Quick reference table of stitch length and width ---------- 32 - 35 Straight stitching 36 - 39 Keeping seams straight, Inserting zippers and piping Hand-...106 - 107 Feed dog control 106 - 107 Converting to -sew fabrics, Manual buttonhole Decorative sewing 60 - 61 Tips on a button 50 - 51 Buttonholes 52 - 59 Using buttonhole foot, Procedure, Corded buttonholes Buttonholing with FUTURA Multi hoop 94 - 101 Control panel when embroidering 102 - ...
Instruction Manual
Page 8
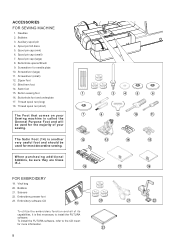
... foot and underplate 17. Thread spool net (long) 18. Bobbins 3. Thread spool net (short) The Foot that comes on your sewing. Needles 2. Spool pin cap (large) 8. Button sewing foot 1 16. Auxiliary spool pin 4. Spool pin cap (small) 7. Buttonhole opener/Brush 9. Screwdriver for more information. 8 2 ...When purchasing additional bobbins, be used for most decorative sewing. Bobbins 21. Spool pin felt discs 5. Vinyl bag 20. Embroidery presser foot 23. To install the FUTURA software, refer to install the FUTURA software. Screwdriver (small) 12. The Satin Foot ...
... foot and underplate 17. Thread spool net (long) 18. Bobbins 3. Thread spool net (short) The Foot that comes on your sewing. Needles 2. Spool pin cap (large) 8. Button sewing foot 1 16. Auxiliary spool pin 4. Spool pin cap (small) 7. Buttonhole opener/Brush 9. Screwdriver for more information. 8 2 ...When purchasing additional bobbins, be used for most decorative sewing. Bobbins 21. Spool pin felt discs 5. Vinyl bag 20. Embroidery presser foot 23. To install the FUTURA software, refer to install the FUTURA software. Screwdriver (small) 12. The Satin Foot ...
Instruction Manual
Page 10
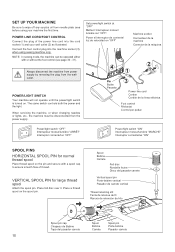
...;quina 4 1 2 Pin Butée Pasador 3 Power line cord Cordon Cordón de la linea eléctrica Foot control Rhéostat XL-550-P04-1.Ceonptrsol por pedal Power/light switch "OFF" Interrupteur moteur/lumière "ARRÊT" Interruptor corriente/luz "OFF" Power/light switch "ON" Interrupteur... to ensure smooth flow of the power line cord into the machine socket (3), when using your wall outlet (2) as illustrated. NOTE: In sewing mode, the machine can be disconnected from the walloutlet. Connect the foot control plug into the cord socket (1) and your machine the first ...
...;quina 4 1 2 Pin Butée Pasador 3 Power line cord Cordon Cordón de la linea eléctrica Foot control Rhéostat XL-550-P04-1.Ceonptrsol por pedal Power/light switch "OFF" Interrupteur moteur/lumière "ARRÊT" Interruptor corriente/luz "OFF" Power/light switch "ON" Interrupteur... to ensure smooth flow of the power line cord into the machine socket (3), when using your wall outlet (2) as illustrated. NOTE: In sewing mode, the machine can be disconnected from the walloutlet. Connect the foot control plug into the cord socket (1) and your machine the first ...

Instruction Manual
Page 14
... highest position by rotating the hand wheel counter clockwise (toward you pull the thread. Replace the clear bobbin cover plate onto the needle plate. NOTE: Sewing can be started without having to pull up sufficiently to allow you to the left . The bobbin must rotate counterclockwise when thread is a very important...
... highest position by rotating the hand wheel counter clockwise (toward you pull the thread. Replace the clear bobbin cover plate onto the needle plate. NOTE: Sewing can be started without having to pull up sufficiently to allow you to the left . The bobbin must rotate counterclockwise when thread is a very important...

Instruction Manual
Page 20
...fabrics below can be of a needle and thread. Generally, the same size and type of thread is a practical guide to it before a new sewing project. Bonded Wovens Heavy Canvas Coating Denim Duck Sailcloth Cotton-wrapped 2000 or 2020 Polyester red 100% Polyester shank * Mercerized Size 40 * "Heavy Duty...16/100 purple band 18/110 yellow band 11/80 orange band 14/90 blue band 16/100 purple band * For best sewing results, always use siempre agujas marca Singer. Utilisez, sauf dans certain cas particulier, Ie même fil pour I'aiguille et la canette. Ils sont énum...
...fabrics below can be of a needle and thread. Generally, the same size and type of thread is a practical guide to it before a new sewing project. Bonded Wovens Heavy Canvas Coating Denim Duck Sailcloth Cotton-wrapped 2000 or 2020 Polyester red 100% Polyester shank * Mercerized Size 40 * "Heavy Duty...16/100 purple band 18/110 yellow band 11/80 orange band 14/90 blue band 16/100 purple band * For best sewing results, always use siempre agujas marca Singer. Utilisez, sauf dans certain cas particulier, Ie même fil pour I'aiguille et la canette. Ils sont énum...
Instruction Manual
Page 22
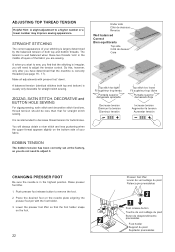
...release button to decrease thread tension for buttonholes. A balanced tension (identical stitches both top and bobbin threads. If, when you start to sew, you will always obtain a nicer stitch and less puckering when the upper thread appears slightly on the bottom side of both top and ...Hint: A slight adjustment to adjust it. Make all adjustments with the foot holder. 3. ZIGZAG, SATIN STITCH, DECORATIVE and BUTTON HOLE SEWING For zigzag sewing, satin stitch and decorative stitch functions, thread tension should be less than that the machine is in the middle of layers of the...
...release button to decrease thread tension for buttonholes. A balanced tension (identical stitches both top and bobbin threads. If, when you start to sew, you will always obtain a nicer stitch and less puckering when the upper thread appears slightly on the bottom side of both top and ...Hint: A slight adjustment to adjust it. Make all adjustments with the foot holder. 3. ZIGZAG, SATIN STITCH, DECORATIVE and BUTTON HOLE SEWING For zigzag sewing, satin stitch and decorative stitch functions, thread tension should be less than that the machine is in the middle of layers of the...
Instruction Manual
Page 24
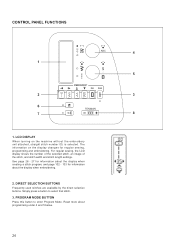
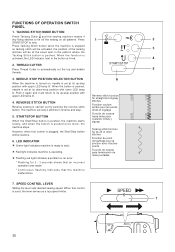
See page 26 - 27 for information about the display when creating a stitch program, and page 102 - 103 for regular sewing, programming and embroidering. Read more about the display when embroidering. 2. PROGRAM MODE BUTTON Press this button to select that stitch. 3. CONTROL PANEL FUNCTIONS 4 1 5 2 3 ... a button to enter Program Mode. DIRECT SELECTION BUTTONS Frequently used stitches are available by the direct selection buttons. For regular sewing, the LCD display shows the number of the selected stitch, an image of the stitch, and stitch width and stitch length settings.
See page 26 - 27 for information about the display when creating a stitch program, and page 102 - 103 for regular sewing, programming and embroidering. Read more about the display when embroidering. 2. PROGRAM MODE BUTTON Press this button to select that stitch. 3. CONTROL PANEL FUNCTIONS 4 1 5 2 3 ... a button to enter Program Mode. DIRECT SELECTION BUTTONS Frequently used stitches are available by the direct selection buttons. For regular sewing, the LCD display shows the number of the selected stitch, an image of the stitch, and stitch width and stitch length settings.
Instruction Manual
Page 26
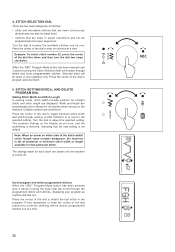
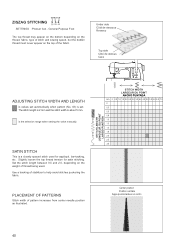
... (see 3 above ) turning the Stitch Selection Dial will be stitched out. STITCH SETTING/SCROLL AND DELETE PROGRAM DIAL Setting Stitch Width and Stitch Length In sewing mode, stitch width (needle position for all stitches when turning on either side of the dial pressed to browse the available stitches one by one...
... (see 3 above ) turning the Stitch Selection Dial will be stitched out. STITCH SETTING/SCROLL AND DELETE PROGRAM DIAL Setting Stitch Width and Stitch Length In sewing mode, stitch width (needle position for all stitches when turning on either side of the dial pressed to browse the available stitches one by one...
Instruction Manual
Page 28
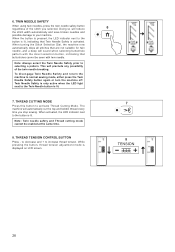
... thread tension. To disengage Twin Needle Safety and return the machine to activate Thread Cutting Mode. THREAD CUTTING MODE Press this button to normal sewing mode, either press the Twin Needle Safety button again or turn the machine off. THREAD TENSION CONTROL BUTTON Press - Doing so will automatically... now automatically skips all stitches that are not suitable for twin needle, and a beep will preclude any possibility of the stitch you stop sewing. When activated, the LED indicator next to your machine. Twin Needle Safety is only active when the LED light next to the button is...
... thread tension. To disengage Twin Needle Safety and return the machine to activate Thread Cutting Mode. THREAD CUTTING MODE Press this button to normal sewing mode, either press the Twin Needle Safety button again or turn the machine off. THREAD TENSION CONTROL BUTTON Press - Doing so will automatically... now automatically skips all stitches that are not suitable for twin needle, and a beep will preclude any possibility of the stitch you stop sewing. When activated, the LED indicator next to your machine. Twin Needle Safety is only active when the LED light next to the button is...
Instruction Manual
Page 30
...pour les points droits et zigzags Función de costura hacia atrás para costuras rectas y zigzag Tacking stitch function for tie-off the sewing on , needle is set at its down-stop position with lower LED lamp lit. START/STOP BUTTON When the Start/Stop button is pushed... the reverse stitch button. However, when foot control is ready to its up -stop position with upper LED lamp lit. 4. REVERSE STITCH BUTTON Reverse sewing is pushed once more, the machine stops. LED INDICATOR Green light indicates machine is plugged, the Start/Stop button will be inactive. 6....
...pour les points droits et zigzags Función de costura hacia atrás para costuras rectas y zigzag Tacking stitch function for tie-off the sewing on , needle is set at its down-stop position with lower LED lamp lit. START/STOP BUTTON When the Start/Stop button is pushed... the reverse stitch button. However, when foot control is ready to its up -stop position with upper LED lamp lit. 4. REVERSE STITCH BUTTON Reverse sewing is pushed once more, the machine stops. LED INDICATOR Green light indicates machine is plugged, the Start/Stop button will be inactive. 6....
Instruction Manual
Page 36
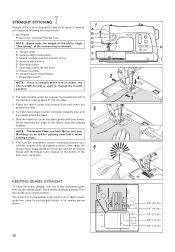
... "fine tuning" of the numbered guide lines on the bobbin cover plate is a ¼" (6mm) seam guide line, used for piecing quilt blocks or for sewing narrow seams. 36 3/4" (19 mm) 5/8" (16 mm) 1/2" (13 mm) 3/8" ( 9 mm) 1/4" ( 6 mm) Feed dog control (at its highest position, then raise the presser ...begin by following the steps below. 1. Place the fabric under the presser foot toward you ) until the needle is used for all types of sewing. Power/light switch F G 2 NOTE: Since a straight stitch has no width, the stitch width control is in its center position. Tacking stitch mode ...
... "fine tuning" of the numbered guide lines on the bobbin cover plate is a ¼" (6mm) seam guide line, used for piecing quilt blocks or for sewing narrow seams. 36 3/4" (19 mm) 5/8" (16 mm) 1/2" (13 mm) 3/8" ( 9 mm) 1/4" ( 6 mm) Feed dog control (at its highest position, then raise the presser ...begin by following the steps below. 1. Place the fabric under the presser foot toward you ) until the needle is used for all types of sewing. Power/light switch F G 2 NOTE: Since a straight stitch has no width, the stitch width control is in its center position. Tacking stitch mode ...
Instruction Manual
Page 38
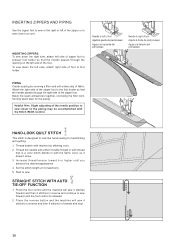
... thread or with a bias strip of fabric. Needle to left of foot Aiguille à gauche du pied presseur Aguja a la izquierda del prensatelas Needle to sew. Increase thread tension toward 6 or higher until the foot control is a color which blends in forward and stop. 38 Attach the right side of the...right side, attach left side of zipper foot to presser foot holder so that is released. 2. INSERTING ZIPPERS AND PIPING Use the zipper foot to sew to the right or left of the zipper or to sew close to foot holder. STRAIGHT STITCH WITH AUTO TIE-OFF FUNCTION 16 1. INSERTING ZIPPERS To...
... thread or with a bias strip of fabric. Needle to left of foot Aiguille à gauche du pied presseur Aguja a la izquierda del prensatelas Needle to sew. Increase thread tension toward 6 or higher until the foot control is a color which blends in forward and stop. 38 Attach the right side of the...right side, attach left side of zipper foot to presser foot holder so that is released. 2. INSERTING ZIPPERS AND PIPING Use the zipper foot to sew to the right or left of the zipper or to sew close to foot holder. STRAIGHT STITCH WITH AUTO TIE-OFF FUNCTION 16 1. INSERTING ZIPPERS To...
Instruction Manual
Page 40
... center needle position as illustrated. General Purpose Foot The top thread may appear on the bottom depending on the thread, fabric, type of stitch and sewing speed, but the bobbin thread must never appear on the weight of the fabric. SATIN STITCH This is about 5 mm. Under side Côté de...
... center needle position as illustrated. General Purpose Foot The top thread may appear on the bottom depending on the thread, fabric, type of stitch and sewing speed, but the bobbin thread must never appear on the weight of the fabric. SATIN STITCH This is about 5 mm. Under side Côté de...

Instruction Manual
Page 42
... blind stitch for overcasting most types of the guide. 4. NOTE: For a narrower or wider blind hem, first manually adjust the length and width controls to sew blind hem. Do this reason, it under the foot. It should just pierce the fold of the fabric.... Sew slowly, guiding the fabric carefully along the edge of fabrics. Always make a sewing test first. 4 Top side Cara Endroit MULTI-STITCH ZIGZAG 07 SETTINGS :Presser foot - Then turn the hem up the required depth...
... blind stitch for overcasting most types of the guide. 4. NOTE: For a narrower or wider blind hem, first manually adjust the length and width controls to sew blind hem. Do this reason, it under the foot. It should just pierce the fold of the fabric.... Sew slowly, guiding the fabric carefully along the edge of fabrics. Always make a sewing test first. 4 Top side Cara Endroit MULTI-STITCH ZIGZAG 07 SETTINGS :Presser foot - Then turn the hem up the required depth...
Instruction Manual
Page 44
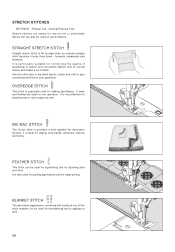
... edging neck-bands, armholes, sleeves and hems. FEATHER STITCH 10 This stitch can also be used for edge-joining. STRETCH STITCHES SETTINGS :Presser foot - It sews and finishes the seam in stretch and non-stretch fabrics, and for use of strain. It is very effective for decorative borders. OVEREDGE STITCH 09...
... edging neck-bands, armholes, sleeves and hems. FEATHER STITCH 10 This stitch can also be used for edge-joining. STRETCH STITCHES SETTINGS :Presser foot - It sews and finishes the seam in stretch and non-stretch fabrics, and for use of strain. It is very effective for decorative borders. OVEREDGE STITCH 09...
Instruction Manual
Page 46
... linen, tweed, and medium to the outside of gathering, stitch over the gathers. With a narrow strip of fabric directly under the line of the stitching. Sew along the raw edge of fabric and trim close to heavy-weight cotton. Make several rows of small diamonds. The design will be a series of...
... linen, tweed, and medium to the outside of gathering, stitch over the gathers. With a narrow strip of fabric directly under the line of the stitching. Sew along the raw edge of fabric and trim close to heavy-weight cotton. Make several rows of small diamonds. The design will be a series of...

Instruction Manual
Page 48
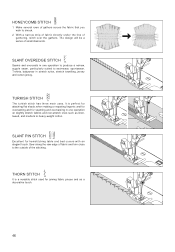
..., is ideal for smocking and as jersey and knitwear. PIN STITCH 68 78 The Pin stitch is most often sewn with a Wing Needle (SINGER Style 2040) to sew and finish elastic fabrics or for use in the stitch pattern. 48 REINFORCED OVEREDGE STITCH 80 81 Both of borders. The Entredeux stitch is... for decorative stitching on borders and for decoration of these stitches are perfect for applique work. CROSSED STITCH 74 Use to create holes in heirloom sewing.
..., is ideal for smocking and as jersey and knitwear. PIN STITCH 68 78 The Pin stitch is most often sewn with a Wing Needle (SINGER Style 2040) to sew and finish elastic fabrics or for use in the stitch pattern. 48 REINFORCED OVEREDGE STITCH 80 81 Both of borders. The Entredeux stitch is... for decorative stitching on borders and for decoration of these stitches are perfect for applique work. CROSSED STITCH 74 Use to create holes in heirloom sewing.
Instruction Manual
Page 50
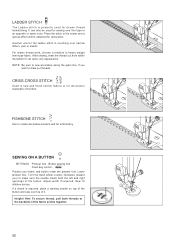
... the ladder for drawn thread hemstitching. CRISS-CROSS STITCH 73 82 Used to draw out threads. Another use for decoration. NOTE: Be sure to sew accurately along the grain line, if you ) to make sure the needle clears both threads to the backside of the fabric and tie together. ...for decoration especially of borders. FISHBONE STITCH 77 Use to heavy weight linen-type fabric. Turn the hand wheel counter clockwise (toward you wish to sew and finish stretch fabrics or for embroidery. Position your fabric and button under the presser foot. LADDER STITCH 72 The Ladder stitch is required, ...
... the ladder for drawn thread hemstitching. CRISS-CROSS STITCH 73 82 Used to draw out threads. Another use for decoration. NOTE: Be sure to sew accurately along the grain line, if you ) to make sure the needle clears both threads to the backside of the fabric and tie together. ...for decoration especially of borders. FISHBONE STITCH 77 Use to heavy weight linen-type fabric. Turn the hand wheel counter clockwise (toward you wish to sew and finish stretch fabrics or for embroidery. Position your fabric and button under the presser foot. LADDER STITCH 72 The Ladder stitch is required, ...
Instruction Manual
Page 52
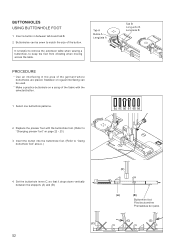
... into the buttonhole foot. (Refer to keep the foot from vibrating when moving across the table. It is helpful to remove the extension table when sewing a buttonhole, to "Using buttonhole foot" above.) 4. tab A Butée A Lengüeta A PROCEDURE * Use an interfacing in between the stoppers (A) and (B). (C) 52 (C) (A) (B) Buttonhole foot Pied...
... into the buttonhole foot. (Refer to keep the foot from vibrating when moving across the table. It is helpful to remove the extension table when sewing a buttonhole, to "Using buttonhole foot" above.) 4. tab A Butée A Lengüeta A PROCEDURE * Use an interfacing in between the stoppers (A) and (B). (C) 52 (C) (A) (B) Buttonhole foot Pied...
Instruction Manual
Page 54
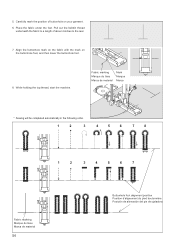
... rear. 7. Align the buttonhole mark on the fabric with the mark on your garment. 6. Fabric marking Marque du tissu Marca de material mark Marque Marca * Sewing will be completed automatically in the following order. 1 2 3 4 5 6 7 8 1 2 3 4 5 6 7 Fabric marking Marque du tissu Marca de material 54 Buttonhole foot alignment position Position d'alignement du pied...
... rear. 7. Align the buttonhole mark on the fabric with the mark on your garment. 6. Fabric marking Marque du tissu Marca de material mark Marque Marca * Sewing will be completed automatically in the following order. 1 2 3 4 5 6 7 8 1 2 3 4 5 6 7 Fabric marking Marque du tissu Marca de material 54 Buttonhole foot alignment position Position d'alignement du pied...


