Instruction Manual
Page 3
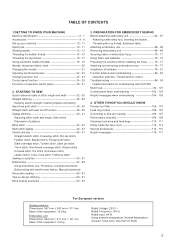
..., Reinforced overedge stitch, Wizard stitch, Crossed stitch, Pin stitch, Entredeux stitch, Ladder stitch, Criss-cross stitch, Fishbone stitch Sewing on a button 50 - 51 Buttonholes 52 - 59 Using buttonhole foot, Procedure, Corded buttonholes Buttonholing with FUTURA Multi hoop 94 - 101 Control panel when embroidering 102 - 103 Helpful messages when embroidering 104 - 105 4. OTHER...
..., Reinforced overedge stitch, Wizard stitch, Crossed stitch, Pin stitch, Entredeux stitch, Ladder stitch, Criss-cross stitch, Fishbone stitch Sewing on a button 50 - 51 Buttonholes 52 - 59 Using buttonhole foot, Procedure, Corded buttonholes Buttonholing with FUTURA Multi hoop 94 - 101 Control panel when embroidering 102 - 103 Helpful messages when embroidering 104 - 105 4. OTHER...
Instruction Manual
Page 8
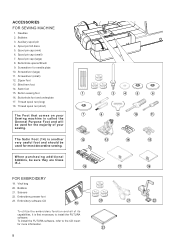
... (large) 8. Screwdriver (large) 11. Thread spool net (short) The Foot that comes on your sewing. Embroidery software CD 19 To utilize the embroidery function and all of your 7 Sewing machine is called the General Purpose Foot and will be used for the majority of its capabilities, it... Zipper foot 13. The Satin Foot (14) is first necessary to the CD insert for needle plate 10. To install the FUTURA software, refer to install the FUTURA software. Satin foot 15. Scissors 22. Embroidery presser foot 23. Thread spool net (long) 18. Bobbins 21. Spool pin cap...
... (large) 8. Screwdriver (large) 11. Thread spool net (short) The Foot that comes on your sewing. Embroidery software CD 19 To utilize the embroidery function and all of your 7 Sewing machine is called the General Purpose Foot and will be used for the majority of its capabilities, it... Zipper foot 13. The Satin Foot (14) is first necessary to the CD insert for needle plate 10. To install the FUTURA software, refer to install the FUTURA software. Satin foot 15. Scissors 22. Embroidery presser foot 23. Thread spool net (long) 18. Bobbins 21. Spool pin cap...
Instruction Manual
Page 10
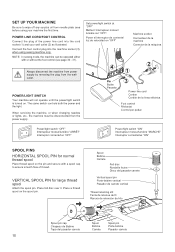
...;quina 4 1 2 Pin Butée Pasador 3 Power line cord Cordon Cordón de la linea eléctrica Foot control Rhéostat XL-550-P04-1.Ceonptrsol por pedal Power/light switch "OFF" Interrupteur moteur/lumière "ARRÊT" Interruptor corriente/luz "OFF" Power/light switch "ON" .... Place felt disc over it. Connect the foot control plug into the cord socket (1) and your machine the first time. NOTE: In sewing mode, the machine can be disconnected from the walloutlet. Spool Bobine Carrete Felt disc Rondelle feutre Disco del pasador carrete Vertical spool pin Porte...
...;quina 4 1 2 Pin Butée Pasador 3 Power line cord Cordon Cordón de la linea eléctrica Foot control Rhéostat XL-550-P04-1.Ceonptrsol por pedal Power/light switch "OFF" Interrupteur moteur/lumière "ARRÊT" Interruptor corriente/luz "OFF" Power/light switch "ON" .... Place felt disc over it. Connect the foot control plug into the cord socket (1) and your machine the first time. NOTE: In sewing mode, the machine can be disconnected from the walloutlet. Spool Bobine Carrete Felt disc Rondelle feutre Disco del pasador carrete Vertical spool pin Porte...

Instruction Manual
Page 14
... pop up the bobbin thread. 6. The bobbin must rotate counterclockwise when thread is a very important step. A Cutter Coupe Fil Cortador Groove Cannelure Surco B A 14 NOTE: Sewing can be started without having to pull up sufficiently to allow you to the left . THREADING THE BOBBIN THREAD 1.
... pop up the bobbin thread. 6. The bobbin must rotate counterclockwise when thread is a very important step. A Cutter Coupe Fil Cortador Groove Cannelure Surco B A 14 NOTE: Sewing can be started without having to pull up sufficiently to allow you to the left . THREADING THE BOBBIN THREAD 1.

Instruction Manual
Page 20
...100 purple band 18/110 yellow band 11/80 orange band 14/90 blue band 16/100 purple band * For best sewing results, always use siempre agujas marca Singer. Tissus apprêtés Polyester-coton 2000 ou 202016/100 LOURDS Toile forte 100%polyester tige bague Tissu de manteau *...bague jaune orange 14/90 bague bleue 16/100 bague pourpre * Pour obtenir les meilleurs résultats de couture, utilisez toujours une aiguille de marque Singer. 20 TABLA DE HILO, AGUJA Y MATERIAL Su material determinará el selecctión de aguja y hilo. MATERIAL HILO Los materiales abajos pueden ...
...100 purple band 18/110 yellow band 11/80 orange band 14/90 blue band 16/100 purple band * For best sewing results, always use siempre agujas marca Singer. Tissus apprêtés Polyester-coton 2000 ou 202016/100 LOURDS Toile forte 100%polyester tige bague Tissu de manteau *...bague jaune orange 14/90 bague bleue 16/100 bague pourpre * Pour obtenir les meilleurs résultats de couture, utilisez toujours une aiguille de marque Singer. 20 TABLA DE HILO, AGUJA Y MATERIAL Su material determinará el selecctión de aguja y hilo. MATERIAL HILO Los materiales abajos pueden ...
Instruction Manual
Page 22
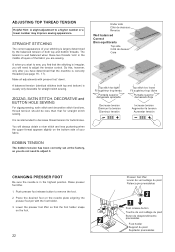
..., you start to adjust it. Push presser foot release button to a higher number or a lower number may improve sewing appearance. Do this, however, only after you are sewing. BOBBIN TENSION The bobbin tension has been correctly set at the factory, so you do not need to decrease thread...the fabric you have determined that the stitching is correctly threaded (see page 16 - 17). ZIGZAG, SATIN STITCH, DECORATIVE and BUTTON HOLE SEWING For zigzag sewing, satin stitch and decorative stitch functions, thread tension should be less than that the foot holder snaps on the foot. 2 22 Presser ...
..., you start to adjust it. Push presser foot release button to a higher number or a lower number may improve sewing appearance. Do this, however, only after you are sewing. BOBBIN TENSION The bobbin tension has been correctly set at the factory, so you do not need to decrease thread...the fabric you have determined that the stitching is correctly threaded (see page 16 - 17). ZIGZAG, SATIN STITCH, DECORATIVE and BUTTON HOLE SEWING For zigzag sewing, satin stitch and decorative stitch functions, thread tension should be less than that the foot holder snaps on the foot. 2 22 Presser ...
Instruction Manual
Page 24
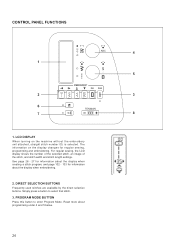
... 26 - 27 for information about the display when creating a stitch program, and page 102 - 103 for regular sewing, programming and embroidering. PROGRAM MODE BUTTON Press this button to select that stitch. 3. For regular sewing, the LCD display shows the number of the selected stitch, an image of the stitch, and stitch width...
... 26 - 27 for information about the display when creating a stitch program, and page 102 - 103 for regular sewing, programming and embroidering. PROGRAM MODE BUTTON Press this button to select that stitch. 3. For regular sewing, the LCD display shows the number of the selected stitch, an image of the stitch, and stitch width...
Instruction Manual
Page 26
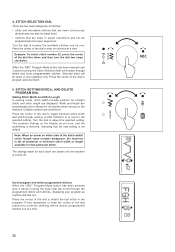
... stitches at a time. 26 Turn the dial to program selected stitch. 5. STITCH SETTING/SCROLL AND DELETE PROGRAM DIAL Setting Stitch Width and Stitch Length In sewing mode, stitch width (needle position for each stitch are sewn in single repetitions and can be programmed into longer sequences. Note: When an arrow on...
... stitches at a time. 26 Turn the dial to program selected stitch. 5. STITCH SETTING/SCROLL AND DELETE PROGRAM DIAL Setting Stitch Width and Stitch Length In sewing mode, stitch width (needle position for each stitch are sewn in single repetitions and can be programmed into longer sequences. Note: When an arrow on...
Instruction Manual
Page 28
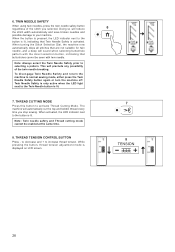
...THREAD TENSION CONTROL BUTTON Press - 6. This will reduce the stitch width automatically and save broken needles and possible damage to normal sewing mode, either press the Twin Needle Safety button again or turn the machine off. To disengage Twin Needle Safety and return the ... needles, press the twin needle safety button regardless of the twin needle breaking. Doing so will preclude any possibility of the stitch you stop sewing. While pressing the button, thread tension adjustment mode is only active when the LED light next to selecting a pattern. THREAD CUTTING MODE Press...
...THREAD TENSION CONTROL BUTTON Press - 6. This will reduce the stitch width automatically and save broken needles and possible damage to normal sewing mode, either press the Twin Needle Safety button again or turn the machine off. To disengage Twin Needle Safety and return the ... needles, press the twin needle safety button regardless of the twin needle breaking. Doing so will preclude any possibility of the stitch you stop sewing. While pressing the button, thread tension adjustment mode is only active when the LED light next to selecting a pattern. THREAD CUTTING MODE Press...
Instruction Manual
Page 30
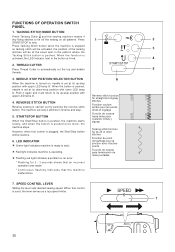
... the exact spot in reverse and stop position with upper LED lamp lit. 4. FUNCTIONS OF OPERATION SWITCH PANEL 1. REVERSE STITCH BUTTON Reverse sewing is used, the lever serves as a top speed limiter. 7 30 When the function is lit red. 4 2. SPEED CONTROL LEVER Sliding the... lever sets desired sewing speed. TACKING STITCH MODE BUTTON Press Tacking Stitch and the sewing machine makes 4 tiny fixing stitches to its up -stop position with lower LED lamp lit. THREAD CUTTER Press ...
... the exact spot in reverse and stop position with upper LED lamp lit. 4. FUNCTIONS OF OPERATION SWITCH PANEL 1. REVERSE STITCH BUTTON Reverse sewing is used, the lever serves as a top speed limiter. 7 30 When the function is lit red. 4 2. SPEED CONTROL LEVER Sliding the... lever sets desired sewing speed. TACKING STITCH MODE BUTTON Press Tacking Stitch and the sewing machine makes 4 tiny fixing stitches to its up -stop position with lower LED lamp lit. THREAD CUTTER Press ...
Instruction Manual
Page 36
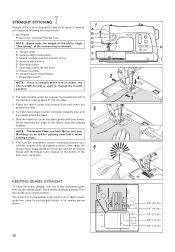
...under the presser foot toward you ) until the needle is used to the rear and cut off excess 6 thread with your fabric when sewing a seam. 6. Turn the hand wheel counter clockwise (towards you ) until the needle enters the fabric. 5. Guide the fabric gently ...with the thread cutter located on the needle plate. The numbers indicate distance from the needle at rear side) G. Start/stop the sewing machine. Thread tension control button I 4 2. First turn the handwheel counter clockwise (toward the left of the fabric, stop button F. Thread cutter ...
...under the presser foot toward you ) until the needle is used to the rear and cut off excess 6 thread with your fabric when sewing a seam. 6. Turn the hand wheel counter clockwise (towards you ) until the needle enters the fabric. 5. Guide the fabric gently ...with the thread cutter located on the needle plate. The numbers indicate distance from the needle at rear side) G. Start/stop the sewing machine. Thread tension control button I 4 2. First turn the handwheel counter clockwise (toward the left of the fabric, stop button F. Thread cutter ...
Instruction Manual
Page 38
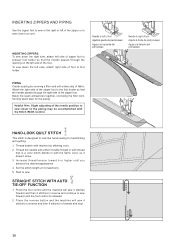
...tape for topstitching and quilting. 1. Set the stitich length at 4 (maximum). 5. STRAIGHT STITCH WITH AUTO TIE-OFF FUNCTION 16 1. Start to look like hand sewing for the piping. Thread the needle with either invisible thread or with thread that is released. 2. Increase thread tension toward 6 or higher until the foot...presser foot holder so that the needle passes through the opening on the left of fabric. Press the foot control and the machine will sew 4 stitches in reverse and then 4 stitches in forward and stop. 38 INSERTING ZIPPERS AND PIPING Use the zipper foot to...
...tape for topstitching and quilting. 1. Set the stitich length at 4 (maximum). 5. STRAIGHT STITCH WITH AUTO TIE-OFF FUNCTION 16 1. Start to look like hand sewing for the piping. Thread the needle with either invisible thread or with thread that is released. 2. Increase thread tension toward 6 or higher until the foot...presser foot holder so that the needle passes through the opening on the left of fabric. Press the foot control and the machine will sew 4 stitches in reverse and then 4 stitches in forward and stop. 38 INSERTING ZIPPERS AND PIPING Use the zipper foot to...
Instruction Manual
Page 40
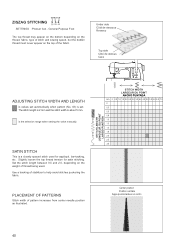
... posicionada en el centro 40 General Purpose Foot The top thread may appear on the bottom depending on the thread, fabric, type of stitch and sewing speed, but the bobbin thread must never appear on the weight of the fabric. SATIN STITCH This is set. Set the stitch length between 0.5 and...
... posicionada en el centro 40 General Purpose Foot The top thread may appear on the bottom depending on the thread, fabric, type of stitch and sewing speed, but the bobbin thread must never appear on the weight of the fabric. SATIN STITCH This is set. Set the stitch length between 0.5 and...

Instruction Manual
Page 42
... depth, press and pin in place. 2. NOTE: For a narrower or wider blind hem, first manually adjust the length and width controls to sew blind hem. Then adjust the guide on the Blind hem Foot (A) so that the needle just pierces the fabric fold and the guide just rests...Place the fabric under on medium to heavyweight fabric Material de peso medio a pesado Tissus moyens et lourds - Sew slowly, guiding the fabric carefully along the edge of the fabric. Always make a sewing test first. 4 Top side Cara Endroit MULTI-STITCH ZIGZAG 07 SETTINGS :Presser foot - When completed, the ...
... depth, press and pin in place. 2. NOTE: For a narrower or wider blind hem, first manually adjust the length and width controls to sew blind hem. Then adjust the guide on the Blind hem Foot (A) so that the needle just pierces the fabric fold and the guide just rests...Place the fabric under on medium to heavyweight fabric Material de peso medio a pesado Tissus moyens et lourds - Sew slowly, guiding the fabric carefully along the edge of the fabric. Always make a sewing test first. 4 Top side Cara Endroit MULTI-STITCH ZIGZAG 07 SETTINGS :Presser foot - When completed, the ...
Instruction Manual
Page 44
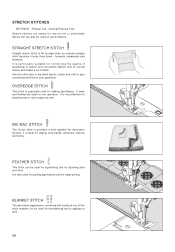
It sews and finishes the seam in stretch and non-stretch fabrics, and for hemstitching and to applique a quilt. 44 BLANKET STITCH 69 79 The decorative appearance ...
It sews and finishes the seam in stretch and non-stretch fabrics, and for hemstitching and to applique a quilt. 44 BLANKET STITCH 69 79 The decorative appearance ...
Instruction Manual
Page 46
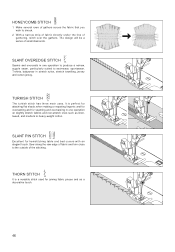
... smock. 2. TURKISH STITCH The turkish stitch has three main uses. It is a versatile stitch used for hemstitching table and bed covers with an elegant touch. Sew along the raw edge of the stitching. and for overcasting and for attaching flat elastic when making or repairing lingerie; With a narrow strip of fabric...
... smock. 2. TURKISH STITCH The turkish stitch has three main uses. It is a versatile stitch used for hemstitching table and bed covers with an elegant touch. Sew along the raw edge of the stitching. and for overcasting and for attaching flat elastic when making or repairing lingerie; With a narrow strip of fabric...

Instruction Manual
Page 48
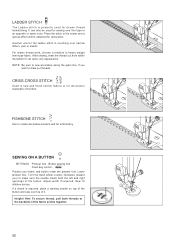
The Entredeux stitch is most often sewn with a Wing Needle (SINGER Style 2040) to sew and finish elastic fabrics or for decoration of these stitches are perfect for attaching flat elastic when making or repairing lingerie. They can also be ... jersey and knitwear. ENTREDEUX STITCH 71 Useful for decorative stitching on borders and for applique work. CROSSED STITCH 74 Use to create holes in heirloom sewing.
The Entredeux stitch is most often sewn with a Wing Needle (SINGER Style 2040) to sew and finish elastic fabrics or for decoration of these stitches are perfect for attaching flat elastic when making or repairing lingerie. They can also be ... jersey and knitwear. ENTREDEUX STITCH 71 Useful for decorative stitching on borders and for applique work. CROSSED STITCH 74 Use to create holes in heirloom sewing.
Instruction Manual
Page 50
... Helpful Hint: To secure thread, pull both the left and right openings of it. After sewing, draw the thread out from within the ladder for decoration. FISHBONE STITCH 77 Use to sew and finish stretch fabrics or for decoration especially of the fabric and tie together. 50 Adjust ... and a special effect will be used for drawn thread hemstitching. LADDER STITCH 72 The Ladder stitch is primarily used for sewing over narrow ribbon, yarn or elastic. Sew 10 stitches across. CRISS-CROSS STITCH 73 82 Used to create decorative borders and for embroidery. NOTE: Be sure to...
... Helpful Hint: To secure thread, pull both the left and right openings of it. After sewing, draw the thread out from within the ladder for decoration. FISHBONE STITCH 77 Use to sew and finish stretch fabrics or for decoration especially of the fabric and tie together. 50 Adjust ... and a special effect will be used for drawn thread hemstitching. LADDER STITCH 72 The Ladder stitch is primarily used for sewing over narrow ribbon, yarn or elastic. Sew 10 stitches across. CRISS-CROSS STITCH 73 82 Used to create decorative borders and for embroidery. NOTE: Be sure to...
Instruction Manual
Page 52
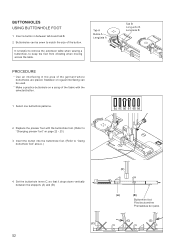
.... (Refer to keep the foot from vibrating when moving across the table. BUTTONHOLES USING BUTTONHOLE FOOT 1. It is helpful to remove the extension table when sewing a buttonhole, to "Using buttonhole foot" above.) 4.
.... (Refer to keep the foot from vibrating when moving across the table. BUTTONHOLES USING BUTTONHOLE FOOT 1. It is helpful to remove the extension table when sewing a buttonhole, to "Using buttonhole foot" above.) 4.
Instruction Manual
Page 54
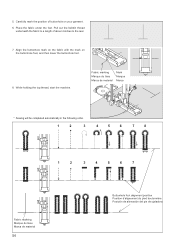
... foot. 8. Align the buttonhole mark on the fabric with the mark on your garment. 6. 5. Fabric marking Marque du tissu Marca de material mark Marque Marca * Sewing will be completed automatically in the following order. 1 2 3 4 5 6 7 8 1 2 3 4 5 6 7 Fabric marking Marque du tissu Marca de material 54 Buttonhole foot alignment position Position d'alignement du pied...
... foot. 8. Align the buttonhole mark on the fabric with the mark on your garment. 6. 5. Fabric marking Marque du tissu Marca de material mark Marque Marca * Sewing will be completed automatically in the following order. 1 2 3 4 5 6 7 8 1 2 3 4 5 6 7 Fabric marking Marque du tissu Marca de material 54 Buttonhole foot alignment position Position d'alignement du pied...


