

Instruction Manual 2
Page 3
... drop or insert any opening. 12. Please turn all instructions before cleaning. SAVE THESE INSTRUCTIONS This sewing machine is not intended for examination, repair, electrical or mechanical adjustment. 4. Close attention is necessary when this manual. 3. Return the appliance to break. 7. Never place anything on cord. Do not allow to be used or where oxygen is required around the sewing machine needle. 6. Always use by the manufacturer as threading needle, changing needle, threading bobbin, changing presser foot or changing...
... drop or insert any opening. 12. Please turn all instructions before cleaning. SAVE THESE INSTRUCTIONS This sewing machine is not intended for examination, repair, electrical or mechanical adjustment. 4. Close attention is necessary when this manual. 3. Return the appliance to break. 7. Never place anything on cord. Do not allow to be used or where oxygen is required around the sewing machine needle. 6. Always use by the manufacturer as threading needle, changing needle, threading bobbin, changing presser foot or changing...
Instruction Manual 2
Page 4
... THE POWER SOURCE 9 Connecting the machine 9 WINDING THE BOBBIN 10-11 Bobbin winding 10-11 INSERTING THE BOBBIN 12 THREADING THE UPPER THREAD 13-14 USING THE NEEDLE THREADER 15 DRAWING UP THE LOWER THREAD 16 CUTTING THE THREAD 16 TWO-STEP PRESSER FOOT LIFTER 17 ADJUSTING PRESSER FOOT PRESSURE 17 STARTING SEWING 18 Start/stop button 18 Foot control 18 THREAD TENSION 19 CHANGING THE PRESSER FOOT 20 PRESSER FOOT CHART 21 MATCHING NEEDLE/ FABRIC/ THREAD 22 REPLACING THE NEEDLE 23 RAISE OR LOWER FEED DOGS 23 OPERATION BUTTONS 24-26 Start/stop button 24 Thread cutter button 24...
... THE POWER SOURCE 9 Connecting the machine 9 WINDING THE BOBBIN 10-11 Bobbin winding 10-11 INSERTING THE BOBBIN 12 THREADING THE UPPER THREAD 13-14 USING THE NEEDLE THREADER 15 DRAWING UP THE LOWER THREAD 16 CUTTING THE THREAD 16 TWO-STEP PRESSER FOOT LIFTER 17 ADJUSTING PRESSER FOOT PRESSURE 17 STARTING SEWING 18 Start/stop button 18 Foot control 18 THREAD TENSION 19 CHANGING THE PRESSER FOOT 20 PRESSER FOOT CHART 21 MATCHING NEEDLE/ FABRIC/ THREAD 22 REPLACING THE NEEDLE 23 RAISE OR LOWER FEED DOGS 23 OPERATION BUTTONS 24-26 Start/stop button 24 Thread cutter button 24...
Instruction Manual 2
Page 5
...BLIND HEMS 37 BUTTON SEWING 38 BUTTONHOLE SEWING 39-42 Making corded buttonholes 42 BAR TACK STITCH 43 EYELET STITCH 44 DARNING STITCH 45-46 ZIPPER INSERTION 47-48 Inserting a centered zipper 47 Inserting a lapped zipper 48 NARROW HEMMING 49 CORDING 50 Single cording 50 Triple cording 50 SATIN STITCH SEWING 51 EDGE/QUILTING GUIDE 52 GATHERING 53 SMOCKING 54 FREE MOTION SEWING 55-56 Darning 55 Embroidery 56 Monogramming 56 WALKING FOOT 57 SIDE CUTTER 58 ROLLER FOOT 58 STRAIGHT STITCH FOOT 58 OPEN TOE FOOT 59 1/4" PIECING FOOT 59 EDGE JOINING FOOT 59 INVISIBLE ZIPPER...
...BLIND HEMS 37 BUTTON SEWING 38 BUTTONHOLE SEWING 39-42 Making corded buttonholes 42 BAR TACK STITCH 43 EYELET STITCH 44 DARNING STITCH 45-46 ZIPPER INSERTION 47-48 Inserting a centered zipper 47 Inserting a lapped zipper 48 NARROW HEMMING 49 CORDING 50 Single cording 50 Triple cording 50 SATIN STITCH SEWING 51 EDGE/QUILTING GUIDE 52 GATHERING 53 SMOCKING 54 FREE MOTION SEWING 55-56 Darning 55 Embroidery 56 Monogramming 56 WALKING FOOT 57 SIDE CUTTER 58 ROLLER FOOT 58 STRAIGHT STITCH FOOT 58 OPEN TOE FOOT 59 1/4" PIECING FOOT 59 EDGE JOINING FOOT 59 INVISIBLE ZIPPER...
Instruction Manual 2
Page 6
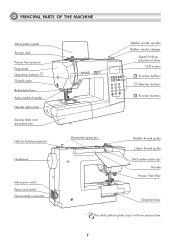
... MACHINE Stitch pattern plate Tension dial Presser foot pressure Face plate Operation buttons A Thread cutter Buttonhole lever Auto needle threader Needle plate cover Sewing table and accessory box Hole for Auxiliary spool pin Handwheel Main power switch Power cord socket Foot controller connector Bobbin winder spindle Bobbin winder stopper Speed limiting adjustment lever LCD screen B Function buttons C Selection buttons B Function buttons Horizontal spool pin Bobbin thread guide Upper thread guide Stitch pattern plate clip* Handle Presser foot lifter Drop feed lever * The stitch pattern...
... MACHINE Stitch pattern plate Tension dial Presser foot pressure Face plate Operation buttons A Thread cutter Buttonhole lever Auto needle threader Needle plate cover Sewing table and accessory box Hole for Auxiliary spool pin Handwheel Main power switch Power cord socket Foot controller connector Bobbin winder spindle Bobbin winder stopper Speed limiting adjustment lever LCD screen B Function buttons C Selection buttons B Function buttons Horizontal spool pin Bobbin thread guide Upper thread guide Stitch pattern plate clip* Handle Presser foot lifter Drop feed lever * The stitch pattern...
Instruction Manual 2
Page 7
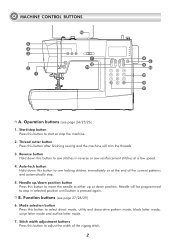
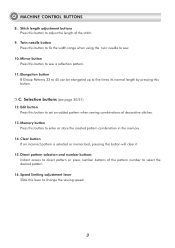
... start or stop . 5. Auto-lock button Hold down this button to sew locking stitches immediately or at a low speed. 4. B. Stitch width adjustment buttons Press this button to adjust the width of the current patterns and automatically stop the machine. 2. MACHINE CONTROL BUTTONS 5 4 3 2 1 16 67 12 123 1 2 3 4 5 6 7 8 9 0 8 6 9 14 15 10 11 A. Reverse button Hold down position. Needle up/down position button Press this button to move the needle to either up or down this button to sew stitches in selected position until button...
... start or stop . 5. Auto-lock button Hold down this button to sew locking stitches immediately or at a low speed. 4. B. Stitch width adjustment buttons Press this button to adjust the width of the current patterns and automatically stop the machine. 2. MACHINE CONTROL BUTTONS 5 4 3 2 1 16 67 12 123 1 2 3 4 5 6 7 8 9 0 8 6 9 14 15 10 11 A. Reverse button Hold down position. Needle up/down position button Press this button to move the needle to either up or down this button to sew stitches in selected position until button...
Instruction Manual 2
Page 8
... stitches. 13. Direct pattern selection and number buttons Instant access to change the sewing speed. 3 Edit button Press this button will clear it. 15. Memory button Press this lever to direct pattern or press number buttons of the stitch. 9. Speed limiting adjustment lever Slide this button to select the desired pattern. 16. Elongation button B Group Patterns 33 to 45 can be elongated up to five times its normal length by pressing this button to adjust the length of the pattern number...
... stitches. 13. Direct pattern selection and number buttons Instant access to change the sewing speed. 3 Edit button Press this button will clear it. 15. Memory button Press this lever to direct pattern or press number buttons of the stitch. 9. Speed limiting adjustment lever Slide this button to select the desired pattern. 16. Elongation button B Group Patterns 33 to 45 can be elongated up to five times its normal length by pressing this button to adjust the length of the pattern number...
Instruction Manual 2
Page 13
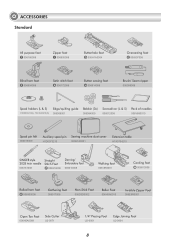
... Buttonhole foot D 006H1A0004 Overcasting foot E 006907008 Blind hem foot F 006904008 Satin stitch foot A 006172008 Button sewing foot H 006914008 Brush/ Seam ripper 006099008 Spool holders (L & S) Edge/quilting guide Bobbin (3x) Screwdriver (L & S) Pack of needles H1D0083210(L) TA10943210(S) 006008001 006084009 006012008 006V880010 Spool pin felt 006015009 Auxiliary spool pin Sewing machine dust cover H1D0073210 020H7A0001 Extension table H7A0754210 SINGER style 2025 twin needle 006161008 Straight Stitch Foot P 006916008 Darning/ Embroidery foot 006016008 Walking foot...
... Buttonhole foot D 006H1A0004 Overcasting foot E 006907008 Blind hem foot F 006904008 Satin stitch foot A 006172008 Button sewing foot H 006914008 Brush/ Seam ripper 006099008 Spool holders (L & S) Edge/quilting guide Bobbin (3x) Screwdriver (L & S) Pack of needles H1D0083210(L) TA10943210(S) 006008001 006084009 006012008 006V880010 Spool pin felt 006015009 Auxiliary spool pin Sewing machine dust cover H1D0073210 020H7A0001 Extension table H7A0754210 SINGER style 2025 twin needle 006161008 Straight Stitch Foot P 006916008 Darning/ Embroidery foot 006016008 Walking foot...
Instruction Manual 2
Page 21
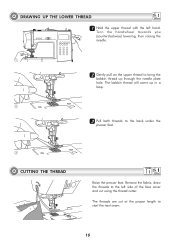
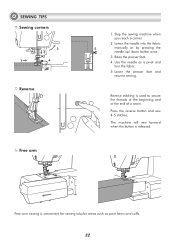
Remove the fabric, draw the threads to the left hand. DRAWING UP THE LOWER THREAD 11 Hold the upper thread with the left side of the face cover and cut at the proper length to start the next seam. 16 The bobbin thread will come up through the needle plate hole. The threads are cut using the thread cutter. Turn the handwheel towards you (counterclockwise) lowering, then raising the needle. 1 22 Gently pull on the upper thread to bring the bobbin thread up in a loop. 2 33 Pull both threads to the back under the presser foot. 3 CUTTING THE THREAD Raise the presser foot.
Remove the fabric, draw the threads to the left hand. DRAWING UP THE LOWER THREAD 11 Hold the upper thread with the left side of the face cover and cut at the proper length to start the next seam. 16 The bobbin thread will come up through the needle plate hole. The threads are cut using the thread cutter. Turn the handwheel towards you (counterclockwise) lowering, then raising the needle. 1 22 Gently pull on the upper thread to bring the bobbin thread up in a loop. 2 33 Pull both threads to the back under the presser foot. 3 CUTTING THE THREAD Raise the presser foot.
Instruction Manual 2
Page 23
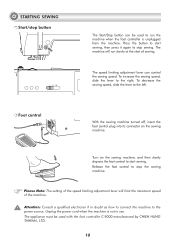
... sewing machine turned off, insert the foot control plug into its connector on the sewing machine, and then slowly depress the foot control to start sewing, then press it again to run slowly at the start of the machine. To increase the sewing speed, slide the lever to the right, To decrease the sewing speed, slide the lever to start sewing. Unplug the power cord when the machine is unplugged from the machine. STARTING SEWING Start/stop button The Start...
... sewing machine turned off, insert the foot control plug into its connector on the sewing machine, and then slowly depress the foot control to start sewing, then press it again to run slowly at the start of the machine. To increase the sewing speed, slide the lever to the right, To decrease the sewing speed, slide the lever to start sewing. Unplug the power cord when the machine is unplugged from the machine. STARTING SEWING Start/stop button The Start...
Instruction Manual 2
Page 26
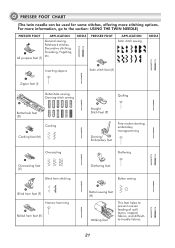
...All purpose foot (T) NEEDLE PRESSER FOOT APPLICATION Satin stitch sewing NEEDLE Inserting zippers Satin stitch foot (A) Zipper foot (I) Buttonhole sewing, Darning-stitch sewing Buttonhole foot (D) Cording Cording foot (M) Overcasting Quilting Straight Stitch Foot (P) Darning/ Embroidery foot Free-motion darning, embroidery, monogramming Gathering Overcasting foot (E) Blind hem stitching Gathering foot Button sewing Blind hem foot (F) Narrow hemming Rolled hem foot (K) Button sewing foot (H) Walking foot This foot helps to the section: USING THE TWIN NEEDLE) PRESSER FOOT...
...All purpose foot (T) NEEDLE PRESSER FOOT APPLICATION Satin stitch sewing NEEDLE Inserting zippers Satin stitch foot (A) Zipper foot (I) Buttonhole sewing, Darning-stitch sewing Buttonhole foot (D) Cording Cording foot (M) Overcasting Quilting Straight Stitch Foot (P) Darning/ Embroidery foot Free-motion darning, embroidery, monogramming Gathering Overcasting foot (E) Blind hem stitching Gathering foot Button sewing Blind hem foot (F) Narrow hemming Rolled hem foot (K) Button sewing foot (H) Walking foot This foot helps to the section: USING THE TWIN NEEDLE) PRESSER FOOT...
Instruction Manual 2
Page 37
Use the needle as pant hems and cuffs. 32 The machine will sew forward when the button is used to secure the threads at the beginning and at the end of a seam. Lower the needle into the fabric 5 manually or by pressing the needle up/ down button once. 3. Lower the presser foot and resume sewing. Reverse stitching is released. Stop the sewing machine when you reach a corner. 2. Raise the presser foot. 4. Press the reverse button and sew 4-5 stitches. Free-arm sewing is convenient...
Use the needle as pant hems and cuffs. 32 The machine will sew forward when the button is used to secure the threads at the beginning and at the end of a seam. Lower the needle into the fabric 5 manually or by pressing the needle up/ down button once. 3. Lower the presser foot and resume sewing. Reverse stitching is released. Stop the sewing machine when you reach a corner. 2. Raise the presser foot. 4. Press the reverse button and sew 4-5 stitches. Free-arm sewing is convenient...

Instruction Manual 2
Page 41
... presser foot and break when sewing other patterns and width settings. Do not set the stitch width narrower than "5.0", as it is possible that the needle drops over the edge of the overcasting foot. Attention: The overcasting foot should be used to sew with the fabric edge against the guide of the fabric on the right side. 36 OVERCASTING STITCHES Using the overcasting foot E 5.0~7.0 2.0~3.0 1 2 11 Change the presser foot to the overcasting foot. 22 Sew...
... presser foot and break when sewing other patterns and width settings. Do not set the stitch width narrower than "5.0", as it is possible that the needle drops over the edge of the overcasting foot. Attention: The overcasting foot should be used to sew with the fabric edge against the guide of the fabric on the right side. 36 OVERCASTING STITCHES Using the overcasting foot E 5.0~7.0 2.0~3.0 1 2 11 Change the presser foot to the overcasting foot. 22 Sew...

Instruction Manual 2
Page 50
... Make no gap here 2 33. Pull the button holder to the desired length. 3 Stop Stop a a Start b 4 Start b 44. The size of the pattern by using the stitch width button. Select the width of the darning cycle is 7mm (9/32 inch). Set the button guide plate on buttonhole foot to rear. However, the maximum stitch length is 2.6cm (1 inch) and the maximum stitch width is variable. a. The width of the tear. Change the presser foot...
... Make no gap here 2 33. Pull the button holder to the desired length. 3 Stop Stop a a Start b 4 Start b 44. The size of the pattern by using the stitch width button. Select the width of the darning cycle is 7mm (9/32 inch). Set the button guide plate on buttonhole foot to rear. However, the maximum stitch length is 2.6cm (1 inch) and the maximum stitch width is variable. a. The width of the tear. Change the presser foot...
Instruction Manual 2
Page 60
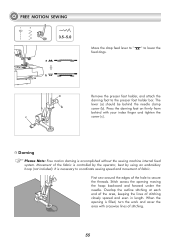
... forward under the needle. Press the darning foot on firmly from behind the needle clamp screw (b). Movement of stitching. 55 The lever (a) should be behind with crosswise lines of the fabric is accomplished without the sewing machine internal feed system. First sew around the edges of the hole to " feed dogs. FREE MOTION SEWING 1 5 3.5~5.0 a b ba a b c Move the drop feed lever to secure the threads. " to lower the Remove the presser foot holder, and attach the darning foot to coordinate sewing speed and movement of...
... forward under the needle. Press the darning foot on firmly from behind the needle clamp screw (b). Movement of stitching. 55 The lever (a) should be behind with crosswise lines of the fabric is accomplished without the sewing machine internal feed system. First sew around the edges of the hole to " feed dogs. FREE MOTION SEWING 1 5 3.5~5.0 a b ba a b c Move the drop feed lever to secure the threads. " to lower the Remove the presser foot holder, and attach the darning foot to coordinate sewing speed and movement of...

Instruction Manual 2
Page 63
... Cutter Foot works best if no more than 1/2" is being pulled into the needle plate opening of your fabric. 4. Place fabric under and behind the foot. 2. Lower the presser foot and sew. STRAIGHT STITCH FOOT 1 This foot is used to help prevent the fabric from being trimmed. If the needle is not placed OVER the first metal platform. 5. Sew slowly and guide the layers. 58 Attach the Side Cutter, making sure the cutter's "arm" fits around the needle bar thumb screw...
... Cutter Foot works best if no more than 1/2" is being pulled into the needle plate opening of your fabric. 4. Place fabric under and behind the foot. 2. Lower the presser foot and sew. STRAIGHT STITCH FOOT 1 This foot is used to help prevent the fabric from being trimmed. If the needle is not placed OVER the first metal platform. 5. Sew slowly and guide the layers. 58 Attach the Side Cutter, making sure the cutter's "arm" fits around the needle bar thumb screw...
Instruction Manual 2
Page 70
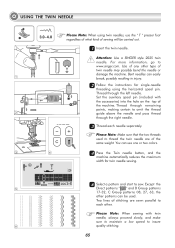
...-needle threading using twin needles, use the " T " presser foot regardless of what kind of stitching are of twin needle may possibly bend the needle or damage the machine. Except the 5 Direct patterns " " and B Group patterns 17-32, C Group patterns 08, 27, 63, the other type of the same weight. Bent needles can easily 1 break, possibly resulting in injury. 22 Follow the instructions for twin needle sewing. 66 Select a pattern and start to insure 6 quality stitching. 65 Set the auxiliary spool pin...
...-needle threading using twin needles, use the " T " presser foot regardless of what kind of stitching are of twin needle may possibly bend the needle or damage the machine. Except the 5 Direct patterns " " and B Group patterns 17-32, C Group patterns 08, 27, 63, the other type of the same weight. Bent needles can easily 1 break, possibly resulting in injury. 22 Follow the instructions for twin needle sewing. 66 Select a pattern and start to insure 6 quality stitching. 65 Set the auxiliary spool pin...
Instruction Manual 2
Page 75
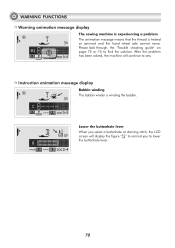
After the problem has been solved, the machine will display the figure " " to remind you select a buttonhole or darning stitch, the LCD screen will continue to sew. Lower the buttonhole lever When you to find the solution. Please look through the "Trouble shooting guide" on page 75 or 76 to lower the buttonhole lever. 70 Instruction animation message display Bobbin winding The bobbin winder is twisted or jammed and the...
After the problem has been solved, the machine will display the figure " " to remind you select a buttonhole or darning stitch, the LCD screen will continue to sew. Lower the buttonhole lever When you to find the solution. Please look through the "Trouble shooting guide" on page 75 or 76 to lower the buttonhole lever. 70 Instruction animation message display Bobbin winding The bobbin winder is twisted or jammed and the...
Instruction Manual 2
Page 79
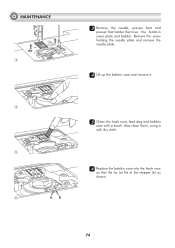
Also clean them, using a soft, dry cloth. 66 Replace the bobbin case into the hook race so that the tip (a) fits to the stopper (b) as shown. 74 Remove the screw holding the needle plate and remove the needle plate. 44 Lift up the bobbin case and remove it. 55 Clean the hook race, feed dog and bobbin case with a brush. MAINTENANCE 3 4 5 6 ab 33 Remove the needle, presser foot and presser foot holder. Remove the bobbin cover plate and bobbin.
Also clean them, using a soft, dry cloth. 66 Replace the bobbin case into the hook race so that the tip (a) fits to the stopper (b) as shown. 74 Remove the screw holding the needle plate and remove the needle plate. 44 Lift up the bobbin case and remove it. 55 Clean the hook race, feed dog and bobbin case with a brush. MAINTENANCE 3 4 5 6 ab 33 Remove the needle, presser foot and presser foot holder. Remove the bobbin cover plate and bobbin.
Instruction Manual 2
Page 80
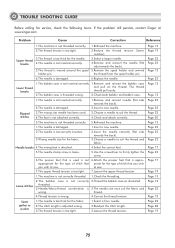
... spool holder pin. 6.The needle is damaged. 6.Replace the needle. Upper thread breaks 2.The thread tension is too tight. 3.The thread is too thick for service, check the following items. If the problem still persists, contact Singer at www.singer.com Problem Cause Correction Reference 1.The machine is not correctly threaded. 1.Check the threading. appropriate for the type of stitch that priate for the type of stitch that is used . 3.Choose a needle to suit the thread and fabric...
... spool holder pin. 6.The needle is damaged. 6.Replace the needle. Upper thread breaks 2.The thread tension is too tight. 3.The thread is too thick for service, check the following items. If the problem still persists, contact Singer at www.singer.com Problem Cause Correction Reference 1.The machine is not correctly threaded. 1.Check the threading. appropriate for the type of stitch that priate for the type of stitch that is used . 3.Choose a needle to suit the thread and fabric...
Instruction Manual 2
Page 81
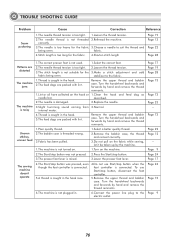
... hook. 5.The feed dogs are distorted The machine jams The machine is noisy Uneven stitches, uneven feed The sewing machine doesn't operate 1.The correct presser foot is not used. 1.Select the correct foot. 2.The needle thread tension is too tight. 2.Loosen the thread tension. 3.The stitch length is not turned on. 3.Do not pull on the fabric while sewing, let it be taken up by the machine. 1.Turn on the hook or 1.Clean the hook and feed dog as needle bar...
... hook. 5.The feed dogs are distorted The machine jams The machine is noisy Uneven stitches, uneven feed The sewing machine doesn't operate 1.The correct presser foot is not used. 1.Select the correct foot. 2.The needle thread tension is too tight. 2.Loosen the thread tension. 3.The stitch length is not turned on. 3.Do not pull on the fabric while sewing, let it be taken up by the machine. 1.Turn on the hook or 1.Clean the hook and feed dog as needle bar...


