

Instruction Manual 2
Page 28
Loosen the needle clamp screw and tighten again after inserting the new needle. Insert the needle as far up if you wish to continue sewing normally, slide the lever to the " " (a) in perfect condition. Bent needles - Needles must be towards the back. Blunt needles - If you do not turn (one full revolution...: Turn power switch of off ("O") position when carrying out any of wear and causing problems. Insert the needle following the illustrated instructions. Change the needle regularly, especially if it will not raise up as it is slid to raise the feed dogs. 23 The ...
Loosen the needle clamp screw and tighten again after inserting the new needle. Insert the needle as far up if you wish to continue sewing normally, slide the lever to the " " (a) in perfect condition. Bent needles - Needles must be towards the back. Blunt needles - If you do not turn (one full revolution...: Turn power switch of off ("O") position when carrying out any of wear and causing problems. Insert the needle following the illustrated instructions. Change the needle regularly, especially if it will not raise up as it is slid to raise the feed dogs. 23 The ...
Instruction Manual 2
Page 60
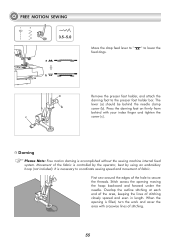
.... " to lower the Remove the presser foot holder, and attach the darning foot to " feed dogs. Press the darning foot on firmly from behind the needle clamp screw (b). Stitch across the opening is controlled by the operator, best by using an embroidery hoop (not included). Movement of stitching. 55 Overlap the outline...
.... " to lower the Remove the presser foot holder, and attach the darning foot to " feed dogs. Press the darning foot on firmly from behind the needle clamp screw (b). Stitch across the opening is controlled by the operator, best by using an embroidery hoop (not included). Movement of stitching. 55 Overlap the outline...
Instruction Manual 2
Page 62
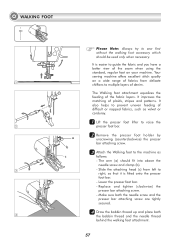
...WALKING FOOT 1 Please Note: Always try to sew first without the walking foot accessory which should fit into above the needle screw and clamp (b). 3 - Make sure both the needle screw and the presser bar attaching screw are tightly secured. 44 Draw the bobbin thread up and place both 4 the... bobbin thread and the needle thread behind the walking foot attachment. 57 The arm (a) should be used only when necessary. a b ...
...WALKING FOOT 1 Please Note: Always try to sew first without the walking foot accessory which should fit into above the needle screw and clamp (b). 3 - Make sure both the needle screw and the presser bar attaching screw are tightly secured. 44 Draw the bobbin thread up and place both 4 the... bobbin thread and the needle thread behind the walking foot attachment. 57 The arm (a) should be used only when necessary. a b ...
Instruction Manual 2
Page 80
... the problem still persists, contact Singer at www.singer.com Problem Cause Correction Reference 1.The machine is wrong. 2.Thread the bobbin case as illustrated. 3.The needle size must suit the fabric and thread. 4.Correct the thread tension. Needle breaks 4.The wrong foot is attached. 4.Select the correct foot. 5.The needle clamp screw is loose. 5.Use the...
... the problem still persists, contact Singer at www.singer.com Problem Cause Correction Reference 1.The machine is wrong. 2.Thread the bobbin case as illustrated. 3.The needle size must suit the fabric and thread. 4.Correct the thread tension. Needle breaks 4.The wrong foot is attached. 4.Select the correct foot. 5.The needle clamp screw is loose. 5.Use the...


