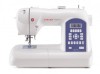
Singer 5625 STYLIST II Support and Manuals
Get Help and Manuals for this Singer item
View All Support Options Below
Free Singer 5625 STYLIST II manuals!
Problems with Singer 5625 STYLIST II?
Ask a Question
Free Singer 5625 STYLIST II manuals!
Problems with Singer 5625 STYLIST II?
Ask a Question
Popular Singer 5625 STYLIST II Manual Pages
Instruction Manual - Page 2
... any air openings blocked. "Always unplug sewing machine from all instructions before
operating
"SAVE THESE INSTRUCTIONS" "This product is a registered trademark of the appliance before carrying out maintenance or
replacing lamps." 12. Unplug the foot controller of The Singer Company Limited or its affiliates. ©2010 The Singer Company Limited or its intended use the...
Instruction Manual - Page 5
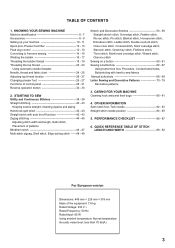
KNOWING YOUR SEWING MACHINE Machine identification 6 - 7 Accessories 8 - 9 Setting up your machine 10 - 11 Spool pins, Presser foot lifter 12 - 13 Feed dog control 12 - 13 Converting to -sew fabrics Manual buttonhole 68 - 69 Letter Sewing and Decorative Patterns 70 - 79 Decorative patterns
3. TABLE OF CONTENTS
1. PERFORMANCE CHECKLIST 86 - 87
6. STARTING TO SEW Utility and ...
Instruction Manual - Page 8

... 4. Extension table (Accessory box) 8. Horizontal spool pin 12. Thread guide 22. Presser foot screw 23. Needle bar 26. Pre-tension guide 2. Feed dog control 19. Needle 24. Needle plate 32. 1. ... 35. Instruction manual
2 3 4 5 6 7
12 13
14 15
20 21 22 23 24
1
8
9
10
11
16 17
19 18
25 26 27 28 29 30 31 32
33
34
35
6 KNOWING YOUR SEWING MACHINE
MACHINE IDENTIFICATION
...
Instruction Manual - Page 12
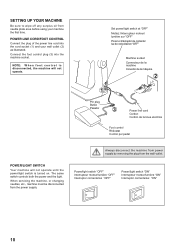
... foot control plug (3) into the cord socket (1) and your machine the first time.
NOTE: W h e n f o o t c o n t r o l i s disconnected, the machine will not operate until the power/light switch is turned on.
When servicing the machine, or changing needles, etc., machine must be disconnected from the wall-outlet. SETTING UP YOUR MACHINE
Be sure to wipe off any surplus oil from...
Instruction Manual - Page 28
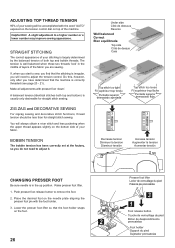
... set at the factory, so you are sewing. Place the desired foot on top of the machine....sew, you will always obtain a nicer stitch and less puckering when the upper thread appears slightly on the foot.
2
26
Presser foot lifter Levier de verrouillage du pied Palanca pie prensatelas
3
1
Foot release button Touche de verrouillage du pied Boton de desprendimiento prensatelas
Foot holder Support...
Instruction Manual - Page 30
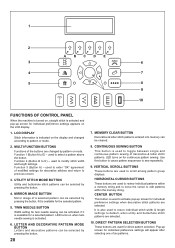
... string and to move the cursor to modify stitch width and length settings. Function 2 (Button B to scroll among pattern group displays. used to E) - HORIZONTAL CURSOR BUTTONS
These buttons are selected. LED turns on when twin needle sewing is activated.
6.
used to review individual patterns within the memory string. UTILITY STITCH MODE BUTTON
Utility...
Instruction Manual - Page 36
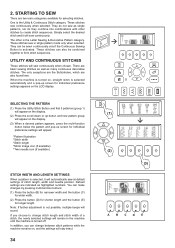
...-function button below the pattern and pop-up screen for individual preference settings will appear:
*Pattern illustration *Stitch width *Stitch length *Mirror image icon (if available)...only if the Continuous Sewing Button is turned off.
UTILITY AND CONTINUOUS STITCHES
These stitches will sew continuously. These stitches sew in the machine until the machine is activated. You...
Instruction Manual - Page 38
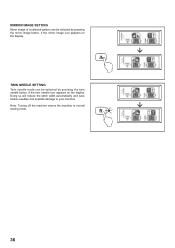
... IMAGE SETTING
Mirror image of a selected pattern can be selected by pressing the twin needle button, if the twin needle icon appears on the display.
Note: Turning off the machine returns the machine to your machine. Doing so will reduce the stitch width automatically and save broken needles and possible damage to normal sewing mode...
Instruction Manual - Page 46
... Position centrale Aguja posicionada en el centro
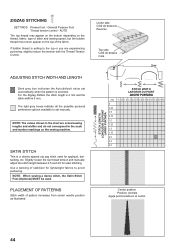
44 ZIGZAG STITCHING
SETTINGS :Presser foot - AUTO
The top thread may appear on the bottom depending on the thread, fabric, type of stitch and sewing speed, but the bobbin thread must never appear on the sewing machine.
General Purpose Foot :Thread tension control - The light grey boxes...
Instruction Manual - Page 48
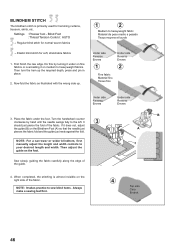
... fold of the guide.
Sew slowly, guiding the fabric carefully along the edge of the fabric. NOTE: For a narrower or wider blindhem, first manually adjust the length and width controls to sew blind hems. Always make a sewing test first.
4
Top side Cara Endroit
46
NOTE: It takes practice to your desired length and width. Settings : Presser foot...
Instruction Manual - Page 50
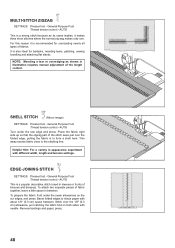
... or fronts of fabric together, leave a little space in illustration requires manual adjustment of the length control.
AUTO
Turn under the seam allowances on...-STITCH ZIGZAG
SETTINGS :Presser foot - SHELL STITCH
(Mirror image)
SETTINGS :Presser foot - Trim away excess fabric close to form a shell hem.
It is recommended for bartacks, mending tears, patching, sewing towelling and ...
Instruction Manual - Page 52
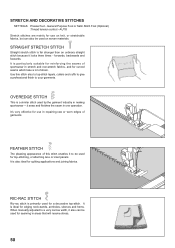
...for use on woven materials. STRETCH AND DECORATIVE STITCHES
SETTINGS :Presser foot - AUTO
Stretch stitches are mainly for ...but can be used by the garment industry in repairing raw or worn edges of this stitch also to... edging neck-bands, armholes, sleeves and hems. When manually adjusted to a very narrow width, it to your ...sews and finishes the seam in areas that will receive stress.
50
Instruction Manual - Page 62

Sew 10 stitches across. General Purpose Foot :Feed dog control -
Helpful Hint: To secure thread, pull both left and right openings of...needle clears both threads to the backside of it. If a shank is required, place a pin on top of the button and sew over top of the fabric and tie together.
60 Lower presser foot. SEWING ON A BUTTON
SETTINGS :Presser foot - Adjust width if required.
Instruction Manual - Page 70
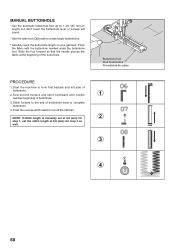
.... Buttonhole foot Pied boutonnière Prensatelas de ojales
PROCEDURE
1. NOTE: If stitch length is manually set at 0.8 (mm) for
2
step 1, set the stitch length at the beginning of buttonhole mark to complete buttonhole.
4.
Start the machine to the end of the buttonhole. Sew second bartack and stitch backward until needle
1
reaches beginning of
buttonhole...
Instruction Manual - Page 82
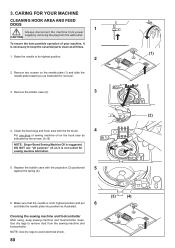
... at all purpose" oil as illustrated. Cleaning the sewing machine and footcontroller
After using, keep the essential parts clean at its highest position.
2
2. CARING FOR YOUR MACHINE
CLEANING HOOK AREA AND FEED DOGS
1
Always disconnect the machine from power CAUTION supply by the arrows. (A, B)
NOTE: Singer Brand Sewing Machine Oil is necessary to remove dust from the wall...
Singer 5625 STYLIST II Reviews
We have not received any reviews for Singer yet.