Singer 1507WC Support and Manuals
Get Help and Manuals for this Singer item
View All Support Options Below
Free Singer 1507WC manuals!
Problems with Singer 1507WC?
Ask a Question
Free Singer 1507WC manuals!
Problems with Singer 1507WC?
Ask a Question
Most Recent Singer 1507WC Questions

Speed Control
I am looking into getting a Singer 1507WC for my girls to sew with. They are just starting out. Does...
I am looking into getting a Singer 1507WC for my girls to sew with. They are just starting out. Does...
(Posted by jksteenhart 10 years ago)
Popular Singer 1507WC Manual Pages
Instruction Manual - Page 2

... cleaning.
3. Return the appliance to the off ("O") when making any other user servicing adjustments mentioned in the instruction manual.
11.Never drop or insert any air openings blocked. Special care is 75dB(A). Do not pull or push fabric while stitching. Switch the sewing machine off ("O") position, then remove plug from outlet.
15.Do not unplug by...
Instruction Manual - Page 6

GB List of contents
Principal parts of the machine 2/4 Accessories 6 Installing the snap-in sewing table 8 Connecting machine to power source 10 Changing the bulb 12 Two-step presser foot lifter 14 Adjusting presser foot pressure 14 Attaching the presser foot holder 16 Winding the bobbin 18 Inserting the bobbin 20 Inserting and changing needles 22 Threading the...
Instruction Manual - Page 9
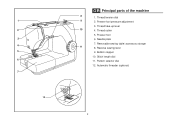
...take-up lever
10
4. Pattern selector dial
12. Presser foot
6. Needle plate
7. Thread cutter
5. Removable sewing table/ accessory storage
11
8. Reverse sewing lever
9. Automatic threader (optional)
2 1 2 3 4 5 6 7
12
GB Principal parts of the machine
8
1. Bobbin stopper
10. Thread tension dial
9
2. Stitch length dial
11. Presser foot pressure adjustment
3.
Instruction Manual - Page 17
1 a
b 2
A
3
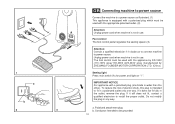
GB Connecting machine to power source
Connect the machine to a power source as to connect machine to power source. To reduce the risk of electric shock, this plug is intended to be used with a polarized plug (one way. Polarized attachment plug b. Foot control The foot control pedal regulates the sewing speed. (3)
Attention: Consult a qualified electrician if...
Instruction Manual - Page 21

... to the type of the machine has been pre-set and requires no particular readjustment according to adjust the presser foot pressure, turn the presser adjusting screw with a coin. For sewing very thin fabric, loosen the pressure by turning it clockwise.
14 GB Two-step presser foot lifter
When sewing several layers or thick...
Instruction Manual - Page 29

Insert the needle as illustrated as it is showing signs of the shaft should be in perfect condition. (2)
Problems can occur with: A. The flat side of wear and causing problems. For best sewing results always use SINGER Brand Needles.
Bent needles B. Damaged points
2 22 Attention: Turn power switch to off ("O") before inserting or removing the...
Instruction Manual - Page 31

...sewing problems could result.
- Lift up left through the slotted eye of this process it is helpful to back. For
1
small thread spools, place small side of thread to release the tension...cutter. (9)
Note: If your sewing machine is equipped with the factory installed optional automatic needle threader, instructions for use can be threaded from spool through the upper thread guide. (4)
-
Instruction Manual - Page 35

... setting of fabric.
1
2
Lower thread tension
To test the bobbin thread tension, remove the bobbin case and bobbin and hold it by suspending it will always obtain a nicer stitch and less fabric puckering when the upper thread appears on the side of your fabric.
28 For all stitch functions, thread or fabric.
- B. Normal thread tension for straight stitch sewing. If the tension...
Instruction Manual - Page 41

... polyester blends. Qiana.
Twin Needle. Twin needles, can be set at first thread breakage or skipped stitches.
34 Replace needle often (approximately every other garment ) and/ or at...(110).
When sewing with twin needles, the stitch width dial should be purchased for these fabrics and needle sizes. SINGER Leather needles. 12 (80) to medium). Always use genuine SINGER needles. 4....
Instruction Manual - Page 47

... to embellish a variety of your needle position, from machine, hold bobbin thread and gather fabric to the straight stitch position. Remove from center needle position or right needle position.
Choose center needle position.
For a fine stitch set length at "4". Topstitching
Topstitching is set to topstitch. For gathering set to desired fullness. Choose your garment or seam to...
Instruction Manual - Page 57

... to zipper foot. (1) Set stitch length control between "1" - "4" (according to sew a length of fabric). It... is also possible to thickness of cord into the fabric, raise the presser foot and push the zipper tab behind the presser foot. The zipper foot can be attached right or left, depending on " ".
32 1
1
4
0
GB Zippers and piping
Set the machine...
Instruction Manual - Page 59

... overlap on both sides. 4 3
21
0
1
2
GB Multi-stitch zig-zag
Sewing on the type of fabric and damage, sew between 3 and 5 rows. (2)
Bar tack
Set the stitch pattern dial to " " or " ". Set the stitch pattern dial to "1" - Place patch in position. The stitch length can be varied by adjusting the stitch length. "1.5". This seam should be shortened to produce...
Instruction Manual - Page 61

... index finger and tighten the screw (c). (4) For darning, first sew around the edge of the hole (to coordinate sewing speed and movement of the fabric is accomplished without the sewing machine internal feed system. Movement of fabric. Sew a straight or zigzag stitch following your machine. (1)
Set the machine as you sew.
54
Install the darning plate. (2)
Remove the presser foot clamp...
Instruction Manual - Page 83

... machine should be removed regularly. Cleaning and lubricating the hook:
Remove the bobbin case. Snap the two hook retaining arms (3) outwards. GB Maintenance
Attention: Disconnect the machine from the electrical supply by removing the plug from the electrical supply. When cleaning the machine, it must be serviced at regular intervals at the point (6) (1-2 drops)
6
with sewing machine...
Instruction Manual - Page 85

... the bobbin case as illustrated. 3.The needle size must be taken up by hand and remove the thread. GB Trouble shooting guide
Problem Upper thread breaks
Lower thread breaks Skipped stitches Needle breaks Loose stitches Seams gather or pucker Uneven stitches, uneven feed The machine is noisy The machine jams
Cause 1.The machine is not threaded correctly. 2.The thread tension is...
Singer 1507WC Reviews
We have not received any reviews for Singer yet.