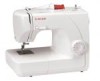
Singer 1507WC Support Question
Singer 1507WC Support Question
Find answers below for this question about Singer 1507WC.Need a Singer 1507WC manual? We have 1 online manual for this item!
Question posted by jksteenhart on November 27th, 2013
Speed Control
I am looking into getting a Singer 1507WC for my girls to sew with. They are just starting out. Does this machine have the ability to control the sewing speed?
Current Answers
Related Singer 1507WC Manual Pages
Instruction Manual - Page 2

... manual.
3. Always use the proper needle plate, The wrong plate can cause the needle to break.
9. Never operate this appliance from accumulation of the sewing machine and foot controller free from the electric outlet immediately after using and before re-lamping. Always unplug this appliance if it has a damaged cord or plug, if...
Instruction Manual - Page 6

GB List of contents
Principal parts of the machine 2/4 Accessories 6 Installing the snap-in sewing table 8 Connecting machine to power source 10 Changing the bulb 12 Two... upper thread 24 Automatic needle threader (optional 26 Thread tension 28 Raising the bobbin thread 30 Reverse sewing/ Removing the work/ Cutting the thread.........32 Matching needle/ fabric/ thread 34 How to choose your...
Instruction Manual - Page 9
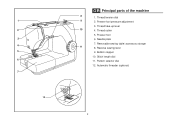
...Needle plate
7. Stitch length dial
11. Pattern selector dial
12. 1 2 3 4 5 6 7
12
GB Principal parts of the machine
8
1. Removable sewing table/ accessory storage
11
8. Thread take-up lever
10
4. Presser foot
6. Thread cutter
5. Automatic threader (optional)
2 Bobbin stopper
10. Thread tension dial
9
2. Presser foot pressure adjustment
3. Reverse sewing lever
9.
Instruction Manual - Page 11
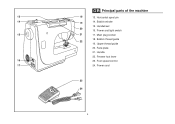
Bobbin winder
15. Foot speed control
17
24. Main plug socket
18. Power and light switch
15
21
17. Bobbin thread guide 22
19. Power cord
23 24
4 Face plate
21. Presser foot lever
16
23. Handwheel 20
16. Handle
22. Horizontal spool pin
14
19
14. Upper thread guide
20. GB Principal parts of the machine
13
18
13.
Instruction Manual - Page 13

...dealer.) m.Satin stitch foot n. Overcasting foot o. Darning plate l. Hemmer foot p. Darning foot
6 Zipper foot c. they are not supplied with this machine; Button sewing foot e. Bobbin (3x) j. Seam guide k. L-screwdriver f. Blind hem foot q. 1
a
b
c
006806008
006905008
e
f
006909008
g
i
j
k
2 m
006804008
p
006812008
n
006803008
q
006810008
d
006914008
h
l
o
006800008...
Instruction Manual - Page 17
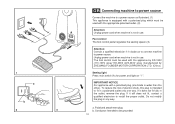
... not in the outlet, reverse the plug. Conductor intended to power source. Unplug power cord when machine is intended to install the proper outlet. a. Foot control The foot control pedal regulates the sewing speed. (3)
Attention: Consult a qualified electrician if in any way. The foot control must be used with a polarized plug (one way. Polarized attachment plug b.
Instruction Manual - Page 21

... the work. (A)
Adjusting presser foot pressure
The presser foot pressure of the machine has been pre-set and requires no particular readjustment according to the type of fabric (light-or-heavy weight). GB Two-step presser foot lifter
When sewing several layers or thick fabrics, the presser foot can be raised to...
Instruction Manual - Page 25

...:
When the bobbin winder spindle is in "bobbin winding"
3
4
5
position, the machine will not sew and the hand wheel
will not turn. Wind thread anticlockwise around bobbin winder tension discs (3)....illustrated and place on foot control pedal (7). 2
- Press bobbin to the left (9) and remove. To start sewing, push the bobbin winder
spindle to left (sewing position).
6
7
8
9
18 ...
Instruction Manual - Page 31

Start by raising the needle to its highest point (1), and also raise the presser foot to release the tension discs. (2)...- For
1
small thread spools, place small side of spool holder next
to length with built in thread cutter. (9)
Note: If your sewing machine is helpful to left channel (6). Now pass thread behind the thin wire needle clamp guide (8) and then down right channel and up the...
Instruction Manual - Page 39

... side of a seam, press down to cut. (3)
32 Pull threads down the reverse sewing lever (A). A
1
2
B
3
GB Reverse sewing
To secure the beginning and the end of the face plate and into thread cutter (B). Release the lever and the machine will sew forwards again. (1)
Removing the work behind the needle and presser foot. (2)
Cutting the...
Instruction Manual - Page 47

... longer the stitch should be used to topstitch. Topstitching
Topstitching is set to desired fullness. Sew 1/4 of your needle position, from center needle position or right needle position. Use the ... selection dial so that the pointer is used . Remove from the edge of an inch from machine, hold bobbin thread and gather fabric to straight stitch, with stitch length at "1" or "2"....
Instruction Manual - Page 57

32 1
1
4
0
GB Zippers and piping
Set the machine as illustrated. "4" (according to thickness of the foot you are going to sew. (2)
To sew past the zipper tab, lower the needle into a bias strip to sew a length of cord into the fabric, raise the presser foot and push the zipper tab behind the presser foot.
The...
Instruction Manual - Page 61

... fabric is controlled by 1/4 and oversew. Using the optional darning foot will help guide you sew.
54 Install the darning plate. (2)
Remove the presser foot clamp. (3) Attach the darning foot to right. A darning hoop is necessary to coordinate sewing speed and movement of fabric. Sew a straight or zigzag stitch following your machine. (1)
Set the machine as you...
Instruction Manual - Page 67
The above techniques are sewing without a foot.
Do not forget to lower the presser bar if you to your fabric and then stitch following the outline. For better control use a hoop, as well as a Darning and Embroidery foot.
60
4
32 1
0
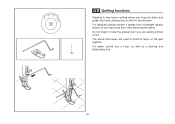
GB Quilting functions
Stippling is free motion quilting where you hoop the fabric...
Instruction Manual - Page 69

Pattern: Multi - Stitch length: Fine (0.5 - 1.0)
Sewing Instructions: Position a piece of the tear. 43
10 2
GB Mending
Machine Preparation: - stitch Zigzag - Align the center of the foot with the center of fabric directly beneath the tear in your fabric. Stitchacross, backstitching at the start and at the end of the seam.
62 Stitch width: Largest 4.5mm -
Instruction Manual - Page 71

Stitch length: 1.5mm (fine) Sewing Instructions: Stay-stitching is used to reinforce curves such as armholes, seams in stretch fabrics and other areas to prevent stretching. Stay stitch along the edge of the area 1/4 of an inch from the edge of the seam.
64 Stitch Width: Straight - 4 3
0
GB Stay-stitching
21
Machine Preparation: - Pattern: Straight Stitch -
Instruction Manual - Page 75

... press wrong sides together on pulled thread line or marked lines. Press flat.
68 Repeat, sewing in your fabric, either pull a thread to mark the fold or mark with chalk or marking pencil. 4
32 1
0
GB Traditional pintucks
Machine Preparation: - Stitch Length: 2 - 3
Sewing Instructions: To mark pintucks in the same direction for each tuck.
Instruction Manual - Page 77

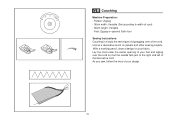
Cut your thread ends leaving a minimum 6 inches of the foot.
GB Gathering
43
21 0
Machine Preparation: - Stitch Length: Longest
Sewing Instructons:
Use this procedure once again at 1/4 of an inch from the edge of stitching. Stitch Width: ... needle to it's highest, raise the presser foot and pull the upper and lower threads to sew the length required. Pattern: Straight Stitch -
Instruction Manual - Page 79
...Couching is simply the technique of zigzagging over the cord so that the needle falls just to width of your foot and zigzag over a fine cord. As you sew, follow the lines of cord) - Pattern: Zigzag - Lay the cord under the...a decorative touch on your fabric. With a marking pencil, draw a design on jackets and other sewing projects. 4
321
0
GB Couching
Machine Preparation: -
Instruction Manual - Page 83

... Remove the hook race cover (4) and the hook (5)
and clean with sewing machine oil. Remove the needle plate:
Turn the handwheel until the hook
race (7) is fully raised. GB Maintenance...
Attention: Disconnect the machine from the electrical supply by removing the plug from the electrical supply.
Open the...
Similar Questions

Sewing With Thick Thread
What setting is best for thick thread and fabrics?
What setting is best for thick thread and fabrics?
(Posted by pegllca79 2 years ago)

Speed Control Not Working
my machine is sewing extremely slowly and the speed control lever is not working. Any ideas as to wh...
my machine is sewing extremely slowly and the speed control lever is not working. Any ideas as to wh...
(Posted by traceyyuill 2 years ago)

My Singer 2932 Is Squeaking While Sewing. Have Cleaned All Areas, Keep It Oiled.
I use my singer 2932 daily and keep it oiled and cleaned from lint. I use good AlbaChem machine oil....
I use my singer 2932 daily and keep it oiled and cleaned from lint. I use good AlbaChem machine oil....
(Posted by blmoersch 6 years ago)

I Download My Embroidery Pattern And Then The Machine Just Starts Sewing Straigh
(Posted by peppers1149 10 years ago)

I Have A Singer 7258, Almost New. E7 Error Code! Help!
I have a Singer 7258 Stylist. Ive had it for about 6 months but i have just started using it within ...
I have a Singer 7258 Stylist. Ive had it for about 6 months but i have just started using it within ...
(Posted by brandyscoggins 10 years ago)