

Instruction Manual 2
Page 3
... appliance only for its intended use the proper needle plate, as contained in the instruction manual. 11. Always use as threading needle, changing needle, threading bobbin, changing presser foot or changing the light. 10. Always unplug sewing machine from the electrical outlet when removing covers, lubricating, or when making any object...
... appliance only for its intended use the proper needle plate, as contained in the instruction manual. 11. Always use as threading needle, changing needle, threading bobbin, changing presser foot or changing the light. 10. Always unplug sewing machine from the electrical outlet when removing covers, lubricating, or when making any object...
Instruction Manual 2
Page 4
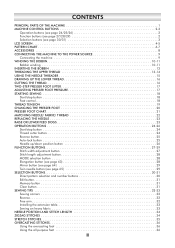
... (see page 30/31 3 LCD SCREEN 4-5 PATTERN CHART 6-7 ACCESSORIES 8 CONNECTING THE MACHINE TO THE POWER SOURCE 9 Connecting the machine 9 WINDING THE BOBBIN 10-11 Bobbin winding 10-11 INSERTING THE BOBBIN 12 THREADING THE UPPER THREAD 13-14 USING THE NEEDLE THREADER 15 DRAWING UP THE LOWER THREAD 16 CUTTING THE THREAD 16...
... (see page 30/31 3 LCD SCREEN 4-5 PATTERN CHART 6-7 ACCESSORIES 8 CONNECTING THE MACHINE TO THE POWER SOURCE 9 Connecting the machine 9 WINDING THE BOBBIN 10-11 Bobbin winding 10-11 INSERTING THE BOBBIN 12 THREADING THE UPPER THREAD 13-14 USING THE NEEDLE THREADER 15 DRAWING UP THE LOWER THREAD 16 CUTTING THE THREAD 16...
Instruction Manual 2
Page 6
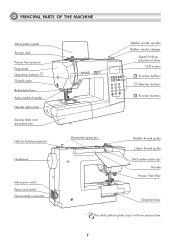
... box Hole for Auxiliary spool pin Handwheel Main power switch Power cord socket Foot controller connector Bobbin winder spindle Bobbin winder stopper Speed limiting adjustment lever LCD screen B Function buttons C Selection buttons B Function buttons Horizontal spool pin Bobbin thread guide Upper thread guide Stitch pattern plate clip* Handle Presser foot lifter Drop feed...
... box Hole for Auxiliary spool pin Handwheel Main power switch Power cord socket Foot controller connector Bobbin winder spindle Bobbin winder stopper Speed limiting adjustment lever LCD screen B Function buttons C Selection buttons B Function buttons Horizontal spool pin Bobbin thread guide Upper thread guide Stitch pattern plate clip* Handle Presser foot lifter Drop feed...
Instruction Manual 2
Page 9
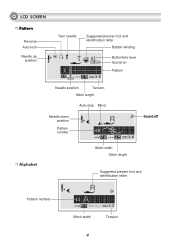
LCD SCREEN Pattern Reverse Auto-lock Needle up position Twin needle Suggested presser foot and identification letter Bobbin winding Buttonhole lever Sound on Pattern Needle position Tension Stitch length Auto-stop Mirror Needle down position Pattern number Sound off Alphabet Stitch width Stitch length Suggested presser foot and identification letter Pattern number Stitch width Tension 4
LCD SCREEN Pattern Reverse Auto-lock Needle up position Twin needle Suggested presser foot and identification letter Bobbin winding Buttonhole lever Sound on Pattern Needle position Tension Stitch length Auto-stop Mirror Needle down position Pattern number Sound off Alphabet Stitch width Stitch length Suggested presser foot and identification letter Pattern number Stitch width Tension 4
Instruction Manual 2
Page 13
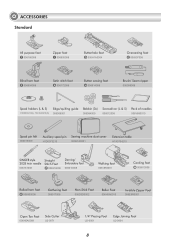
... stitch foot A 006172008 Button sewing foot H 006914008 Brush/ Seam ripper 006099008 Spool holders (L & S) Edge/quilting guide Bobbin (3x) Screwdriver (L & S) Pack of needles H1D0083210(L) TA10943210(S) 006008001 006084009 006012008 006V880010 Spool pin felt 006015009 Auxiliary spool... pin Sewing machine dust cover H1D0073210 020H7A0001 Extension table H7A0754210 SINGER style 2025 twin needle 006161008 Straight Stitch Foot P 006916008 Darning/ Embroidery foot 006016008 Walking foot 0061850081 Cording ...
... stitch foot A 006172008 Button sewing foot H 006914008 Brush/ Seam ripper 006099008 Spool holders (L & S) Edge/quilting guide Bobbin (3x) Screwdriver (L & S) Pack of needles H1D0083210(L) TA10943210(S) 006008001 006084009 006012008 006V880010 Spool pin felt 006015009 Auxiliary spool... pin Sewing machine dust cover H1D0073210 020H7A0001 Extension table H7A0754210 SINGER style 2025 twin needle 006161008 Straight Stitch Foot P 006916008 Darning/ Embroidery foot 006016008 Walking foot 0061850081 Cording ...

Instruction Manual 2
Page 15
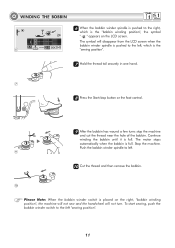
For smaller spools of thread, place the small side of the inner holes in the bobbin as illustrated and place empty bobbin on the spindle. 4 5 Push the bobbin to right. 5 10 WINDING THE BOBBIN 2 1 3 4 10 Bobbin winding 1 1 Place the thread and spool holder onto the spool pin. If the thread spool has a...this end of the spool toward the right, so the thread doesn't get caught while winding the bobbin. 2 Snap the thread into the thread guide. 2 3 Wind the thread counter-clockwise around the bobbin winder tension disks. 3 4 Place the thread end through one of the spool holder toward the ...
For smaller spools of thread, place the small side of the inner holes in the bobbin as illustrated and place empty bobbin on the spindle. 4 5 Push the bobbin to right. 5 10 WINDING THE BOBBIN 2 1 3 4 10 Bobbin winding 1 1 Place the thread and spool holder onto the spool pin. If the thread spool has a...this end of the spool toward the right, so the thread doesn't get caught while winding the bobbin. 2 Snap the thread into the thread guide. 2 3 Wind the thread counter-clockwise around the bobbin winder tension disks. 3 4 Place the thread end through one of the spool holder toward the ...
Instruction Manual 2
Page 16
...turns stop the machine and cut the thread near the hole of the bobbin. The symbol will not turn. Push the bobbin winder spindle to the left, which is the "bobbin winding position", the symbol " " appears on the right, "bobbin winding position", the machine will not sew and the handwheel will disappear... from the LCD screen when the bobbin winder spindle is pushed to left. 9 10 Cut the thread and then remove the bobbin. 10 Please Note: When the bobbin winder switch is full. To start sewing, push the bobbin winder switch to the right, which is full. ...
...turns stop the machine and cut the thread near the hole of the bobbin. The symbol will not turn. Push the bobbin winder spindle to the left, which is the "bobbin winding position", the symbol " " appears on the right, "bobbin winding position", the machine will not sew and the handwheel will disappear... from the LCD screen when the bobbin winder spindle is pushed to left. 9 10 Cut the thread and then remove the bobbin. 10 Please Note: When the bobbin winder switch is full. To start sewing, push the bobbin winder switch to the right, which is full. ...
Instruction Manual 2
Page 17
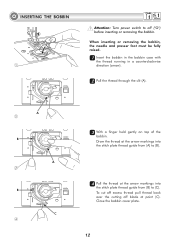
A 2 B A 3 B C 4 33 With a finger held gently on top of the bobbin. When inserting or removing the bobbin, the needle and presser foot must be fully raised. 11 Insert the bobbin in the bobbin case with the thread running in a counterclockwise direction (arrow). 22 Pull the thread through the slit (A).... Draw the thread at the arrow markings into the stitch plate thread guide from (A) to (C). Close the bobbin cover plate. 12 INSERTING THE BOBBIN 1 Attention: Turn power switch to off blade at the arrow markings into the stitch plate thread guide from (B) to (B)....
A 2 B A 3 B C 4 33 With a finger held gently on top of the bobbin. When inserting or removing the bobbin, the needle and presser foot must be fully raised. 11 Insert the bobbin in the bobbin case with the thread running in a counterclockwise direction (arrow). 22 Pull the thread through the slit (A).... Draw the thread at the arrow markings into the stitch plate thread guide from (A) to (C). Close the bobbin cover plate. 12 INSERTING THE BOBBIN 1 Attention: Turn power switch to off blade at the arrow markings into the stitch plate thread guide from (B) to (B)....
Instruction Manual 2
Page 21
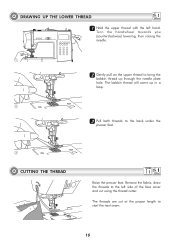
The bobbin thread will come up through the needle plate hole. Turn the handwheel towards you (counterclockwise) lowering, then raising the needle. 1 22 Gently pull on the upper thread to bring the bobbin thread up in a loop. 2 33 Pull both threads to the back under the presser foot. 3 CUTTING THE THREAD Raise the presser foot. The threads are cut using the thread cutter. Remove the fabric, draw the threads to the left hand. DRAWING UP THE LOWER THREAD 11 Hold the upper thread with the left side of the face cover and cut at the proper length to start the next seam. 16
The bobbin thread will come up through the needle plate hole. Turn the handwheel towards you (counterclockwise) lowering, then raising the needle. 1 22 Gently pull on the upper thread to bring the bobbin thread up in a loop. 2 33 Pull both threads to the back under the presser foot. 3 CUTTING THE THREAD Raise the presser foot. The threads are cut using the thread cutter. Remove the fabric, draw the threads to the left hand. DRAWING UP THE LOWER THREAD 11 Hold the upper thread with the left side of the face cover and cut at the proper length to start the next seam. 16
Instruction Manual 2
Page 24
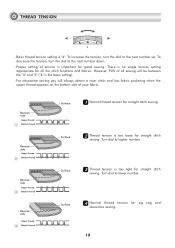
.... Basic thread tension setting is the basic setting). - Turn dial to higher number. Reverse side Upper thread 1 Bobbin thread Reverse side Upper thread 2 Bobbin thread Reverse side Upper thread 3 Bobbin thread Reverse side Upper thread 4 Bobbin thread Surface 11 Normal thread tension for all sewing will always obtain a nicer stitch and less fabric puckering...
.... Basic thread tension setting is the basic setting). - Turn dial to higher number. Reverse side Upper thread 1 Bobbin thread Reverse side Upper thread 2 Bobbin thread Reverse side Upper thread 3 Bobbin thread Reverse side Upper thread 4 Bobbin thread Surface 11 Normal thread tension for all sewing will always obtain a nicer stitch and less fabric puckering...

Instruction Manual 2
Page 27
... bottom. 18 (110) Heavy woolens, overcoat fabrics, Heavy duty thread. Use the same thread for actual sewing. - Ball point needles are used for needle and bobbin. - In general, fine threads and needles are used for sewing fine fabrics, and thicker threads are recommended for sewing heavy fabrics. - Please Note: - Light-duty...
... bottom. 18 (110) Heavy woolens, overcoat fabrics, Heavy duty thread. Use the same thread for actual sewing. - Ball point needles are used for needle and bobbin. - In general, fine threads and needles are used for sewing fine fabrics, and thicker threads are recommended for sewing heavy fabrics. - Please Note: - Light-duty...
Instruction Manual 2
Page 59
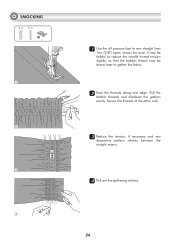
Pull the bobbin threads and distribute the gathers evenly. It may be helpful to reduce the needle thread tension slightly, so that the bobbin thread may be drawn later to sew straight lines 1cm (3/8") apart, across the area. Secure the threads at the other end. 33 Reduce the tension, if necessary and sew decorative pattern stitches between the straight seams. 44 Pull out the gathering stitches. 54 SMOCKING B-14 B-15 A 1 2 3 4 11 Use the all purpose foot to gather the fabric. 22 Knot the threads along one edge.
Pull the bobbin threads and distribute the gathers evenly. It may be helpful to reduce the needle thread tension slightly, so that the bobbin thread may be drawn later to sew straight lines 1cm (3/8") apart, across the area. Secure the threads at the other end. 33 Reduce the tension, if necessary and sew decorative pattern stitches between the straight seams. 44 Pull out the gathering stitches. 54 SMOCKING B-14 B-15 A 1 2 3 4 11 Use the all purpose foot to gather the fabric. 22 Knot the threads along one edge.
Instruction Manual 2
Page 62
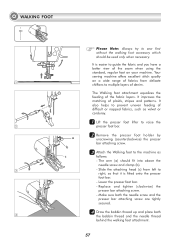
Make sure both the needle screw and the presser bar attaching screw are tightly secured. 44 Draw the bobbin thread up and place both 4 the bobbin thread and the needle thread behind the walking foot attachment. 57 It improves the matching of the fabric layers. It also helps to prevent uneven ...
Make sure both the needle screw and the presser bar attaching screw are tightly secured. 44 Draw the bobbin thread up and place both 4 the bobbin thread and the needle thread behind the walking foot attachment. 57 It improves the matching of the fabric layers. It also helps to prevent uneven ...
Instruction Manual 2
Page 75
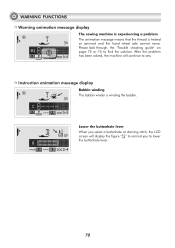
Instruction animation message display Bobbin winding The bobbin winder is twisted or jammed and the hand wheel axle cannot move. Lower the buttonhole lever When you select a buttonhole or darning stitch, the LCD ... buttonhole lever. 70 WARNING FUNCTIONS Warning animation message display The sewing machine is experiencing a problem The animation message means that the thread is winding the bobbin.
Instruction animation message display Bobbin winding The bobbin winder is twisted or jammed and the hand wheel axle cannot move. Lower the buttonhole lever When you select a buttonhole or darning stitch, the LCD ... buttonhole lever. 70 WARNING FUNCTIONS Warning animation message display The sewing machine is experiencing a problem The animation message means that the thread is winding the bobbin.
Instruction Manual 2
Page 76
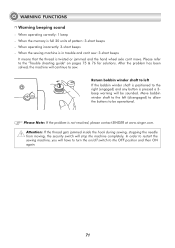
When operating incorrectly: 3-short beeps - Return bobbin winder shaft to left (disengaged) to allow the buttons to the "Trouble shooting guide" on /off switch to the OFF position and then ON again. ...: 3-short beeps - When the memory is not resolved, please contact SINGER at www.singer.com. When the sewing machine is in trouble and can 't move. In order to sew. When operating correctly: 1 beep - Move bobbin winder shaft to the left If the bobbin winder shaft is positioned to the right (engaged) and any button...
When operating incorrectly: 3-short beeps - Return bobbin winder shaft to left (disengaged) to allow the buttons to the "Trouble shooting guide" on /off switch to the OFF position and then ON again. ...: 3-short beeps - When the memory is not resolved, please contact SINGER at www.singer.com. When the sewing machine is in trouble and can 't move. In order to sew. When operating correctly: 1 beep - Move bobbin winder shaft to the left If the bobbin winder shaft is positioned to the right (engaged) and any button...
Instruction Manual 2
Page 78
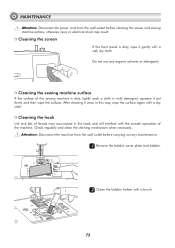
... or electrical shock may accumulate in the hook and will interfere with a dry cloth. Do not use any maintenance. 11 Remove the bobbin cover plate and bobbin. 1 22 Clean the bobbin holder with a soft, dry cloth. Cleaning the hook Lint and bits of thread may result. After cleaning it once in mild detergent...
... or electrical shock may accumulate in the hook and will interfere with a dry cloth. Do not use any maintenance. 11 Remove the bobbin cover plate and bobbin. 1 22 Clean the bobbin holder with a soft, dry cloth. Cleaning the hook Lint and bits of thread may result. After cleaning it once in mild detergent...
Instruction Manual 2
Page 79
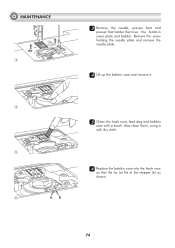
Remove the screw holding the needle plate and remove the needle plate. 44 Lift up the bobbin case and remove it. 55 Clean the hook race, feed dog and bobbin case with a brush. MAINTENANCE 3 4 5 6 ab 33 Remove the needle, presser foot and presser foot holder. Remove the bobbin cover plate and bobbin. Also clean them, using a soft, dry cloth. 66 Replace the bobbin case into the hook race so that the tip (a) fits to the stopper (b) as shown. 74
Remove the screw holding the needle plate and remove the needle plate. 44 Lift up the bobbin case and remove it. 55 Clean the hook race, feed dog and bobbin case with a brush. MAINTENANCE 3 4 5 6 ab 33 Remove the needle, presser foot and presser foot holder. Remove the bobbin cover plate and bobbin. Also clean them, using a soft, dry cloth. 66 Replace the bobbin case into the hook race so that the tip (a) fits to the stopper (b) as shown. 74
Instruction Manual 2
Page 80
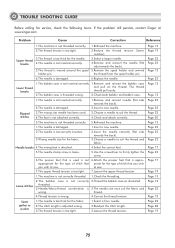
... 13 Page 23 Page 12 Page 12 1.The needle is not inserted correctly. 2.The needle is threaded wrong. 2.Check both bobbin and bobbin case. appropriate for the type of stitch that priate for the type of stitch that is not correctly inserted. 2.Insert the ...thread. 4.Correct the thread tension. Lower thread breaks 1.The bobbin case is damaged. 6.Replace the needle. TROUBLE SHOOTING GUIDE Before calling for service, check the following items. If the problem still persists, contact Singer at www.singer.com Problem Cause Correction Reference 1.The machine is too tight....
... 13 Page 23 Page 12 Page 12 1.The needle is not inserted correctly. 2.The needle is threaded wrong. 2.Check both bobbin and bobbin case. appropriate for the type of stitch that priate for the type of stitch that is not correctly inserted. 2.Insert the ...thread. 4.Correct the thread tension. Lower thread breaks 1.The bobbin case is damaged. 6.Replace the needle. TROUBLE SHOOTING GUIDE Before calling for service, check the following items. If the problem still persists, contact Singer at www.singer.com Problem Cause Correction Reference 1.The machine is too tight....
Instruction Manual 2
Page 81
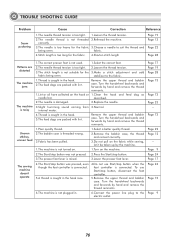
...the handwheel backwards and forwards by hand and remove the thread remnants. 1.Poor quality thread. 1.Select a better quality thread. 2.The bobbin case is threaded wrong. 2.Remove the bobbin case, the thread and reinsert correctly. 3.Fabric has been pulled. 1.The machine is not turned on. 3.Do not pull on...thread tension is too tight. 1.Loosen the thread tension. 2.The needle thread is caught in the hook race. 5.Remove the upper thread and bobbin case. fabric. 4.Stitch length is caught in the hook. 2.The feed dogs are distorted The machine jams The machine is noisy Uneven stitches,...
...the handwheel backwards and forwards by hand and remove the thread remnants. 1.Poor quality thread. 1.Select a better quality thread. 2.The bobbin case is threaded wrong. 2.Remove the bobbin case, the thread and reinsert correctly. 3.Fabric has been pulled. 1.The machine is not turned on. 3.Do not pull on...thread tension is too tight. 1.Loosen the thread tension. 2.The needle thread is caught in the hook race. 5.Remove the upper thread and bobbin case. fabric. 4.Stitch length is caught in the hook. 2.The feed dogs are distorted The machine jams The machine is noisy Uneven stitches,...


