
Singer H74 Support Question
Singer H74 Support Question
Find answers below for this question about Singer H74.Need a Singer H74 manual? We have 2 online manuals for this item!
Question posted by beloDp on February 22nd, 2014
What Size Bobbin Does Singer H74 Take
The person who posted this question about this Singer product did not include a detailed explanation. Please use the "Request More Information" button to the right if more details would help you to answer this question.
Current Answers
Related Singer H74 Manual Pages
Instruction Manual 2 - Page 3

...Use only the attachments recommended by the manufacturer as
threading needle, changing needle, threading bobbin, changing presser foot or changing the light. 10. Do not pull or push ... required around the sewing machine needle.
6. It may cause the needle to break. 9. Switch the sewing machine off or unplug the machine if it to break.
7. Always unplug sewing machine from the electrical...
Instruction Manual 2 - Page 4
... SOURCE 9 Connecting the machine 9 WINDING THE BOBBIN 10-11 Bobbin winding 10-11 INSERTING THE BOBBIN 12 THREADING THE UPPER THREAD 13-14 USING THE NEEDLE THREADER 15 DRAWING UP THE LOWER THREAD 16 CUTTING THE THREAD 16 TWO-STEP PRESSER FOOT LIFTER 17 ADJUSTING PRESSER FOOT PRESSURE 17 STARTING SEWING 18 Start/stop button...
Instruction Manual 2 - Page 5
...HEMMING 49 CORDING 50 Single cording 50 Triple cording 50 SATIN STITCH SEWING 51 EDGE/QUILTING GUIDE 52 GATHERING 53 SMOCKING 54 FREE MOTION SEWING 55-56 Darning 55 Embroidery 56 Monogramming 56 WALKING FOOT 57 ...72 MAINTENANCE 73-74 Cleaning the screen 73 Cleaning the sewing machine surface 73 Cleaning the hook 73-74 TROUBLE SHOOTING GUIDE 75-76 STITCH ADJUSTMENT REFERENCE CHART ...
Instruction Manual 2 - Page 6
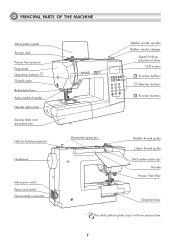
PRINCIPAL PARTS OF THE MACHINE
Stitch pattern plate Tension dial Presser foot pressure Face plate Operation buttons A Thread cutter Buttonhole lever Auto needle threader Needle plate cover
Sewing table and accessory box
Hole for Auxiliary spool pin
Handwheel
Main power switch Power cord socket Foot controller connector
Bobbin winder spindle Bobbin winder stopper
Speed limiting...
Instruction Manual 2 - Page 13
...
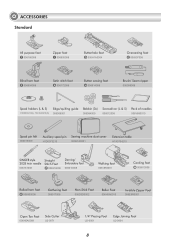
Brush/ Seam ripper
006099008
Spool holders (L & S) Edge/quilting guide Bobbin (3x) Screwdriver (L & S) Pack of needles
H1D0083210(L) TA10943210(S) 006008001
006084009
006012008
006V880010
Spool pin felt
006015009
Auxiliary spool pin Sewing machine dust cover
H1D0073210
020H7A0001
Extension table
H7A0754210
SINGER style 2025 twin needle
006161008
Straight Stitch Foot
P 006916008...
Instruction Manual 2 - Page 16
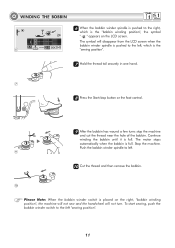
... cut the thread near the hole of the bobbin. The motor stops automatically when the bobbin is full.
WINDING THE BOBBIN
6 When the bobbin winder spindle is pushed to the left, which is the "bobbin winding position", the symbol " " appears on the right, "bobbin winding position", the machine will not sew and the handwheel will not turn. Continue...
Instruction Manual 2 - Page 23
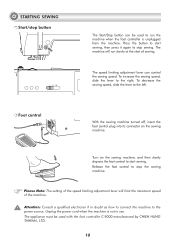
... the power cord when the machine is unplugged from the machine. Turn on the sewing machine. Press the button to start sewing. Foot control
With the sewing machine turned off, insert the foot control plug into its connector on the sewing machine, and then slowly depress the foot control to stop the sewing machine. To increase the sewing speed, slide the lever...
Instruction Manual 2 - Page 27

... suitable for best results.
Please Note: - Always test thread and needle size on a small piece of fabric which will be used for needle and bobbin. -
Most threads sold are recommended for actual
sewing. - MATCHING NEEDLE/ FABRIC/ THREAD
NEEDLE, FABRIC, THREAD SELECTION GUIDE
NEEDLE SIZE
FABRICS
THREAD
9-11 (70-80)
Lightweight fabrics-thin cottons, voile...
Instruction Manual 2 - Page 37
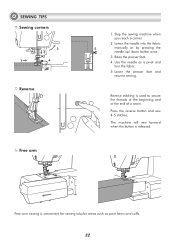
... the threads at the beginning and at the end of a seam.
Stop the sewing machine when you reach a corner.
2. Lower the needle into the fabric
5
manually or by pressing the
needle up/ down button once.
3. Press the reverse button and sew 4-5 stitches. Use the needle as pant hems and cuffs.
32 Reverse stitching...
Instruction Manual 2 - Page 49
Large: 7.0mm (1/4 inch).
Once sewing is not included with the machine.
4
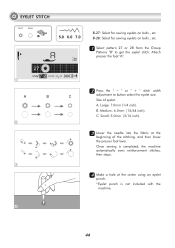
44 EYELET STITCH
B-27
B-28
A
5.0 6.0 7.0
B-27: Select for sewing eyelets on belts , etc B-28: Select for sewing eyelets on belts , etc
11 Select pattern 27 or 28 from the Group
Patterns "B" to button select the eyelet size.
A. C. Size of the stitching, and then lower the presser...
Instruction Manual 2 - Page 60
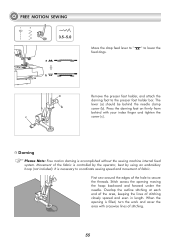
... work and cover the area with your index finger and tighten the screw (c).
First sew around the edges of stitching closely spaced and even in length. Darning
Please Note: ... to coordinate sewing speed and movement of fabric.
When the opening moving the hoop backward and forward under the needle. Movement of stitching.
55 It is accomplished without the sewing machine internal feed ...
Instruction Manual 2 - Page 62
... lifter to the machine as
c
follows:
- a b
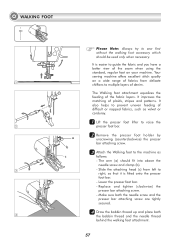
22 Remove the presser foot holder by
unscrewing (counterclockwise) the presser
bar attaching screw.
33 Attach the Walking foot to raise the
2
presser foot bar. The arm (a) should be used only when necessary. It is fitted onto the presser
foot bar.
-
Your
sewing machine offers excellent stitch...
Instruction Manual 2 - Page 71
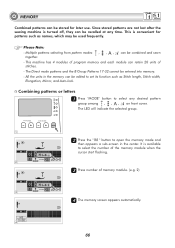
... and each module can retain 20 units of memory module. (e.g. 2)
M
3
44 The memory screen appears automatically. M
4
66 Since stored patterns are not lost after the sewing machine is available
to select any time. Combining patterns or letters 11 Press "MODE" button to select the number of the memory module when the
M
cursor...
Instruction Manual 2 - Page 74
..." buttons.
3
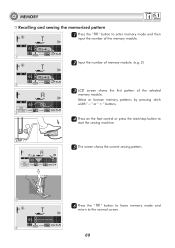
44 Press on the foot control or press the start/stop button to
start the sewing machine.
4
M
55 The screen shows the current sewing pattern.
5
66 Press the "000" button to leave memory mode and
return to enter memory mode... LCD screen shows the first pattern of the memory module. MEMORY
Recalling and sewing the memorized pattern 1 Press the " " button to the normal screen.
6
69
Instruction Manual 2 - Page 75
... lever.
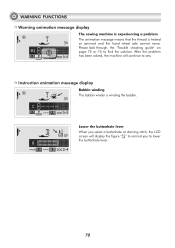
70 After the problem has been solved, the machine will display the figure " " to remind you to sew. Instruction animation message display
Bobbin winding The bobbin winder is twisted or jammed and the hand wheel axle cannot move. WARNING FUNCTIONS Warning animation message display
The sewing machine is experiencing a problem The animation message means that...
Instruction Manual 2 - Page 76
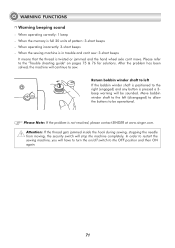
...solved, the machine will have to turn the on pages 75 & 76 for solutions. Move bobbin winder shaft to the left If the bobbin winder shaft is positioned to sew.
When operating ...: 3-short beeps - When the sewing machine is in trouble and can't sew: 3-short beeps
It means that the thread is not resolved, please contact SINGER at www.singer.com. WARNING FUNCTIONS Warning beeping sound...
Instruction Manual 2 - Page 78
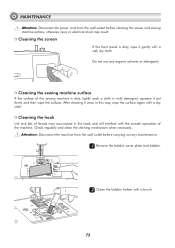
Do not use any maintenance.
11 Remove the bobbin cover plate and bobbin.
1
22 Clean the bobbin holder with a brush.
2
73 Cleaning the sewing machine surface
If the surface of the sewing machine is dirty, wipe it gently with a soft, dry cloth. Attention: Disconnect the machine from the wall socket before carrying out any organic solvents or detergents. Cleaning...
Instruction Manual 2 - Page 80
... wrong.
2.Thread the bobbin case as illustrated.
3.The needle size must suit the fabric and thread.
4.Correct the thread tension. Seam gather or
pucker
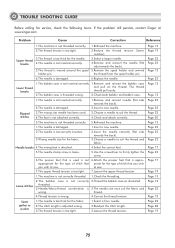
1.The needle is too thick for service, check the following items. If the problem still persists, contact Singer at www.singer.com
Problem
Cause
Correction
Reference
1.The machine is appro- Skipped...
Instruction Manual 2 - Page 81
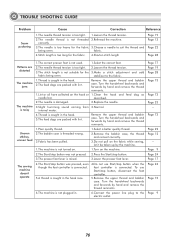
... quality thread.
1.Select a better quality thread.
2.The bobbin case is threaded wrong.
2.Remove the bobbin case, the thread and reinsert correctly.
3.Fabric has been pulled. 1.The machine is not turned on.
3.Do not pull on the fabric while sewing, let it be taken up by the machine.
1.Turn on the hook or 1.Clean the hook...
Instruction Manual 2 - Page 86

If in accordance with relevant National legislation relating to electrical/electronic products. Please note that on disposal, this product must be safely recycled in doubt please contact your retailer for guidance.
021H7A0101( ) May/11 SINGER H74(H74A)/B5
Similar Questions


Beeping From Singer Sewing Machine Stylist Ii 5625
My sewing machine will beep and stop sewing after three inches of sewing. I have taken it to be repa...
My sewing machine will beep and stop sewing after three inches of sewing. I have taken it to be repa...
(Posted by arusheria 9 years ago)

Will Singer H74 Sewing Machine Go Into Sewing Machine Table
(Posted by vogelgeos 10 years ago)

What Size Bobbin Does The 8280 Prelude Use? I Could Not Find It In The Manual!
What size Bobbin does the Prelude 8280 use? I looked thru the manual twice and could NOT find it. Th...
What size Bobbin does the Prelude 8280 use? I looked thru the manual twice and could NOT find it. Th...
(Posted by sharonmc79 10 years ago)