
Singer H74 Support Question
Singer H74 Support Question
Find answers below for this question about Singer H74.Need a Singer H74 manual? We have 2 online manuals for this item!
Question posted by vogelgeos on April 19th, 2014
Will Singer H74 Sewing Machine Go Into Sewing Machine Table
The person who posted this question about this Singer product did not include a detailed explanation. Please use the "Request More Information" button to the right if more details would help you to answer this question.
Current Answers
Related Singer H74 Manual Pages
Instruction Manual 2 - Page 3

...needle, threading bobbin, changing presser foot or changing the light. 10. SAVE THESE INSTRUCTIONS
This sewing machine is not operating properly. 18. DANGER -To reduce the risk of lint, dust, and ...is 75dB(A). 17. Do not use by pulling on the foot controller. 19. Never operate this sewing machine. Always use as described in the instruction manual. 11.
Do not allow to break. 9. ...
Instruction Manual 2 - Page 4
...see page 30/31 3 LCD SCREEN 4-5 PATTERN CHART 6-7 ACCESSORIES 8 CONNECTING THE MACHINE TO THE POWER SOURCE 9 Connecting the machine 9 WINDING THE BOBBIN 10-11 Bobbin winding 10-11 INSERTING THE BOBBIN 12 ...31 Memory button 31 Clear button 31 SEWING TIPS 32-33 Sewing corners 32 Reverse 32 Free arm 32 Installing the extension table 33 Sewing on heavy fabric 33 NEEDLE POSITION AND...
Instruction Manual 2 - Page 5
...HEMMING 49 CORDING 50 Single cording 50 Triple cording 50 SATIN STITCH SEWING 51 EDGE/QUILTING GUIDE 52 GATHERING 53 SMOCKING 54 FREE MOTION SEWING 55-56 Darning 55 Embroidery 56 Monogramming 56 WALKING FOOT 57 ...72 MAINTENANCE 73-74 Cleaning the screen 73 Cleaning the sewing machine surface 73 Cleaning the hook 73-74 TROUBLE SHOOTING GUIDE 75-76 STITCH ADJUSTMENT REFERENCE CHART ...
Instruction Manual 2 - Page 6
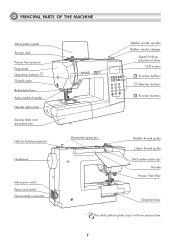
PRINCIPAL PARTS OF THE MACHINE
Stitch pattern plate Tension dial Presser foot pressure Face plate Operation buttons A Thread cutter Buttonhole lever Auto needle threader Needle plate cover
Sewing table and accessory box
Hole for Auxiliary spool pin
Handwheel
Main power switch Power cord socket Foot controller connector
Bobbin winder spindle Bobbin winder stopper
Speed...
Instruction Manual 2 - Page 7
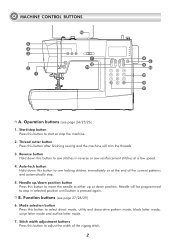
... to either up /down position. Stitch width adjustment buttons Press this button to start or stop button Press this button to move the needle to sew stitches in selected position until button is pressed again.
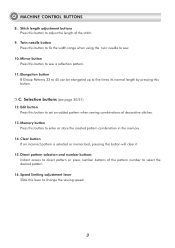
MACHINE CONTROL BUTTONS
5 4 3
2 1
16
67 12 123
1
2
3
4
5
6
7
8
9
0
8 6
9 14
15
10 11
A. Start/stop the...
Instruction Manual 2 - Page 8
...sew.
10. Clear button If an incorrect pattern is selected or memorized, pressing this lever to sew... a reflection pattern.
11. Direct pattern selection and number buttons Instant access to direct pattern or press number buttons of the pattern number to set an added pattern when sewing... combinations of the stitch.
9.
C. Edit button Press this button to change the sewing speed...
Instruction Manual 2 - Page 13
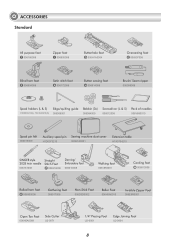
...(3x) Screwdriver (L & S) Pack of needles
H1D0083210(L) TA10943210(S) 006008001
006084009
006012008
006V880010
Spool pin felt
006015009
Auxiliary spool pin Sewing machine dust cover
H1D0073210
020H7A0001
Extension table
H7A0754210
SINGER style 2025 twin needle
006161008
Straight Stitch Foot
P 006916008
Darning/ Embroidery foot
006016008
Walking foot
0061850081
Cording foot
M 006813008...
Instruction Manual 2 - Page 14
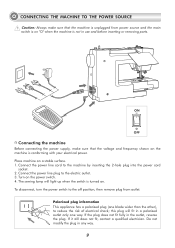
... connecting the power supply, make sure that the voltage and frequency shown on the machine is turned on. Place machine on the power switch. 4. The sewing lamp will fit in any way.
9 Connect the power line plug to the machine by inserting the 2-hole plug into the power cord
socket. 2. If it still does...
Instruction Manual 2 - Page 16
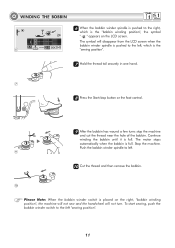
... "bobbin winding position", the symbol " " appears on the right, "bobbin winding position", the machine will not sew and the handwheel will disappear from the LCD screen when the
bobbin winder spindle is pushed to left , which is the
6
"sewing position".
7 Hold the thread tail securely in one hand.
7
8 Press the Start/stop button...
Instruction Manual 2 - Page 22
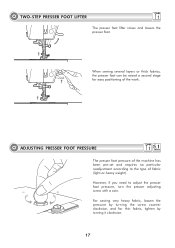
...work. ADJUSTING PRESSER FOOT PRESSURE
The presser foot pressure of fabric (light-or-heavy weight).
When sewing several layers or thick fabrics, the presser foot can be raised a second stage for thin ..., tighten by turning it clockwise.
17 However, if you need to the type of the machine has been pre-set and requires no particular readjustment according to adjust the presser foot pressure, ...
Instruction Manual 2 - Page 23
...., LTD.
18
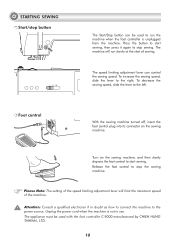
Foot control
With the sewing machine turned off, insert the foot control plug into its connector on the sewing machine, and then slowly depress the foot control to start sewing, then press it again to stop sewing. Release the foot control to stop the sewing machine. Turn on the sewing machine. The speed limiting adjustment lever can be...
Instruction Manual 2 - Page 29
... trim the threads.
24
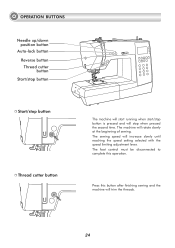
Press this operation. The foot control must be disconnected to complete this button after finishing sewing and the machine will rotate slowly at the beginning of sewing. OPERATION BUTTONS
Needle up/down position button
Auto-lock button Reverse button Thread cutter button
Start/stop button
Start/stop button Thread...
Instruction Manual 2 - Page 30

...-lock button is stopped.
25 The LCD screen will display the figure " " until the machine is stopped. An arrow " " on the LCD screen display appears while stitching in reverse. Press the button again to sew, the machine will permanently sew in reverse. Select Direct patterns 6-7, B Group Patterns 07-16, 33-50, and C Group Patterns...
Instruction Manual 2 - Page 31

... Needle up/down in the up position. When the arrow points downward, the needle will stop in the up or down position button
The machine automatically stops sewing with the needle in the up position or down position button will stop in the highest position. When the Needle up/down position button...
Instruction Manual 2 - Page 34
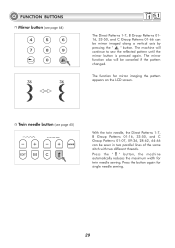
... 0116, 33-50, and C Group Patterns 01-66 can be mirror imaged along a vertical axis by pressing the " " button. The function for twin needle sewing. Press the " " button, the machine automatically reduces the maximum width for mirror imaging the pattern appears on the LCD screen. The mirror function also will continue to...
Instruction Manual 2 - Page 38
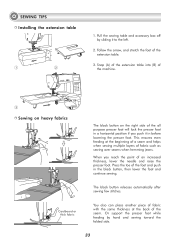
... with the same thickness at the beginning of a seam and helps when sewing multiple layers of an increased thickness, lower the needle and raise the presser foot. SEWING TIPS Installing the extension table
1
2
1. Snap (A) of the extension table into (B) of the machine.
3
Sewing on heavy fabrics
The black button on the right side of the all...
Instruction Manual 2 - Page 70
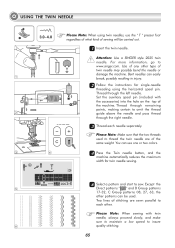
...-needle
threading using twin needles, use one or two colors.
3
4
44 Press the Twin needle button, and the
machine automatically reduces the maximum width for twin needle sewing.
66 Select a pattern and start to
www.singer.com. Please Note: Make sure that the two threads used .
Except the
5
Direct patterns " " and B Group patterns...
Instruction Manual 2 - Page 76
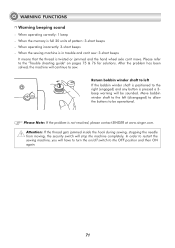
... Please refer to restart the sewing machine, you will stop the machine completely. Move bobbin winder shaft to the left If the bobbin winder shaft is positioned to sew.
Return bobbin winder shaft to...during sewing, stopping the needle from moving, the security switch will have to turn the on pages 75 & 76 for solutions. When the memory is not resolved, please contact SINGER at www.singer....
Instruction Manual 2 - Page 80
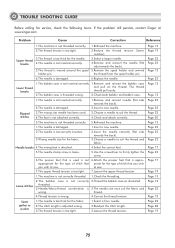
... check the following items. If the problem still persists, contact Singer at www.singer.com
Problem
Cause
Correction
Reference
1.The machine is too tight.
1.Select a finer needle. 2.Readjust the ...stitch that priate for the type of stitch that is used . 3.Choose a needle to sew.
Loose stitches
2.The bobbin case is not correctly threaded.
3.Needle/fabric/thread combination is wrong...
Instruction Manual 2 - Page 86
If in accordance with relevant National legislation relating to electrical/electronic products. Please note that on disposal, this product must be safely recycled in doubt please contact your retailer for guidance.
021H7A0101( ) May/11 SINGER H74(H74A)/B5
Similar Questions

Parts
How do I order replacements for my Singer H74 sewing machine?
How do I order replacements for my Singer H74 sewing machine?
(Posted by Anonymous-153883 8 years ago)

Can This Machine Be Installed In A Sewing Table(cabinet)?
(Posted by beagle82491 9 years ago)


Can I Hook Up A Singer Machine Model 5400 Into A Sewing Table?
Can a singer machine model 5400 go into a regular sewing machine table?
Can a singer machine model 5400 go into a regular sewing machine table?
(Posted by Rosa316 9 years ago)