Get support for Singer H74

Singer H74 Support Question

Singer H74 Support Question

Find answers below for this question about Singer H74.
Need a Singer H74 manual? We have 2 online manuals for this item!
Question posted by nikido on July 21st, 2014

Who Makes The Singer H74 Sewing Machine

The person who posted this question about this Singer product did not include a detailed explanation. Please use the "Request More Information" button to the right if more details would help you to answer this question.

Current Answers

There are currently no answers that have been posted for this question.
Be the first to post an answer!

Remember that you can earn up to 1,100 points for every answer you submit. The better the quality of your answer, the better chance it has to be accepted.

Related Singer H74 Manual Pages

Instruction Manual 2 - Page 3

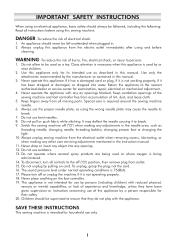
Use this appliance only for examination, repair, electrical or mechanical adjustment. 4. Never operate this manual. 3. Keep fingers away from outlet. 15. Switch the sewing machine off ("O") when making any other user servicing adjustments mentioned in this appliance if it has a damaged cord or plug, if it is 75dB(A). 17. Never drop or insert ...
Instruction Manual 2 - Page 5

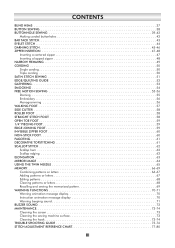
...SEWING 38 BUTTONHOLE SEWING 39-42 Making corded buttonholes 42 BAR TACK STITCH 43 EYELET STITCH 44 DARNING STITCH 45-46 ZIPPER INSERTION 47-48 Inserting a centered zipper 47 Inserting a lapped zipper 48 NARROW HEMMING 49 CORDING 50 Single cording 50 Triple cording 50 SATIN STITCH SEWING... 73 Cleaning the sewing machine surface 73 Cleaning the hook 73-74 TROUBLE SHOOTING GUIDE ...
Instruction Manual 2 - Page 13

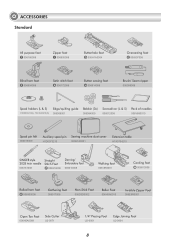
...(3x) Screwdriver (L & S) Pack of needles H1D0083210(L) TA10943210(S) 006008001 006084009 006012008 006V880010 Spool pin felt 006015009 Auxiliary spool pin Sewing machine dust cover H1D0073210 020H7A0001 Extension table H7A0754210 SINGER style 2025 twin needle 006161008 Straight Stitch Foot P 006916008 Darning/ Embroidery foot 006016008 Walking foot 0061850081 Cording foot M 006813008...
Instruction Manual 2 - Page 14

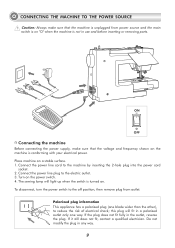
... not modify the plug in the outlet, reverse the plug. CONNECTING THE MACHINE TO THE POWER SOURCE Caution: Always make sure that the machine is unplugged from outlet. To disconnect, turn the power switch to reduce the risk of electrical shock; The sewing lamp will fit in a polarized outlet only one blade wider than...
Instruction Manual 2 - Page 23

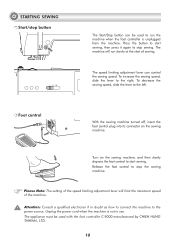
... adjustment lever can be used to run slowly at the start sewing, then press it again to start of sewing. Press the button to stop sewing. Foot control With the sewing machine turned off, insert the foot control plug into its connector on the sewing machine, and then slowly depress the foot control to the power source...
Instruction Manual 2 - Page 37

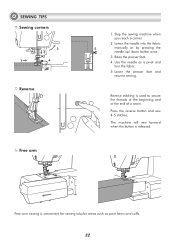
... the beginning and at the end of a seam. Free-arm sewing is convenient for sewing tubular areas such as a pivot and turn the fabric. 5. Use the needle as pant hems and cuffs. 32 Reverse stitching is released. SEWING TIPS Sewing corners 3 2 1 4 Reverse Free arm 1. Stop the sewing machine when you reach a corner. 2. Raise the presser foot. 4.
Instruction Manual 2 - Page 49

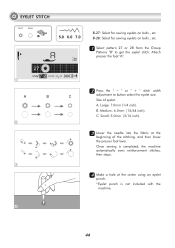
... foot "A". 1 22 Press the " – " or " + " stitch width A B C adjustment to get the eyelet stitch. C. A. B. Medium: 6.0mm (15/64 inch). Once sewing is completed, the machine automatically sews reinforcement stitches, then stops. 3 44 Make a hole at the beginning of eyelet. Size of the stitching, and then lower the presser foot lever. Large: 7.0mm (1/4 inch). Small...
Instruction Manual 2 - Page 58

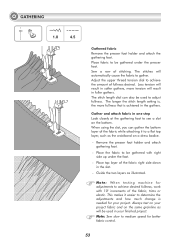
...will automatically cause the fabric to see a slot on a dress bodice. - Note: When testing machine for your project. When using the slot, you can also be gathered with 10" increments of ...the gathering foot to gather. Sew a row of fullness desired. Gather and attach fabric in the slot. - Remove the presser foot holder and attach gathering foot. - This makes it to a flat top ...
Instruction Manual 2 - Page 60

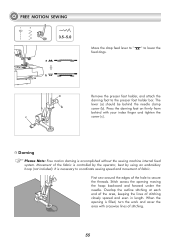
... attach the darning foot to " feed dogs. The lever (a) should be behind with crosswise lines of the hole to coordinate sewing speed and movement of the fabric is accomplished without the sewing machine internal feed system. Movement of fabric. When the opening moving the hoop backward and forward under the needle. Press the...
Instruction Manual 2 - Page 61

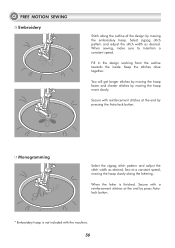
You will get longer stitches by moving the hoop more slowly. Sew at a constant speed, moving the embroidery hoop. Keep the stitches ... button. * Embroidery hoop is finished. FREE MOTION SEWING Embroidery Stitch along the lettering. When sewing, make sure to maintain a constant speed. When the letter is not included with the machine. 56 Secure with a reinforcement stitches at the end...
Instruction Manual 2 - Page 62

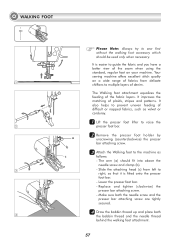
...- It is fitted onto the presser foot bar. - Your sewing machine offers excellent stitch quality 1 on your machine. Make sure both the needle screw and the presser bar attaching screw ...holder by unscrewing (counterclockwise) the presser bar attaching screw. 33 Attach the Walking foot to sew first without the walking foot accessory which should fit into above the needle screw and clamp...
Instruction Manual 2 - Page 70

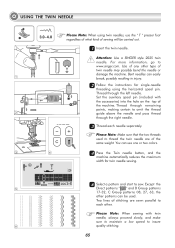
... what kind of sewing will be used to thread the twin needle are of stitching are sewn parallel to www.singer.com. For more information, go to each needle separately. Thread through the right needle. 33 Thread each other type of the machine. Two lines of the same weight. Please Note: Make sure that...
Instruction Manual 2 - Page 71

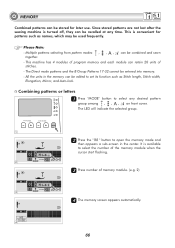
...of memory module. (e.g. 2) M 3 44 The memory screen appears automatically. Please Note: - This machine has 4 modules of program memory and each module can be entered into memory. - MEMORY Combined patterns...2 33 Press number of stitches. - Since stored patterns are not lost after the sewing machine is convenient for patterns such as Stitch length, Stitch width, Elongation, Mirror, and Auto...
Instruction Manual 2 - Page 74

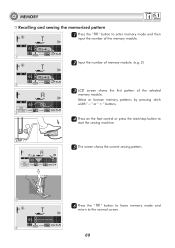
...44 Press on the foot control or press the start/stop button to start the sewing machine. 4 M 55 The screen shows the current sewing pattern. 5 66 Press the "000" button to leave memory mode and return... to enter memory mode and then input the number of the selected memory module. MEMORY Recalling and sewing the memorized pattern 1 Press the " " button to the normal screen. 6 69 M 1 22...
Instruction Manual 2 - Page 75

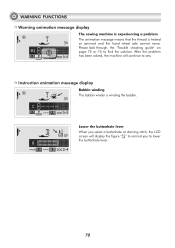
... or 76 to lower the buttonhole lever. 70 Lower the buttonhole lever When you to find the solution. WARNING FUNCTIONS Warning animation message display The sewing machine is experiencing a problem The animation message means that the thread is winding the bobbin. After the problem has been solved, the...
Instruction Manual 2 - Page 76

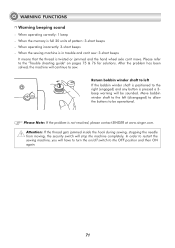
...for solutions. When the sewing machine is in trouble and ...machine will be operational. In order to restart the sewing machine, you will stop the machine completely. Return bobbin winder shaft to left (disengaged) to allow the buttons to sew. Please refer to the "Trouble shooting guide" on /off switch to the right (engaged) and any button is not resolved, please contact SINGER at www.singer...
Instruction Manual 2 - Page 78

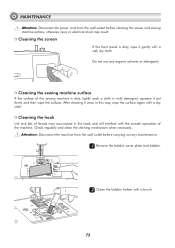
... Cleaning the hook Lint and bits of thread may result. MAINTENANCE Attention: Disconnect the power cord from the wall outlet before cleaning the screen and sewing machine surface, otherwise injury or electrical shock may accumulate in the hook and will interfere with a dry cloth. Check regularly and clean the stitching mechanism when...
Instruction Manual 2 - Page 80

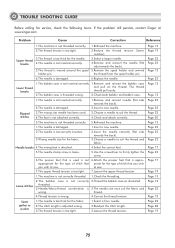
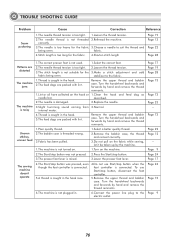
... www.singer.com Problem Cause Correction Reference 1.The machine is damaged. 6.Replace the needle. Upper thread breaks 2.The thread tension is too tight. 3.The thread is too thick for the fabric. 3.Choose a needle to sew. 7.The upper thread tension is too tight. 7.Loosen the upper thread tension. 1.The machine is threaded wrong. 2.Check both...
Instruction Manual 2 - Page 81

... noisy Uneven stitches, uneven feed The sewing machine doesn't operate 1.The correct presser foot is not used. 1.Select the correct foot. 2.The needle thread tension is too tight. 2.Loosen the thread tension. 3.The stitch length is too heavy for the 3.Make a stitch adjustment and add fabric being sewn. To use Start/stop button...
Instruction Manual 2 - Page 86

If in accordance with relevant National legislation relating to electrical/electronic products. Please note that on disposal, this product must be safely recycled in doubt please contact your retailer for guidance. 021H7A0101( ) May/11 SINGER H74(H74A)/B5

Similar Questions

I Get E7 Error Message On My Singer Model 7258 Sewing Machine. There Is No Refe
Error message E7 is up on my Singer Stylist model 7258 sewing machine. It is not working at all. I t...
(Posted by ebellamybellamy9 5 years ago)
Parts
How do I order replacements for my Singer H74 sewing machine?
(Posted by Anonymous-153883 8 years ago)
Beeping From Singer Sewing Machine Stylist Ii 5625
My sewing machine will beep and stop sewing after three inches of sewing. I have taken it to be repa...
(Posted by arusheria 9 years ago)
Ask a New Question
Use the box below to post a new question about this Singer product .
Points & Prizes
  • You can earn points for nearly everything you do on HelpOwl.com
  • You can trade in those points for gift cards at leading retailers such as Amazon.com and Walmart
  • It's that simple!
See How it Works
Create a Free Account

Singer Manuals

Find free Singer H74 manuals and user guides available at ManualOwl.com. Try out our unique manual viewer allowing you to interact with manuals from directly within your browser!

Singer Reviews

View thousands of Singer user reviews and customer ratings available at ReviewOwl.com.

Contact Information

Complete Singer customer service contact information including steps to reach representatives, hours of operation, customer support links and more from ContactHelp.com.

Scoreboard Ratings

See detailed Singer customer service rankings, employee comments and much more from our sister site.