Get support for Singer 9970

Singer 9970 Support Question

Singer 9970 Support Question

Find answers below for this question about Singer 9970.
Need a Singer 9970 manual? We have 1 online manual for this item!
Question posted by alewis41 on November 18th, 2016

Why Won't My Machine Sew, Checked Bobbin And Retreaded. Has Power Just Will Not

the machine has power and threade correctly and bobbin is in right. It did freeze on me when sewing. I stopped and ck everything and retreaded and clean bobbin case But will not run just gives me to beeps and nothing. Nothing in display to indicate what's wrong. Help!!

Current Answers

Answer #1: Posted by Troubleshooter101 on January 23rd, 2017 10:09 PM
This answer was accepted by the poster of the original question.
Troubleshooter101

Member since:
September 30th, 2015

Points: 2,927,040
1,080
points
Common Sewing Machine Problems

With the manual on hand along with the following tips, many of the most common sewing problems can be resolved.
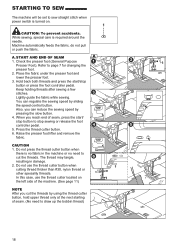
1. Machine Not Sewing

If the machine is simply not sewing or has other related errors, the easiest thing to check is whether the thread and needle are set up properly.
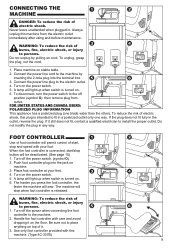
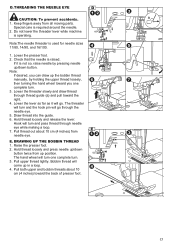
Threading the Machine

Check that the machine is threaded properly according the manual. When threading the machine, remember to always do so with the presser foot up, which releases the tension. Once threaded, putting the presser foot down will apply tension to the thread.
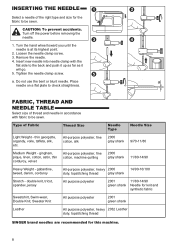
Sewing Machine Needle

Be sure that the needle is locked and facing the correct direction for the machine. If it's not, the thread will not be picked up by the hook when sewing. The flat side of the needle shank faces away from the bobbin insertion point in most machines. Blunt or damaged needles can contribute to a number of sewing problems, so don't wait until the needle is broken to change it.
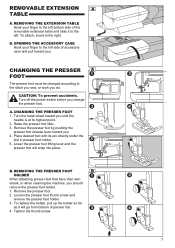
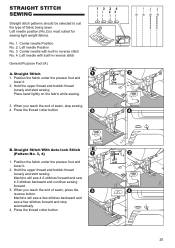
Fabric Not Feeding or Is Jamming

Both the presser foot and feed dog may have raise and lower settings. Without enough pressure on the fabric from the presser foot, the feed dog cannot do its job. On the other hand, having the presser foot too low may cause too much pressure or prevent the fabric from feeding through, causing jams. Check that the feed dog is in its raised position when sewing. If the feed dog seems to be jammed, it may be due to lint and debris.

2. Breaking Needles

The needle is often the easiest part of a sewing machine to change; that's fortunate because it is also the part most prone to wear. Needles may break due to simple reasons like prolonged use or hitting a straight pin; these breaks can be difficult to predict. However, needles also break from very controllable factors such as forcing the fabric through the feed or by using the wrong needle. Forcing the fabric rather than allowing the feed dog to do its job can bend or break the needle; a bent needle may hit the hook when sewing, which can lead to broken needles and damage to the hook.
Using the wrong size needle is often the culprit of a broken needle. Needle size should be relative to the thickness of the material being sewn. American needle sizes range from 8-19 while European sizes range from 60-120. Needles will often be listed with both sizes, such as 70/10. There are also specialty needles for fabrics such as leather and denim.

3. Skipping Stitches

Skipped stitches are usually due to a bad needle. The needle may have become damaged or bent by sewing material too thick for the needle, forcing material through the feed dog, or hitting a straight pin. If the problem seems to be consistently reoccurring, it may be due to forcing the fabric. Sewers should allow the feed dog to pull the fabric and only use their hands to guide the fabric through the feed. When sewing knitted fabrics, using a stretch needle can help prevent skipped stitches.

4. Sewing Machine Thread Is Tangling, Bunching, or Breaking

Having the thread not cooperate as intended is a problem that can lead to stress among those who sew. The good news is that thread problems usually arise from very fixable issues.

Thread Looping and Bunching

Thread looping problems that occur on the bottom side of the fabric are typically issues with the upper threading, not the bobbin threading. Looping or bunching that occurs on top of the fabric tends to a problem with the bobbin threading. For any thread issue, it's best to begin by checking that the machine is threaded properly according to the machine's specifications. If the machine was not threaded with the presser foot up, it will not have the needed tension for sewing. Also check that there is no lint or debris in the area and that moving parts are oiled. Finally, check the needle for any damage.

Thread Breaking

Thread that continually breaks may be an issue with the quality of the thread or obstructions within the machine. Inexpensive, bargain threads typically shed more lint, contain knots, and break more often than good, quality threads. Lint and knots can obstruct the thread from feeding through the machine. Also check the path the thread travels through, including the bobbin and needle, is free from burrs, nicks, or any sharp points that may cause a break or snag. Polish these areas with sand paper or steel wool. If the spool itself seems to be jamming, try changing the direction from which the spool is unwinding. Some fine threads used for embroidery may be more prone to breakage; it is best to use a specified embroidery needle for these projects.
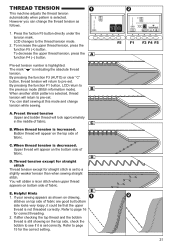
Tension Adjustments

Most sewing machines require very little altering of the tension settings or disks. However, if all other thread issues have been resolved but the problem is still reoccurring, not having proper tension may be the problem. Changing the tension can affect the timing of the machine as the pressure exerted on the upper thread and bobbin thread needs to be even; therefore, its best to review the machine's manual for tension specifications. Upper tension is user adjustable, but the setting should be in a medium range for most sewing projects. Tension problems with the bobbin threading are particularly intricate and should be repaired professionally. Using different color threads in the upper threading and bobbin is a good way to determine which area is having tension problems.
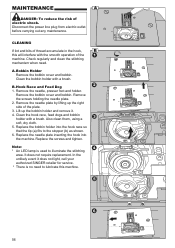
5. Mechanical Noises and Maintenance

If the sewing machine is making uncommon noises, such as grinding or banging, the machine parts may be jammed or in need of cleaning or maintenance. Do not use the machine when it is operating this way, and turn off power to the machine before inspecting the issue. Lint buildup will occur due to the constant use of fabric and thread. Clean lint and other debris out of the machine using a brush.
The machine should be oiled according the owner's manual. Only sewing machine oil should be used to lubricate moving parts. The oil prevents wear as well as rust. Run a test thread and fabric through the machine to remove excess oil.
Examine the machine for loose screws and tighten them. However, do not tighten hex screws as these screws often affect the timing and settings of the machine. If any of hex screws seem to be missing or out of order, the machine should be taken to a professional for repairs.
Regular cleaning and maintenance can help protect the machine for future use, but if mechanical noises still continue, the machine should be examined by a professional repairman.

6. Seams Do Not Look Professional

While not necessarily a problem with the machine, some might question why the seams they sew look more homemade than professional or why pattern pieces don't fit together. A number of factors could be the culprit here. If there are large holes in the stitches, the needle is too big for the fabric. Ironing or steaming the fabric before sewing is also a must for a professional-looking end product. To accurately sew seams, it is important to watch the seam guide rather than the needle. Using the guide will keep the seams consistent and balanced throughout the project, which will allow pattern pieces to properly fit together.

Finding Sewing Machine Parts on eBay

When problems arise with machine parts, needles, and thread, replacements can be found on eBay. From the eBay homepage, the Sewing & Fabric subcategory can be located by clicking on Home, Outdoors & Decor in the category menu and proceeding to the Crafts category. From here, users can browse or search for sewing machine needles, oil, and other parts and supplies as well as quality thread and fabric..

Conclusion

Many common sewing issues can be resolved within the maintenance and setup of the machine. However, if any of the troubleshooting tips do not resolve the problems, it is always best to take the machine in for professional repairs and inspection, especially if it seems to be a timing or tension issue. Continued use of the machine may result in more wear and tear on the machine, which could make the machine completely inoperable. This could lead to expensive repairs or the need to purchase a new sewing machine..


Thanks


Please respond to my effort to provide you with the best possible solution by using the "Acceptable Solution" and/or the "Helpful" buttons when the answer has proven to be helpful. Please feel free to submit further info for your question, if a solution was not provided. I appreciate the opportunity to serve you!
Troublshooter101

Related Singer 9970 Manual Pages

Instruction Manual - Page 2

... plugged in the instruction manual. 16. All rights reserved. Use only attachments recommended by pulling on the floor. This sewing machine is being used or where oxygen is not ... any adjustments in this sewing machine is used as threading needle, changing needle, threading bobbin, or changing presser foot. 15. Do not expose the machine or machine case to place anything on ...
Instruction Manual - Page 3

...B. HAND LOOK QUILTING STITCH (NO. 8 27 ZIGZAG STITCH SEWING 28 MULTI-STITCH ZIGZAG 28 FREE ARM SEWING 28 OVERCASTING-OVERLOCKING 29 A. SELECTING DECORATIVE & LETTER STITCH (selecting mode 50 B. START/STOP BUTTON 10 B. THREAD CUTTER 11 I . LCD DISPLAY 12 B. EDIT BUTTON 12 I . PREPARING TO THREAD MACHINE 16 B. AUTO TACK STITCH 19 D. SELECTING OTHER UTILITY...
Instruction Manual - Page 5

... Box 55. MAIN PARTS 1. Speed Control Button 4. Thread Cutter 13. Feed Dogs 21. Bobbin Winder Stop 37. Twin Needle Button 43. Straight Stitch Button 45. Utility Stitch Button 47. Presser Foot Lifter 49. Power Line Cord 51. Face Plate 3. Top Cover 9. Stitch Balance Adjusting Screw (underneath machine) 12. Needle 25. Felt Washer 34. Clear Button...
Instruction Manual - Page 6

... the dust cover. Needle Pack 2. 4 Bobbins Class 15 (1 is not being used. Driver for Needle Plate 8. Satin Foot (B) 14 15 16 17 18 17. Cording Foot 20. Shank w/o metal 2. Parallel Sewing Foot 10. Braiding Guide 5. Stitch in the machine) 3. Auxiliary Spool Pin with Center Guide 7. Thread Cap (On the machine when delivered) 9. Overcasting Foot (C) 10...
Instruction Manual - Page 7

REMOVABLE EXTENSION TABLE A. OPENING THE ACCESSORY CASE Hook your finger to the right. A. CHANGING THE PRESSER FOOT 1. B. ...cleaning the machine, you do. CAUTION: To prevent accidents. Loosen the presser foot thumb screw and remove the presser foot holder. 3. B. Raise the presser foot lifter. 3. To replace the holder, pull up the holder as far as it to the stitch you sew...
Instruction Manual - Page 8

... All-purpose polyester, fine cotton, machine quilting 2000 gray shank 11/80-14/90 Heavy Weight - Turn off the power before removing the needle. 1. Turn...thread SINGER brand needles are recommended for the fabric to check straightness. Type of Fabric Thread Size Needle Type Needle Size Light Weight - INSERTING THE NEEDLE Select a needle of the right type and size for this machine...
Instruction Manual - Page 9

... permit control of foot controller will light up when switch is turned on the power switch. 5. WARNING: To reduce the risk of electric shock. Connect the power line plug to the machine. 2. FOOT CONTROLLER Use of start /stop button will sew. The machine will light up when switch is released. Be sure not to place anything...
Instruction Manual - Page 10

.... (Except for bobbin winding) 10 C. If the red light is pressed and will sew in reverse while this button again, the speed will rotate slowly at low speed while this button limits the maximum speed. While sewing, by this button, machine will stop button is pressed. START/STOP BUTTON The machine will start running when start /stop when pressed...
Instruction Manual - Page 11

... not press this position. Insert wide table to the machine sliding to the right. For ordinary sewing, move the lever to the left to cut the upper and bobbin threads. H.THREAD CUTTER Use this button after sewing. 2. HAND WHEEL By turning the hand wheel, the needle will cut threads. Remove the extension table (See Page 7) 2. F. EXTRA WIDE TABLE...
Instruction Manual - Page 13

...SEWING By pressing this button, you can sew a back tack stitch at the beginning and at the end of a decorative stitch pattern, machine will scroll up or down by pressing this button is turned off . 13 Turn off the single beep only. Turn on the power..., 5 patterns or letters will stop automatically at the end of the stitch pattern and tie off until the machine is pressed at the end of...
Instruction Manual - Page 14

b. After the bobbin winds a few turns, stop the machine by pressing the start /stop button or releasing the foot controller pedal. The bobbin winding will go. Pull the bobbin cover latch to use cross wound thread. SETTING SPOOL OF THREAD ON SPOOL PIN 1. Bring thread to the right and pass thread to the thread guide from right to left. 3. Hold the end of the...
Instruction Manual - Page 16

... cap on spool pin so that the thread unrolls from right to left . 3. Bring thread frontward and pass through needle eye from front to the guide from right side opening . 2. C. To thread the take-up lever, draw thread up position. (Keep this position until needle eye threading.) B. THREADING THE MACHINE A. b. PREPARING TO THREAD MACHINE 1. Use the small spool cap when you...
Instruction Manual - Page 17

... accidents. Do not lower the threader lever while machine is required around the needle. 2. Hold thread loosely and release the lever. Hold thread loosely and press needle up the bobbin thread manually, by pressing needle up/down button twice from up in a loop. 4. Special care is operating. Check that the needle is used for needle sizes...
Instruction Manual - Page 18

... SEW The machine will be set to sew straight stitch when power switch is turned on the left side of the machine. (See page 11) NOTE After you cut the threads. A. Lightly guide the fabric while sewing. Machine automatically feeds the fabric, do not pull or push the fabric. Hold back both threads and press the start / stop button to stop...
Instruction Manual - Page 21

...). When another stitch pattern is set correctly. E. By pressing the function F3 (AUTO) or clear "C" button, thread tension will return to a slightly weaker tension than when sewing straight stitch. If after checking the top thread and the bobbin thread is not threaded correctly. C. D. A. THREAD TENSION This machine adjusts the thread tension automatically when pattern is indicating...
Instruction Manual - Page 25

... Place hand lightly on the fabric while sewing. 3. Machine will sew a few stitches backward and sew a few stitches forward and stop sewing. 4. Straight Stitch With Auto-lock Stitch (Pattern No. 3, 4) 1. Position the fabric under the presser foot and lower it . 2. Hold the upper thread and bobbin thread loosely and start sewing. Press the thread cutter button. Press the...
Instruction Manual - Page 27

...by shaped pieces of 1/4 inch (6.3 mm) B. Hand Look Quilting Stitch (No. 8) Use invisible nylon sewing thread or very lightweight thread that matches the fabric on the bobbin. Place thread that you sew, bobbin thread will give the appearance of a traditional hand quilting stitch. 27 ELASTIC STITCH SEWING Elastic stitches are strong and flexible and will pull to prevent skipping stitches...
Instruction Manual - Page 56

... right side of thread accumulate in the hook, this machine. 56 It does not require replacement. Disconnect the power line plug from electric outlet before carrying out any maintenance. CLEANING If lint and bits of the plate. 3. Remove the screws holding the needle plate. 2. Replace the screws and tighten. A. B. Clean the hook race, feed dogs and bobbin...
Instruction Manual - Page 57

... is not lowered completely. Do not pull fabric. 18 Select correct foot and pattern. 25- Buttonhole Sewing Mode; * Buttonhole lever is not attached. Re-thread machine. 16 Re-thread the bobbin. 15 Insert new needle. 8 Readjust thread tension. 21 Machine makes Bobbin threaded incorrectly. Attach correct foot. 25- bobbin holder and clean the hook race and feed dog. Adjust the...
Instruction Manual - Page 58

... the foot controller pedal. 4 5. Machine memory is connected. 11 12.Release the needle up-down / slow button. 12 13.Release the thread cutter button. 13 14.Turn off the power switch. 14 58 Release the start/stop button. 9 10.Rethread the upper thread. 10 11.Foot controller is full. 6 7. After sewing buttonhole, raise the presser foot...

Similar Questions

Classes On How To Use Singer 9970 Sewing Machine
I bought the sewing machine during the pandemic and would like to learn how to use it- functions, st...
(Posted by Connienm 1 year ago)
Top Thread Sticking On Bobbin Case
I am having a problem with the top thread catching on the bobbin case and breaking the thread. I had...
(Posted by mvieira10 5 years ago)
My Machine Was Working Then It Stop Sewing. Singer9970
had it in repair shop twice,replace bobbing case twice. it wont sewing. power on but wont sew.
(Posted by sdallas624 9 years ago)
Ask a New Question
Use the box below to post a new question about this Singer product .
Points & Prizes
  • You can earn points for nearly everything you do on HelpOwl.com
  • You can trade in those points for gift cards at leading retailers such as Amazon.com and Walmart
  • It's that simple!
See How it Works
Create a Free Account

Singer Manuals

Find free Singer 9970 manuals and user guides available at ManualOwl.com. Try out our unique manual viewer allowing you to interact with manuals from directly within your browser!

Singer Reviews

View thousands of Singer user reviews and customer ratings available at ReviewOwl.com.

Contact Information

Complete Singer customer service contact information including steps to reach representatives, hours of operation, customer support links and more from ContactHelp.com.

Scoreboard Ratings

See detailed Singer customer service rankings, employee comments and much more from our sister site.