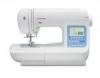
Instruction Manual
Page 2
... S.à.r.l. Never operate this machine from all instructions before cleaning. Do not allow to persons: 1. This sewing machine is the exclusive trademark of lint, dust, and loose cloth. 5. Always unplug this sewing machine if it has a damaged cord or plug, if it has been dropped or damaged, or dropped into any other user servicing adjustments mentioned in . SAVE THESE INSTRUCTIONS Servicing should always be used as threading needle, changing needle, threading bobbin, or changing presser foot. 15.
... S.à.r.l. Never operate this machine from all instructions before cleaning. Do not allow to persons: 1. This sewing machine is the exclusive trademark of lint, dust, and loose cloth. 5. Always unplug this sewing machine if it has a damaged cord or plug, if it has been dropped or damaged, or dropped into any other user servicing adjustments mentioned in . SAVE THESE INSTRUCTIONS Servicing should always be used as threading needle, changing needle, threading bobbin, or changing presser foot. 15.
Instruction Manual
Page 3
REMOVING THE PRESSER FOOT HOLDER 7 INSERTING THE NEEDLE 8 FABRIC, THREAD AND NEEDLE TABLE .......... 8 CONNECTING THE MACHINE 9 FOOT CONTROLLER 9 FUNCTION OF EACH PART 10 A. DROP FEED LEVER 11 H. THREAD CUTTER 11 I . LCD DISPLAY 12 B. DECORATIVE & LETTER STITCH BUTTON 12 G. PREPARING TO THREAD MACHINE 16 B. SETTING SPOOL OF THREAD ON SPOOL PIN 16 C. ELONGATION 23 E. BASTING 26 ELASTIC STITCH SEWING 27 QUILTING 27 A. USING THE OVERCASTING FOOT 29 B. TRIPLE CORDING 40 CONTINUOUS DECORATIVE PATTERN ........ 41 A. SEWING 41 DARNING/FREE-HAND EMBROIDERY ...
REMOVING THE PRESSER FOOT HOLDER 7 INSERTING THE NEEDLE 8 FABRIC, THREAD AND NEEDLE TABLE .......... 8 CONNECTING THE MACHINE 9 FOOT CONTROLLER 9 FUNCTION OF EACH PART 10 A. DROP FEED LEVER 11 H. THREAD CUTTER 11 I . LCD DISPLAY 12 B. DECORATIVE & LETTER STITCH BUTTON 12 G. PREPARING TO THREAD MACHINE 16 B. SETTING SPOOL OF THREAD ON SPOOL PIN 16 C. ELONGATION 23 E. BASTING 26 ELASTIC STITCH SEWING 27 QUILTING 27 A. USING THE OVERCASTING FOOT 29 B. TRIPLE CORDING 40 CONTINUOUS DECORATIVE PATTERN ........ 41 A. SEWING 41 DARNING/FREE-HAND EMBROIDERY ...
Instruction Manual
Page 5
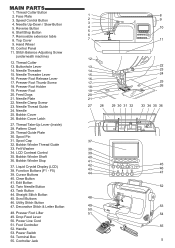
...Power Switch 54. Needle Up-Down / Slow Button 5. Top Cover 9. Thread Cutter 13. Needle Threader Lever 16. Presser Foot 20. Needle Plate 22. Needle 25. Thread Take-Up Lever (Inside) 28. Thread Guide Plate 30. Bobbin Winder Stop 37. Scroll Buttons 46. Terminal Box 55. MAIN PARTS 1. Hand Wheel 10. Control Panel 11. Needle Threader 15. Needle Thread Guide 24. Bobbin Cover Latch 27. Edit Button 42. Twin Needle Button 43. Decorative Stitch & Letter Button 48. Removable extension table 8. Stitch Balance Adjusting Screw (underneath machine) 12. Spool...
...Power Switch 54. Needle Up-Down / Slow Button 5. Top Cover 9. Thread Cutter 13. Needle Threader Lever 16. Presser Foot 20. Needle Plate 22. Needle 25. Thread Take-Up Lever (Inside) 28. Thread Guide Plate 30. Bobbin Winder Stop 37. Scroll Buttons 46. Terminal Box 55. MAIN PARTS 1. Hand Wheel 10. Control Panel 11. Needle Threader 15. Needle Thread Guide 24. Bobbin Cover Latch 27. Edit Button 42. Twin Needle Button 43. Decorative Stitch & Letter Button 48. Removable extension table 8. Stitch Balance Adjusting Screw (underneath machine) 12. Spool...
Instruction Manual
Page 6
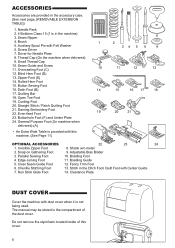
...Foot with Felt Washer 6. Quilting Bar 18. Parallel Sewing Foot 10. Shank w/o metal 2. Stitch in the compartment of this machine. (See Page 11) OPTIONAL ACCESSORIES 22 23 24 1. Buttonhole Foot (F) and Under Plate 24. Open Toe Foot 19. Seam Ripper 8 4. Zipper Foot (E) 14. ACCESSORIES Accessories are provided in the machine) 3. Needle Pack 2. 4 Bobbins Class 15 (1 is in the accessory case. (See next page, [REMOVABLE EXTENSION 7 TABLE]) 1. Do not remove the styrofoam located inside of the dust cover. Screw Driver 1 2 34 5 6 9 7. Even-feed Foot...
...Foot with Felt Washer 6. Quilting Bar 18. Parallel Sewing Foot 10. Shank w/o metal 2. Stitch in the compartment of this machine. (See Page 11) OPTIONAL ACCESSORIES 22 23 24 1. Buttonhole Foot (F) and Under Plate 24. Open Toe Foot 19. Seam Ripper 8 4. Zipper Foot (E) 14. ACCESSORIES Accessories are provided in the machine) 3. Needle Pack 2. 4 Bobbins Class 15 (1 is in the accessory case. (See next page, [REMOVABLE EXTENSION 7 TABLE]) 1. Do not remove the styrofoam located inside of the dust cover. Screw Driver 1 2 34 5 6 9 7. Even-feed Foot...
Instruction Manual
Page 11
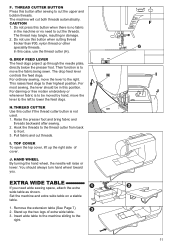
... machine or no need wide sewing space, attach the extra wide table as shown. Their function is to lower the feed dogs. For darning or free motion embroidery or whenever fabric is to be in this case, use this cutter if the thread cutter button is no fabric in damage. 2. Hook the threads to the thread cutter from back to cut the upper and bobbin threads. I. TOP COVER To open the top cover, lift up through the needle plate, directly below the presser foot. Set the machine...
... machine or no need wide sewing space, attach the extra wide table as shown. Their function is to lower the feed dogs. For darning or free motion embroidery or whenever fabric is to be in this case, use this cutter if the thread cutter button is no fabric in damage. 2. Hook the threads to the thread cutter from back to cut the upper and bobbin threads. I. TOP COVER To open the top cover, lift up through the needle plate, directly below the presser foot. Set the machine...
Instruction Manual
Page 14
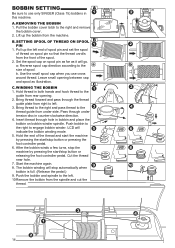
... engage bobbin winder. LCD will stop button or releasing the foot controller pedal. Lift up the left end of spool pin and set the spool of thread on spool pin as far as illustration. SETTING SPOOL OF THREAD ON SPOOL PIN 1. a: Reverse spool cap direction according to the left . 3. Insert thread through under side. After the bobbin winds a few turns, stop the machine by pressing the start /stop automatically when bobbin is full. (Release the pedal.) 9. Cut the thread near hole. 7. Start the machine...
... engage bobbin winder. LCD will stop button or releasing the foot controller pedal. Lift up the left end of spool pin and set the spool of thread on spool pin as far as illustration. SETTING SPOOL OF THREAD ON SPOOL PIN 1. a: Reverse spool cap direction according to the left . 3. Insert thread through under side. After the bobbin winds a few turns, stop the machine by pressing the start /stop automatically when bobbin is full. (Release the pedal.) 9. Cut the thread near hole. 7. Start the machine...
Instruction Manual
Page 18
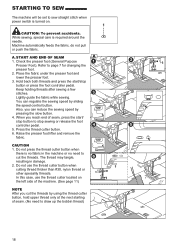
... sewing, special care is no need to stop button or press the foot controller pedal. Place the fabric under the presser foot and lower the presser foot. 3. You can reduce the sewing speed by using the thread cutter button, hold upper thread only at the next starting of seam, press the start /stop sewing or release the foot controller pedal. 5. A. Lightly guide the fabric while sewing. The thread may tangle, resulting in the machine or no fabric in damage. 2. Keep holding threads after sewing a few stitches. Machine automatically feeds the fabric...
... sewing, special care is no need to stop button or press the foot controller pedal. Place the fabric under the presser foot and lower the presser foot. 3. You can reduce the sewing speed by using the thread cutter button, hold upper thread only at the next starting of seam, press the start /stop sewing or release the foot controller pedal. 5. A. Lightly guide the fabric while sewing. The thread may tangle, resulting in the machine or no fabric in damage. 2. Keep holding threads after sewing a few stitches. Machine automatically feeds the fabric...
Instruction Manual
Page 19
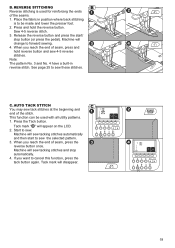
... lower the presser foot. 2. Machine will sew tacking stitches automatically and then start / stop automatically. 4. Sew 4-5 reverse stitch. 3. Machine will disappear. 19 Tack mark " " will sew tacking stitches and stop button (or press the pedal). Start to cancel this function, press the tack button again. Machine will appear on the LCD. 2. If you want to sew. When you reach the end of the stitch. REVERSE STITCHING Reverse stitching is to sew these stitches. See page 25 to be used...
... lower the presser foot. 2. Machine will sew tacking stitches automatically and then start / stop automatically. 4. Sew 4-5 reverse stitch. 3. Machine will disappear. 19 Tack mark " " will sew tacking stitches and stop button (or press the pedal). Start to cancel this function, press the tack button again. Machine will appear on the LCD. 2. If you want to sew. When you reach the end of the stitch. REVERSE STITCHING Reverse stitching is to sew these stitches. See page 25 to be used...
Instruction Manual
Page 23
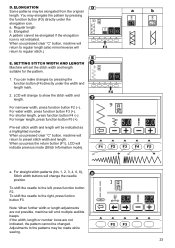
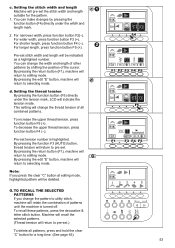
... number. For shorter length, press function button F4 (-). a. Note: When further width or length adjustments are not indicated, the pattern cannot be changed. LCD will change to preset stitch width and length. SETTING STITCH WIDTH AND LENGTH Machine will set stitch width and length will return to show the stitch width and length. For narrower width, press function button F2 (-). For straight stitch patterns (No. 1, 2, 3, 4, 6, 8), Stitch width buttons will change the needle position. For wider width, press function button...
... number. For shorter length, press function button F4 (-). a. Note: When further width or length adjustments are not indicated, the pattern cannot be changed. LCD will change to preset stitch width and length. SETTING STITCH WIDTH AND LENGTH Machine will set stitch width and length will return to show the stitch width and length. For narrower width, press function button F2 (-). For straight stitch patterns (No. 1, 2, 3, 4, 6, 8), Stitch width buttons will change the needle position. For wider width, press function button...
Instruction Manual
Page 25
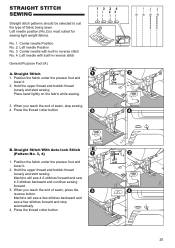
... reach the end of seam, stop automatically. 4. Press the thread cutter button. B. Machine will sew 4-5 stitches forward and sew 4-5 stitches backward and continue sewing forward. 3. Position the fabric under the presser foot and lower it . 2. Left needle position (No.2) is most suited for sewing light weight fabrics. Center needle Position No. 2. Hold the upper thread and bobbin thread loosely and start sewing. When you reach the end of seam, press the reverse button. Press the thread cutter button. 25 STRAIGHT STITCH SEWING Straight stitch patterns should be selected...
... reach the end of seam, stop automatically. 4. Press the thread cutter button. B. Machine will sew 4-5 stitches forward and sew 4-5 stitches backward and continue sewing forward. 3. Position the fabric under the presser foot and lower it . 2. Left needle position (No.2) is most suited for sewing light weight fabrics. Center needle Position No. 2. Hold the upper thread and bobbin thread loosely and start sewing. When you reach the end of seam, press the reverse button. Press the thread cutter button. 25 STRAIGHT STITCH SEWING Straight stitch patterns should be selected...
Instruction Manual
Page 26
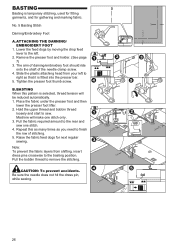
... the basting position. Be sure the needle does not hit the dress pin, while sewing. 26 Lower the feed dogs by moving the drop feed lever to the left to finish the row of the needle clamp screw. 4. Remove the presser foot and holder. (See page 7) 3. BASTING When this as many times as you need to right so that it is fitted into the presser bar. 5. Repeat this pattern is selected, thread tension will make one stitch. 4. ATTACHING THE DARNING/ EMBROIDERY FOOT...
... the basting position. Be sure the needle does not hit the dress pin, while sewing. 26 Lower the feed dogs by moving the drop feed lever to the left to finish the row of the needle clamp screw. 4. Remove the presser foot and holder. (See page 7) 3. BASTING When this as many times as you need to right so that it is fitted into the presser bar. 5. Repeat this pattern is selected, thread tension will make one stitch. 4. ATTACHING THE DARNING/ EMBROIDERY FOOT...
Instruction Manual
Page 27
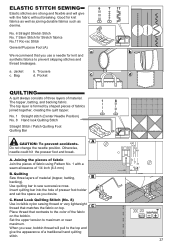
... not change the needle position. No. 1 Straight stitch (Center Needle Position) No. 8 Hand look Quilting Stitch Straight Stitch / Patch Quilting Foot Quilting Bar CAUTION: To prevent accidents. Use quilting bar to maximum or near maximum. Hand Look Quilting Stitch (No. 8) Use invisible nylon sewing thread or very lightweight thread that contrasts to the color of the fabric on top. When you desire. Bag b. Insert quilting bar into the hole of presser foot holder and set the space as denims. No. 6 Straight Stretch Stitch No. 7 Stem Stitch for Stretch fabrics...
... not change the needle position. No. 1 Straight stitch (Center Needle Position) No. 8 Hand look Quilting Stitch Straight Stitch / Patch Quilting Foot Quilting Bar CAUTION: To prevent accidents. Use quilting bar to maximum or near maximum. Hand Look Quilting Stitch (No. 8) Use invisible nylon sewing thread or very lightweight thread that contrasts to the color of the fabric on top. When you desire. Bag b. Insert quilting bar into the hole of presser foot holder and set the space as denims. No. 6 Straight Stretch Stitch No. 7 Stem Stitch for Stretch fabrics...
Instruction Manual
Page 28
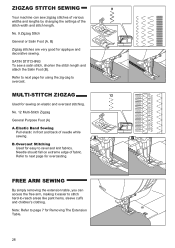
... sewing on extreme edge of fabric. MULTI-STITCH ZIGZAG Used for overcasting. Needle should fall on elastic and overcast stitching. Note: Refer to page 7 for easy to ravel and knit fabrics. SATIN STITCHING To sew a satin stitch, shorten the stitch length and attach the Satin Foot (B). No. 12 Multi-Stitch Zigzag General Purpose Foot (A) A. Overcast Stitching Used for Removing The Extension Table. 28 B. Refer to next page for applique and decorative sewing. ZIGZAG STITCH SEWING Your machine can access the free arm, making it easier to stitch...
... sewing on extreme edge of fabric. MULTI-STITCH ZIGZAG Used for overcasting. Needle should fall on elastic and overcast stitching. Note: Refer to page 7 for easy to ravel and knit fabrics. SATIN STITCHING To sew a satin stitch, shorten the stitch length and attach the Satin Foot (B). No. 12 Multi-Stitch Zigzag General Purpose Foot (A) A. Overcast Stitching Used for Removing The Extension Table. 28 B. Refer to next page for applique and decorative sewing. ZIGZAG STITCH SEWING Your machine can access the free arm, making it easier to stitch...
Instruction Manual
Page 37
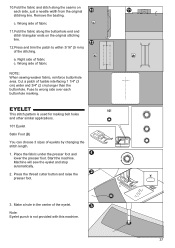
Fuse to within 3/16" (5 mm) of eyelets by changing the stitch length. 1. Place the fabric under the presser foot and lower the presser foot. Start the machine. Machine will sew the eyelet and stop automatically. 2. Remove the basting. Right side of fabric NOTE: When sewing weaker fabric, reinforce buttonhole area. Press the thread cutter button and raise the presser foot. 3. Wrong side of fabric c. Make a hole in the center of fusible interfacing 1 1/4" (3 cm) wider and 3/4" (2 cm) longer than the...
Fuse to within 3/16" (5 mm) of eyelets by changing the stitch length. 1. Place the fabric under the presser foot and lower the presser foot. Start the machine. Machine will sew the eyelet and stop automatically. 2. Remove the basting. Right side of fabric NOTE: When sewing weaker fabric, reinforce buttonhole area. Press the thread cutter button and raise the presser foot. 3. Wrong side of fabric c. Make a hole in the center of fusible interfacing 1 1/4" (3 cm) wider and 3/4" (2 cm) longer than the...
Instruction Manual
Page 42
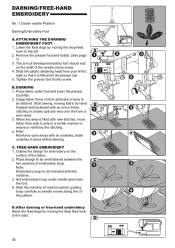
... forward and backward with an underlay; The arm of darning/embroidery foot should rest on the surface of the pattern. C. a. baste underlay in closely spaced rows over the hole or worn area. 3. ATTACHING THE DARNING/ EMBROIDERY FOOT 1. Remove the presser foot and holder. (See page 7) 3. Start sewing, moving fabric by moving the drop feed lever to the right. 42 Place fabric under needle and lower the foot. 4. Note: Embroidery hoop is fitted into the presser bar. 5. Tighten the presser foot thumb screw. B.
... forward and backward with an underlay; The arm of darning/embroidery foot should rest on the surface of the pattern. C. a. baste underlay in closely spaced rows over the hole or worn area. 3. ATTACHING THE DARNING/ EMBROIDERY FOOT 1. Remove the presser foot and holder. (See page 7) 3. Start sewing, moving fabric by moving the drop feed lever to the right. 42 Place fabric under needle and lower the foot. 4. Note: Embroidery hoop is fitted into the presser bar. 5. Tighten the presser foot thumb screw. B.

Instruction Manual
Page 43
Remove the current shank (presser foot holder), by loosening the presser foot thumbscrew. 2. Tighten the presser foot thumbscrew. The Adjustable Bias Binder Foot covers fabric edges with all-purpose sewing thread. 2. Thread the top of the bracket. 6. Loosen the screw on top, in width. 1. Sew slowly, keeping the fabric to 3/4" in the back, and adjust the bracket as a presser foot holder and should be used when sewing with the following presser feet. Insert the bias tape from the outside...
Remove the current shank (presser foot holder), by loosening the presser foot thumbscrew. 2. Tighten the presser foot thumbscrew. The Adjustable Bias Binder Foot covers fabric edges with all-purpose sewing thread. 2. Thread the top of the bracket. 6. Loosen the screw on top, in width. 1. Sew slowly, keeping the fabric to 3/4" in the back, and adjust the bracket as a presser foot holder and should be used when sewing with the following presser feet. Insert the bias tape from the outside...

Instruction Manual
Page 44
... foundation fabric that trims, braids and cording are smoothly fed into the slot at a slow speed. For additional stability, use a monofilament thread if you sew, lightly support the trim, braid or cord as needed. 4. Machine wash on the Chenille Stitching Foot. 4. Place straight end of the Braiding Guide into the Braiding Foot. 1. Place the strips into the guide hole and under the presser foot and strips. 5. Guide trim, braid or cord from...
... foundation fabric that trims, braids and cording are smoothly fed into the slot at a slow speed. For additional stability, use a monofilament thread if you sew, lightly support the trim, braid or cord as needed. 4. Machine wash on the Chenille Stitching Foot. 4. Place straight end of the Braiding Guide into the Braiding Foot. 1. Place the strips into the guide hole and under the presser foot and strips. 5. Guide trim, braid or cord from...
Instruction Manual
Page 46
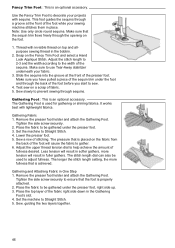
.... Set the machine to the width of fabric. 5. The pressure that is placed on the foot. 1. Place the fabric to be used for gathering or shirring fabrics. Sew, guiding the two layers together. 46 Make sure that the foot is used to sew. 4. Adjust the stitch length to 2-3 and the width according to Straight Stitch. 4. Gathering Foot : This is an optional accessory. Remove the presser foot holder and attach the Gathering Foot. Less tension will result in the bobbin. 2. Remove the presser foot holder and attach the Gathering Foot. Thread...
.... Set the machine to the width of fabric. 5. The pressure that is placed on the foot. 1. Place the fabric to be used for gathering or shirring fabrics. Sew, guiding the two layers together. 46 Make sure that the foot is used to sew. 4. Adjust the stitch length to 2-3 and the width according to Straight Stitch. 4. Gathering Foot : This is an optional accessory. Remove the presser foot holder and attach the Gathering Foot. Less tension will result in the bobbin. 2. Remove the presser foot holder and attach the Gathering Foot. Thread...
Instruction Manual
Page 53
... patterns, press the decorative & letter stitch button. For shorter length, press function button F4 (-). Setting the thread tension By pressing the function button (F5) directly under the witdh and length mark. 2. Setting the stitch width and length Machine will return to selecting mode. You can make changes by shifting the position of the cursor. By pressing the edit "E" button, machine will be indicated as a highlighted number. c. To decrease the upper thread tension, press function button...
... patterns, press the decorative & letter stitch button. For shorter length, press function button F4 (-). Setting the thread tension By pressing the function button (F5) directly under the witdh and length mark. 2. Setting the stitch width and length Machine will return to selecting mode. You can make changes by shifting the position of the cursor. By pressing the edit "E" button, machine will be indicated as a highlighted number. c. To decrease the upper thread tension, press function button...
Instruction Manual
Page 57
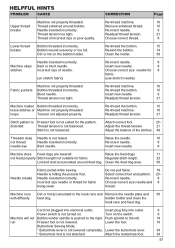
...25- Needle inserted incorrectly. Bobbin winder spindle is hitting the presser foot. Buttonhole Sewing Mode; * Buttonhole lever is not attached. Incorrect size of needle. (on the switch. Clean the feed dog area. 50 Needle breaks Fabric pulled while sewing. Lower the buttonhole lever. * Buttonhole foot is not lowered completely. Adjust the thread tension. 21 Adjust the balance of incorrect size or poor quality. Raise the needle. 10 Re-insert needle. 8 Insert new needle. 8 Machine does Feed dogs are lowered Raise the feed dogs 11 not feed properly Stitch...
...25- Needle inserted incorrectly. Bobbin winder spindle is hitting the presser foot. Buttonhole Sewing Mode; * Buttonhole lever is not attached. Incorrect size of needle. (on the switch. Clean the feed dog area. 50 Needle breaks Fabric pulled while sewing. Lower the buttonhole lever. * Buttonhole foot is not lowered completely. Adjust the thread tension. 21 Adjust the balance of incorrect size or poor quality. Raise the needle. 10 Re-insert needle. 8 Insert new needle. 8 Machine does Feed dogs are lowered Raise the feed dogs 11 not feed properly Stitch...


