

Instruction Manual 2
Page 3
...1. To unplug, grasp the plug, not the cord. 16. The sound pressure level under normal operating conditions is required around the sewing machine needle. 6. Always unplug this manual. 3. Never operate the appliance with the appliance. Do not operate where aerosol spray products are being...to be used as threading needle, changing needle, threading bobbin, changing presser foot or changing the light. 10. Switch the sewing machine off ("O") position, then remove plug from the electrical outlet when removing covers, lubricating, or when making any other user servicing adjustments ...
...1. To unplug, grasp the plug, not the cord. 16. The sound pressure level under normal operating conditions is required around the sewing machine needle. 6. Always unplug this manual. 3. Never operate the appliance with the appliance. Do not operate where aerosol spray products are being...to be used as threading needle, changing needle, threading bobbin, changing presser foot or changing the light. 10. Switch the sewing machine off ("O") position, then remove plug from the electrical outlet when removing covers, lubricating, or when making any other user servicing adjustments ...
Instruction Manual 2
Page 4
.../25/26 2 Function buttons (see page 27/28/29 2 Selection buttons (see page 30/31 3 LCD SCREEN 4-5 PATTERN CHART 6-7 ACCESSORIES 8 CONNECTING THE MACHINE TO THE POWER SOURCE 9 Connecting the machine 9 WINDING THE BOBBIN 10-11 Bobbin winding 10-11 INSERTING THE BOBBIN 12 THREADING THE UPPER THREAD 13-14 USING THE NEEDLE...
.../25/26 2 Function buttons (see page 27/28/29 2 Selection buttons (see page 30/31 3 LCD SCREEN 4-5 PATTERN CHART 6-7 ACCESSORIES 8 CONNECTING THE MACHINE TO THE POWER SOURCE 9 Connecting the machine 9 WINDING THE BOBBIN 10-11 Bobbin winding 10-11 INSERTING THE BOBBIN 12 THREADING THE UPPER THREAD 13-14 USING THE NEEDLE...
Instruction Manual 2
Page 5
... message display 70 Instruction animation message display 70 Warning beeping sound 71 BUZZER SOUND 72 MAINTENANCE 73-74 Cleaning the screen 73 Cleaning the sewing machine surface 73 Cleaning the hook 73-74 TROUBLE SHOOTING GUIDE 75-76 STITCH ADJUSTMENT REFERENCE CHART 77-80
... message display 70 Instruction animation message display 70 Warning beeping sound 71 BUZZER SOUND 72 MAINTENANCE 73-74 Cleaning the screen 73 Cleaning the sewing machine surface 73 Cleaning the hook 73-74 TROUBLE SHOOTING GUIDE 75-76 STITCH ADJUSTMENT REFERENCE CHART 77-80
Instruction Manual 2
Page 6
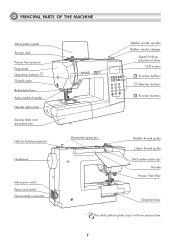
PRINCIPAL PARTS OF THE MACHINE Stitch pattern plate Tension dial Presser foot pressure Face plate Operation buttons A Thread cutter Buttonhole lever Auto needle threader Needle plate cover Sewing table and ...
PRINCIPAL PARTS OF THE MACHINE Stitch pattern plate Tension dial Presser foot pressure Face plate Operation buttons A Thread cutter Buttonhole lever Auto needle threader Needle plate cover Sewing table and ...
Instruction Manual 2
Page 7
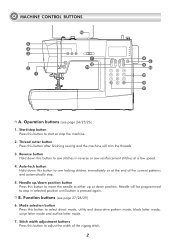
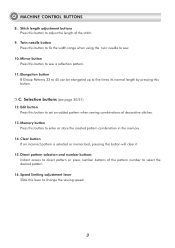
Operation buttons (see page 27/28/29) 6. Thread cutter button Press this button after finishing sewing and the machine will be programmed to sew locking stitches immediately or at a low speed. 4. Needle up/down position button Press this button to move...letter mode, script letter mode and outline letter mode. 7. Function buttons (see page 24/25/26) 1. MACHINE CONTROL BUTTONS 5 4 3 2 1 16 67 12 123 1 2 3 4 5 6 7 8 9 0 8 6 9 14 15 10 11 A. Start/stop the machine. 2. Reverse button Hold down this button to stop in reverse or sew reinforcement stitches at the end of ...
Operation buttons (see page 27/28/29) 6. Thread cutter button Press this button after finishing sewing and the machine will be programmed to sew locking stitches immediately or at a low speed. 4. Needle up/down position button Press this button to move...letter mode, script letter mode and outline letter mode. 7. Function buttons (see page 24/25/26) 1. MACHINE CONTROL BUTTONS 5 4 3 2 1 16 67 12 123 1 2 3 4 5 6 7 8 9 0 8 6 9 14 15 10 11 A. Start/stop the machine. 2. Reverse button Hold down this button to stop in reverse or sew reinforcement stitches at the end of ...
Instruction Manual 2
Page 8
... buttons (see page 30/31) 12. Memory button Press this button to sew. 10. Speed limiting adjustment lever Slide this button will clear it. 15. MACHINE CONTROL BUTTONS 8.
... buttons (see page 30/31) 12. Memory button Press this button to sew. 10. Speed limiting adjustment lever Slide this button will clear it. 15. MACHINE CONTROL BUTTONS 8.
Instruction Manual 2
Page 13
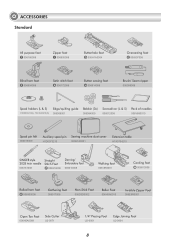
... guide Bobbin (3x) Screwdriver (L & S) Pack of needles H1D0083210(L) TA10943210(S) 006008001 006084009 006012008 006V880010 Spool pin felt 006015009 Auxiliary spool pin Sewing machine dust cover H1D0073210 020H7A0001 Extension table H7A0754210 SINGER style 2025 twin needle 006161008 Straight Stitch Foot P 006916008 Darning/ Embroidery foot 006016008 Walking foot 0061850081 Cording foot M 006813008 Rolled hem foot...
... guide Bobbin (3x) Screwdriver (L & S) Pack of needles H1D0083210(L) TA10943210(S) 006008001 006084009 006012008 006V880010 Spool pin felt 006015009 Auxiliary spool pin Sewing machine dust cover H1D0073210 020H7A0001 Extension table H7A0754210 SINGER style 2025 twin needle 006161008 Straight Stitch Foot P 006916008 Darning/ Embroidery foot 006016008 Walking foot 0061850081 Cording foot M 006813008 Rolled hem foot...
Instruction Manual 2
Page 14
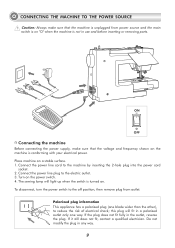
... from outlet. Connect the power line plug to the off position, then remove plug from power source and the main switch is on "O" when the machine is conforming with your electrical power. The sewing lamp will fit in use and before inserting or removing parts. If it still does not fit... power switch to the electric outlet. 3. this plug will light up when the switch is turned on the machine is not in a polarized outlet only one blade wider than the other), to the machine by inserting the 2-hole plug into the power cord socket. 2. Connect the power line cord to reduce the...
... from outlet. Connect the power line plug to the off position, then remove plug from power source and the main switch is on "O" when the machine is conforming with your electrical power. The sewing lamp will fit in use and before inserting or removing parts. If it still does not fit... power switch to the electric outlet. 3. this plug will light up when the switch is turned on the machine is not in a polarized outlet only one blade wider than the other), to the machine by inserting the 2-hole plug into the power cord socket. 2. Connect the power line cord to reduce the...
Instruction Manual 2
Page 16
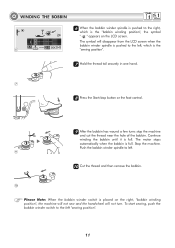
The motor stops automatically when the bobbin is full. Stop the machine. Push the bobbin winder spindle to left. 9 10 Cut the thread and then remove the bobbin... left , which is the "bobbin winding position", the symbol " " appears on the right, "bobbin winding position", the machine will not sew and the handwheel will disappear from the LCD screen when the bobbin winder spindle is pushed to the left "sewing... the Start/stop button or the foot control. 8 9 After the bobbin has wound a few turns stop the machine and cut the thread near the hole of the bobbin. The symbol will not turn.
The motor stops automatically when the bobbin is full. Stop the machine. Push the bobbin winder spindle to left. 9 10 Cut the thread and then remove the bobbin... left , which is the "bobbin winding position", the symbol " " appears on the right, "bobbin winding position", the machine will not sew and the handwheel will disappear from the LCD screen when the bobbin winder spindle is pushed to the left "sewing... the Start/stop button or the foot control. 8 9 After the bobbin has wound a few turns stop the machine and cut the thread near the hole of the bobbin. The symbol will not turn.
Instruction Manual 2
Page 22
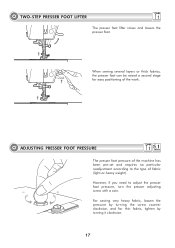
ADJUSTING PRESSER FOOT PRESSURE The presser foot pressure of the machine has been pre-set and requires no particular readjustment according to adjust the presser foot pressure, turn the presser adjusting screw with a coin. For sewing ...
ADJUSTING PRESSER FOOT PRESSURE The presser foot pressure of the machine has been pre-set and requires no particular readjustment according to adjust the presser foot pressure, turn the presser adjusting screw with a coin. For sewing ...
Instruction Manual 2
Page 23
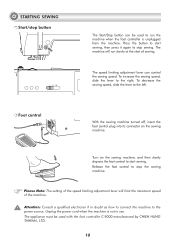
...sewing, then press it again to stop the sewing machine. The speed limiting adjustment lever can be used to the left. Foot control With the sewing machine turned off, insert the foot control plug into its connector on the sewing machine, and then slowly depress the foot control to ...the power source. The machine will limit the maximum speed of sewing. Attention: Consult a qualified...
...sewing, then press it again to stop the sewing machine. The speed limiting adjustment lever can be used to the left. Foot control With the sewing machine turned off, insert the foot control plug into its connector on the sewing machine, and then slowly depress the foot control to ...the power source. The machine will limit the maximum speed of sewing. Attention: Consult a qualified...
Instruction Manual 2
Page 29
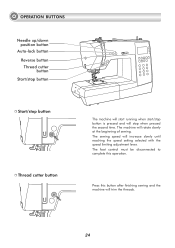
...Needle up/down position button Auto-lock button Reverse button Thread cutter button Start/stop button Start/stop button Thread cutter button The machine will start running when start/stop when pressed the second time. The foot control must be disconnected to complete this button after... finishing sewing and the machine will increase slowly until reaching the speed setting selected with the speed limiting adjustment lever. The machine will stop button is pressed and will rotate slowly at the beginning of sewing.
...Needle up/down position button Auto-lock button Reverse button Thread cutter button Start/stop button Start/stop button Thread cutter button The machine will start running when start/stop when pressed the second time. The foot control must be disconnected to complete this button after... finishing sewing and the machine will increase slowly until reaching the speed setting selected with the speed limiting adjustment lever. The machine will stop button is pressed and will rotate slowly at the beginning of sewing.

Instruction Manual 2
Page 30
... current pattern and automatically stop . An arrow " " on the LCD screen display appears while stitching in reverse. The machine will display the figure " " until the machine is stopped. 25 The function will sew in reverse. The LCD screen will sew forward after the button is pressed....in reverse. If you press the button once again or select another pattern. Press the button again to sew, the machine will sew 3 locking stitches at a low speed and machine automatically stops if the reverse button is released. When Direct Patterns 6-7, B Group Patterns 07-16 , 33-50, ...
... current pattern and automatically stop . An arrow " " on the LCD screen display appears while stitching in reverse. The machine will display the figure " " until the machine is stopped. 25 The function will sew in reverse. The LCD screen will sew forward after the button is pressed....in reverse. If you press the button once again or select another pattern. Press the button again to sew, the machine will sew 3 locking stitches at a low speed and machine automatically stops if the reverse button is released. When Direct Patterns 6-7, B Group Patterns 07-16 , 33-50, ...

Instruction Manual 2
Page 31
... on the LCD screen. When the arrow points upward, the needle will raise or lower the needle. OPERATION BUTTONS Needle up/down position button The machine automatically stops sewing with the needle in the up position or down in the up or down position. When the arrow points downward, the needle...
... on the LCD screen. When the arrow points upward, the needle will raise or lower the needle. OPERATION BUTTONS Needle up/down position button The machine automatically stops sewing with the needle in the up position or down in the up or down position. When the arrow points downward, the needle...
Instruction Manual 2
Page 32
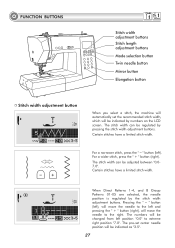
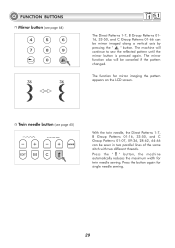
... adjustment buttons Stitch length adjustment buttons Mode selection button Twin needle button Mirror button Elongation button Stitch width adjustment button When you select a stitch, the machine will automatically set center needle position will be regulated by pressing the stitch width adjustment buttons. The stitch width can be indicated as "3.5". 27
... adjustment buttons Stitch length adjustment buttons Mode selection button Twin needle button Mirror button Elongation button Stitch width adjustment button When you select a stitch, the machine will automatically set center needle position will be regulated by pressing the stitch width adjustment buttons. The stitch width can be indicated as "3.5". 27

Instruction Manual 2
Page 33
FUNCTION BUTTONS Stitch length adjustment buttons When you select a stitch the machine will automatically set at Direct mode " " when the machine is selected. To shorten the stitch length, press the " – " button (left). Script letter mode: Character selection using number buttons. For a longer stitch length, press ...
FUNCTION BUTTONS Stitch length adjustment buttons When you select a stitch the machine will automatically set at Direct mode " " when the machine is selected. To shorten the stitch length, press the " – " button (left). Script letter mode: Character selection using number buttons. For a longer stitch length, press ...
Instruction Manual 2
Page 34
The machine will be canceled if the pattern changed. FUNCTION BUTTONS Mirror button (see page 65) With the twin needle, the Direct Patterns 1-7, B Group Patterns 01-16, ... the LCD screen. The mirror function also will continue to sew the reflected pattern until the mirror button is pressed again. Press the " " button, the machine automatically reduces the maximum width for twin needle sewing.
The machine will be canceled if the pattern changed. FUNCTION BUTTONS Mirror button (see page 65) With the twin needle, the Direct Patterns 1-7, B Group Patterns 01-16, ... the LCD screen. The mirror function also will continue to sew the reflected pattern until the mirror button is pressed again. Press the " " button, the machine automatically reduces the maximum width for twin needle sewing.
Instruction Manual 2
Page 36
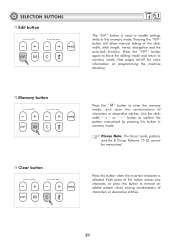
... pattern memorized by pressing this button when the incorrect character is used to memory mode. (See pages 66-69 for more information on programming the machine Memory). SELECTION BUTTONS Edit button Memory button Clear button The " " button is selected. Pressing the " " button will allow manual setting of the stitch width, stitch...
... pattern memorized by pressing this button when the incorrect character is used to memory mode. (See pages 66-69 for more information on programming the machine Memory). SELECTION BUTTONS Edit button Memory button Clear button The " " button is selected. Pressing the " " button will allow manual setting of the stitch width, stitch...
Instruction Manual 2
Page 37
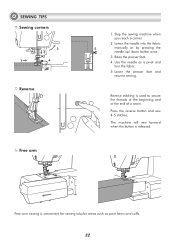
... up/ down button once. 3. Free-arm sewing is used to secure the threads at the beginning and at the end of a seam. Stop the sewing machine when you reach a corner. 2. Lower the presser foot and resume sewing. Reverse stitching is convenient for sewing tubular areas such as a pivot and turn the...
... up/ down button once. 3. Free-arm sewing is used to secure the threads at the beginning and at the end of a seam. Stop the sewing machine when you reach a corner. 2. Lower the presser foot and resume sewing. Reverse stitching is convenient for sewing tubular areas such as a pivot and turn the...
Instruction Manual 2
Page 38
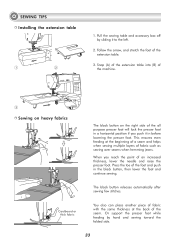
.... Pull the sewing table and accessory box off by hand and sewing toward the folded side. 33 Snap (A) of the extension table into (B) of the machine. 3 Sewing on heavy fabrics The black button on the right side of the seam. The black button releases automatically after sewing few stitches. SEWING TIPS...
.... Pull the sewing table and accessory box off by hand and sewing toward the folded side. 33 Snap (A) of the extension table into (B) of the machine. 3 Sewing on heavy fabrics The black button on the right side of the seam. The black button releases automatically after sewing few stitches. SEWING TIPS...


