
XGP10XU Operation Manual
Page 6
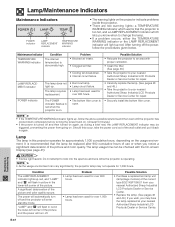
...and after the lamp has been used for details. Lamp Monitor Function When the projector is subjected to these environments, the lens and filter must be careful not to maintain high image quality, SHARP recommends that all internal cleaning must be cleaned internally. See pages 48 and 49...device will turn off . Periodically the filter should be replaced and the projector should be cleaned more often. If the temperature continues to "Lamp/Maintenance Indicators" on the power by an Authorized Sharp Industrial LCD Products Dealer or Service Center. The three marks shown on the left...
...and after the lamp has been used for details. Lamp Monitor Function When the projector is subjected to these environments, the lens and filter must be careful not to maintain high image quality, SHARP recommends that all internal cleaning must be cleaned internally. See pages 48 and 49...device will turn off . Periodically the filter should be replaced and the projector should be cleaned more often. If the temperature continues to "Lamp/Maintenance Indicators" on the power by an Authorized Sharp Industrial LCD Products Dealer or Service Center. The three marks shown on the left...
XGP10XU Operation Manual
Page 8
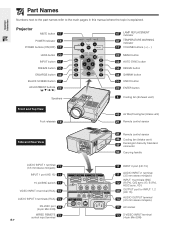
... Numbers next to the part names refer to the main pages in this manual where the topic is explained. Projector MUTE button 17 POWER indicator 16 POWER buttons (ON/OFF) 17 LENS button 20 INPUT button 17 FREEZE button 33 ENLARGE button 34 BLACK SCREEN button 37 ADJUSTMENT buttons 23 Speakers 47...
... Numbers next to the part names refer to the main pages in this manual where the topic is explained. Projector MUTE button 17 POWER indicator 16 POWER buttons (ON/OFF) 17 LENS button 20 INPUT button 17 FREEZE button 33 ENLARGE button 34 BLACK SCREEN button 37 ADJUSTMENT buttons 23 Speakers 47...
XGP10XU Operation Manual
Page 9
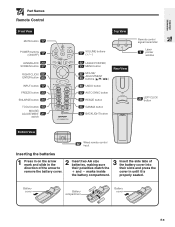
Battery cover Battery compartment Battery cover E-8 Important Information Part Names Remote Control Front View MUTE button 17 POWER buttons (ON/OFF) 17 LENS/BLACK 20 SCREEN button 37 RIGHT-CLICK/ 22 ENTER button 23 INPUT button 17 FREEZE button 33 ENLARGE button 34 TOOLS button 43 MOUSE/ ADJUSTMENT ...
Battery cover Battery compartment Battery cover E-8 Important Information Part Names Remote Control Front View MUTE button 17 POWER buttons (ON/OFF) 17 LENS/BLACK 20 SCREEN button 37 RIGHT-CLICK/ 22 ENTER button 23 INPUT button 17 FREEZE button 33 ENLARGE button 34 TOOLS button 43 MOUSE/ ADJUSTMENT ...
XGP10XU Operation Manual
Page 11
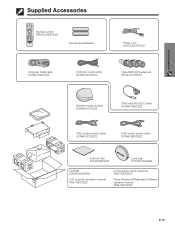
... receiver RUNTK0673CEZZ DIN-D-sub RS-232C cable QCNW-5288CEZZ PS/2 mouse control cable QCNW-5113CEZZ USB mouse control cable QCNW-5680CEZZ Extra air filter PFILD0088CEZZ Lens cap PCAPH1056CESA CD-ROM UDSKA0022CEN1 LCD projector operation manual TINS-7052CEZZ LCD projector quick reference TINS-7053CEZZ Sharp Advanced Presentation Software operation manual TINS-7054CEZZ E-10
... receiver RUNTK0673CEZZ DIN-D-sub RS-232C cable QCNW-5288CEZZ PS/2 mouse control cable QCNW-5113CEZZ USB mouse control cable QCNW-5680CEZZ Extra air filter PFILD0088CEZZ Lens cap PCAPH1056CESA CD-ROM UDSKA0022CEN1 LCD projector operation manual TINS-7052CEZZ LCD projector quick reference TINS-7053CEZZ Sharp Advanced Presentation Software operation manual TINS-7054CEZZ E-10
XGP10XU Operation Manual
Page 19
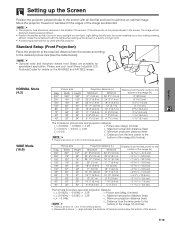
.... • Position the screen so that it is an error of ע3% in the formula above . Move the projector forward or backward if the edges of the screen. Close the curtains and dim the lights when setting up the Screen Position the...feet flat and level to the desired picture size (see your local Sharp Industrial LCD Products Dealer for specialized application. Standard Setup (Front Projection) X Place the projector at the required distance from Sharp are distorted. • The projector lens should be centered in the middle of the image are available for ...
.... • Position the screen so that it is an error of ע3% in the formula above . Move the projector forward or backward if the edges of the screen. Close the curtains and dim the lights when setting up the Screen Position the...feet flat and level to the desired picture size (see your local Sharp Industrial LCD Products Dealer for specialized application. Standard Setup (Front Projection) X Place the projector at the required distance from Sharp are distorted. • The projector lens should be centered in the middle of the image are available for ...
XGP10XU Operation Manual
Page 20
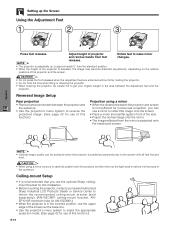
... foot releases when the adjustment feet are extended without firmly holding the projector. • Do not hold the lens when lifting or lowering the projector. • When lowering the projector, be achieved when the projector is positioned perpendicular to get your nearest Authorized Sharp Industrial LCD Products Dealer or Service Center to obtain the recommended ceiling-mount...
... foot releases when the adjustment feet are extended without firmly holding the projector. • Do not hold the lens when lifting or lowering the projector. • When lowering the projector, be achieved when the projector is positioned perpendicular to get your nearest Authorized Sharp Industrial LCD Products Dealer or Service Center to obtain the recommended ceiling-mount...
XGP10XU Operation Manual
Page 21
.... 3 Press to make adjustments. 4 a. position.) 1 Press LENS to make adjustments. 4 a. Press LENS until normal screen appears. Each time LENS is pressed, the screen changes as shown on the remote control to shift the image up the Screen Projector Remote control 1, 4a 3 2 4b On-screen Display (Example:...; Straight lines and the edges of the displayed image may appear jagged, when adjusting the KEYSTONE setting. • Do not touch the lens when adjusting the focus or zoom. on the near left . 2 Press ENTER to display test pattern. 3 Press to select mode. Setting...
.... 3 Press to make adjustments. 4 a. position.) 1 Press LENS to make adjustments. 4 a. Press LENS until normal screen appears. Each time LENS is pressed, the screen changes as shown on the remote control to shift the image up the Screen Projector Remote control 1, 4a 3 2 4b On-screen Display (Example:...; Straight lines and the edges of the displayed image may appear jagged, when adjusting the KEYSTONE setting. • Do not touch the lens when adjusting the focus or zoom. on the near left . 2 Press ENTER to display test pattern. 3 Press to select mode. Setting...
XGP10XU Operation Manual
Page 23
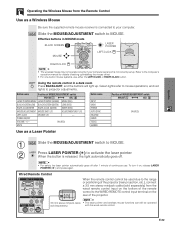
...Wireless Mouse from the wired remote control input on the bottom of the remote control to the computer's operation manual for details of the projector (rear projection, etc.), connect a 3.5 mm stereo minijack cable (sold separately) with the wired remote control. Slide the MOUSE/ADJUSTMENT ... GAMMA Position of MOUSE/ADJUSTMENT switch MOUSE ADJ. MOUSE ADJ. LASER POINTER/MENU LASER POINTER (GREEN) MENU (RED) BLACK SCREEN/LENS BLACK SCREEN (GREEN) LENS (RED) RIGHT-CLICK/ENTER RIGHT-CLICK (GREEN) ENTER (RED) MOUSE/ADJUSTMENT MOUSE (NOT LIT) ADJUSTMENT (NOT LIT) LEFT-CLICK...
...Wireless Mouse from the wired remote control input on the bottom of the remote control to the computer's operation manual for details of the projector (rear projection, etc.), connect a 3.5 mm stereo minijack cable (sold separately) with the wired remote control. Slide the MOUSE/ADJUSTMENT ... GAMMA Position of MOUSE/ADJUSTMENT switch MOUSE ADJ. MOUSE ADJ. LASER POINTER/MENU LASER POINTER (GREEN) MENU (RED) BLACK SCREEN/LENS BLACK SCREEN (GREEN) LENS (RED) RIGHT-CLICK/ENTER RIGHT-CLICK (GREEN) ENTER (RED) MOUSE/ADJUSTMENT MOUSE (NOT LIT) ADJUSTMENT (NOT LIT) LEFT-CLICK...
XGP10XU Operation Manual
Page 48
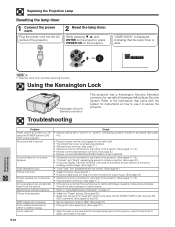
... indicator which lets you know when to look into the aperture and lens while the projector is operating. • As the usage environment can be triggered, preventing the power from your nearest Authorized Sharp Industrial LCD Products Dealer or Service Center. • Replace the lamp. (See...LAMP REPLACEMENT indicator may be checked with proper ventilation. • Clean the filter. (See page 46.) • Take the projector to your nearest Authorized Sharp Industrial LCD Products Dealer or Service Center for repair. • Carefully replace the lamp. (See pages 48 and 49.) • ...
... indicator which lets you know when to look into the aperture and lens while the projector is operating. • As the usage environment can be triggered, preventing the power from your nearest Authorized Sharp Industrial LCD Products Dealer or Service Center. • Replace the lamp. (See...LAMP REPLACEMENT indicator may be checked with proper ventilation. • Clean the filter. (See page 46.) • Take the projector to your nearest Authorized Sharp Industrial LCD Products Dealer or Service Center for repair. • Carefully replace the lamp. (See pages 48 and 49.) • ...
XGP10XU Operation Manual
Page 50
... right. Using the Kensington Lock Kensington Security Standard connector Troubleshooting This projector has a Kensington Security Standard connector for instructions on the projector, push the lens firmly in place, and rotate to secure the projector. Sound is heard. Picture appears but no sound is heard but... down. (See page 8.) • Remote control's MOUSE/ADJUSTMENT switch is set to MOUSE. • Cables incorrectly connected to rear panel of the projector. (See pages 11-15.) • "Contrast" and "Bright" adjustments are not correct. (See page 26.) • Adjust the focus. (See...
... right. Using the Kensington Lock Kensington Security Standard connector Troubleshooting This projector has a Kensington Security Standard connector for instructions on the projector, push the lens firmly in place, and rotate to secure the projector. Sound is heard. Picture appears but no sound is heard but... down. (See page 8.) • Remote control's MOUSE/ADJUSTMENT switch is set to MOUSE. • Cables incorrectly connected to rear panel of the projector. (See pages 11-15.) • "Contrast" and "Bright" adjustments are not correct. (See page 26.) • Adjust the focus. (See...
XGP10XU Operation Manual
Page 51
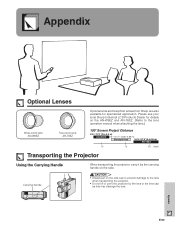
... Handle Carrying handle When transporting the projector, carry it by the carrying handle on the lens cap to prevent damage to the lens when transporting the projector. • Do not lift or carry the projector by the lens or the lens cap as this may damage the lens. Please see your local Sharp Industrial LCD Products Dealer for specialized application.
... Handle Carrying handle When transporting the projector, carry it by the carrying handle on the lens cap to prevent damage to the lens when transporting the projector. • Do not lift or carry the projector by the lens or the lens cap as this may damage the lens. Please see your local Sharp Industrial LCD Products Dealer for specialized application.
XGP10XU Operation Manual
Page 53
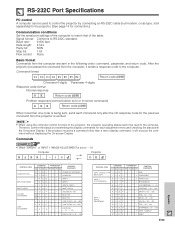
... PC control A computer can be read to the computer. Computer RABR _מ1 0 → ← Projector OK CONTROL ITEM POWER SETTING INPUT SWITCHING INPUT CHECK VOLUME ADJUSTMENT LENS ADJUSTMENT COMMAND PARAMETER C1 C2 C3 C4 P1 P2 P3 P4 CONTROL CONTENTS P O W R _ _ _ 0 POWER...8235;מ30 - ם30) R A T I _ * * * TINT (מ30 - ם30) R A S H _ * * * SHARPNESS (מ30 - ם30) R A R E _ _ _ 0 INPUT 1 DISPLAY R A R E _ _ _ 1 RESET E-52 Appendix Command format C1 C2 ...
... PC control A computer can be read to the computer. Computer RABR _מ1 0 → ← Projector OK CONTROL ITEM POWER SETTING INPUT SWITCHING INPUT CHECK VOLUME ADJUSTMENT LENS ADJUSTMENT COMMAND PARAMETER C1 C2 C3 C4 P1 P2 P3 P4 CONTROL CONTENTS P O W R _ _ _ 0 POWER...8235;מ30 - ם30) R A T I _ * * * TINT (מ30 - ם30) R A S H _ * * * SHARPNESS (מ30 - ם30) R A R E _ _ _ 0 INPUT 1 DISPLAY R A R E _ _ _ 1 RESET E-52 Appendix Command format C1 C2 ...

XGP10XU Operation Manual
Page 55
...functions are complex and are reverse confirmation bits, with "10" indicating "Front" and "01" indicating "Rear". Sharp remote control signal format Transmission format: 15-bit format D D D D D D D D D D D ...Function) 1 POWER ON 2 POWER OFF 3 VOLUME מ 4 VOLUME ם 5 MUTE 6 MENU 7 LENS 8 TOOLS 9 BLACK SCREEN 10 ENTER 11 UNDO System Code Data Code External Code C1 C2 C3 C4 C5 C6 C7 C8 C9...input, connect the cable from the WIRED REMOTE control input terminal on the projector to D Common Data Bit Reverse in D Appendix E-54 Wired Remote Control...
...functions are complex and are reverse confirmation bits, with "10" indicating "Front" and "01" indicating "Rear". Sharp remote control signal format Transmission format: 15-bit format D D D D D D D D D D D ...Function) 1 POWER ON 2 POWER OFF 3 VOLUME מ 4 VOLUME ם 5 MUTE 6 MENU 7 LENS 8 TOOLS 9 BLACK SCREEN 10 ENTER 11 UNDO System Code Data Code External Code C1 C2 C3 C4 C5 C6 C7 C8 C9...input, connect the cable from the WIRED REMOTE control input terminal on the projector to D Common Data Bit Reverse in D Appendix E-54 Wired Remote Control...
XGP10XU Operation Manual
Page 57
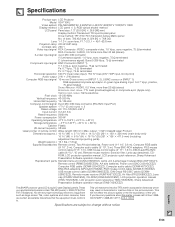
...must conform to. Specifications Product type LCD Projector Model XG-P10XU Video system PAL/SECAM/NTSC 3.58/NTSC 4.43/DTV 480P/DTV 720P/DTV 1080I Display method LCD panel ן3, RGB optical shutter method LCD panel Panel size: 1.3Љ ...receiver (RUNTK0673CEZZ), Air filter (PFILD0088CEZZ), Lens cap (PCAPH1056CESA), CD-ROM (UDSKA0022CEN1), LCD projector operation manual (TINS-7052CEZZ), LCD projector quick reference (TINS-7053CEZZ), Sharp Advanced Presentation Software operation manual (TINS-7054CEZZ) This SHARP projector uses LCD (Liquid Crystal Display) panels. U.S.A. of...
...must conform to. Specifications Product type LCD Projector Model XG-P10XU Video system PAL/SECAM/NTSC 3.58/NTSC 4.43/DTV 480P/DTV 720P/DTV 1080I Display method LCD panel ן3, RGB optical shutter method LCD panel Panel size: 1.3Љ ...receiver (RUNTK0673CEZZ), Air filter (PFILD0088CEZZ), Lens cap (PCAPH1056CESA), CD-ROM (UDSKA0022CEN1), LCD projector operation manual (TINS-7052CEZZ), LCD projector quick reference (TINS-7053CEZZ), Sharp Advanced Presentation Software operation manual (TINS-7054CEZZ) This SHARP projector uses LCD (Liquid Crystal Display) panels. U.S.A. of...
XGP10XU Operation Manual
Page 64
... and expansion 3 I/P conversion 28 K Kensington Security Standard connector 49 L LAMP REPLACEMENT indicator 47 LASER POINTER button 22 Laser pointer window 5 LEFT-CLICK button 22 LENS button 20 Lens cap 50 E-63 M MENU button 23 MOUSE/ADJUSTMENT switch 21 MOUSE buttons 22 MUTE button 17 O On-screen display language 25 OUTPUT port for... mouse control cable 15 V VIDEO INPUT 3 terminal 13 VOLUME buttons 17 W Wired remote control input 22 WIRED REMOTE control input terminal 22 Wireless mouse 21 X XGA resolution 3 Appendix
... and expansion 3 I/P conversion 28 K Kensington Security Standard connector 49 L LAMP REPLACEMENT indicator 47 LASER POINTER button 22 Laser pointer window 5 LEFT-CLICK button 22 LENS button 20 Lens cap 50 E-63 M MENU button 23 MOUSE/ADJUSTMENT switch 21 MOUSE buttons 22 MUTE button 17 O On-screen display language 25 OUTPUT port for... mouse control cable 15 V VIDEO INPUT 3 terminal 13 VOLUME buttons 17 W Wired remote control input 22 WIRED REMOTE control input terminal 22 Wireless mouse 21 X XGA resolution 3 Appendix
