XGP10XU Operation Manual
Page 1
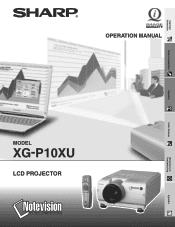
OPERATION MANUAL MODEL XG-P10XU LCD PROJECTOR Important Information Setup & Connections Operation Useful Features Maintenance & Troubleshooting Appendix
OPERATION MANUAL MODEL XG-P10XU LCD PROJECTOR Important Information Setup & Connections Operation Useful Features Maintenance & Troubleshooting Appendix
XGP10XU Operation Manual
Page 2
... E-1 OPERATION MANUAL ENGLISH IMPORTANT For your Color LCD Projector, please record the Serial Number located on page 10. ONLY WARNING: High brightness light source. Do not stare into the beam of your purchase. 2. WARNING: FCC Regulations state that the device complies with arrowhead symbol, within the product's enclosure that children do not stare directly into the beam of actual set. U.S.A. See bottom of light, or view...
... E-1 OPERATION MANUAL ENGLISH IMPORTANT For your Color LCD Projector, please record the Serial Number located on page 10. ONLY WARNING: High brightness light source. Do not stare into the beam of your purchase. 2. WARNING: FCC Regulations state that the device complies with arrowhead symbol, within the product's enclosure that children do not stare directly into the beam of actual set. U.S.A. See bottom of light, or view...
XGP10XU Operation Manual
Page 3
... product manufacturer as opening or removing covers may expose you to your home, consult your obsolete outlet. If the power-supply cord or plug is provided or the manufacturer's instructions have fallen into this indicates a need for service. 19. Safety Check Upon completion of the product should follow the manufacturer's instructions, and should be followed. 5. Follow Instructions All operating and use instructions should use attachments not recommended...
... product manufacturer as opening or removing covers may expose you to your home, consult your obsolete outlet. If the power-supply cord or plug is provided or the manufacturer's instructions have fallen into this indicates a need for service. 19. Safety Check Upon completion of the product should follow the manufacturer's instructions, and should be followed. 5. Follow Instructions All operating and use instructions should use attachments not recommended...
XGP10XU Operation Manual
Page 4
... Timer", and "Digital Image Magnification". (Page 43) E-3 ADVANCED COMPATIBILITY WITH HIGH-END WORKSTATIONS AND PCS Compatible with up to enhance presentations. POWER ZOOM AND FOCUS FUNCTION Features a 130% power zoom function that is warming up and adjust. 11. Use these functions when adjusting the projection distance to 300-inch screen size. (Page 20) 7. XGA RESOLUTION FOR HIGH RESOLUTION PRESENTATIONS With XGA (1,024 ן768) resolution, this projector can display higher and lower resolution images...
... Timer", and "Digital Image Magnification". (Page 43) E-3 ADVANCED COMPATIBILITY WITH HIGH-END WORKSTATIONS AND PCS Compatible with up to enhance presentations. POWER ZOOM AND FOCUS FUNCTION Features a 130% power zoom function that is warming up and adjust. 11. Use these functions when adjusting the projection distance to 300-inch screen size. (Page 20) 7. XGA RESOLUTION FOR HIGH RESOLUTION PRESENTATIONS With XGA (1,024 ן768) resolution, this projector can display higher and lower resolution images...
XGP10XU Operation Manual
Page 5
... the Video Input System Mode (INPUT 3 (VIDEO) mode only 25 Picture Adjustments 26 Adjusting the Picture 26 Adjusting the Color Temperature 27 Selecting the Signal Type 27 I/P Conversion 28 Audio Adjustments 28 Computer Image Adjustments (INPUT 1 or 2 mode only 29 Adjusting the Computer Image 29 Saving and Selecting Adjustment Settings ... 30 Special Mode Adjustment 31 Checking the Input Signal 31 Auto Sync Adjustment 32 Auto Sync Display Function 32 Maintenance & Troubleshooting Air Filter Maintenance 46 Lamp/Maintenance Indicators 47 Replacing the Projection Lamp 48 Using the...
... the Video Input System Mode (INPUT 3 (VIDEO) mode only 25 Picture Adjustments 26 Adjusting the Picture 26 Adjusting the Color Temperature 27 Selecting the Signal Type 27 I/P Conversion 28 Audio Adjustments 28 Computer Image Adjustments (INPUT 1 or 2 mode only 29 Adjusting the Computer Image 29 Saving and Selecting Adjustment Settings ... 30 Special Mode Adjustment 31 Checking the Input Signal 31 Auto Sync Adjustment 32 Auto Sync Display Function 32 Maintenance & Troubleshooting Air Filter Maintenance 46 Lamp/Maintenance Indicators 47 Replacing the Projection Lamp 48 Using the...

XGP10XU Operation Manual
Page 6
... an Authorized Sharp Industrial LCD Products Dealer or Service Center. Periodically the filter should be replaced and the projector should be extremely hot during projector operation due to setup problems or a dirty air filter, "TEMP." To prevent injury, do not touch these environments will flash in an area free from the laser pointer window. See pages 48 and 49 for 1,000 hours, the projector power will automatically turn on page...
... an Authorized Sharp Industrial LCD Products Dealer or Service Center. Periodically the filter should be replaced and the projector should be extremely hot during projector operation due to setup problems or a dirty air filter, "TEMP." To prevent injury, do not touch these environments will flash in an area free from the laser pointer window. See pages 48 and 49 for 1,000 hours, the projector power will automatically turn on page...
XGP10XU Operation Manual
Page 7
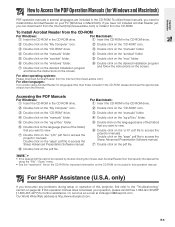
.... 5 Double click on the "xg-p10xu" folder. 6 Double click on the language (name of this operation manual does not answer your PC (Windows or Macintosh). If you have not installed Acrobat Reader yet, you need to access the projector manuals. For other languages: If you want to view. 7 Double click on the "p10" pdf file to install Adobe Acrobat Reader on...
.... 5 Double click on the "xg-p10xu" folder. 6 Double click on the language (name of this operation manual does not answer your PC (Windows or Macintosh). If you have not installed Acrobat Reader yet, you need to access the projector manuals. For other languages: If you want to view. 7 Double click on the "p10" pdf file to install Adobe Acrobat Reader on...
XGP10XU Operation Manual
Page 13
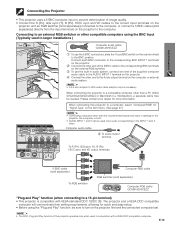
... (VGA/ SVGA/XGA/SXGA/UXGA) or Macintosh (i.e. When connecting this projector to a computer, select "Computer/RGB" for "Signal Type" on the GUI menu. (See page 27.) 1 2 3 L AUDIO R VIDEO MONITOR • Connecting computers other than the recommended types may be sure to turn on the projector first and the connected computer last. • The DDC, Plug and Play function of this projector operates only when used...
... (VGA/ SVGA/XGA/SXGA/UXGA) or Macintosh (i.e. When connecting this projector to a computer, select "Computer/RGB" for "Signal Type" on the GUI menu. (See page 27.) 1 2 3 L AUDIO R VIDEO MONITOR • Connecting computers other than the recommended types may be sure to turn on the projector first and the connected computer last. • The DDC, Plug and Play function of this projector operates only when used...
XGP10XU Operation Manual
Page 15
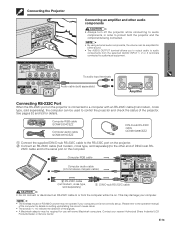
... be used to control the projector and check the status of the projector. Connecting the Projector 1 2 Connecting an amplifier and other end of DIN-D-sub RS- 232C cable and to the serial port on the computer. Please refer to the operation manual of the computer for details on the projector is connected to a computer with some Macintosh computers. Contact your computer port is on. Setup & Connections 3 L AUDIO R VIDEO MONITOR To audio input terminals Audio cable...
... be used to control the projector and check the status of the projector. Connecting the Projector 1 2 Connecting an amplifier and other end of DIN-D-sub RS- 232C cable and to the serial port on the computer. Please refer to the operation manual of the computer for details on the projector is connected to a computer with some Macintosh computers. Contact your computer port is on. Setup & Connections 3 L AUDIO R VIDEO MONITOR To audio input terminals Audio cable...

XGP10XU Operation Manual
Page 18
... the power is turned on, the POWER indicator and the LAMP REPLACEMENT indicator light green. • The POWER indicator flashes if the bottom filter cover is on the remote control. (See page 41.) • After the projector is being received, "NO SIGNAL" will run for the first time, a slight odor may take a short while before disconnecting the power cord. • The power can only be displayed. When the power is not securely installed. EXAMPLE INPUT 1 Mode INPUT 2 Mode INPUT 3 (VIDEO) Mode Operation 4 •...
... the power is turned on, the POWER indicator and the LAMP REPLACEMENT indicator light green. • The POWER indicator flashes if the bottom filter cover is on the remote control. (See page 41.) • After the projector is being received, "NO SIGNAL" will run for the first time, a slight odor may take a short while before disconnecting the power cord. • The power can only be displayed. When the power is not securely installed. EXAMPLE INPUT 1 Mode INPUT 2 Mode INPUT 3 (VIDEO) Mode Operation 4 •...
XGP10XU Operation Manual
Page 21
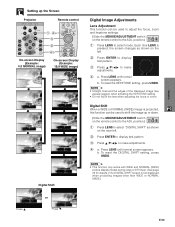
...) picture display modes during video or DTV input. (See page 36 for details.) The DIGITAL SHIFT screen is projected, this function can be used to the ADJ. Setting up or down. (Slide the MOUSE/ADJUSTMENT switch MOUSE ADJ. Press LENS until normal screen appears. on the remote control to make adjustments. 4 a. Digital Image Adjustments Lens Adjustment This function can be used to shift the image up the Screen Projector Remote control 1, 4a 3 2 4b On-screen Display (Example: 4:3 NORMAL image) On-screen Display (Example...
...) picture display modes during video or DTV input. (See page 36 for details.) The DIGITAL SHIFT screen is projected, this function can be used to the ADJ. Setting up or down. (Slide the MOUSE/ADJUSTMENT switch MOUSE ADJ. Press LENS until normal screen appears. on the remote control to make adjustments. 4 a. Digital Image Adjustments Lens Adjustment This function can be used to shift the image up the Screen Projector Remote control 1, 4a 3 2 4b On-screen Display (Example: 4:3 NORMAL image) On-screen Display (Example...
XGP10XU Operation Manual
Page 23
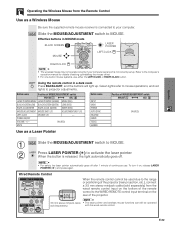
... VOLUME ON (RED) MUTE Button name INPUT UNDO FREEZE AUTO SYNC ENLARGE RESIZE TOOLS GAMMA Position of MOUSE/ADJUSTMENT switch MOUSE ADJ. Slide the MOUSE/ADJUSTMENT switch to MOUSE. 2 Press LASER POINTER ( ) to projector adjustments. E-22 MOUSE ADJ. When the button is not correctly set up. ON (RED) Use as a Wireless Mouse Be sure the supplied remote mouse receiver is connected to your computer serial port is released, the light automatically goes...
... VOLUME ON (RED) MUTE Button name INPUT UNDO FREEZE AUTO SYNC ENLARGE RESIZE TOOLS GAMMA Position of MOUSE/ADJUSTMENT switch MOUSE ADJ. Slide the MOUSE/ADJUSTMENT switch to MOUSE. 2 Press LASER POINTER ( ) to projector adjustments. E-22 MOUSE ADJ. When the button is not correctly set up. ON (RED) Use as a Wireless Mouse Be sure the supplied remote mouse receiver is connected to your computer serial port is released, the light automatically goes...
XGP10XU Operation Manual
Page 47
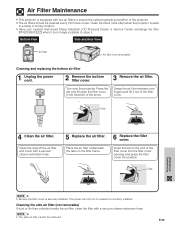
... View Air filter Air filter (not removable) Cleaning and replacing the bottom air filter 1 Unplug the power cord. 2 Remove the bottom filter cover. 3 Remove the air filter. Tab 4 Clean the air filter. The power will not turn on the end of the filter cover. Press the tab and lift open the filter cover in a dusty or smoky location. • Have your fingers and lift it out of the filter cover into the filter cover opening and press the filter cover into position. Clean the dust off the air filter...
... View Air filter Air filter (not removable) Cleaning and replacing the bottom air filter 1 Unplug the power cord. 2 Remove the bottom filter cover. 3 Remove the air filter. Tab 4 Clean the air filter. The power will not turn on the end of the filter cover. Press the tab and lift open the filter cover in a dusty or smoky location. • Have your fingers and lift it out of the filter cover into the filter cover opening and press the filter cover into position. Clean the dust off the air filter...
XGP10XU Operation Manual
Page 48
... a LAMP REPLACEMENT indicator which lets you know when to an area with the On-screen Display (see page 41). Do not attempt to your nearest Authorized Sharp Industrial LCD Products Dealer or Service Center for repair. • Securely install the bottom filter cover. "LAMP" and " " will flash in yellow in the lower-left corner of the picture and color quality. Maintenance & Troubleshooting • If the TEMPERATURE WARNING indicator lights up . Lamp The lamp in red...
... a LAMP REPLACEMENT indicator which lets you know when to an area with the On-screen Display (see page 41). Do not attempt to your nearest Authorized Sharp Industrial LCD Products Dealer or Service Center for repair. • Securely install the bottom filter cover. "LAMP" and " " will flash in yellow in the lower-left corner of the picture and color quality. Maintenance & Troubleshooting • If the TEMPERATURE WARNING indicator lights up . Lamp The lamp in red...
XGP10XU Operation Manual
Page 49
... lamp replaced at least one hour after replacement, take your projector to allow the surface of the projector. Wait until the cooling fan stops. or 2 3 Disconnect the power cord. If the new lamp does not light after the power cord is disconnected to the nearest Authorized Sharp Industrial LCD Products Dealer or Service Center for cleaning the air filters. 1 Turn off the power. IMPORTANT NOTE TO U.S. Attach the lamp cage cover. Then carefully change the lamp...
... lamp replaced at least one hour after replacement, take your projector to allow the surface of the projector. Wait until the cooling fan stops. or 2 3 Disconnect the power cord. If the new lamp does not light after the power cord is disconnected to the nearest Authorized Sharp Industrial LCD Products Dealer or Service Center for cleaning the air filters. 1 Turn off the power. IMPORTANT NOTE TO U.S. Attach the lamp cage cover. Then carefully change the lamp...
XGP10XU Operation Manual
Page 50
... Kensington Lock Kensington Security Standard connector Troubleshooting This projector has a Kensington Security Standard connector for INPUT 3 (VIDEO) mode). Picture appears but no sound. This will not affect operation or performance. • Refer to "Lamp/Maintenance Indicators" on the projector, push the lens firmly in place, and rotate to ON using the POWER buttons (ON/ OFF) on the projector. E-49 Maintenance & Troubleshooting Set the NOISE FILTER to the right. Replacing the Projection Lamp Resetting the lamp timer 1 Connect the power cord.
... Kensington Lock Kensington Security Standard connector Troubleshooting This projector has a Kensington Security Standard connector for INPUT 3 (VIDEO) mode). Picture appears but no sound. This will not affect operation or performance. • Refer to "Lamp/Maintenance Indicators" on the projector, push the lens firmly in place, and rotate to ON using the POWER buttons (ON/ OFF) on the projector. E-49 Maintenance & Troubleshooting Set the NOISE FILTER to the right. Replacing the Projection Lamp Resetting the lamp timer 1 Connect the power cord.
XGP10XU Operation Manual
Page 53
... connection.) Communication conditions Set the serial port settings of the computer to match that of INPUT 1 IMAGE ADJUSTMENT is being sent, send each command only after the OK response code for each adjustment menu and checking the status with the On-screen Display. If the projector receives a command other than one code is set to RS-232C standard. After the projector processes the command from the projector is verified. • When using the computer control...
... connection.) Communication conditions Set the serial port settings of the computer to match that of INPUT 1 IMAGE ADJUSTMENT is being sent, send each command only after the OK response code for each adjustment menu and checking the status with the On-screen Display. If the projector receives a command other than one code is set to RS-232C standard. After the projector processes the command from the projector is verified. • When using the computer control...
XGP10XU Operation Manual
Page 54
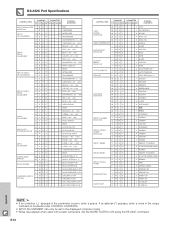
... in the range indicated in brackets under CONTROL CONTENTS. • INPUT ADJUSTMENT can only be set in the parameter column, enter a space. E-53 Set the NOISE FILTER to ON using the RS-232C command. RS-232C Port Specifications CONTROL ITEM COMMAND PARAMETER C1 C2 C3 C4 P1 P2 P3 P4 CONTROL CONTENTS INPUT2 SIGNAL TYPE I B S I _ _ _ 1 RGB SELECTION I B S I _ _ _ 2 COMPONENT INPUT2 I/P CONVERSION R B I P _ _ _ 0 INTERLACED R B I P _ _ _ 1 PROGRESSIVE R B C T _ _ * * COLOR TEMPERATURE (מ...
... in the range indicated in brackets under CONTROL CONTENTS. • INPUT ADJUSTMENT can only be set in the parameter column, enter a space. E-53 Set the NOISE FILTER to ON using the RS-232C command. RS-232C Port Specifications CONTROL ITEM COMMAND PARAMETER C1 C2 C3 C4 P1 P2 P3 P4 CONTROL CONTENTS INPUT2 SIGNAL TYPE I B S I _ _ _ 1 RGB SELECTION I B S I _ _ _ 2 COMPONENT INPUT2 I/P CONVERSION R B I P _ _ _ 0 INTERLACED R B I P _ _ _ 1 PROGRESSIVE R B C T _ _ * * COLOR TEMPERATURE (מ...
XGP10XU Operation Manual
Page 57
...⁄64Љ, 15 cm), Remote mouse receiver, Extra air filter, Lens cap (attached), CDROM, LCD projector operation manual, LCD projector quick reference, Sharp Advanced Presentation Software operation manual Replacement parts Standard lens unit (CLNS-0169CE02), Lamp unit (Lamp/cage module) (BQC-XGP10XU/1), Remote control (RRMCG1585CESA), AA size batteries, Power cord (QACCU5013CEZZ), Computer RGB cable (QCNW-5304CEZZ), Computer audio cable (QCNW-4870CEZZ), BNC-RCA adaptors (QPLGJ0107GEZZ), PS/2 mouse control cable (QCNW-5113CEZZ), USB mouse control cable (QCNW-5680CEZZ), DIN-D-sub RS-232C...
...⁄64Љ, 15 cm), Remote mouse receiver, Extra air filter, Lens cap (attached), CDROM, LCD projector operation manual, LCD projector quick reference, Sharp Advanced Presentation Software operation manual Replacement parts Standard lens unit (CLNS-0169CE02), Lamp unit (Lamp/cage module) (BQC-XGP10XU/1), Remote control (RRMCG1585CESA), AA size batteries, Power cord (QACCU5013CEZZ), Computer RGB cable (QCNW-5304CEZZ), Computer audio cable (QCNW-4870CEZZ), BNC-RCA adaptors (QPLGJ0107GEZZ), PS/2 mouse control cable (QCNW-5113CEZZ), USB mouse control cable (QCNW-5680CEZZ), DIN-D-sub RS-232C...
XGP10XU Operation Manual
Page 64
...-screen display language 25 OUTPUT port for INPUT 1, 2 39 P PDF 6 Phase 29 Picture adjustments 26 POWER buttons 17 Power cord 11 POWER indicator 16 Presentation tools 43 PS/2 mouse control cable 15 R Rear projection 19 Remote control 21 Remote control sensor 21 Remote control signal transmitter 8 Remote mouse receiver 15 RESIZE button 36 RIGHT-CLICK button 22 RS-232C port 14 S Speakers 7 Startup image 38 Status function 44 S-VIDEO INPUT terminal 13 Sync 32 Sync on green 51 T TEMPERATURE WARNING indicator 47 TOOLS button 43 U UNDO button 20 USB mouse control cable...
...-screen display language 25 OUTPUT port for INPUT 1, 2 39 P PDF 6 Phase 29 Picture adjustments 26 POWER buttons 17 Power cord 11 POWER indicator 16 Presentation tools 43 PS/2 mouse control cable 15 R Rear projection 19 Remote control 21 Remote control sensor 21 Remote control signal transmitter 8 Remote mouse receiver 15 RESIZE button 36 RIGHT-CLICK button 22 RS-232C port 14 S Speakers 7 Startup image 38 Status function 44 S-VIDEO INPUT terminal 13 Sync 32 Sync on green 51 T TEMPERATURE WARNING indicator 47 TOOLS button 43 U UNDO button 20 USB mouse control cable...


