XG-C330X , XG-C335X , XG-C430X Operation Manual
Page 6
... Use the Storage Case 20 Connections Samples of Cables for Connection 21 Connecting to a Computer 23 Connecting to Video Equipment 25 Controlling the Projector by a Computer ... 27 Connecting to a Monitor with RGB Input Terminal 28 Connecting to an Amplifier or Other Audio Equipment 29 Using .../Off 30 Connecting the Power Cord 30 Turning the Projector On 30 Turning the Power Off (Putting the Projector into Standby Mode 30 Image Projection 31 Using the Adjustment Feet 31 Correcting Trapezoidal Distortion 32 Adjusting the Lens 33 Switching the INPUT Mode 34 Adjusting the Volume 35...
... Use the Storage Case 20 Connections Samples of Cables for Connection 21 Connecting to a Computer 23 Connecting to Video Equipment 25 Controlling the Projector by a Computer ... 27 Connecting to a Monitor with RGB Input Terminal 28 Connecting to an Amplifier or Other Audio Equipment 29 Using .../Off 30 Connecting the Power Cord 30 Turning the Projector On 30 Turning the Power Off (Putting the Projector into Standby Mode 30 Image Projection 31 Using the Adjustment Feet 31 Correcting Trapezoidal Distortion 32 Adjusting the Lens 33 Switching the INPUT Mode 34 Adjusting the Volume 35...
XG-C330X , XG-C335X , XG-C430X Operation Manual
Page 7
... Projection Distance 3 Changing the Lens 9 Connecting Pin Assignments 11 RS-232C Specifications and Commands ... 13 Setting up the Projector Network Environment 18 Controlling the Projector via LAN 24 Setting up the Projector Using RS-232C or Telnet 29 Resetting the Lamp Timer of the Projector via LAN 39 Troubleshooting 41 ...60 Removing and Installing the Lamp Unit 61 Resetting the Lamp Timer 62 Computer Compatibility Chart 63 Troubleshooting 64 For SHARP Assistance 66 Specifications 67 Index 68 SETUP MANUAL Refer to the "SETUP MANUAL" contained on the supplied CDROM for details.
... Projection Distance 3 Changing the Lens 9 Connecting Pin Assignments 11 RS-232C Specifications and Commands ... 13 Setting up the Projector Network Environment 18 Controlling the Projector via LAN 24 Setting up the Projector Using RS-232C or Telnet 29 Resetting the Lamp Timer of the Projector via LAN 39 Troubleshooting 41 ...60 Removing and Installing the Lamp Unit 61 Resetting the Lamp Timer 62 Computer Compatibility Chart 63 Troubleshooting 64 For SHARP Assistance 66 Specifications 67 Index 68 SETUP MANUAL Refer to the "SETUP MANUAL" contained on the supplied CDROM for details.
XG-C330X , XG-C335X , XG-C430X Operation Manual
Page 10
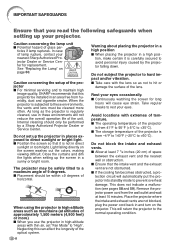
... curtains and dim the lights when setting up your eyes. When using the projector in high-altitude areas such as the projector is regularly cleaned, use the projector in high-altitude areas with the lens so as not to "High". Do not block the intake and exhaust vents...vents and lens must be within ±9 degrees of horizontal. CAUTION PRECAUCIÓN PRÉCAUTION Caution concerning the setup of the optical system. -8 Warning about placing the projector in a high position ■ When placing the projector in a sunny or bright room. Rest your nearest Sharp Authorized Pro...
... curtains and dim the lights when setting up your eyes. When using the projector in high-altitude areas such as the projector is regularly cleaned, use the projector in high-altitude areas with the lens so as not to "High". Do not block the intake and exhaust vents...vents and lens must be within ±9 degrees of horizontal. CAUTION PRECAUCIÓN PRÉCAUTION Caution concerning the setup of the optical system. -8 Warning about placing the projector in a high position ■ When placing the projector in a sunny or bright room. Rest your nearest Sharp Authorized Pro...
XG-C330X , XG-C335X , XG-C430X Operation Manual
Page 11
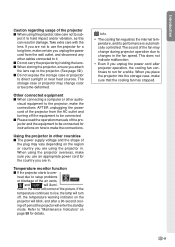
...hard impact and/or vibration, as this can result in damage. Using the projector in other audio- When you place the projector into the storage case, make the connections. Take extra care with the lens. ing-off , the temperature warning indicator on page 58 for the country you... . ■ Do not carry the projector by holding the lens. ■ When storing the projector, ensure you attach the lens cap to the projector. (See page 12.) ■ Do not expose the storage case or projector to direct sunlight or near heat sources. When using the projector, take care not to sub- nate ...
...hard impact and/or vibration, as this can result in damage. Using the projector in other audio- When you place the projector into the storage case, make the connections. Take extra care with the lens. ing-off , the temperature warning indicator on page 58 for the country you... . ■ Do not carry the projector by holding the lens. ■ When storing the projector, ensure you attach the lens cap to the projector. (See page 12.) ■ Do not expose the storage case or projector to direct sunlight or near heat sources. When using the projector, take care not to sub- nate ...

XG-C330X , XG-C335X , XG-C430X Operation Manual
Page 12
... with your country. For Australia, New Zealand and Oceania (6' (1.8 m)) QACCLA018WJPZ RGB cable (10' (3.0 m)) QCNWGA045WJPZ DIN-D-sub RS-232C adaptor (5 57/64" (15 cm)) QCNWGA015WJPZ Lens cap (attached) Lens cap strap PCAPHA026WJSA UBNDTA017WJZZ Storage case GCASNA020WJSA • Operation manual (this manual (TINS-D048WJZZ) and CD-ROM (UDSKAA087WJZZ)) Optional accessories ■ 3 RCA to the...
... with your country. For Australia, New Zealand and Oceania (6' (1.8 m)) QACCLA018WJPZ RGB cable (10' (3.0 m)) QCNWGA045WJPZ DIN-D-sub RS-232C adaptor (5 57/64" (15 cm)) QCNWGA015WJPZ Lens cap (attached) Lens cap strap PCAPHA026WJSA UBNDTA017WJZZ Storage case GCASNA020WJSA • Operation manual (this manual (TINS-D048WJZZ) and CD-ROM (UDSKAA087WJZZ)) Optional accessories ■ 3 RCA to the...
XG-C330X , XG-C335X , XG-C430X Operation Manual
Page 13
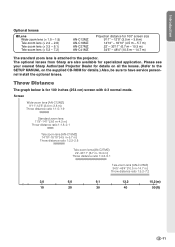
...-C27MZ) 22'-33'11" (6.7 m-10.3 m) Throw distance ratio 1:3.3-5.1 Tele-zoom lens (AN-C41MZ) 34'5"-48'4" (10.5 m-14.7 m) Throw distance ratio 1:5.2-7.2 3.0 6.0 9.1 12.2 15.2(m) 10 20 30 40 50(ft) -11 Please see your nearest Sharp Authorized Projector Dealer for details on all the lenses. (Refer to the SETUP MANUAL on the supplied CD-ROM...
...-C27MZ) 22'-33'11" (6.7 m-10.3 m) Throw distance ratio 1:3.3-5.1 Tele-zoom lens (AN-C41MZ) 34'5"-48'4" (10.5 m-14.7 m) Throw distance ratio 1:5.2-7.2 3.0 6.0 9.1 12.2 15.2(m) 10 20 30 40 50(ft) -11 Please see your nearest Sharp Authorized Projector Dealer for details on all the lenses. (Refer to the SETUP MANUAL on the supplied CD-ROM...

XG-C330X , XG-C335X , XG-C430X Operation Manual
Page 14
KEYSTONE button 32 For entering the Keystone Correction mode. Adjustment buttons 42 ('/"/\/|) For selecting and adjusting on the front side of the projector, next to the lens, as shown in the illustration. -12 Part Names and Functions Numbers in refer to the previous display. Front View Zoom knob 33 For ... 31 Height Adjustment button 31 Adjustment foot 55·56 Air filter/Intake vent (on the bottom of the projector) Attaching the lens cap After putting the lens cap strap on the lens cap, pass the other end of the strap through the hole on -screen items. RETURN button 43 For ...
KEYSTONE button 32 For entering the Keystone Correction mode. Adjustment buttons 42 ('/"/\/|) For selecting and adjusting on the front side of the projector, next to the lens, as shown in the illustration. -12 Part Names and Functions Numbers in refer to the previous display. Front View Zoom knob 33 For ... 31 Height Adjustment button 31 Adjustment foot 55·56 Air filter/Intake vent (on the bottom of the projector) Attaching the lens cap After putting the lens cap strap on the lens cap, pass the other end of the strap through the hole on -screen items. RETURN button 43 For ...

XG-C330X , XG-C335X , XG-C430X Operation Manual
Page 15
... When transporting the projector, carry it by the carrying handle on the side. • Always put on the lens cap to prevent damage to the lens when transporting the projector. • Do not lift or carry the projector by the lens or the lens cap as this may damage the lens. * Using the... Kensington Lock • This projector has a Kensington Security Standard connector for use...
... When transporting the projector, carry it by the carrying handle on the side. • Always put on the lens cap to prevent damage to the lens when transporting the projector. • Do not lift or carry the projector by the lens or the lens cap as this may damage the lens. * Using the... Kensington Lock • This projector has a Kensington Security Standard connector for use...

XG-C330X , XG-C335X , XG-C430X Operation Manual
Page 18
... connecting equipment other than the computer, see the page described below for each step. Connect the projector to the computer and plug the power cord into the AC socket of the projector and the computer is explained using one example. 3 7 STANDBY/ON button 6 INPUT buttons 6 ENTER... Quick Start This section shows the basic operation (projector connecting with the computer). For details, see pages 25, 28 and 29. Place the projector facing a screen 6 COMPUTER 1 button Page 18 2. Remove the lens cap and turn the projector on On the projector On the remote control Page 30 -16 Pages...
... connecting equipment other than the computer, see the page described below for each step. Connect the projector to the computer and plug the power cord into the AC socket of the projector and the computer is explained using one example. 3 7 STANDBY/ON button 6 INPUT buttons 6 ENTER... Quick Start This section shows the basic operation (projector connecting with the computer). For details, see pages 25, 28 and 29. Place the projector facing a screen 6 COMPUTER 1 button Page 18 2. Remove the lens cap and turn the projector on On the projector On the remote control Page 30 -16 Pages...
XG-C330X , XG-C335X , XG-C430X Operation Manual
Page 20
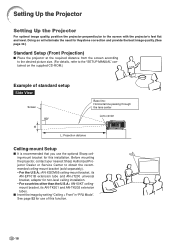
... need for this function. -18 Before mounting the projector, contact your nearest Sharp Authorized Projector Dealer or Service Center to the screen with the projector's feet flat and level. See page 52 for use the optional Sharp ceiling-mount bracket for Keystone correction and provide the best...Place the projector at the required distance from the screen according to the desired picture size. (For details, refer to the "SETUP MANUAL" contained on the supplied CD-ROM.) Example of standard setup Side View Screen Base line: Horizontal line passing through the lens center Lens center H...
... need for this function. -18 Before mounting the projector, contact your nearest Sharp Authorized Projector Dealer or Service Center to the screen with the projector's feet flat and level. See page 52 for use the optional Sharp ceiling-mount bracket for Keystone correction and provide the best...Place the projector at the required distance from the screen according to the desired picture size. (For details, refer to the "SETUP MANUAL" contained on the supplied CD-ROM.) Example of standard setup Side View Screen Base line: Horizontal line passing through the lens center Lens center H...
XG-C330X , XG-C335X , XG-C430X Operation Manual
Page 21
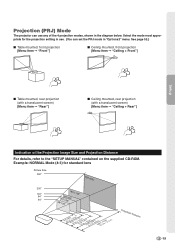
... Distance For details, refer to the "SETUP MANUAL" contained on the supplied CD-ROM. Projection (PRJ) Mode The projector can set the PRJ mode in "Options2" menu. Select the mode most appropriate for standard lens Picture Size 500" 400"×300" 200" 100" 84" 60" 160"×120" 48"×6376"8×...
... Distance For details, refer to the "SETUP MANUAL" contained on the supplied CD-ROM. Projection (PRJ) Mode The projector can set the PRJ mode in "Options2" menu. Select the mode most appropriate for standard lens Picture Size 500" 400"×300" 200" 100" 84" 60" 160"×120" 48"×6376"8×...

XG-C330X , XG-C335X , XG-C430X Operation Manual
Page 22
... place it in the supplied storage case. 1 Open the cover of the storage case. 2 Place the projector into the storage case with the lens facing the handle. • Ensure the projector is held in place by using the fixing band. 3 Close the cover of the storage case. 4 Place the ...accessories in the front pocket of the storage case. Lens cap Fixing band Supplied accessories (Remote control, etc.) -20 Storing the Projector How to Use the Storage Case When storing the projector, attach the lens cap to the lens for protection. • Place the...
... place it in the supplied storage case. 1 Open the cover of the storage case. 2 Place the projector into the storage case with the lens facing the handle. • Ensure the projector is held in place by using the fixing band. 3 Close the cover of the storage case. 4 Place the ...accessories in the front pocket of the storage case. Lens cap Fixing band Supplied accessories (Remote control, etc.) -20 Storing the Projector How to Use the Storage Case When storing the projector, attach the lens cap to the lens for protection. • Place the...

XG-C330X , XG-C335X , XG-C430X Operation Manual
Page 32
...lamp may be experienced within the first minute after the lamp has been illuminated. If you use with the projector. (See pages 23-29.) Remove the lens cap and press STANDBY/ON on the projector or ON on . dicating the status of the lamp. Enter the right keycode to run for details.... ting the Projector into Standby Mode) 1 Press STANDBY/ON on the projector or STANDBY on -screen display to another language, change...
...lamp may be experienced within the first minute after the lamp has been illuminated. If you use with the projector. (See pages 23-29.) Remove the lens cap and press STANDBY/ON on the projector or ON on . dicating the status of the lamp. Enter the right keycode to run for details.... ting the Projector into Standby Mode) 1 Press STANDBY/ON on the projector or STANDBY on -screen display to another language, change...

XG-C330X , XG-C335X , XG-C430X Operation Manual
Page 33
..." (see page 48), keystone correction functions automatically to correct trapezoidal distortion. tons. • The adjustment feet come out without firmly holding the projector. • Do not hold the lens when lifting or lowering the projector. • When lowering the projector, be adjusted using the adjustment feet when the screen is located higher than the...
..." (see page 48), keystone correction functions automatically to correct trapezoidal distortion. tons. • The adjustment feet come out without firmly holding the projector. • Do not hold the lens when lifting or lowering the projector. • When lowering the projector, be adjusted using the adjustment feet when the screen is located higher than the...

XG-C330X , XG-C335X , XG-C430X Operation Manual
Page 35
ing the focus ring. 2 Zooming is adjusted by rotat- Focus ring Zoom knob 1 The focus is focused and adjusted to the screen size using the focus ring or zoom knob on the projector. Adjusting the Lens The image is adjusted by moving the zoom knob. Zoom out Zoom in Basic Operation -33
ing the focus ring. 2 Zooming is adjusted by rotat- Focus ring Zoom knob 1 The focus is focused and adjusted to the screen size using the focus ring or zoom knob on the projector. Adjusting the Lens The image is adjusted by moving the zoom knob. Zoom out Zoom in Basic Operation -33
XG-C330X , XG-C335X , XG-C430X Operation Manual
Page 57
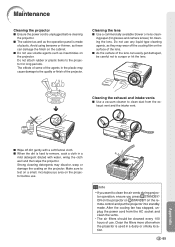
...in the plastic may discolor, warp or damage the coating on the projector. PaCpleeraning Mild detergent diluted with water, wring the cloth well and then wipe the projector. Cleaning the lens ■ Use a commercially available blower or lens cleaning paper (for glasses and camera lenses) for long periods. ...Appendix Mild detergent Wax Thinner ■ Wipe off the coating film on the projector. Info • If you want to scrape or hit the lens. After the cooling fan has stopped, unplug the power cord from the exhaust vent and the intake vent....
...in the plastic may discolor, warp or damage the coating on the projector. PaCpleeraning Mild detergent diluted with water, wring the cloth well and then wipe the projector. Cleaning the lens ■ Use a commercially available blower or lens cleaning paper (for glasses and camera lenses) for long periods. ...Appendix Mild detergent Wax Thinner ■ Wipe off the coating film on the projector. Info • If you want to scrape or hit the lens. After the cooling fan has stopped, unplug the power cord from the exhaust vent and the intake vent....

XG-C330X , XG-C335X , XG-C430X Operation Manual
Page 61
... . • • The filter cover, lamp unit cover or lens housing cover is open. Power indicator Green on/ Red on Green blinks (Cooling) Red blinks The power indicator blinks in red when the projector is on Green blinks when the lamp is warming up Time to change...not illuminate. • Carefully replace the lamp. (See • Remaining lamp life page 61.) becomes 5% or less. • Take the projector to your nearest Sharp Authorized Projector Dealer or Service Center (see page 8) and then try turning the power back on again. • The cooling fan keeps the internal temperature...
... . • • The filter cover, lamp unit cover or lens housing cover is open. Power indicator Green on/ Red on Green blinks (Cooling) Red blinks The power indicator blinks in red when the projector is on Green blinks when the lamp is warming up Time to change...not illuminate. • Carefully replace the lamp. (See • Remaining lamp life page 61.) becomes 5% or less. • Take the projector to your nearest Sharp Authorized Projector Dealer or Service Center (see page 8) and then try turning the power back on again. • The cooling fan keeps the internal temperature...

XG-C330X , XG-C335X , XG-C430X Operation Manual
Page 66
...("Clock" Adjustment) • Perform "Fine Sync" Adjustments. ("Phase" Adjustment) • Noise may form on the surface of the lens and the image will not affect from the cabinet. Please set up the projector at least one hour before it is suddenly heated, condensation may appear depending on the... lens. occasionally heard caused by room temperature changes. Picture is faded or poor. Color is blurred; If ...
...("Clock" Adjustment) • Perform "Fine Sync" Adjustments. ("Phase" Adjustment) • Noise may form on the surface of the lens and the image will not affect from the cabinet. Please set up the projector at least one hour before it is suddenly heated, condensation may appear depending on the... lens. occasionally heard caused by room temperature changes. Picture is faded or poor. Color is blurred; If ...
XG-C330X , XG-C335X , XG-C430X Operation Manual
Page 69
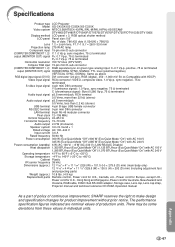
Specifications Product type LCD Projector Model XG-C430X/XG-C335X/XG-C330X Video system NTSC3.58/NTSC4.43/PAL/PAL-M/PAL-N/PAL-60/SECAM/ DTV480I/DTV480P/DTV540P/DTV576I/DTV576P/DTV720P/DTV1035I/DTV1080I Display method LCD panel × 3, RGB optical shutter method LCD panel Panel size: 0.8" ..., Lens cap strap, Projector manual and technical reference CD-ROM, Operation manual As a part of policy of production units. The performance specification figures indicated are nominal values of continuous improvement, SHARP reserves the right to +60°C) Cabinet Plastic I/R carrier frequency 38 kHz...
Specifications Product type LCD Projector Model XG-C430X/XG-C335X/XG-C330X Video system NTSC3.58/NTSC4.43/PAL/PAL-M/PAL-N/PAL-60/SECAM/ DTV480I/DTV480P/DTV540P/DTV576I/DTV576P/DTV720P/DTV1035I/DTV1080I Display method LCD panel × 3, RGB optical shutter method LCD panel Panel size: 0.8" ..., Lens cap strap, Projector manual and technical reference CD-ROM, Operation manual As a part of policy of production units. The performance specification figures indicated are nominal values of continuous improvement, SHARP reserves the right to +60°C) Cabinet Plastic I/R carrier frequency 38 kHz...
XG-C330X , XG-C335X , XG-C430X Operation Manual
Page 70
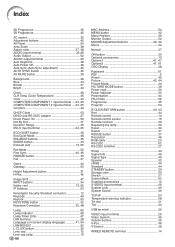
... terminal 28 Language (on-screen display language 41, 54 LAN/RS232C 52 L-CLICK button 39 Lens cap 12 Lens cap strap 10 -68 MAC Address 54 MENU button 42 Menu Position 49 Monitor Output 52 ...44 PICTURE MODE button 36 Power cord 30 Power indicator 30 Presentation 44 PRJ mode 52 Progressive 45 Projector 54 R-CLICK/RETURN button 39, 43 Red 44 Remote control 14 Remote control sensor 15 Remote receiver... 47 RESIZE button 37 Resolution 46 RGB cable 23 RS-232C 52 RS-232C terminal 27 Sharp 44 Signal Info 46 Signal Type 45 Speaker 52 sRGB 44 Standard 44 STANDBY button 30 ...
... terminal 28 Language (on-screen display language 41, 54 LAN/RS232C 52 L-CLICK button 39 Lens cap 12 Lens cap strap 10 -68 MAC Address 54 MENU button 42 Menu Position 49 Monitor Output 52 ...44 PICTURE MODE button 36 Power cord 30 Power indicator 30 Presentation 44 PRJ mode 52 Progressive 45 Projector 54 R-CLICK/RETURN button 39, 43 Red 44 Remote control 14 Remote control sensor 15 Remote receiver... 47 RESIZE button 37 Resolution 46 RGB cable 23 RS-232C 52 RS-232C terminal 27 Sharp 44 Signal Info 46 Signal Type 45 Speaker 52 sRGB 44 Standard 44 STANDBY button 30 ...
