
XG-C330X , XG-C335X , XG-C430X Operation Manual
Page 6
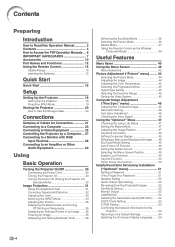
... Power Off (Putting the Projector into Standby Mode 30 Image Projection 31 Using the Adjustment Feet 31 Correcting Trapezoidal Distortion 32 Adjusting the Lens 33 Switching the INPUT Mode 34 Adjusting the Volume 35 Displaying the Black Screen and Turning Off the Sound Temporarily 35 Displaying an Enlarged Portion of an Image ....... 35 Freezing an Image 35 Displaying and Setting the Break Timer 36 Switching the Eco/Quiet Mode 36 Selecting the Picture Mode 36 Resize Mode 37 Using the Remote Control...
... Power Off (Putting the Projector into Standby Mode 30 Image Projection 31 Using the Adjustment Feet 31 Correcting Trapezoidal Distortion 32 Adjusting the Lens 33 Switching the INPUT Mode 34 Adjusting the Volume 35 Displaying the Black Screen and Turning Off the Sound Temporarily 35 Displaying an Enlarged Portion of an Image ....... 35 Freezing an Image 35 Displaying and Setting the Break Timer 36 Switching the Eco/Quiet Mode 36 Selecting the Picture Mode 36 Resize Mode 37 Using the Remote Control...
XG-C330X , XG-C335X , XG-C430X Operation Manual
Page 7
... Screen 2 Screen Size and Projection Distance 3 Changing the Lens 9 Connecting Pin Assignments 11 RS-232C Specifications and Commands ... 13 Setting up the Projector Network Environment 18 Controlling the Projector via LAN 24 Setting up the Projector Using RS-232C or Telnet 29 Resetting the Lamp Timer of the Projector via LAN 39 Troubleshooting 41 Dimensions 44 -5 Introduction Reference Appendix Maintenance 55 Replacing the Air Filter 56 Replacing the Air Filter 56 Maintenance Indicators 58 Regarding the Lamp 60 Lamp 60 Caution Concerning the Lamp 60 Replacing...
... Screen 2 Screen Size and Projection Distance 3 Changing the Lens 9 Connecting Pin Assignments 11 RS-232C Specifications and Commands ... 13 Setting up the Projector Network Environment 18 Controlling the Projector via LAN 24 Setting up the Projector Using RS-232C or Telnet 29 Resetting the Lamp Timer of the Projector via LAN 39 Troubleshooting 41 Dimensions 44 -5 Introduction Reference Appendix Maintenance 55 Replacing the Air Filter 56 Replacing the Air Filter 56 Maintenance Indicators 58 Regarding the Lamp 60 Lamp 60 Caution Concerning the Lamp 60 Replacing...
XG-C330X , XG-C335X , XG-C430X Operation Manual
Page 8
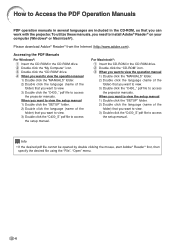
... double clicking the mouse, start Adobe® Reader® first, then specify the desired file using the "File", "Open" menu. -6 How to Access the PDF Operation Manuals PDF operation manuals in several languages are included in the CD-ROM, so that you want to view. 3) Double click the "C430_" pdf file to access the projector manuals. Accessing the PDF Manuals For Windows®: 1 Insert the CD-ROM...
... double clicking the mouse, start Adobe® Reader® first, then specify the desired file using the "File", "Open" menu. -6 How to Access the PDF Operation Manuals PDF operation manuals in several languages are included in the CD-ROM, so that you want to view. 3) Double click the "C430_" pdf file to access the projector manuals. Accessing the PDF Manuals For Windows®: 1 Insert the CD-ROM...

XG-C330X , XG-C335X , XG-C430X Operation Manual
Page 10
... for long hours will not reduce the overall operation life of the unit. CAUTION PRECAUCIÓN PRÉCAUTION Caution concerning the setup of the projector ■ For minimal servicing and to hit or damage the surface of the lens. Do not set "Fan Mode" to +60°C). When using the projector in high-altitude areas such as not to maintain high image quality, SHARP recommends...
... for long hours will not reduce the overall operation life of the unit. CAUTION PRECAUCIÓN PRÉCAUTION Caution concerning the setup of the projector ■ For minimal servicing and to hit or damage the surface of the lens. Do not set "Fan Mode" to +60°C). When using the projector in high-altitude areas such as not to maintain high image quality, SHARP recommends...

XG-C330X , XG-C335X , XG-C430X Operation Manual
Page 14
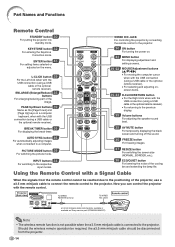
... remove. 30·58 Lamp indicator 58 Temperature warning indicator 46 AUTO SYNC button For automatically adjusting images when connected to a computer. 43 ENTER button For setting items selected or adjusted on the menu. 35 Volume buttons For adjusting the speaker sound level. 42 MENU button For displaying adjustment and setting screens. 36 ECO/QUIET button For lowering the noise of the cooling fan and extending the lamp life. 33 Focus ring For adjusting the focus. 52 Speaker 15 Remote control sensor 31 Height Adjustment button...
... remove. 30·58 Lamp indicator 58 Temperature warning indicator 46 AUTO SYNC button For automatically adjusting images when connected to a computer. 43 ENTER button For setting items selected or adjusted on the menu. 35 Volume buttons For adjusting the speaker sound level. 42 MENU button For displaying adjustment and setting screens. 36 ECO/QUIET button For lowering the noise of the cooling fan and extending the lamp life. 33 Focus ring For adjusting the focus. 52 Speaker 15 Remote control sensor 31 Height Adjustment button...
XG-C330X , XG-C335X , XG-C430X Operation Manual
Page 16
... MUTE button For temporarily displaying the black screen and turning off the sound. 35 FREEZE button For freezing images. 37 RESIZE button For switching the screen size (NORMAL, BORDER, etc.). 36 ECO/QUIET button For lowering the noise of the cooling fan and extending the lamp life. AUTO SYNC button 46 For automatically adjusting images when connected to the respective input modes. WIRED R/C JACK For controlling the projector by connecting the remote control to the projector. Should the wireless remote operation be...
... MUTE button For temporarily displaying the black screen and turning off the sound. 35 FREEZE button For freezing images. 37 RESIZE button For switching the screen size (NORMAL, BORDER, etc.). 36 ECO/QUIET button For lowering the noise of the cooling fan and extending the lamp life. AUTO SYNC button 46 For automatically adjusting images when connected to the respective input modes. WIRED R/C JACK For controlling the projector by connecting the remote control to the projector. Should the wireless remote operation be...

XG-C330X , XG-C335X , XG-C430X Operation Manual
Page 32
... blinks, in this section, connect any equipment that button again while the confirmation message is displayed, to put into standby mode. -30 ▼On-screen Display Info • You can unplug the power cord even if the projector is operating. • Even if you want to change the on the rear of the lamp. If you unplug the power cord from the projector, the cooling fan continues to start projection. Green: The lamp...
... blinks, in this section, connect any equipment that button again while the confirmation message is displayed, to put into standby mode. -30 ▼On-screen Display Info • You can unplug the power cord even if the projector is operating. • Even if you want to change the on the rear of the lamp. If you unplug the power cord from the projector, the cooling fan continues to start projection. Green: The lamp...

XG-C330X , XG-C335X , XG-C430X Operation Manual
Page 50
... The projector automatically enters the standby mode when no input signal is active. Manual Correction \ button | button Menu operation Page 42 6 Selecting a Startup and Background Image Selectable items Description Logo SHARP default image Blue Blue screen None Black screen 7 Eco/Quiet Mode Setting Selectable items Brightness Fan Sound On 80% Low Power consumption (When using AC 110V) 300 W Off 100% Normal 360 W Lamp life Approx. 3,000 hours Approx. 2,000 hours Note • The Keystone Correction can also use ECO/QUIET button...
... The projector automatically enters the standby mode when no input signal is active. Manual Correction \ button | button Menu operation Page 42 6 Selecting a Startup and Background Image Selectable items Description Logo SHARP default image Blue Blue screen None Black screen 7 Eco/Quiet Mode Setting Selectable items Brightness Fan Sound On 80% Low Power consumption (When using AC 110V) 300 W Off 100% Normal 360 W Lamp life Approx. 3,000 hours Approx. 2,000 hours Note • The Keystone Correction can also use ECO/QUIET button...
XG-C330X , XG-C335X , XG-C430X Operation Manual
Page 54
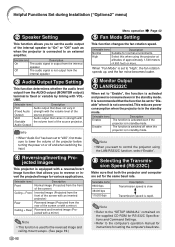
.... Note • Refer to "High", the fan rotation speeds up, and the fan noise becomes louder. 6 Monitor Output 7 LAN/RS232C When set for the reversed image and ceiling-mount setups. (See page 19.) -52 Menu operation Page 42 5 Fan Mode Setting This function changes the fan rotation speed. Selectable items Description FAO Audio output that both the projector and computer are set to reverse or invert the projected image for normal environments. Note •...
.... Note • Refer to "High", the fan rotation speeds up, and the fan noise becomes louder. 6 Monitor Output 7 LAN/RS232C When set for the reversed image and ceiling-mount setups. (See page 19.) -52 Menu operation Page 42 5 Fan Mode Setting This function changes the fan rotation speed. Selectable items Description FAO Audio output that both the projector and computer are set to reverse or invert the projected image for normal environments. Note •...

XG-C330X , XG-C335X , XG-C430X Operation Manual
Page 55
.... appears, then the menu screen appears. Note • Confirm the existing network's segment (IP address group) to change the projector IP address. • For details about each setting, consult your network administrator. 2 Select "TCP/IP", then press ENTER. 3 Enter "IP Address" using ', ", | and \, then press ENTER. -53 9 DHCP Client Setting Connect the LAN cable before turning the projector on the network. Off Sets the TCP/IP manually. If "192.168...
.... appears, then the menu screen appears. Note • Confirm the existing network's segment (IP address group) to change the projector IP address. • For details about each setting, consult your network administrator. 2 Select "TCP/IP", then press ENTER. 3 Enter "IP Address" using ', ", | and \, then press ENTER. -53 9 DHCP Client Setting Connect the LAN cable before turning the projector on the network. Off Sets the TCP/IP manually. If "192.168...

XG-C330X , XG-C335X , XG-C430X Operation Manual
Page 64
... projector. • "LAMP 0000H" is displayed, indicating that the lamp timer is reset. -62 User service screw (for lamp unit cover) AC socket STANDBY/ON button ENTER button " button MENU button Info • If the lamp unit and lamp unit cover are not correctly installed, the power will not turn on, even if the power cord is connected to the SETUP MANUAL on the supplied CD-ROM for details.) 1 Connect the power cord. • Plug the power cord into the lamp unit compartment. Fasten the securing screws. 6 Replace...
... projector. • "LAMP 0000H" is displayed, indicating that the lamp timer is reset. -62 User service screw (for lamp unit cover) AC socket STANDBY/ON button ENTER button " button MENU button Info • If the lamp unit and lamp unit cover are not correctly installed, the power will not turn on, even if the power cord is connected to the SETUP MANUAL on the supplied CD-ROM for details.) 1 Connect the power cord. • Plug the power cord into the lamp unit compartment. Fasten the securing screws. 6 Replace...
XG-C330X , XG-C335X , XG-C430X Operation Manual
Page 67
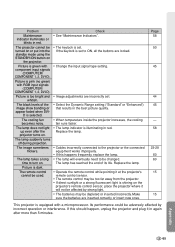
... standby mode using the STANDBY/ON button on . Replace the lamp. • Operate the remote control while pointing it at the projector's remote control sensor. • The remote control may be affected by incorrect operation or interference. Problem Maintenance indicator illuminates or blinks in red. The projector cannot be used. D is too bright and whitish. The lamp takes a long time to ON, all the buttons are locked. • Change the input signal type setting. • Image adjustments are inserted correctly or insert new...
... standby mode using the STANDBY/ON button on . Replace the lamp. • Operate the remote control while pointing it at the projector's remote control sensor. • The remote control may be affected by incorrect operation or interference. Problem Maintenance indicator illuminates or blinks in red. The projector cannot be used. D is too bright and whitish. The lamp takes a long time to ON, all the buttons are locked. • Change the input signal type setting. • Image adjustments are inserted correctly or insert new...

XG-C330X , XG-C335X , XG-C430X Operation Manual
Page 68
... http://www.sharp.com.hk Sharp Corporation (Taiwan) 0800-025111 http://www.sharp-scot.com.tw Sharp-Roxy Sales & Service Co. (60) 3-5125678 Sharp Middle East Fze 971-4-81-5311 [email protected].sharp.co.jp Sharp Thebnakorn Co. For SHARP Assistance If you encounter any problems during setup or operation of this operation manual does not answer your question, please contact the SHARP Service departments...
... http://www.sharp.com.hk Sharp Corporation (Taiwan) 0800-025111 http://www.sharp-scot.com.tw Sharp-Roxy Sales & Service Co. (60) 3-5125678 Sharp Middle East Fze 971-4-81-5311 [email protected].sharp.co.jp Sharp Thebnakorn Co. For SHARP Assistance If you encounter any problems during setup or operation of this operation manual does not answer your question, please contact the SHARP Service departments...
XG-C330X , XG-C335X , XG-C430X Operation Manual
Page 70
... MAC Address 54 MENU button 42 Menu Position 49 Monitor Output 52 MOUSE/Adjustment buttons 39, 42 Movie 44 Normal 37 ON button 30 Optional accessories 10 Options1 41, 47 Options2 41, 51 OSD Display 48 Password 51 PDF 6 Phase 46 Picture 40, 44 Picture Mode 44 PICTURE MODE button 36 Power cord 30 Power indicator 30 Presentation 44 PRJ mode 52 Progressive 45 Projector 54 R-CLICK/RETURN button 39, 43 Red 44 Remote control 14 Remote control sensor...
... MAC Address 54 MENU button 42 Menu Position 49 Monitor Output 52 MOUSE/Adjustment buttons 39, 42 Movie 44 Normal 37 ON button 30 Optional accessories 10 Options1 41, 47 Options2 41, 51 OSD Display 48 Password 51 PDF 6 Phase 46 Picture 40, 44 Picture Mode 44 PICTURE MODE button 36 Power cord 30 Power indicator 30 Presentation 44 PRJ mode 52 Progressive 45 Projector 54 R-CLICK/RETURN button 39, 43 Red 44 Remote control 14 Remote control sensor...

XGC330X|XGC430X Operation Manual
Page 6
... Power Off (Putting the Projector into Standby Mode 30 Image Projection 31 Using the Adjustment Feet 31 Correcting Trapezoidal Distortion 32 Adjusting the Lens 33 Switching the INPUT Mode 34 Adjusting the Volume 35 Displaying the Black Screen and Turning Off the Sound Temporarily 35 Displaying an Enlarged Portion of an Image ....... 35 Freezing an Image 35 Displaying and Setting the Break Timer 36 Switching the Eco/Quiet Mode 36 Selecting the Picture Mode 36 Resize Mode 37 Using the Remote Control...
... Power Off (Putting the Projector into Standby Mode 30 Image Projection 31 Using the Adjustment Feet 31 Correcting Trapezoidal Distortion 32 Adjusting the Lens 33 Switching the INPUT Mode 34 Adjusting the Volume 35 Displaying the Black Screen and Turning Off the Sound Temporarily 35 Displaying an Enlarged Portion of an Image ....... 35 Freezing an Image 35 Displaying and Setting the Break Timer 36 Switching the Eco/Quiet Mode 36 Selecting the Picture Mode 36 Resize Mode 37 Using the Remote Control...

XGC330X|XGC430X Operation Manual
Page 32
... the projector is set to start operation. • When System Lock is put the projector into standby mode. -30 ▼On-screen Display Info • This projector has the "Direct Power On" function.You can unplug the power cord even if the projector is shut down abnormally or the lamp should be replaced. • When switching on the projector, a slight flickering of the image may be turned on automatically when you want to change...
... the projector is set to start operation. • When System Lock is put the projector into standby mode. -30 ▼On-screen Display Info • This projector has the "Direct Power On" function.You can unplug the power cord even if the projector is shut down abnormally or the lamp should be replaced. • When switching on the projector, a slight flickering of the image may be turned on automatically when you want to change...

XGC330X|XGC430X Operation Manual
Page 50
... the slide bar. Manual Correction \ button | button Menu operation Page 42 6 Selecting a Startup and Background Image Selectable items Description Logo SHARP default image Blue Blue screen None Black screen 7 Eco/Quiet Mode Setting Selectable items Brightness Fan Sound On 80% Low Power consumption (When using AC 110V) 300 W Off 100% Normal 360 W Lamp life Approx. 3,000 hours Approx. 2,000 hours Note • The Keystone Correction can also use ECO/QUIET button on the remote control or on or...
... the slide bar. Manual Correction \ button | button Menu operation Page 42 6 Selecting a Startup and Background Image Selectable items Description Logo SHARP default image Blue Blue screen None Black screen 7 Eco/Quiet Mode Setting Selectable items Brightness Fan Sound On 80% Low Power consumption (When using AC 110V) 300 W Off 100% Normal 360 W Lamp life Approx. 3,000 hours Approx. 2,000 hours Note • The Keystone Correction can also use ECO/QUIET button on the remote control or on or...

XGC330X|XGC430X Operation Manual
Page 55
... (IP address group) to avoid setting an IP address that of "192.168.150.XXX", you don't have to : "000. 000. 000. 000". Off Sets the TCP/IP manually. 9 DHCP Client Setting Connect the LAN cable before turning the projector on. Gateway Factory default setting: 000. 000. 000. 000 * When not in a network with an IP address of the computer and equipment on the TCP/IP screen.
... (IP address group) to avoid setting an IP address that of "192.168.150.XXX", you don't have to : "000. 000. 000. 000". Off Sets the TCP/IP manually. 9 DHCP Client Setting Connect the LAN cable before turning the projector on. Gateway Factory default setting: 000. 000. 000. 000 * When not in a network with an IP address of the computer and equipment on the TCP/IP screen.

XGC330X|XGC430X Operation Manual
Page 67
...- Replace the lamp. • Operate the remote control while pointing it will eventually need to the projector or the connected equipment works improperly. • If this should happen, unplug the projector and plug it in red. If the keylock is set to turn on. Make sure the batteries are incorrectly set . The remote control cannot be turned on or put into the standby mode using the STANDBY/ON button on the projector. Picture...
...- Replace the lamp. • Operate the remote control while pointing it will eventually need to the projector or the connected equipment works improperly. • If this should happen, unplug the projector and plug it in red. If the keylock is set to turn on. Make sure the batteries are incorrectly set . The remote control cannot be turned on or put into the standby mode using the STANDBY/ON button on the projector. Picture...
XGC330X|XGC430X Operation Manual
Page 68
... If you encounter any problems during setup or operation of Australia Pty. U.S.A. Thailand Korea India SHARP Electronics Benelux BV 0900-SHARPCE (0900-7427723) Nederland 9900-0159 Belgium http://www.sharp.nl http://www.sharp.be http://www.sharp.lu Sharp Corporation of this operation manual does not answer your question, please contact the SHARP Service departments listed below. Ltd. 02-236-0170...
... If you encounter any problems during setup or operation of Australia Pty. U.S.A. Thailand Korea India SHARP Electronics Benelux BV 0900-SHARPCE (0900-7427723) Nederland 9900-0159 Belgium http://www.sharp.nl http://www.sharp.be http://www.sharp.lu Sharp Corporation of this operation manual does not answer your question, please contact the SHARP Service departments listed below. Ltd. 02-236-0170...


