
Operation Manual
Page 1
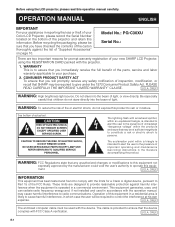
OPERATION MANUAL MODEL PG-C30XU LCD PROJECTOR Important Information Setup & Connections Operation Useful Features Maintenance & Troubleshooting Appendix
OPERATION MANUAL MODEL PG-C30XU LCD PROJECTOR Important Information Setup & Connections Operation Useful Features Maintenance & Troubleshooting Appendix
Operation Manual
Page 2
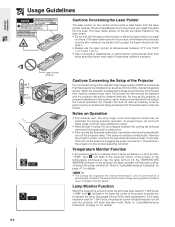
... USER-SERVICEABLE PARTS EXCEPT LAMP UNIT. Do not stare into the beam of uninsulated "dangerous voltage" within a triangle is operated in reporting the loss or theft of your Color LCD Projector, please record the Serial Number located on the bottom of "Supplied Accessories" on page 10. The lightning flash with the limits for prompt warranty registration of the FCC Rules. Model No.: PG-C30XU Serial No...
... USER-SERVICEABLE PARTS EXCEPT LAMP UNIT. Do not stare into the beam of uninsulated "dangerous voltage" within a triangle is operated in reporting the loss or theft of your Color LCD Projector, please record the Serial Number located on the bottom of "Supplied Accessories" on page 10. The lightning flash with the limits for prompt warranty registration of the FCC Rules. Model No.: PG-C30XU Serial No...
Operation Manual
Page 3
... LCD Projector, observe the following basic rules for its installation, use this product, ask the service technician to perform safety checks to operate from the product. 14. Overloading Do not overload wall outlets, extension cords, or integral convenience receptacles as opening or removing covers may result in a wet basement; Object and Liquid Entry Never push objects of any service or repairs to be covered...
... LCD Projector, observe the following basic rules for its installation, use this product, ask the service technician to perform safety checks to operate from the product. 14. Overloading Do not overload wall outlets, extension cords, or integral convenience receptacles as opening or removing covers may result in a wet basement; Object and Liquid Entry Never push objects of any service or repairs to be covered...
Operation Manual
Page 5
...Computer Image 29 Saving and Selecting Adjustment Settings ... 30 Special Mode Adjustment 31 Checking the Input Signal 31 Auto Sync Adjustment 32 Auto Sync Display Function 32 Maintenance & Troubleshooting Air Filter Maintenance 46 Lamp/Maintenance Indicators 47 Replacing the Projection Lamp 48 Using the Kensington Lock 49 Troubleshooting 49 Appendix Optional Lenses 50 Transporting the Projector 50 Connection Pin Assignments 51 RS-232C Port Specifications 52 Computer Compatibility Chart 54 Specifications 55 Dimensions 56 Guide to Access the PDF Operation Manuals (for Windows...
...Computer Image 29 Saving and Selecting Adjustment Settings ... 30 Special Mode Adjustment 31 Checking the Input Signal 31 Auto Sync Adjustment 32 Auto Sync Display Function 32 Maintenance & Troubleshooting Air Filter Maintenance 46 Lamp/Maintenance Indicators 47 Replacing the Projection Lamp 48 Using the Kensington Lock 49 Troubleshooting 49 Appendix Optional Lenses 50 Transporting the Projector 50 Connection Pin Assignments 51 RS-232C Port Specifications 52 Computer Compatibility Chart 54 Specifications 55 Dimensions 56 Guide to Access the PDF Operation Manuals (for Windows...
Operation Manual
Page 6
... 1,500 hours, the projector power will automatically turn on Operation • The exhaust vent, the lamp cage cover and adjacent areas may be cleaned internally. However, be performed by plugging the power cord back in these environments will shut off , the TEMPERATURE WARNING indicator on the projector will enter standby mode. Periodically the filter should be replaced and the projector should be extremely hot during projector operation due to "Lamp/Maintenance Indicators" on yourself...
... 1,500 hours, the projector power will automatically turn on Operation • The exhaust vent, the lamp cage cover and adjacent areas may be cleaned internally. However, be performed by plugging the power cord back in these environments will shut off , the TEMPERATURE WARNING indicator on the projector will enter standby mode. Periodically the filter should be replaced and the projector should be extremely hot during projector operation due to "Lamp/Maintenance Indicators" on yourself...
Operation Manual
Page 7
... prefer using the "File", "Open" menu. • See the "readme.txt" file on the "c30" pdf file to access the projector manuals. Our World Wide Web address is http://www.sharplcd.com . For other languages: If you encounter any problems during setup or operation of this projector, first refer to the "Troubleshooting" section on the pdf file. To utilize these manuals, you want to view...
... prefer using the "File", "Open" menu. • See the "readme.txt" file on the "c30" pdf file to access the projector manuals. Our World Wide Web address is http://www.sharplcd.com . For other languages: If you encounter any problems during setup or operation of this projector, first refer to the "Troubleshooting" section on the pdf file. To utilize these manuals, you want to view...
Operation Manual
Page 11
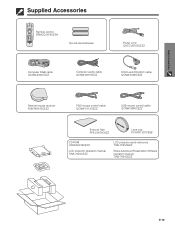
Setup & Connections Supplied Accessories Remote control RRMCG1579CESA Two AA size batteries Power cord QACCU5013CEZZ Computer RGB cable QCNW-5304CEZZ Computer audio cable QCNW-4870CEZZ DIN-D-sub RS-232C cable QCNW-5288CEZZ Remote mouse receiver RUNTK0673CEZZ PS/2 mouse control cable QCNW-5113CEZZ USB mouse control cable QCNW-5680CEZZ Extra air filter PFILD0076CEZZ Lens cap PCAPH1307CESB CD-ROM UDSKA0019CEN1 LCD projector operation manual TINS-7023CEZZ LCD projector quick reference TINS-7025CEZZ Sharp Advanced Presentation Software operation manual TINS-7054CEZZ E-10
Setup & Connections Supplied Accessories Remote control RRMCG1579CESA Two AA size batteries Power cord QACCU5013CEZZ Computer RGB cable QCNW-5304CEZZ Computer audio cable QCNW-4870CEZZ DIN-D-sub RS-232C cable QCNW-5288CEZZ Remote mouse receiver RUNTK0673CEZZ PS/2 mouse control cable QCNW-5113CEZZ USB mouse control cable QCNW-5680CEZZ Extra air filter PFILD0076CEZZ Lens cap PCAPH1307CESB CD-ROM UDSKA0019CEN1 LCD projector operation manual TINS-7023CEZZ LCD projector quick reference TINS-7025CEZZ Sharp Advanced Presentation Software operation manual TINS-7054CEZZ E-10
Operation Manual
Page 15
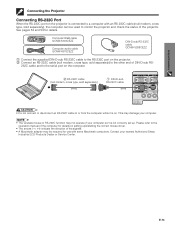
... the serial port on . Contact your computer port is not correctly set up /installing the correct mouse driver. • The arrows (→, ↔) indicate the direction of the signals. • A Macintosh adaptor may not operate if your nearest Authorized Sharp Industrial LCD Products Dealer or Service Center. Computer RGB cable QCNW-5304CEZZ Computer audio cable QCNW-4870CEZZ DIN-D-sub RS-232C cable QCNW-5288CEZZ 1 Connect the supplied DIN...
... the serial port on . Contact your computer port is not correctly set up /installing the correct mouse driver. • The arrows (→, ↔) indicate the direction of the signals. • A Macintosh adaptor may not operate if your nearest Authorized Sharp Industrial LCD Products Dealer or Service Center. Computer RGB cable QCNW-5304CEZZ Computer audio cable QCNW-4870CEZZ DIN-D-sub RS-232C cable QCNW-5288CEZZ 1 Connect the supplied DIN...
Operation Manual
Page 17
... projector enters standby mode. • If the bottom filter cover is not securely installed, the POWER indicator flashes. 2 Press Power ON. • The flashing green LAMP REPLACEMENT indicator shows that the lamp is ready. Flashing green: Warming up . Red: Change the lamp. E-16 Wait until the indicator stops flashing before operating the projector. • If the power is turned off and then immediately turned on again, it may be used on the remote control. (See page 41.) • After the projector is set...
... projector enters standby mode. • If the bottom filter cover is not securely installed, the POWER indicator flashes. 2 Press Power ON. • The flashing green LAMP REPLACEMENT indicator shows that the lamp is ready. Flashing green: Warming up . Red: Change the lamp. E-16 Wait until the indicator stops flashing before operating the projector. • If the power is turned off and then immediately turned on again, it may be used on the remote control. (See page 41.) • After the projector is set...
Operation Manual
Page 18
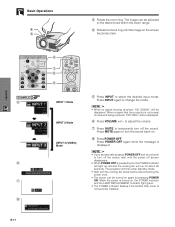
... desired size within the zoom range. 4 Rotate the focus ring until the cooling fan stops before disconnecting the power cord. • The power can be adjusted to turn off the power, wait until the power off the sound. Operation EXAMPLE 5 f f 6 7 8 6 7 8 5 INPUT 1 Mode INPUT 2 Mode INPUT 3 (VIDEO) Mode 5 Press INPUT to temporarily turn the sound back on again by pressing POWER ON. will then enter standby mode. • Wait until the image on , the POWER indicator and the LAMP REPLACEMENT indicator light green. • The POWER indicator flashes if...
... desired size within the zoom range. 4 Rotate the focus ring until the cooling fan stops before disconnecting the power cord. • The power can be adjusted to turn off the power, wait until the power off the sound. Operation EXAMPLE 5 f f 6 7 8 6 7 8 5 INPUT 1 Mode INPUT 2 Mode INPUT 3 (VIDEO) Mode 5 Press INPUT to temporarily turn the sound back on again by pressing POWER ON. will then enter standby mode. • Wait until the image on , the POWER indicator and the LAMP REPLACEMENT indicator light green. • The POWER indicator flashes if...
Operation Manual
Page 23
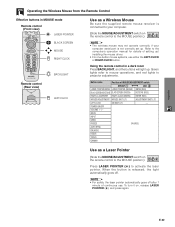
... on MOUSE ADJ. Refer to your computer serial port is not correctly set up / installing the mouse driver. • For one-button mouse systems, use . LASER POINTER/MENU LASER POINTER (GREEN) MENU (RED) BLACK SCREEN/KEYSTONE BLACK SCREEN (GREEN) KEYSTONE (RED) RIGHT-CLICK/ENTER RIGHT-CLICK (GREEN) ENTER (RED) MOUSE/ADJUSTMENT MOUSE (NOT LIT) ADJUSTMENT (NOT LIT) LEFT-CLICK ON (NOT LIT) - the remote control to the MOUSE position.) Press LASER POINTER ( ) to projector adjustments.
... on MOUSE ADJ. Refer to your computer serial port is not correctly set up / installing the mouse driver. • For one-button mouse systems, use . LASER POINTER/MENU LASER POINTER (GREEN) MENU (RED) BLACK SCREEN/KEYSTONE BLACK SCREEN (GREEN) KEYSTONE (RED) RIGHT-CLICK/ENTER RIGHT-CLICK (GREEN) ENTER (RED) MOUSE/ADJUSTMENT MOUSE (NOT LIT) ADJUSTMENT (NOT LIT) LEFT-CLICK ON (NOT LIT) - the remote control to the MOUSE position.) Press LASER POINTER ( ) to projector adjustments.

Operation Manual
Page 33
...Computer Image Adjustments (INPUT 1 or 2 mode Only) Projector Remote control 1, 5 2, 3, 4 AUTO SYNC button (GUI) On-screen Display Auto Sync Adjustment • Used to automatically adjust a computer image. • Auto Sync adjustment can be achieved with Auto Sync adjustment, use manual adjustments. (See page 29.) During Auto Sync adjustment, the On-screen Display changes as shown on the left. • Auto Sync adjustment may take some time to complete, depending on the image of the computer connected to the projector. When "Auto Sync" is set to "ON": • The sync adjustment is...
...Computer Image Adjustments (INPUT 1 or 2 mode Only) Projector Remote control 1, 5 2, 3, 4 AUTO SYNC button (GUI) On-screen Display Auto Sync Adjustment • Used to automatically adjust a computer image. • Auto Sync adjustment can be achieved with Auto Sync adjustment, use manual adjustments. (See page 29.) During Auto Sync adjustment, the On-screen Display changes as shown on the left. • Auto Sync adjustment may take some time to complete, depending on the image of the computer connected to the projector. When "Auto Sync" is set to "ON": • The sync adjustment is...
Operation Manual
Page 44
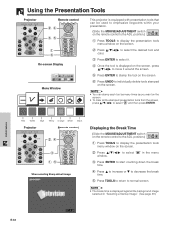
Red Green Blue Yellow Orange White Black Projector Remote control 2, 4 3 1, 5 When selecting Sharp default image Displaying the Break Time (Slide the MOUSE/ADJUSTMENT switch MOUSE ADJ. position.) 1 Press TOOLS to display the presentation tools menu window on the screen. • To clear all the stamped presentation tools from the screen, press to select " " and then press ENTER. position.) 1 Press TOOLS to display the presentation tools menu window on the screen. 2 Press to select " " in the menu window. 3 Press...
Red Green Blue Yellow Orange White Black Projector Remote control 2, 4 3 1, 5 When selecting Sharp default image Displaying the Break Time (Slide the MOUSE/ADJUSTMENT switch MOUSE ADJ. position.) 1 Press TOOLS to display the presentation tools menu window on the screen. • To clear all the stamped presentation tools from the screen, press to select " " and then press ENTER. position.) 1 Press TOOLS to display the presentation tools menu window on the screen. 2 Press to select " " in the menu window. 3 Press...
Operation Manual
Page 47
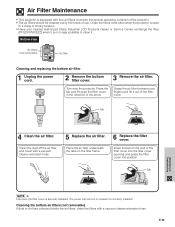
... Sharp Industrial LCD Products Dealer or Service Center exchange the filter (PFILD0076CEZZ) when it is correctly installed. Clean the dust off the air filter and cover with a vacuum cleaner extension hose. The power will not turn on unless it out of use. Insert the tab on the filter frame. 6 Replace the filter cover. Bottom View Air filters (not removable) Air filter Cleaning and replacing the bottom air filter 1 Unplug the power cord. 2 Remove the bottom filter cover. 3 Remove the air filter. Air Filter Maintenance • This projector...
... Sharp Industrial LCD Products Dealer or Service Center exchange the filter (PFILD0076CEZZ) when it is correctly installed. Clean the dust off the air filter and cover with a vacuum cleaner extension hose. The power will not turn on unless it out of use. Insert the tab on the filter frame. 6 Replace the filter cover. Bottom View Air filters (not removable) Air filter Cleaning and replacing the bottom air filter 1 Unplug the power cord. 2 Remove the bottom filter cover. 3 Remove the air filter. Air Filter Maintenance • This projector...
Operation Manual
Page 48
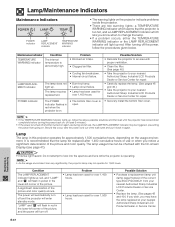
... on. Problem • Blocked air intake. • Clogged air filter. • Cooling fan breakdown. • Internal circuit failure. Possible Solution • Relocate the projector to change the lamp. • If a problem occurs, either the TEMPERATURE WARNING indicator or the LAMP REPLACEMENT indicator will light up red, and "LAMP" and " " will flash in yellow in the lower-left corner of the picture, and the power will enter standby mode. It is too hot, and a LAMP REPLACEMENT indicator which lets...
... on. Problem • Blocked air intake. • Clogged air filter. • Cooling fan breakdown. • Internal circuit failure. Possible Solution • Relocate the projector to change the lamp. • If a problem occurs, either the TEMPERATURE WARNING indicator or the LAMP REPLACEMENT indicator will light up red, and "LAMP" and " " will flash in yellow in the lower-left corner of the picture, and the power will enter standby mode. It is too hot, and a LAMP REPLACEMENT indicator which lets...
Operation Manual
Page 49
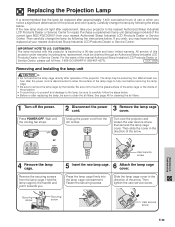
... one hour after the power cord is backed by the handle. Wait at your projector to clean the air filters. Replacing the Projection Lamp It is recommended that secures the lamp cage cover. Then carefully change the lamp by following the steps below . • Before or after replacing the lamp, be replaced after replacement, take your nearest Authorized Sharp Industrial LCD Products Dealer or Service Center. Turn over the projector and loosen the user service screw...
... one hour after the power cord is backed by the handle. Wait at your projector to clean the air filters. Replacing the Projection Lamp It is recommended that secures the lamp cage cover. Then carefully change the lamp by following the steps below . • Before or after replacing the lamp, be replaced after replacement, take your nearest Authorized Sharp Industrial LCD Products Dealer or Service Center. Turn over the projector and loosen the user service screw...
Operation Manual
Page 50
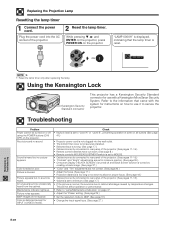
... for INPUT 3 (VIDEO) mode). Picture is faded or poor. Replacing the Projection Lamp Resetting the lamp timer 1 Connect the power cord. Plug the power cord into the wall outlet. • The bottom filter cover is not securely installed. • Selected input is wrong. (See page 17.) • Cables incorrectly connected to rear panel of the projector. (See pages 11-15.) • "Contrast" and "Bright" adjustments are set to 480P. (See page 31.) • Change the input signal type...
... for INPUT 3 (VIDEO) mode). Picture is faded or poor. Replacing the Projection Lamp Resetting the lamp timer 1 Connect the power cord. Plug the power cord into the wall outlet. • The bottom filter cover is not securely installed. • Selected input is wrong. (See page 17.) • Cables incorrectly connected to rear panel of the projector. (See pages 11-15.) • "Contrast" and "Bright" adjustments are set to 480P. (See page 31.) • Change the input signal type...
Operation Manual
Page 53
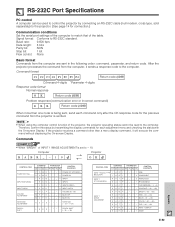
...) to the projector. (See page 14 for connection.) Communication conditions Set the serial port settings of the computer to match that of the table. Computer RABR _מ1 0 → ← Projector OK CONTROL ITEM POWER SETTING INPUT SWITCHING INPUT CHECK VOLUME ADJUSTMENT KEYSTONE ADJUSTMENT DIGITAL SHIFT COMMAND PARAMETER C1 C2 C3 C4 P1 P2 P3 P4 CONTROL CONTENTS P O W R _ _ _ 0 POWER OFF (STANDBY) P O W R _ _ _ 1 POWER ON I R G B _ _ _ 1 INPUT1 I R G B _ _ _ 2 INPUT2 I V E D _ _ _ 1 INPUT3 (VIDEO) I C H K _ _ _ 0 INPUT CHECK V O L A _ _ * * VOLUME (00...
...) to the projector. (See page 14 for connection.) Communication conditions Set the serial port settings of the computer to match that of the table. Computer RABR _מ1 0 → ← Projector OK CONTROL ITEM POWER SETTING INPUT SWITCHING INPUT CHECK VOLUME ADJUSTMENT KEYSTONE ADJUSTMENT DIGITAL SHIFT COMMAND PARAMETER C1 C2 C3 C4 P1 P2 P3 P4 CONTROL CONTENTS P O W R _ _ _ 0 POWER OFF (STANDBY) P O W R _ _ _ 1 POWER ON I R G B _ _ _ 1 INPUT1 I R G B _ _ _ 2 INPUT2 I V E D _ _ _ 1 INPUT3 (VIDEO) I C H K _ _ _ 0 INPUT CHECK V O L A _ _ * * VOLUME (00...
Operation Manual
Page 56
... Remote mouse receiver, Extra air filter, Lens cap (attached), CD-ROM, LCD projector operation manual, LCD projector quick reference, Sharp Advanced Presentation Software operation manual Replacement parts Lamp unit (Lamp/cage module) (BQC-PGC30XU/1), Remote control (RRMCG1579CESA), AA size batteries, Power cord (QACCU5013CEZZ), Computer RGB cable (QCNW-5304CEZZ), Computer audio cable (QCNW-4870CEZZ), PS/2 mouse control cable (QCNW-5113CEZZ), USB mouse control cable (QCNW-5680CEZZ), DIN-D-sub RS-232C cable (QCNW-5276CEZZ), Remote mouse receiver (RUNTK0673CEZZ), Air filter (PFILD0076CEZZ), Lens...
... Remote mouse receiver, Extra air filter, Lens cap (attached), CD-ROM, LCD projector operation manual, LCD projector quick reference, Sharp Advanced Presentation Software operation manual Replacement parts Lamp unit (Lamp/cage module) (BQC-PGC30XU/1), Remote control (RRMCG1579CESA), AA size batteries, Power cord (QACCU5013CEZZ), Computer RGB cable (QCNW-5304CEZZ), Computer audio cable (QCNW-4870CEZZ), PS/2 mouse control cable (QCNW-5113CEZZ), USB mouse control cable (QCNW-5680CEZZ), DIN-D-sub RS-232C cable (QCNW-5276CEZZ), Remote mouse receiver (RUNTK0673CEZZ), Air filter (PFILD0076CEZZ), Lens...
Operation Manual
Page 63
... Lens cap 50 M MENU button 23 MOUSE/ADJUSTMENT switch 21 MOUSE buttons 22 MUTE button 17 O On-screen display language 25 OUTPUT port for INPUT 1, 2 7 P PDF 6 Phase 29 Picture adjustments 26 POWER buttons 16 Power cord 11 POWER indicator 16 Presentation tools 43 PS/2 mouse control cable 15 R Rear projection 19 Remote control 21 Remote control sensor 21 Remote control signal transmitter 8 Remote mouse receiver 15 RESIZE button 36 RIGHT-CLICK button 22 RS-232C port 14 S Speaker 7 Startup image 38 Status function 44 S-VIDEO INPUT terminal 13 Sync...
... Lens cap 50 M MENU button 23 MOUSE/ADJUSTMENT switch 21 MOUSE buttons 22 MUTE button 17 O On-screen display language 25 OUTPUT port for INPUT 1, 2 7 P PDF 6 Phase 29 Picture adjustments 26 POWER buttons 16 Power cord 11 POWER indicator 16 Presentation tools 43 PS/2 mouse control cable 15 R Rear projection 19 Remote control 21 Remote control sensor 21 Remote control signal transmitter 8 Remote mouse receiver 15 RESIZE button 36 RIGHT-CLICK button 22 RS-232C port 14 S Speaker 7 Startup image 38 Status function 44 S-VIDEO INPUT terminal 13 Sync...


