Operation Manual
Page 17
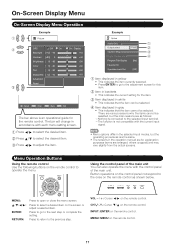
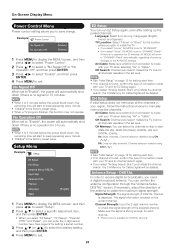
... Display Menu On-Screen Display Menu Operation Example Picture OPC Off On Backlight [b12] a16 Contrast [b30] 0 Brightness [ 0] a30 Color [ 0] a30 Tint [ 0] a30 Sharpness [ b2] a10 Advanced Reset On : Display b16 b40 b30 b30 b30 b10 : Select ENTER : Enter RETURN : Back MENU : Exit The bar above is connected to open or close...
... Display Menu On-Screen Display Menu Operation Example Picture OPC Off On Backlight [b12] a16 Contrast [b30] 0 Brightness [ 0] a30 Color [ 0] a30 Tint [ 0] a30 Sharpness [ b2] a10 Advanced Reset On : Display b16 b40 b30 b30 b30 b10 : Select ENTER : Enter RETURN : Back MENU : Exit The bar above is connected to open or close...
Operation Manual
Page 18
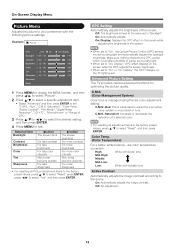
...to adjust the color either more reddish or more sharpness • For resetting all adjustment items to the factory preset values, press a/b to select "Reset", and then press ENTER. Off: No adjustment. 18 Advanced Picture Setting This TV provides various advanced functions for optimizing the picture ...Press MENU to exit. OPC Off On Backlight [b12] a16 Contrast [b30] 0 Brightness [ 0] a30 Color [ 0] a30 Tint [ 0] a30 Sharpness [ b2] a10 Advanced Reset On : Display b16 b40 b30 b30 b30 b10 1 Press MENU to display the MENU screen, and then press c/d to select "Picture". 2 Press...
...to adjust the color either more reddish or more sharpness • For resetting all adjustment items to the factory preset values, press a/b to select "Reset", and then press ENTER. Off: No adjustment. 18 Advanced Picture Setting This TV provides various advanced functions for optimizing the picture ...Press MENU to exit. OPC Off On Backlight [b12] a16 Contrast [b30] 0 Brightness [ 0] a30 Color [ 0] a30 Tint [ 0] a30 Sharpness [ b2] a10 Advanced Reset On : Display b16 b40 b30 b30 b30 b10 1 Press MENU to display the MENU screen, and then press c/d to select "Picture". 2 Press...
Operation Manual
Page 19
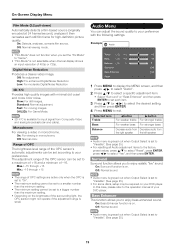
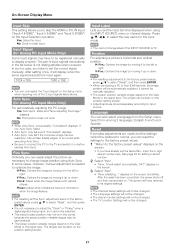
... On: For viewing in monochrome. Off: Normal color. Treble [ 0] a15 b15 Bass [ 0] a15 b15 Balance [ 0] L R Surround [Off] Bass Enhancer [On] Reset 1 Press MENU to display the MENU screen, and then press c/d to select "Audio". 2 Press a/b to select a specific adjustment item. • Select "Surround" ... settings are active only when the OPC is set to "Variable". (See page 25.) • For resetting all Audio adjustment items to the factory preset values, press a/b to select "Reset", press ENTER, press c/d to enjoy bass-enhanced sound. Max.: -15 through +16 Min.: -16 through...
... On: For viewing in monochrome. Off: Normal color. Treble [ 0] a15 b15 Bass [ 0] a15 b15 Balance [ 0] L R Surround [Off] Bass Enhancer [On] Reset 1 Press MENU to display the MENU screen, and then press c/d to select "Audio". 2 Press a/b to select a specific adjustment item. • Select "Surround" ... settings are active only when the OPC is set to "Variable". (See page 25.) • For resetting all Audio adjustment items to the factory preset values, press a/b to select "Reset", press ENTER, press c/d to enjoy bass-enhanced sound. Max.: -15 through +16 Min.: -16 through...
Operation Manual
Page 20
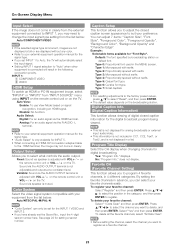
... will start to keep appearing every minute. • "Disable" is displayed. No Signal Off When set area. CH Search: Channel auto search makes the TV look for 3 hours. • When it is no signal for setting a secret number. 3 Press a/b (or c/d) to select the desired setting, and... signal strength of the antenna to save energy. Setup Menu Example Setup EZ Setup CH Setup Antenna Setup-DIGITAL Input Skip Parental CTRL Position Language Reset [English] 1 Press MENU to display the MENU screen, and then press c/d to select "Setup". 2 Press a/b to select a specific ...
... will start to keep appearing every minute. • "Disable" is displayed. No Signal Off When set area. CH Search: Channel auto search makes the TV look for 3 hours. • When it is no signal for setting a secret number. 3 Press a/b (or c/d) to select the desired setting, and... signal strength of the antenna to save energy. Setup Menu Example Setup EZ Setup CH Setup Antenna Setup-DIGITAL Input Skip Parental CTRL Position Language Reset [English] 1 Press MENU to display the MENU screen, and then press c/d to select "Setup". 2 Press a/b to select a specific ...
Operation Manual
Page 21
...input terminal displayed when using Auto Sync. Auto Sync. (for setting a secret number. 2 Select "Yes". • "Now, TV will be restored to normal, you can reset the settings to the factory preset values. 1 "Return to the factory preset values" displays on the position-setting screen. Yes: Auto... stripes. Phase: Adjust when characters have already set the correct signal manually. adjustment items to the factory preset values, press a/b to select "Reset", and then press ENTER. • It is not necessary to adjust the "Clock" or "Phase" when a digital signal is not distinguishable...
...input terminal displayed when using Auto Sync. Auto Sync. (for setting a secret number. 2 Select "Yes". • "Now, TV will be restored to normal, you can reset the settings to the factory preset values. 1 "Return to the factory preset values" displays on the position-setting screen. Yes: Auto... stripes. Phase: Adjust when characters have already set the correct signal manually. adjustment items to the factory preset values, press a/b to select "Reset", and then press ENTER. • It is not necessary to adjust the "Clock" or "Phase" when a digital signal is not distinguishable...
Operation Manual
Page 25
... the signal type. • "Audio Select" is not displayed in the following connection priority. Type 7: Small capitals. • For resetting adjustments to the factory preset values, press a/b to your external equipment operation manual for "Font Style". INPUT 1: 1 COMPONENT VIDEO 2...", "Background Opacity" and "Character Edge". Sound via the R-AUDIO -L terminal. • Refer to select "Reset", and then press ENTER. • The default value depends on the TV. Press a/b/c/ d to suit your favorite channels easily. Analog: For an audio signal via speaker is connected will...
... the signal type. • "Audio Select" is not displayed in the following connection priority. Type 7: Small capitals. • For resetting adjustments to the factory preset values, press a/b to your external equipment operation manual for "Font Style". INPUT 1: 1 COMPONENT VIDEO 2...", "Background Opacity" and "Character Edge". Sound via the R-AUDIO -L terminal. • Refer to select "Reset", and then press ENTER. • The default value depends on the TV. Press a/b/c/ d to suit your favorite channels easily. Analog: For an audio signal via speaker is connected will...
Operation Manual
Page 30
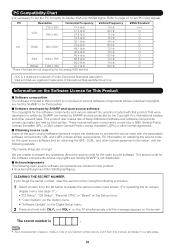
...by third parties. PC Resolution Horizontal Frequency 720 x 400 31.5 kHz VGA 640 x 480 31.5 kHz 37.9 kHz 37.5 kHz 35.1 kHz PC ...page 17.) • "EZ Setup", "CH Setup", "Parental CTRL" or "Reset" on the Setup menu. • "Color System" on the Option menu. ...Setup menu. 2 Press and hold both CHr and VOLk on the TV simultaneously until the message appears on obtaining the source code for obtaining ...SHARP is . • As a precautionary measure, make a note of various software components whose copyrights are held by SHARP or by third parties. ■ Software developed by SHARP...
...by third parties. PC Resolution Horizontal Frequency 720 x 400 31.5 kHz VGA 640 x 480 31.5 kHz 37.9 kHz 37.5 kHz 35.1 kHz PC ...page 17.) • "EZ Setup", "CH Setup", "Parental CTRL" or "Reset" on the Setup menu. • "Color System" on the Option menu. ...Setup menu. 2 Press and hold both CHr and VOLk on the TV simultaneously until the message appears on obtaining the source code for obtaining ...SHARP is . • As a precautionary measure, make a note of various software components whose copyrights are held by SHARP or by third parties. ■ Software developed by SHARP...


