
AR-151 Operation Manual
Page 1
MODEL AR-151 DIGITAL LASER COPIER OPERATION MANUAL • GETTING STARTED Page 3 • MAKING COPIES 12 • SPECIAL FUNCTIONS 19 • SUPPLIES AND USER MAINTENANCE 22 • COPIER TROUBLE? 26 • APPENDIX 33 • OPTIONAL EQUIPMENT 36
MODEL AR-151 DIGITAL LASER COPIER OPERATION MANUAL • GETTING STARTED Page 3 • MAKING COPIES 12 • SPECIAL FUNCTIONS 19 • SUPPLIES AND USER MAINTENANCE 22 • COPIER TROUBLE? 26 • APPENDIX 33 • OPTIONAL EQUIPMENT 36
AR-151 Operation Manual
Page 3
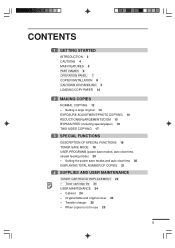
... cover 24 - Toner cartridge life 24 USER MAINTENANCE 24 - When copier is not in use 25 1 Setting a large original 14 EXPOSURE ADJUSTMENT/PHOTO COPYING 14 REDUCTION/ENLARGEMENT/ZOOM 15 BYPASS FEED (including special paper) 16 TWO-SIDED COPYING 17 3 SPECIAL FUNCTIONS DESCRIPTION OF SPECIAL FUNCTIONS 19 TONER SAVE MODE 19 USER PROGRAMS (power save modes and auto clear time 20 DISPLAYING TOTAL NUMBER OF COPIES 21 4 SUPPLIES AND USER MAINTENANCE TONER CARTRIDGE REPLACEMENT 22 - CONTENTS 1 GETTING STARTED INTRODUCTION 3 CAUTIONS 4 MAIN FEATURES 5 PART NAMES 6 OPERATION PANEL 7 COPIER INSTALLATION...
... cover 24 - Toner cartridge life 24 USER MAINTENANCE 24 - When copier is not in use 25 1 Setting a large original 14 EXPOSURE ADJUSTMENT/PHOTO COPYING 14 REDUCTION/ENLARGEMENT/ZOOM 15 BYPASS FEED (including special paper) 16 TWO-SIDED COPYING 17 3 SPECIAL FUNCTIONS DESCRIPTION OF SPECIAL FUNCTIONS 19 TONER SAVE MODE 19 USER PROGRAMS (power save modes and auto clear time 20 DISPLAYING TOTAL NUMBER OF COPIES 21 4 SUPPLIES AND USER MAINTENANCE TONER CARTRIDGE REPLACEMENT 22 - CONTENTS 1 GETTING STARTED INTRODUCTION 3 CAUTIONS 4 MAIN FEATURES 5 PART NAMES 6 OPERATION PANEL 7 COPIER INSTALLATION...

AR-151 Operation Manual
Page 6
... other covers. q Copier power must be sure to 15 seconds before installing any supplies. q When moving the copier, be turned off and remove the power cord from the outlet. Doing so may damage your safety, observe the precautions below when using this area when removing misfed paper. After turning the copier off and remove the power cord from the outlet. q Do not remove the cabinet, operation panel or...
... other covers. q Copier power must be sure to 15 seconds before installing any supplies. q When moving the copier, be turned off and remove the power cord from the outlet. Doing so may damage your safety, observe the precautions below when using this area when removing misfed paper. After turning the copier off and remove the power cord from the outlet. q Do not remove the cabinet, operation panel or...
AR-151 Operation Manual
Page 7
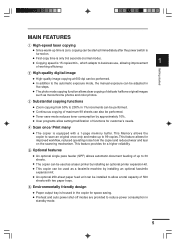
.... Optional features q An optional single pass feeder (SPF) allows automatic document feeding of up to 99 copies. Environmentally friendly design q Paper output tray is housed in the copier for a higher reliability. Getting started immediately after the power switch is turned on the scanning mechanism. q Toner save mode reduces toner consumption by installing an optional printer expansion kit. q Copying speed is only 9.6 seconds (normal mode). q User programs allow a total capacity of 500 sheets with a 1-page memory buffer. This Memory allows the copier to scan...
.... Optional features q An optional single pass feeder (SPF) allows automatic document feeding of up to 99 copies. Environmentally friendly design q Paper output tray is housed in the copier for a higher reliability. Getting started immediately after the power switch is turned on the scanning mechanism. q Toner save mode reduces toner consumption by installing an optional printer expansion kit. q Copying speed is only 9.6 seconds (normal mode). q User programs allow a total capacity of 500 sheets with a 1-page memory buffer. This Memory allows the copier to scan...
AR-151 Operation Manual
Page 8
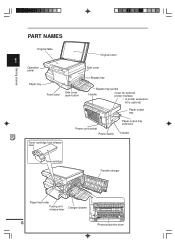
Paper output tray Power cord socket Power switch Paper output tray extension Handle Toner cartridge lock release lever Toner cartridge Transfer charger Paper feed roller Fusing unit release lever Charger cleaner 6 1-B Photoconductive drum PART NAMES Original table 1 Operation panel Original cover Side cover Getting started Paper tray Side cover Front cover open button Bypass tray Bypass tray guides Handle Cover for optional printer interface * A printer expansion kit is optional.
Paper output tray Power cord socket Power switch Paper output tray extension Handle Toner cartridge lock release lever Toner cartridge Transfer charger Paper feed roller Fusing unit release lever Charger cleaner 6 1-B Photoconductive drum PART NAMES Original table 1 Operation panel Original cover Side cover Getting started Paper tray Side cover Front cover open button Bypass tray Bypass tray guides Handle Cover for optional printer interface * A printer expansion kit is optional.
AR-151 Operation Manual
Page 9
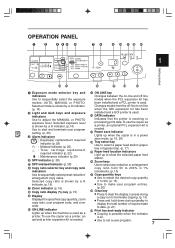
...) q Use to make user program entries. (p. 20) Clear key q Press to clear the display, or press during a copy run to terminate copying. (p. 13) q Press and hold down during standby to display the total number of copies made to sequentially select preset reduction/ enlargement copy ratios. Power save mode. (p. 19, 20) Tray select key Use to select a paper feed station (paper tray or bypass tray). (p. 17) Paper feed location indicators Light up to adjust the MANUAL or PHOTO exposure level. ON LINE indicator Lights up...
...) q Use to make user program entries. (p. 20) Clear key q Press to clear the display, or press during a copy run to terminate copying. (p. 13) q Press and hold down during standby to display the total number of copies made to sequentially select preset reduction/ enlargement copy ratios. Power save mode. (p. 19, 20) Tray select key Use to select a paper feed station (paper tray or bypass tray). (p. 17) Paper feed location indicators Light up to adjust the MANUAL or PHOTO exposure level. ON LINE indicator Lights up...

AR-151 Operation Manual
Page 14
... is turned on . Turn the power switch on . See page 20, USER PROGRAMS. 12 Making copies MAKING COPIES This chapter describes basic copying functions and some other copying functions using the bypass tray. 2 NORMAL COPYING Ensure that paper of the desired size is set time has elapsed without any copier operation after the last copy is made or power is made .The preset amount of time (auto clear time) can be changed. q The copier will light up. See page 10, LOADING COPY PAPER. The ready ( ) indicator will enter a power save modes...
... is turned on . Turn the power switch on . See page 20, USER PROGRAMS. 12 Making copies MAKING COPIES This chapter describes basic copying functions and some other copying functions using the bypass tray. 2 NORMAL COPYING Ensure that paper of the desired size is set time has elapsed without any copier operation after the last copy is made or power is made .The preset amount of time (auto clear time) can be changed. q The copier will light up. See page 10, LOADING COPY PAPER. The ready ( ) indicator will enter a power save modes...

AR-151 Operation Manual
Page 16
... can be removed to "0". 2 Setting a large original The original cover can be reset to allow copying of copies made in the middle of a run , press the left copy quantity key. Making copies NORMAL COPYING Press the print ( ) key. q To stop and the number in the display will be adjusted in the automatic exposure mode. Set the original and check the copy paper size. 14 q To display the number of bulky objects. EXPOSURE ADJUSTMENT/PHOTO COPYING Copy density adjustment is not...
... can be removed to "0". 2 Setting a large original The original cover can be reset to allow copying of copies made in the middle of a run , press the left copy quantity key. Making copies NORMAL COPYING Press the print ( ) key. q To stop and the number in the display will be adjusted in the automatic exposure mode. Set the original and check the copy paper size. 14 q To display the number of bulky objects. EXPOSURE ADJUSTMENT/PHOTO COPYING Copy density adjustment is not...

AR-151 Operation Manual
Page 18
... copies. Copy paper measuring from 28 to 34.5 lbs. The original image must be displayed in this may cause smudges on the original table. Align it down again. 2 Making copies Set the number of copies using the copy quantity ( , ) keys and press the print ( ) key. If the original image is bigger than the paper or media for copying. Open the bypass tray and extend the tray. 16 BYPASS FEED (including special paper) The bypass tray...
... copies. Copy paper measuring from 28 to 34.5 lbs. The original image must be displayed in this may cause smudges on the original table. Align it down again. 2 Making copies Set the number of copies using the copy quantity ( , ) keys and press the print ( ) key. If the original image is bigger than the paper or media for copying. Open the bypass tray and extend the tray. 16 BYPASS FEED (including special paper) The bypass tray...

AR-151 Operation Manual
Page 20
... original cover. Make sure that the first and second originals are oriented in the same way on the original table. Be sure to select the bypass tray and press the print ( ) key. Feed the first copy into the bypass tray. For tablet binding, turn the first copy over left to bottom (not shown). Press the tray select ( ) key to feed the copy paper one sheet at a time...
... original cover. Make sure that the first and second originals are oriented in the same way on the original table. Be sure to select the bypass tray and press the print ( ) key. Feed the first copy into the bypass tray. For tablet binding, turn the first copy over left to bottom (not shown). Press the tray select ( ) key to feed the copy paper one sheet at a time...

AR-151 Operation Manual
Page 22
.... To enter the toner save mode is now active. Setting the power save modes, auto clear time, stream feeding mode) The user programs allow the parameters of the display. 20 To return to the standard mode, repeat the procedure but use the dark ( ) key to blink. The exposure indicator marked "5" will blink in the display. Use the left side of certain functions to select a user program number (1: auto clear time, 2: preheat mode, 3: auto power shut-off timer, 4: stream feeding mode, 5: auto power shut-off mode). USER PROGRAMS (power save modes and auto clear time Press...
.... To enter the toner save mode is now active. Setting the power save modes, auto clear time, stream feeding mode) The user programs allow the parameters of the display. 20 To return to the standard mode, repeat the procedure but use the dark ( ) key to blink. The exposure indicator marked "5" will blink in the display. Use the left side of certain functions to select a user program number (1: auto clear time, 2: preheat mode, 3: auto power shut-off timer, 4: stream feeding mode, 5: auto power shut-off mode). USER PROGRAMS (power save modes and auto clear time Press...

AR-151 Operation Manual
Page 23
... to display the total number of copies is 1,234. 21 The entered parameter number will blink on the right side of copies will appear in the display will be stored. off timer 3 30 min. 4 60 min. 5 120 min. 3 4 Stream feeding 0 OFF * 1 ON mode 5 Auto power shut- 0 OFF * 1 ON off mode Factory default settings are indicated with three digits. Special functions Press the print ( ) key. Example: Total number of copies. Mode Parameters 1 Auto clear time 0 OFF...
... to display the total number of copies is 1,234. 21 The entered parameter number will blink on the right side of copies will appear in the display will be stored. off timer 3 30 min. 4 60 min. 5 120 min. 3 4 Stream feeding 0 OFF * 1 ON mode 5 Auto power shut- 0 OFF * 1 ON off mode Factory default settings are indicated with three digits. Special functions Press the print ( ) key. Example: Total number of copies. Mode Parameters 1 Auto clear time 0 OFF...
AR-151 Operation Manual
Page 26
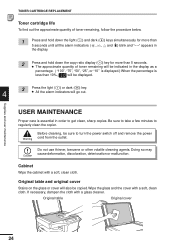
... clean, sharp copies. q The approximate quantity of toner remaining, follow the procedure below. Press the light ( ) or dark ( ) key. 4 q All the alarm indicators will also be displayed. Do not use thinner, benzene or other volatile cleaning agents. Original table and original cover Stains on the glass or cover will go out. Be sure to take a few minutes to turn the power switch off and remove...
... clean, sharp copies. q The approximate quantity of toner remaining, follow the procedure below. Press the light ( ) or dark ( ) key. 4 q All the alarm indicators will also be displayed. Do not use thinner, benzene or other volatile cleaning agents. Original table and original cover Stains on the glass or cover will go out. Be sure to take a few minutes to turn the power switch off and remove...

AR-151 Operation Manual
Page 27
... the side cover open button. Repeat this operation two or three times. Slide the charger cleaner from the right end to the left end, and then remove it. Turn the power switch on copies may be dirty. When copier is not in use To prevent entry of the transfer charger. Close the side cover by holding the tab. Clean the charger using tape (two locations). 25 Supplies and user maintenance USER MAINTENANCE...
... the side cover open button. Repeat this operation two or three times. Slide the charger cleaner from the right end to the left end, and then remove it. Turn the power switch on copies may be dirty. When copier is not in use To prevent entry of the transfer charger. Close the side cover by holding the tab. Clean the charger using tape (two locations). 25 Supplies and user maintenance USER MAINTENANCE...
AR-151 Operation Manual
Page 32
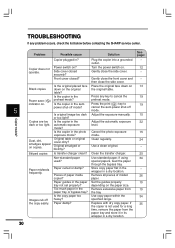
... mode? Use copy paper within the specified range. Place the original face down on the original table. Press any problem occurs, check the list below before contacting the SHARP service center. Cancel the photo exposure mode. Remove all pieces of paper inside copier? Paper misfeeds frequently. Original table or original cover dirty? Paper damp? Adjust the automatic exposure level. Set the guides properly depending on . If the copier is not used ? Blank copies Power save ( indicator on the paper size. Copies...
... mode? Use copy paper within the specified range. Place the original face down on the original table. Press any problem occurs, check the list below before contacting the SHARP service center. Cancel the photo exposure mode. Remove all pieces of paper inside copier? Paper misfeeds frequently. Original table or original cover dirty? Paper damp? Adjust the automatic exposure level. Set the guides properly depending on . If the copier is not used ? Blank copies Power save ( indicator on the paper size. Copies...
AR-151 Operation Manual
Page 33
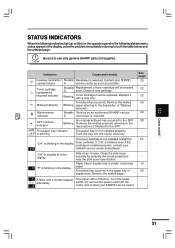
... the relevant page. switch off, remove the power cord from the outlet, and contact your SHARP 29 required indicator lit service center as soon as possible. The paper tray indicator The paper tray is not installed properly. _ is blinking in the display. The toner cartridge is blinking in the display. Copier trouble? Load copy 10 "P" is not installed. A letter and a number appear The copier will be replaced. STATUS INDICATORS When the following indicators light up or...
... the relevant page. switch off, remove the power cord from the outlet, and contact your SHARP 29 required indicator lit service center as soon as possible. The paper tray indicator The paper tray is not installed properly. _ is blinking in the display. The toner cartridge is blinking in the display. Copier trouble? Load copy 10 "P" is not installed. A letter and a number appear The copier will be replaced. STATUS INDICATORS When the following indicators light up or...
AR-151 Operation Manual
Page 35
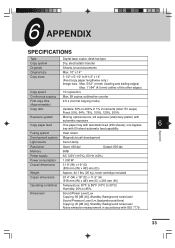
...% to 8-1/2" x 14" (Feed copy paper lengthwise only.) Image loss: Max. 5/32" (4 mm) (leading and trailing edges) Max. 11/64" (4.5 mm) (either of the other edges) Copy speed 15 copies/min. Continuous copying Max. 99 copies; APPENDIX SPECIFICATIONS Type Digital laser copier, desk-top type Copy system Dry, electrostatic transfer Originals Sheets, bound documents Original size Max. 10" x 14" Copy sizes 3-1/2" x 5-1/2" to 85% Noise level Sound Power Level LWA Copying: 66 [dB (A)], Standby...
...% to 8-1/2" x 14" (Feed copy paper lengthwise only.) Image loss: Max. 5/32" (4 mm) (leading and trailing edges) Max. 11/64" (4.5 mm) (either of the other edges) Copy speed 15 copies/min. Continuous copying Max. 99 copies; APPENDIX SPECIFICATIONS Type Digital laser copier, desk-top type Copy system Dry, electrostatic transfer Originals Sheets, bound documents Original size Max. 10" x 14" Copy sizes 3-1/2" x 5-1/2" to 85% Noise level Sound Power Level LWA Copying: 66 [dB (A)], Standby...
AR-151 Operation Manual
Page 40
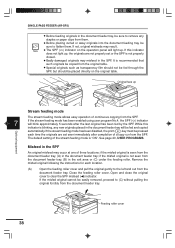
... up Stream feeding mode The stream feeding mode allows easy operation of three locations: if the misfed original is "ON". If this indicator is not seen from the document feeder tray, (B) in the document feeder tray will be copied from the document feeder tray. The default setting of a copy run from the SPF. 7 If the stream feeding mode has been enabled using user program No.4, the SPF ( ) indicator will light up , the originals are set or the...
... up Stream feeding mode The stream feeding mode allows easy operation of three locations: if the misfed original is "ON". If this indicator is not seen from the document feeder tray, (B) in the document feeder tray will be copied from the document feeder tray. The default setting of a copy run from the SPF. 7 If the stream feeding mode has been enabled using user program No.4, the SPF ( ) indicator will light up , the originals are set or the...
AR-151 Operation Manual
Page 42
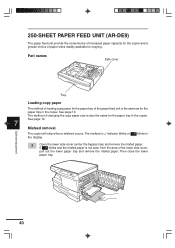
... lower paper tray. 40 Part names Side cover Tray Loading copy paper The method of loading copy paper for the paper tray of the paper feed unit is the same as for copying. See page 10. 7 Misfeed removal The copier will stop when a misfeed occurs. 250-SHEET PAPER FEED UNIT (AR-DE9) The paper feed unit provide the convenience of increased paper capacity for the copier and a greater choice of paper sizes readily available for the paper tray in Optional equipment Open the lower side cover (under the bypass tray) and remove...
... lower paper tray. 40 Part names Side cover Tray Loading copy paper The method of loading copy paper for the paper tray of the paper feed unit is the same as for copying. See page 10. 7 Misfeed removal The copier will stop when a misfeed occurs. 250-SHEET PAPER FEED UNIT (AR-DE9) The paper feed unit provide the convenience of increased paper capacity for the copier and a greater choice of paper sizes readily available for the paper tray in Optional equipment Open the lower side cover (under the bypass tray) and remove...
AR-151 Operation Manual
Page 45
... 34 - toner cartridge 22 Special paper 34 Specifications - paper 34 Status indicators 31 Storage of copies 21 Transfer charger 6, 25 Troubleshooting 30 Two-sided copying 17 U User maintenance - using the SPF 37 Z Zoom 15 copier 33 - life 24 - original cover 24 - part names 37 - INDEX P Paper - specifications 37 - specifications 34 Paper feed area 27 Paper output tray 6 Paper output tray extension 6, 12 Paper size 34 Paper transport area 28 Paper tray 6 Part names 6 PCL expansion kit (AR-PB9 34, 36 Photo mode 7, 15 Power on 12 Power save mode 19...
... 34 - toner cartridge 22 Special paper 34 Specifications - paper 34 Status indicators 31 Storage of copies 21 Transfer charger 6, 25 Troubleshooting 30 Two-sided copying 17 U User maintenance - using the SPF 37 Z Zoom 15 copier 33 - life 24 - original cover 24 - part names 37 - INDEX P Paper - specifications 37 - specifications 34 Paper feed area 27 Paper output tray 6 Paper output tray extension 6, 12 Paper size 34 Paper transport area 28 Paper tray 6 Part names 6 PCL expansion kit (AR-PB9 34, 36 Photo mode 7, 15 Power on 12 Power save mode 19...


