
Owners Manual
Page 1
INSTRUCTION MANUAL Digital Camera Please read these instructions carefully before using the camera. Keep this manual in a safe place for later reference.
INSTRUCTION MANUAL Digital Camera Please read these instructions carefully before using the camera. Keep this manual in a safe place for later reference.

Owners Manual
Page 3
.... Occasionally a retailer will specify a unique product color, appearance, and internal memory capacity. This is a trademark of your camera. Products very often vary between retailers especially with your dealer for the product. The illustrations in this manual. This User Manual...and accessories that different retailers often specify slightly different product inclusions and accessories to suit their respective owners. Contact your camera may be different from the actual design of Apple Inc. READ THIS FIRST Trademark Information Microsoft® and Windows®...
.... Occasionally a retailer will specify a unique product color, appearance, and internal memory capacity. This is a trademark of your camera. Products very often vary between retailers especially with your dealer for the product. The illustrations in this manual. This User Manual...and accessories that different retailers often specify slightly different product inclusions and accessories to suit their respective owners. Contact your camera may be different from the actual design of Apple Inc. READ THIS FIRST Trademark Information Microsoft® and Windows®...

Owners Manual
Page 4
... turn the power off and remove the batteries. Consult the store of purchase. Do not use might cause poisoning. This might cause the camera to fall or tilt over or result in areas near the shore. This might cause fire or electric shock. Take special care during rain... store of purchase. SAFETY INSTRUCTIONS Read and understand all Warnings and Cautions before using this product. Do not disassemble, change or repair the camera. Keep the batteries out of the reach of purchase. Swallowing the batteries might cause fire or electric shock. Do not use might cause ...
... turn the power off and remove the batteries. Consult the store of purchase. Do not use might cause poisoning. This might cause the camera to fall or tilt over or result in areas near the shore. This might cause fire or electric shock. Take special care during rain... store of purchase. SAFETY INSTRUCTIONS Read and understand all Warnings and Cautions before using this product. Do not disassemble, change or repair the camera. Keep the batteries out of the reach of purchase. Swallowing the batteries might cause fire or electric shock. Do not use might cause ...

Owners Manual
Page 5
...battery might cause damage to build up and deform the case, resulting in fire. Do not use . The battery becomes hot during use the camera in humid, steamy, smoky, or dusty places. If the internal fluid has entered your body or clothes, rinse with its polarities inverted might cause... heat to the camera. Inserting the battery with fresh water. Do not remove the battery immediately after long period of the terminals. This might cause fire and injury,...
...battery might cause damage to build up and deform the case, resulting in fire. Do not use . The battery becomes hot during use the camera in humid, steamy, smoky, or dusty places. If the internal fluid has entered your body or clothes, rinse with its polarities inverted might cause... heat to the camera. Inserting the battery with fresh water. Do not remove the battery immediately after long period of the terminals. This might cause fire and injury,...
Owners Manual
Page 8
... to questions or problems concerning camera operation in this device must accept any interference received, including interference that may cause undesired operation. EN-7 FCC information Tested To Comply With FCC Standards FOR HOME OR OFFICE USE Declaration of Conformity Model number: VPC-S880 Trade Name: SANYO Responsible party: SANYO FISHER COMPANY Address: 21605 Plummer...
... to questions or problems concerning camera operation in this device must accept any interference received, including interference that may cause undesired operation. EN-7 FCC information Tested To Comply With FCC Standards FOR HOME OR OFFICE USE Declaration of Conformity Model number: VPC-S880 Trade Name: SANYO Responsible party: SANYO FISHER COMPANY Address: 21605 Plummer...
Owners Manual
Page 9
...Stored for a long time in a fully charged condition, their performance and lifetime, we recommend that can shorten the battery life and reduce camera performance. Notes on Battery Usage When you fully charge the batteries and discharge them after no battery power is a risk of continuous use.... Always keep the batteries away from the camera to maximize their performance may feel warm after a long period of explosion if the batteries are highly recommended. Therefore, to prevent ...
...Stored for a long time in a fully charged condition, their performance and lifetime, we recommend that can shorten the battery life and reduce camera performance. Notes on Battery Usage When you fully charge the batteries and discharge them after no battery power is a risk of continuous use.... Always keep the batteries away from the camera to maximize their performance may feel warm after a long period of explosion if the batteries are highly recommended. Therefore, to prevent ...
Owners Manual
Page 10
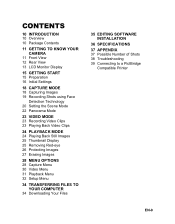
CONTENTS 10 INTRODUCTION 10 Overview 10 Package Contents 11 GETTING TO KNOW YOUR CAMERA 11 Front View 12 Rear View 13 LCD Monitor Display 15 GETTING START 15 Preparation 16 Initial Settings 18 CAPTURE MODE 18 Capturing Images 19 ...
CONTENTS 10 INTRODUCTION 10 Overview 10 Package Contents 11 GETTING TO KNOW YOUR CAMERA 11 Front View 12 Rear View 13 LCD Monitor Display 15 GETTING START 15 Preparation 16 Initial Settings 18 CAPTURE MODE 18 Capturing Images 19 ...

Owners Manual
Page 11
... following items: Common Product Components: „ Digital camera „ Software CD-ROM „ USB cable „ Camera strap „ Camera pouch „ 2 x AA size batteries „ Instruction manual Optional Accessory: „ SD/SDHC memory card „ Accessories and components may vary by retailer. Equipped with an 8.1-megapixel sensor, this camera is fast and easy with a resolution...
... following items: Common Product Components: „ Digital camera „ Software CD-ROM „ USB cable „ Camera strap „ Camera pouch „ 2 x AA size batteries „ Instruction manual Optional Accessory: „ SD/SDHC memory card „ Accessories and components may vary by retailer. Equipped with an 8.1-megapixel sensor, this camera is fast and easy with a resolution...
Owners Manual
Page 16
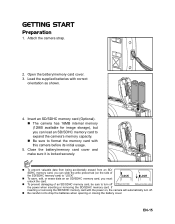
... memory card, you can load an SD/SDHC memory card to expand the camera's memory capacity. Be careful not to format the memory card with this camera before its initial usage. 5. Insert an SD/SDHC memory card (Optional). The camera has 16MB internal memory (12MB available for image storage), but you can slide... the write protect tab (on , the camera will automatically turn off . To prevent valuable data from being accidentally erased from an SD/ SDHC memory card, you must unlock the card. If inserting ...
... memory card, you can load an SD/SDHC memory card to expand the camera's memory capacity. Be careful not to format the memory card with this camera before its initial usage. 5. Insert an SD/SDHC memory card (Optional). The camera has 16MB internal memory (12MB available for image storage), but you can slide... the write protect tab (on , the camera will automatically turn off . To prevent valuable data from being accidentally erased from an SD/ SDHC memory card, you must unlock the card. If inserting ...
Owners Manual
Page 17
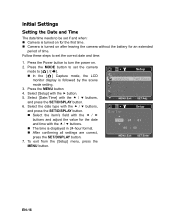
... Language English Fr.No.Reset Next Menu LCD Bright. 0 Auto Off 3 Min. Press the Power button to turn the power on after leaving the camera without the battery for an extended period of time. Select [Date/Time] with the c / d buttons, and press the SET/DISPLAY button. The... time is followed by the scene mode setting. 3. Camera is turned on . 2. Select [Setup] with the e / f buttons and adjust the value for the first time. After confirming all settings are correct, press ...
... Language English Fr.No.Reset Next Menu LCD Bright. 0 Auto Off 3 Min. Press the Power button to turn the power on after leaving the camera without the battery for an extended period of time. Select [Date/Time] with the c / d buttons, and press the SET/DISPLAY button. The... time is followed by the scene mode setting. 3. Camera is turned on . 2. Select [Setup] with the e / f buttons and adjust the value for the first time. After confirming all settings are correct, press ...

Owners Manual
Page 18
Set the camera mode to [x]. 2. Select [Setup] menu with the f button. 4. Select [Setup] menu with the f button. 4. Next Menu Language English MENU:Exit SET:Adj. Select the displayed ... the MENU button. 3. The Language setting screen will be stored. Select [Format] with the c / d buttons, and press the SET/DISPLAY button. EN-17 Set the camera mode to [ ] / [S]. Next Menu Sys. Choosing the Language Specify in which language menus and messages are to be displayed. 5. You may set the language from...
Set the camera mode to [x]. 2. Select [Setup] menu with the f button. 4. Select [Setup] menu with the f button. 4. Next Menu Language English MENU:Exit SET:Adj. Select the displayed ... the MENU button. 3. The Language setting screen will be stored. Select [Format] with the c / d buttons, and press the SET/DISPLAY button. EN-17 Set the camera mode to [ ] / [S]. Next Menu Sys. Choosing the Language Specify in which language menus and messages are to be displayed. 5. You may set the language from...
Owners Manual
Page 19
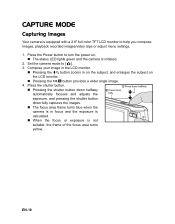
... button provides a wider angle image. 4. When the focus or exposure is initiated. 2. EN-18 Set the camera mode to turn the power on the LCD monitor. The focus area frame turns blue when the camera is in on the subject, and enlarges the subject on . Pressing the button zooms in focus and... adjusts the exposure, and pressing the shutter button down fully captures the images. Press the Power button to [ ]. 3. The status LED lights green and the camera is not suitable, the frame of the focus area turns yellow. CAPTURE MODE Capturing Images Your...
... button provides a wider angle image. 4. When the focus or exposure is initiated. 2. EN-18 Set the camera mode to turn the power on the LCD monitor. The focus area frame turns blue when the camera is in on the subject, and enlarges the subject on . Pressing the button zooms in focus and... adjusts the exposure, and pressing the shutter button down fully captures the images. Press the Power button to [ ]. 3. The status LED lights green and the camera is not suitable, the frame of the focus area turns yellow. CAPTURE MODE Capturing Images Your...
Owners Manual
Page 20
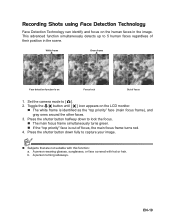
... detection function is on the LCD monitor. Press the shutter button down to capture your image. This advanced function simultaneously detects up to [ ]. 2. Set the camera mode to 5 human faces regardless of focus, the main focus frame turns red. 4. b. Recording Shots using Face Detection Technology Face Detection Technology can identify and...
... detection function is on the LCD monitor. Press the shutter button down to capture your image. This advanced function simultaneously detects up to [ ]. 2. Set the camera mode to 5 human faces regardless of focus, the main focus frame turns red. 4. b. Recording Shots using Face Detection Technology Face Detection Technology can identify and...
Owners Manual
Page 21
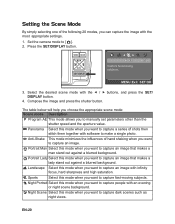
... mode: Scene mode Description P Program AE This mode allows you want to capture a series of shots then stitch them together with software to [ ]. 2. Set the camera mode to make a single photo.
... mode: Scene mode Description P Program AE This mode allows you want to capture a series of shots then stitch them together with software to [ ]. 2. Set the camera mode to make a single photo.
Owners Manual
Page 23
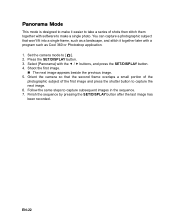
... subject of shots then stitch them together with software to capture the next image. 6. Orient the camera so that won't fit into a single frame, such as Cool 360 or Photoshop application. 1. EN-22 Set the camera mode to capture subsequent images in the sequence. 7. Select [Panorama] with a program such as a landscape, and...
... subject of shots then stitch them together with software to capture the next image. 6. Orient the camera so that won't fit into a single frame, such as Cool 360 or Photoshop application. 1. EN-22 Set the camera mode to capture subsequent images in the sequence. 7. Select [Panorama] with a program such as a landscape, and...
Owners Manual
Page 24
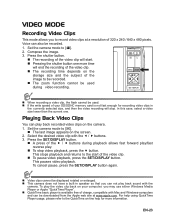
...the recording of 320 x 240 / 640 x 480 pixels. The recording time depends on the camera. 1. Select the desired video clip with the camera. To cancel pause, press the SET/DISPLAY button again. This camera does not have a built-in the currently selected size, and then the video recording will ... be downloaded from the Apple web site at a resolution of the video clip. Set the camera mode to [x]. Compose the image. 3. When recording a video clip, the flash cannot be used . Set the camera mode to [w]. 2. Press the SET/DISPLAY button. To play back recorded video clips on ...
...the recording of 320 x 240 / 640 x 480 pixels. The recording time depends on the camera. 1. Select the desired video clip with the camera. To cancel pause, press the SET/DISPLAY button again. This camera does not have a built-in the currently selected size, and then the video recording will ... be downloaded from the Apple web site at a resolution of the video clip. Set the camera mode to [x]. Compose the image. 3. When recording a video clip, the flash cannot be used . Set the camera mode to [w]. 2. Press the SET/DISPLAY button. To play back recorded video clips on ...
Owners Manual
Page 25
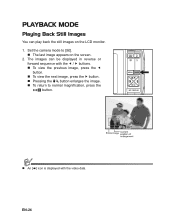
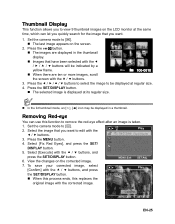
x1.5 An [S] icon is displayed with the e / f buttons. Set the camera mode to normal magnification, press the button. The images can play back the still images on the screen. 2. To view the previous image, press the e button. To return to [x]. To view the next image, press the f button. Pressing the button enlarges the image. PLAYBACK MODE Playing Back Still Images You can be displayed in reverse or forward sequence with the video data. The last image appears on the LCD monitor. 1. EN-24
x1.5 An [S] icon is displayed with the e / f buttons. Set the camera mode to normal magnification, press the button. The images can play back the still images on the screen. 2. To view the previous image, press the e button. To return to [x]. To view the next image, press the f button. Pressing the button enlarges the image. PLAYBACK MODE Playing Back Still Images You can be displayed in reverse or forward sequence with the video data. The last image appears on the LCD monitor. 1. EN-24
Owners Manual
Page 26
...Red-eye You can let you quickly search for the image that you want to card Next Menu press the SET/DISPLAY button. 6. Set the camera mode to view 9 thumbnail images on the corrected image. Select [Fix Red Eyes], and press the SET/ DISPLAY button. 5. Press the SET... SET:Adj. 7. Press the button. „ The images are displayed in a thumbnail. Press the e / f / c / d buttons to select the image to [x]. 2. Set the camera mode to be indicated by a yellow frame. „ When there are ten or more images, scroll the screen with the e / f buttons. 3. Select the image that...
...Red-eye You can let you quickly search for the image that you want to card Next Menu press the SET/DISPLAY button. 6. Set the camera mode to view 9 thumbnail images on the corrected image. Select [Fix Red Eyes], and press the SET/ DISPLAY button. 5. Press the SET... SET:Adj. 7. Press the button. „ The images are displayed in a thumbnail. Press the e / f / c / d buttons to select the image to [x]. 2. Set the camera mode to be indicated by a yellow frame. „ When there are ten or more images, scroll the screen with the e / f buttons. 3. Select the image that...
Owners Manual
Page 27
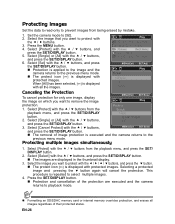
... c / d buttons, and press the SET/DISPLAY button. 6. The protect icon [y] is applied to the image and the camera returns to the previous menu mode. Press the SET/DISPLAY button. EN-26 Play Single All Select Canceling the Protection To cancel protection... the d button. The protect icon [y] is repeated to the previous menu mode. When [All] has been selected, [y] is executed and the camera returns to select multiple images. 4. The removal of the protection are displayed in the thumbnail display. 3. Protection and cancellation of image protection is displayed...
... c / d buttons, and press the SET/DISPLAY button. 6. The protect icon [y] is applied to the image and the camera returns to the previous menu mode. Press the SET/DISPLAY button. EN-26 Play Single All Select Canceling the Protection To cancel protection... the d button. The protect icon [y] is repeated to the previous menu mode. When [All] has been selected, [y] is executed and the camera returns to select multiple images. 4. The removal of the protection are displayed in the thumbnail display. 3. Protection and cancellation of image protection is displayed...
Owners Manual
Page 28
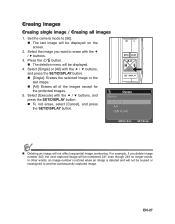
The last image will be reused or reassigned to another subsequently captured image. EN-27 Set the camera mode to erase with the c / d buttons, and press the SET/DISPLAY button. Select the image you delete image number 240, the next captured image will ...
The last image will be reused or reassigned to another subsequently captured image. EN-27 Set the camera mode to erase with the c / d buttons, and press the SET/DISPLAY button. Select the image you delete image number 240, the next captured image will ...


