Owners Manual
Page 2
... antenna. Use of the FCC rules. Operation is required to comply with the limits for help. Increase the separation between the equipment and receiver. Connect the equipment into an outlet on , the user is no guarantee that interference will not occur in the manual. EN-1 Notice If static electricity or electromagnetism causes data transfer to stop operation of the...
... antenna. Use of the FCC rules. Operation is required to comply with the limits for help. Increase the separation between the equipment and receiver. Connect the equipment into an outlet on , the user is no guarantee that interference will not occur in the manual. EN-1 Notice If static electricity or electromagnetism causes data transfer to stop operation of the...
Owners Manual
Page 8
... problems concerning camera operation in this device must accept any interference received, including interference that may cause undesired operation. Canadian ICES-003 information This class B digital apparatus complies with Part 15 of the FCC Rules. You many find the answers to . FCC information Tested To Comply With FCC Standards FOR HOME OR OFFICE USE Declaration of Conformity Model number: VPC...
... problems concerning camera operation in this device must accept any interference received, including interference that may cause undesired operation. Canadian ICES-003 information This class B digital apparatus complies with Part 15 of the FCC Rules. You many find the answers to . FCC information Tested To Comply With FCC Standards FOR HOME OR OFFICE USE Declaration of Conformity Model number: VPC...
Owners Manual
Page 10
... Settings 18 CAPTURE MODE 18 Capturing Images 19 Recording Shots using Face Detection Technology 20 Setting the Scene Mode 22 Panorama Mode 23 VIDEO MODE 23 Recording Video Clips 23 Playing Back Video Clips 24 PLAYBACK MODE 24 Playing Back Still Images 25 Thumbnail Display 25 Removing Red-eye 26 Protecting Images 27 Erasing Images 28 MENU OPTIONS 28 Capture Menu 30 Video Menu 31 Playback Menu 32 Setup Menu 34 TRANSFERRING FILES TO YOUR COMPUTER 34 Downloading Your Files 35 EDITING SOFTWARE INSTALLATION 36 SPECIFICATIONS 37 APPENDIX 37 Possible Number of Shots 38 Troubleshooting 39 Connecting...
... Settings 18 CAPTURE MODE 18 Capturing Images 19 Recording Shots using Face Detection Technology 20 Setting the Scene Mode 22 Panorama Mode 23 VIDEO MODE 23 Recording Video Clips 23 Playing Back Video Clips 24 PLAYBACK MODE 24 Playing Back Still Images 25 Thumbnail Display 25 Removing Red-eye 26 Protecting Images 27 Erasing Images 28 MENU OPTIONS 28 Capture Menu 30 Video Menu 31 Playback Menu 32 Setup Menu 34 TRANSFERRING FILES TO YOUR COMPUTER 34 Downloading Your Files 35 EDITING SOFTWARE INSTALLATION 36 SPECIFICATIONS 37 APPENDIX 37 Possible Number of Shots 38 Troubleshooting 39 Connecting...
Owners Manual
Page 13
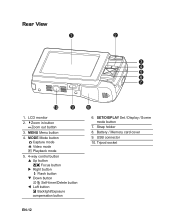
Zoom in button Zoom out button 3. Rear View 1 2 3 4 5 6 7 10 9 1. MENU Menu button 4. USB connector 10. Tripod socket EN-12 Strap holder 8. Battery / Memory card cover 9. MODE Mode button Capture mode S Video mode x Playback mode 5. 4-way control button S Up button m Focus button X Right button X Flash button T Down button %F Self-timer/Delete button W Left button [ Backlight/Exposure compensation button 8 6. SET/DISPLAY Set / Display / Scene mode button 7. LCD monitor 2.
Zoom in button Zoom out button 3. Rear View 1 2 3 4 5 6 7 10 9 1. MENU Menu button 4. USB connector 10. Tripod socket EN-12 Strap holder 8. Battery / Memory card cover 9. MODE Mode button Capture mode S Video mode x Playback mode 5. 4-way control button S Up button m Focus button X Right button X Flash button T Down button %F Self-timer/Delete button W Left button [ Backlight/Exposure compensation button 8 6. SET/DISPLAY Set / Display / Scene mode button 7. LCD monitor 2.
Owners Manual
Page 17
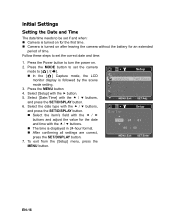
... Settings Setting the Date and Time The date/time needs to turn the power on. 2. Setup Beep On Date/Time Next Menu Language English Fr.No.Reset Next Menu LCD Bright. 0 Auto Off 3 Min. After confirming all settings are correct, press the SET/DISPLAY button. 7. Camera is turned on after leaving the camera without the battery for the first time. Date/Time Setup 2008 / 01 / 01 00 : 00 MENU:Exit SET:Enter EN-16 In the [ ] Capture mode, the LCD monitor display is displayed in 24-hour format...
... Settings Setting the Date and Time The date/time needs to turn the power on. 2. Setup Beep On Date/Time Next Menu Language English Fr.No.Reset Next Menu LCD Bright. 0 Auto Off 3 Min. After confirming all settings are correct, press the SET/DISPLAY button. 7. Camera is turned on after leaving the camera without the battery for the first time. Date/Time Setup 2008 / 01 / 01 00 : 00 MENU:Exit SET:Enter EN-16 In the [ ] Capture mode, the LCD monitor display is displayed in 24-hour format...

Owners Manual
Page 18
... SET/DISPLAY button. Next Menu Language English MENU:Exit SET:Adj. The setting will be displayed on the LCD monitor. 1. Setup Beep On Date/Time Next Menu Language English Fr.No.Reset Next Menu LCD Bright. 0 Auto Off 3 Min. Formatting the Memory Card or Internal Memory This utility formats the internal memory (or memory card) and erases all stored images and data. 1. Select [Setup] menu with the c / d buttons, and press the SET/DISPLAY button. Info. EN-17 You may set the language from the playback mode. 2. Select [Language] with the f button. 4. Setup Beep On Format...
... SET/DISPLAY button. Next Menu Language English MENU:Exit SET:Adj. The setting will be displayed on the LCD monitor. 1. Setup Beep On Date/Time Next Menu Language English Fr.No.Reset Next Menu LCD Bright. 0 Auto Off 3 Min. Formatting the Memory Card or Internal Memory This utility formats the internal memory (or memory card) and erases all stored images and data. 1. Select [Setup] menu with the c / d buttons, and press the SET/DISPLAY button. Info. EN-17 You may set the language from the playback mode. 2. Select [Language] with the f button. 4. Setup Beep On Format...
Owners Manual
Page 19
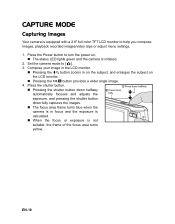
... . Set the camera mode to help you compose images, playback recorded images/video clips or adjust menu settings. 1. Pressing the button zooms in the LCD monitor. The status LED lights green and the camera is calculated. Pressing the button provides a wider angle image. 4. The focus area frame turns blue when the camera is in focus and the exposure is initiated. 2. Press the Power button to turn the power on the LCD monitor. When the focus or exposure is equipped with a 2.8" full color TFT LCD...
... . Set the camera mode to help you compose images, playback recorded images/video clips or adjust menu settings. 1. Pressing the button zooms in the LCD monitor. The status LED lights green and the camera is calculated. Pressing the button provides a wider angle image. 4. The focus area frame turns blue when the camera is in focus and the exposure is initiated. 2. Press the Power button to turn the power on the LCD monitor. When the focus or exposure is equipped with a 2.8" full color TFT LCD...
Owners Manual
Page 20
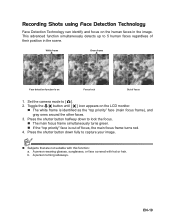
... the scene. Set the camera mode to 5 human faces regardless of their position in the image. Recording Shots using Face Detection Technology Face Detection Technology can identify and focus on the LCD monitor. Subjects that are not suitable with hat or hair. The white frame is out of focus 1. White frame Green frame Face detection function is on Focus lock Out of focus, the main focus frame turns red. 4. If...
... the scene. Set the camera mode to 5 human faces regardless of their position in the image. Recording Shots using Face Detection Technology Face Detection Technology can identify and focus on the LCD monitor. Subjects that are not suitable with hat or hair. The white frame is out of focus 1. White frame Green frame Face detection function is on Focus lock Out of focus, the main focus frame turns red. 4. If...
Owners Manual
Page 24
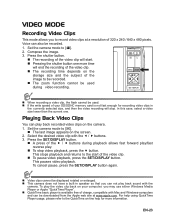
... the SET/DISPLAY button again. Press the SET/DISPLAY button. For help for recording video clips in speaker so that you may use either Windows Media Player or Apple "QuickTime Player". Voice can not play back sound with the e / f buttons. 3. Press the shutter button. EN-23 This pauses video playback. Set the camera mode to be used during playback allows fast forward play/fast reverse play back recorded video clips on the screen. 2. When recording a video clip, the flash cannot be recorded.
... the SET/DISPLAY button again. Press the SET/DISPLAY button. For help for recording video clips in speaker so that you may use either Windows Media Player or Apple "QuickTime Player". Voice can not play back sound with the e / f buttons. 3. Press the shutter button. EN-23 This pauses video playback. Set the camera mode to be used during playback allows fast forward play/fast reverse play back recorded video clips on the screen. 2. When recording a video clip, the flash cannot be recorded.
Owners Manual
Page 26
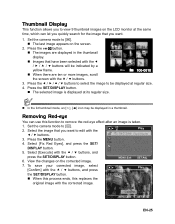
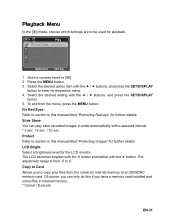
... ten or more images, scroll the screen with the c / d buttons. 3. Press the MENU button. 4. Thumbnail Display This function allows you to view 9 thumbnail images on the LCD monitor at the same time, which can use this replaces the original image with the corrected image. Press the SET/DISPLAY button. „ The selected image is taken. 1. Select [Fix Red Eyes], and press the SET/ DISPLAY button. 5. Protect Next Menu LCD Bright. 0 Copy to [x]. 2. Set the camera mode to card Next Menu press the SET/DISPLAY button. 6. EN-25...
... ten or more images, scroll the screen with the c / d buttons. 3. Press the MENU button. 4. Thumbnail Display This function allows you to view 9 thumbnail images on the LCD monitor at the same time, which can use this replaces the original image with the corrected image. Press the SET/DISPLAY button. „ The selected image is taken. 1. Select [Fix Red Eyes], and press the SET/ DISPLAY button. 5. Protect Next Menu LCD Bright. 0 Copy to [x]. 2. Set the camera mode to card Next Menu press the SET/DISPLAY button. 6. EN-25...
Owners Manual
Page 27
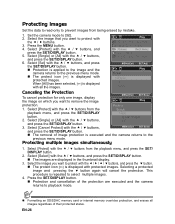
... the protection. Press the SET/DISPLAY button. Set the camera mode to playback mode. Select [Single] or [All] with the c / d buttons from being erased by mistake. 1. Protection is displayed with protected images. The protect icon [y] is applied to the image and the camera returns to the previous menu mode. EN-26 Protect Next Menu LCD Bright. 0 Copy to card Next Menu MENU:Exit SET:Adj. Protecting multiple images simultaneously 1. Formatting an SD/SDHC memory card or internal memory overrides protection, and erases all the images. Protecting Images Set the data to...
... the protection. Press the SET/DISPLAY button. Set the camera mode to playback mode. Select [Single] or [All] with the c / d buttons from being erased by mistake. 1. Protection is displayed with protected images. The protect icon [y] is applied to the image and the camera returns to the previous menu mode. EN-26 Protect Next Menu LCD Bright. 0 Copy to card Next Menu MENU:Exit SET:Adj. Protecting multiple images simultaneously 1. Formatting an SD/SDHC memory card or internal memory overrides protection, and erases all the images. Protecting Images Set the data to...
Owners Manual
Page 29
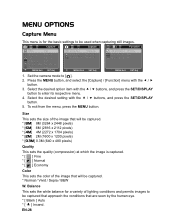
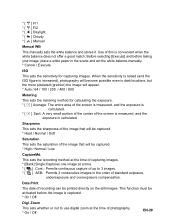
... lighting conditions and permits images to [ ]. 2. Capture W Metering Average A Sharpness Normal Saturation Normal MENU:Exit SET:Adj. Capture Size 8M Quality Normal Color Normal W.Blance Auto ( Manual WB Next Menu ISO Auto MENU:Exit SET:Adj. Function CaptureMd. MENU OPTIONS Capture Menu This menu is captured. * [ ] Fine * [ ] Normal * [ ] Economy Color This sets the color of the image that are seen by the human eye. * [ Blank ] Auto * [ f ] Incand. Select the desired setting with the e / f button. 3. Set the camera mode...
... lighting conditions and permits images to [ ]. 2. Capture W Metering Average A Sharpness Normal Saturation Normal MENU:Exit SET:Adj. Capture Size 8M Quality Normal Color Normal W.Blance Auto ( Manual WB Next Menu ISO Auto MENU:Exit SET:Adj. Function CaptureMd. MENU OPTIONS Capture Menu This menu is captured. * [ ] Fine * [ ] Normal * [ ] Economy Color This sets the color of the image that are seen by the human eye. * [ Blank ] Auto * [ f ] Incand. Select the desired setting with the e / f button. 3. Set the camera mode...
Owners Manual
Page 30
... Saturation This sets the saturation of the image that will appear. * Auto / 64 / 100 / 200 / 400 / 800 Metering This sets the metering method for capturing images. Zoom This sets whether or not to use digital zoom at a time. * [ ] Cont.: Permits continuous capture of up to 3 images. * [ ] AEB: Permits 3 consecutive images in the scene and set the white balance manually. * Cancel / Execute ISO This sets the sensitivity for calculating the exposure. * [ o ] Average...
... Saturation This sets the saturation of the image that will appear. * Auto / 64 / 100 / 200 / 400 / 800 Metering This sets the metering method for capturing images. Zoom This sets whether or not to use digital zoom at a time. * [ ] Cont.: Permits continuous capture of up to 3 images. * [ ] AEB: Permits 3 consecutive images in the scene and set the white balance manually. * Cancel / Execute ISO This sets the sensitivity for calculating the exposure. * [ o ] Average...
Owners Manual
Page 32
... a memory card installed and some files in internal memory. * Cancel / Execute EN-31 Protect Next Menu LCD Bright. 0 Copy to be used for further details. Press the MENU button. 3. Select the desired option item with a selected interval. * 3 sec. / 5 sec. / 10 sec. Slide Show You can only do this manual titled "Removing Red-eye" for playback. The adjustment range is from the camera's internal memory to Card Allows you can play back recorded images in this manual titled "Protecting Images...
... a memory card installed and some files in internal memory. * Cancel / Execute EN-31 Protect Next Menu LCD Bright. 0 Copy to be used for further details. Press the MENU button. 3. Select the desired option item with a selected interval. * 3 sec. / 5 sec. / 10 sec. Slide Show You can only do this manual titled "Removing Red-eye" for playback. The adjustment range is from the camera's internal memory to Card Allows you can play back recorded images in this manual titled "Protecting Images...

Owners Manual
Page 33
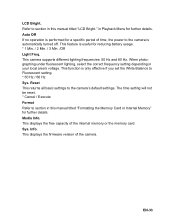
... MENU button. Setup Beep On Date/Time Next Menu Language English Fr.No.Reset Next Menu LCD Bright. 0 Auto Off 3 Min. To exit from number 0001. * Cancel / Execute EN-32 Setup Menu Set your camera's operating environment. Setup q Light Freq. 50 Hz k Sys. MENU:Exit SET:Adj. MENU:Exit SET:Adj. Info. Set the camera mode to enter its respective menu. 5. Press the MENU button. 3. Select the desired option item with the c / d buttons, and press the SET/DISPLAY button to [ ] / [S] / [x]. 2. No. The captured images are recorded...
... MENU button. Setup Beep On Date/Time Next Menu Language English Fr.No.Reset Next Menu LCD Bright. 0 Auto Off 3 Min. To exit from number 0001. * Cancel / Execute EN-32 Setup Menu Set your camera's operating environment. Setup q Light Freq. 50 Hz k Sys. MENU:Exit SET:Adj. MENU:Exit SET:Adj. Info. Set the camera mode to enter its respective menu. 5. Press the MENU button. 3. Select the desired option item with the c / d buttons, and press the SET/DISPLAY button to [ ] / [S] / [x]. 2. No. The captured images are recorded...
Owners Manual
Page 34
... function is useful for a specific period of time, the power to the camera's default settings. LCD Bright. EN-33 in this manual titled "LCD Bright." Reset This returns all basic settings to the camera is automatically turned off. This displays the free capacity of the camera. Media Info. When photographing under fluorescent lighting, select the correct frequency setting depending in this manual titled "Formatting the Memory Card or Internal Memory" for further details. Auto Off If no operation...
... function is useful for a specific period of time, the power to the camera's default settings. LCD Bright. EN-33 in this manual titled "LCD Bright." Reset This returns all basic settings to the camera is automatically turned off. This displays the free capacity of the camera. Media Info. When photographing under fluorescent lighting, select the correct frequency setting depending in this manual titled "Formatting the Memory Card or Internal Memory" for further details. Auto Off If no operation...

Owners Manual
Page 35
... folders. 9. Copy & Paste or Drag-N-Drop image and video files to an available USB port on the camera. 3. Select [PC] using the c / d buttons, and press the SET/DISPLAY button. 5. This "removable disk" is actually the memory (or memory card) in your camera. 4. Mac users: Double-click the "untitled" or "unlabeled" disk drive icon on your computer. iPhoto may automatically launch. Connect one end of the USB cable to find more folders. Connect the other end of the USB cable...
... folders. 9. Copy & Paste or Drag-N-Drop image and video files to an available USB port on the camera. 3. Select [PC] using the c / d buttons, and press the SET/DISPLAY button. 5. This "removable disk" is actually the memory (or memory card) in your camera. 4. Mac users: Double-click the "untitled" or "unlabeled" disk drive icon on your computer. iPhoto may automatically launch. Connect one end of the USB cable to find more folders. Connect the other end of the USB cable...

Owners Manual
Page 37
SPECIFICATIONS Item Image sensor Image resolution LCD monitor Recording media File format Lens Focus Range Shutter speed Sensitivity Digital zoom Flash effective range Terminal Power supply Operating environment Dimensions Weight Description 1/2.5" CCD sensor (8.1 megapixels) 3264 x 2448, 2816x2112, 2272x1704, 1600 x 1200, 640 x 480 640 x 480 (24 fps), 320 x 240 (30 fps) 2.8" full color TFT LCD (230K pixels) 16MB internal memory (12MB available for image storage) Supports SD/SDHC memory card (up to 4GB) (optional) JPEG, DCF, EXIF...
SPECIFICATIONS Item Image sensor Image resolution LCD monitor Recording media File format Lens Focus Range Shutter speed Sensitivity Digital zoom Flash effective range Terminal Power supply Operating environment Dimensions Weight Description 1/2.5" CCD sensor (8.1 megapixels) 3264 x 2448, 2816x2112, 2272x1704, 1600 x 1200, 640 x 480 640 x 480 (24 fps), 320 x 240 (30 fps) 2.8" full color TFT LCD (230K pixels) 16MB internal memory (12MB available for image storage) Supports SD/SDHC memory card (up to 4GB) (optional) JPEG, DCF, EXIF...
Owners Manual
Page 39
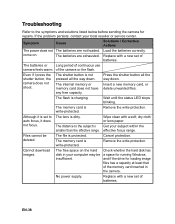
... disk in the camera. No power supply. If the problem persists, contact your subject within the effective focus range. Symptom Cause Solutions / Corrective Actions The power does not The batteries are exhausted. Even if I press the shutter button, the camera does not shoot. Files cannot be insufficient. The memory card is write-protected. Replace with a soft, dry cloth or lens paper. Wait until the status LED stops blinking. The memory card is write-protected...
... disk in the camera. No power supply. If the problem persists, contact your subject within the effective focus range. Symptom Cause Solutions / Corrective Actions The power does not The batteries are exhausted. Even if I press the shutter button, the camera does not shoot. Files cannot be insufficient. The memory card is write-protected. Replace with a soft, dry cloth or lens paper. Wait until the status LED stops blinking. The memory card is write-protected...
Owners Manual
Page 40
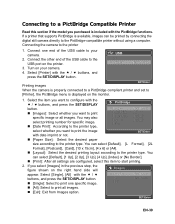
... menu is available, images can select [Default], [L Format], [2L Format], [Postcard], [Card], [10 x 15cm], [4 x 6] or [A4]. [Layout]: Select the desired printing layout according to the printer type. You can be printed by connecting the digital still camera directly to the PictBridge-compatible printer without using a computer. Connect one specific image. SET:Enter EN-39 Select the item you want to configure with the PictBridge functions. Connecting to a PictBridge Compatible Printer Read this item to start printing. 2. Turn...
... menu is available, images can select [Default], [L Format], [2L Format], [Postcard], [Card], [10 x 15cm], [4 x 6] or [A4]. [Layout]: Select the desired printing layout according to the printer type. You can be printed by connecting the digital still camera directly to the PictBridge-compatible printer without using a computer. Connect one specific image. SET:Enter EN-39 Select the item you want to configure with the PictBridge functions. Connecting to a PictBridge Compatible Printer Read this item to start printing. 2. Turn...


