VPC-S600 Owners Manual English
Page 2
... different retailers often specify slightly different product inclusions and accessories to discontinue midway (fail), restart the application or disconnect and connect the communication cable (USB, etc.) again. This is due to the fact that come with accessories such as batteries, chargers, memory cards, cables, carrying cases/pouches, and language support. Notice If static electricity or electromagnetism causes data transfer to suit their respective owners.
... different retailers often specify slightly different product inclusions and accessories to discontinue midway (fail), restart the application or disconnect and connect the communication cable (USB, etc.) again. This is due to the fact that come with accessories such as batteries, chargers, memory cards, cables, carrying cases/pouches, and language support. Notice If static electricity or electromagnetism causes data transfer to suit their respective owners.
VPC-S600 Owners Manual English
Page 9
... the Camera Strap ...20 LED Indicators and Self-timer Indicators ...20 GETTING STARTED ...21 Turning the Power On/Off ...21 Choosing the Screen Language ...21 Setting the Date and Time ...22 Formatting an SD/SDHC Memory Card or Internal Memory 23 Using the LCD Monitor ...24 PHOTOGRAPHY MODE ...25 Shooting Images ...25 Mode Dial ...26 Setting the Panorama Mode ...27 Setting Image Resolution and Quality ...28 Using the Zoom Function ...29 Using the Flash ...30 Setting Focus ...31 CAPTURE MODE ...32 Burst ...32 Auto Bracket ...33 Self-Timer ...34 Adjusting the Exposure...
... the Camera Strap ...20 LED Indicators and Self-timer Indicators ...20 GETTING STARTED ...21 Turning the Power On/Off ...21 Choosing the Screen Language ...21 Setting the Date and Time ...22 Formatting an SD/SDHC Memory Card or Internal Memory 23 Using the LCD Monitor ...24 PHOTOGRAPHY MODE ...25 Shooting Images ...25 Mode Dial ...26 Setting the Panorama Mode ...27 Setting Image Resolution and Quality ...28 Using the Zoom Function ...29 Using the Flash ...30 Setting Focus ...31 CAPTURE MODE ...32 Burst ...32 Auto Bracket ...33 Self-Timer ...34 Adjusting the Exposure...
VPC-S600 Owners Manual English
Page 10
... MODE - ADVANCED FEATURES 44 Playing Back Still Images/Movie Clips on TV ...44 Deleting Images/Movie Clips ...45 Protecting Images/Movie Clips ...46 Setting the DPOF ...47 TRANSFERRING RECORDED IMAGES AND VIDEOS TO YOUR COMPUTER 49 Connect the digital camera to your computer ...50 Download images or movie clips ...51 EDITING SOFTWARE INSTALLATION 52 Installing Photo Explorer ...52 Installing Photo Express ...53 Installing Cool 360 ...54 MENU OPTIONS ...55 Camera Menu ...55 Movie Menu ...59 Playback Menu ...60 Setup Menu ...62 SPECIFICATIONS ...65 TROUBLESHOOTING GUIDE ...67 POSSIBLE NUMBER...
... MODE - ADVANCED FEATURES 44 Playing Back Still Images/Movie Clips on TV ...44 Deleting Images/Movie Clips ...45 Protecting Images/Movie Clips ...46 Setting the DPOF ...47 TRANSFERRING RECORDED IMAGES AND VIDEOS TO YOUR COMPUTER 49 Connect the digital camera to your computer ...50 Download images or movie clips ...51 EDITING SOFTWARE INSTALLATION 52 Installing Photo Explorer ...52 Installing Photo Express ...53 Installing Cool 360 ...54 MENU OPTIONS ...55 Camera Menu ...55 Movie Menu ...59 Playback Menu ...60 Setup Menu ...62 SPECIFICATIONS ...65 TROUBLESHOOTING GUIDE ...67 POSSIBLE NUMBER...
VPC-S600 Owners Manual English
Page 15
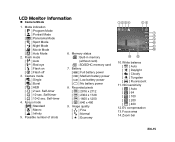
... 400 12. EV compensation 13. LCD Monitor Information „ Camera Mode 1. Self-timer 4. Possible number of shots 6. Battery [ ] Full battery power [ ] Medium battery power [ ] Low battery power [ ] No battery power 8. Capture mode [ ] Single [ ] Burst [ ] AEB [ ] 2 sec. Recorded pixels [ ] 2816 x 2112 [ ] 2304 x 1728 [ ] 1600 x 1200 [ ] 640 x 480 9. Focus area 14. Self-timer [ ] 10+2 sec. Flash mode [ ] Auto [ ] Red eye [ ] Flash on [ ] Flash off 3. Memory status : Built-in memory (without card) : SD/SDHC memory card 7. Image quality [ ] Fine [ ] Normal [ ] Economy...
... 400 12. EV compensation 13. LCD Monitor Information „ Camera Mode 1. Self-timer 4. Possible number of shots 6. Battery [ ] Full battery power [ ] Medium battery power [ ] Low battery power [ ] No battery power 8. Capture mode [ ] Single [ ] Burst [ ] AEB [ ] 2 sec. Recorded pixels [ ] 2816 x 2112 [ ] 2304 x 1728 [ ] 1600 x 1200 [ ] 640 x 480 9. Focus area 14. Self-timer [ ] 10+2 sec. Flash mode [ ] Auto [ ] Red eye [ ] Flash on [ ] Flash off 3. Memory status : Built-in memory (without card) : SD/SDHC memory card 7. Image quality [ ] Fine [ ] Normal [ ] Economy...
VPC-S600 Owners Manual English
Page 19
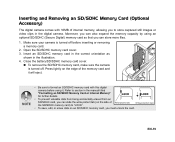
... the memory card and it . Close the battery/SD/SDHC memory card cover. „ To remove the SD/SDHC memory card, make sure the camera is turned off . Inserting and Removing an SD/SDHC Memory Card (Optional Accessory) The digital camera comes with this digital camera before inserting or removing a memory card. 2. Make sure your camera is turned off before using an optional SD/SDHC (Secure Digital) memory card so that you to "LOCK". • To save, edit, or erase data on...
... the memory card and it . Close the battery/SD/SDHC memory card cover. „ To remove the SD/SDHC memory card, make sure the camera is turned off . Inserting and Removing an SD/SDHC Memory Card (Optional Accessory) The digital camera comes with this digital camera before inserting or removing a memory card. 2. Make sure your camera is turned off before using an optional SD/SDHC (Secure Digital) memory card so that you to "LOCK". • To save, edit, or erase data on...
VPC-S600 Owners Manual English
Page 21
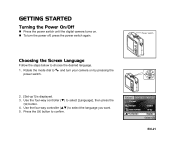
GETTING STARTED Turning the Power On/Off „ Press the power switch until the digital camera turns on by pressing the 2. [Set-up1] is displayed. 3. Set-up1 Set-up2 Set-up3 Format Beeper Louder Date & Time m/d/y Language English Select : EN-21 Use the four-way controller (ST) to choose the desired language. 1. Power switch Choosing the Screen Language Follow the steps below to select the language you want. 5. Rotate the mode dial to confirm. Press the button to power switch. Use the...
GETTING STARTED Turning the Power On/Off „ Press the power switch until the digital camera turns on by pressing the 2. [Set-up1] is displayed. 3. Set-up1 Set-up2 Set-up3 Format Beeper Louder Date & Time m/d/y Language English Select : EN-21 Use the four-way controller (ST) to choose the desired language. 1. Power switch Choosing the Screen Language Follow the steps below to select the language you want. 5. Rotate the mode dial to confirm. Press the button to power switch. Use the...
VPC-S600 Owners Manual English
Page 23
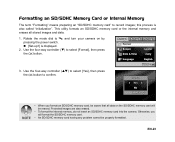
... images and data. 1. Use the four-way controller (T) to record images; Use the four-way controller (ST) to select [Yes], then press the button to and turn your camera on the SD/SDHC memory card will format the SD/SDHC memory card. • An SD/SDHC memory card having any problem cannot be erased. EN-23 Format Yes No Select : • When you will be properly formatted. Set-up1 Set-up2 Set-up3 Format Beeper Louder Date & Time m/d/y Language English...
... images and data. 1. Use the four-way controller (T) to record images; Use the four-way controller (ST) to select [Yes], then press the button to and turn your camera on the SD/SDHC memory card will format the SD/SDHC memory card. • An SD/SDHC memory card having any problem cannot be erased. EN-23 Format Yes No Select : • When you will be properly formatted. Set-up1 Set-up2 Set-up3 Format Beeper Louder Date & Time m/d/y Language English...
VPC-S600 Owners Manual English
Page 24
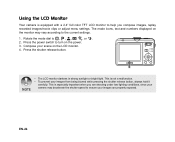
... bright light. This is especially important when you compose images, replay recorded images/movie clips or adjust menu settings. Rotate the mode dial to turn on the power. 3. This is not a malfunction. • To prevent your images from being blurred while pressing the shutter release button, always hold it carefully. Using the LCD Monitor Your camera is equipped with a 2.4" full color TFT LCD monitor to help you are shooting under low lighting conditions...
... bright light. This is especially important when you compose images, replay recorded images/movie clips or adjust menu settings. Rotate the mode dial to turn on the power. 3. This is not a malfunction. • To prevent your images from being blurred while pressing the shutter release button, always hold it carefully. Using the LCD Monitor Your camera is equipped with a 2.4" full color TFT LCD monitor to help you are shooting under low lighting conditions...
VPC-S600 Owners Manual English
Page 28
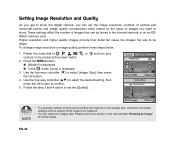
... memory card. Balance ISO Return : Select : Image Size 2816 X 2112 22304 X 1728 1600 X 1200 640 X 480 Cancel : Select : • The possible number of shots and recording time depend on by pressing the power switch. 2. To change image resolution or image quality, perform these steps below: 1. Press the MENU button. „ [Mode1] is displayed. „ In the mode, [Auto] is displayed. 3. Use the four-way controller (ST) to select the desired setting, then press the button...
... memory card. Balance ISO Return : Select : Image Size 2816 X 2112 22304 X 1728 1600 X 1200 640 X 480 Cancel : Select : • The possible number of shots and recording time depend on by pressing the power switch. 2. To change image resolution or image quality, perform these steps below: 1. Press the MENU button. „ [Mode1] is displayed. „ In the mode, [Auto] is displayed. 3. Use the four-way controller (ST) to select the desired setting, then press the button...
VPC-S600 Owners Manual English
Page 30
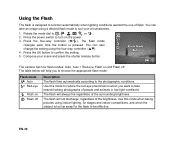
... flash mode: Flash mode Auto Red-eye Flash on the power. 3. Press the power switch to suit your scene and press the shutter release button. Press the button to , , , , , or . 2. Press the four-way controller (W/ ). You can also change the setting using indoor lighting, for stages and indoor competitions, and when the subject is pressed. You can take natural-looking photographs of flash. The flash will help you want to take an image using a desired flash mode to turn...
... flash mode: Flash mode Auto Red-eye Flash on the power. 3. Press the power switch to suit your scene and press the shutter release button. Press the button to , , , , , or . 2. Press the four-way controller (W/ ). You can also change the setting using indoor lighting, for stages and indoor competitions, and when the subject is pressed. You can take natural-looking photographs of flash. The flash will help you want to take an image using a desired flash mode to turn...
VPC-S600 Owners Manual English
Page 31
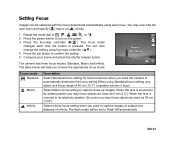
... shutter release button. Select Macro-focus setting to Flash Off automatically. The flash mode will help you choose the appropriate focus mode: Focus Standard OK : Focus mode Standard Macro Infinity Description Select Standard-focus setting for most occasions when you may over-ride the auto focus and specify [ ] macro or [ ] infinity. 1. EN-31 The focus mode changes each time the button is zoomed to its widest position you want to turn on the power. 3. The camera has three focus modes: Standard, Macro...
... shutter release button. Select Macro-focus setting to Flash Off automatically. The flash mode will help you choose the appropriate focus mode: Focus Standard OK : Focus mode Standard Macro Infinity Description Select Standard-focus setting for most occasions when you may over-ride the auto focus and specify [ ] macro or [ ] infinity. 1. EN-31 The focus mode changes each time the button is zoomed to its widest position you want to turn on the power. 3. The camera has three focus modes: Standard, Macro...
VPC-S600 Owners Manual English
Page 32
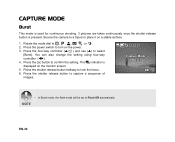
... flash mode will be set to , , , , , or . 2. Secure the camera to turn on the power. 3. Press the power switch to a tripod or place it on the monitor screen. 5. EN-32 The indicator is pressed. Press the shutter release button halfway to confirm the setting. Press the button to lock the focus. 6. Press the four-way controller (S/ ) and use (S) to capture a sequence of images. You can also change the setting using four-way controller...
... flash mode will be set to , , , , , or . 2. Secure the camera to turn on the power. 3. Press the power switch to a tripod or place it on the monitor screen. 5. EN-32 The indicator is pressed. Press the shutter release button halfway to confirm the setting. Press the button to lock the focus. 6. Press the four-way controller (S/ ) and use (S) to capture a sequence of images. You can also change the setting using four-way controller...
VPC-S600 Owners Manual English
Page 33
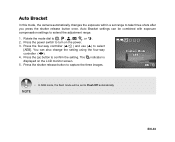
... the adjustment range. 1. EN-33 Auto Bracket settings can also change the setting using the four-way controller (WX). 4. Press the four-way controller (S/ ) and use (S) to capture the three images. The indicator is displayed on the power. 3. Auto Bracket In this mode, the camera automatically changes the exposure within a set to Flash Off automatically. You can be set range to take three shots after you press the shutter release button once. Press the shutter release button...
... the adjustment range. 1. EN-33 Auto Bracket settings can also change the setting using the four-way controller (WX). 4. Press the four-way controller (S/ ) and use (S) to capture the three images. The indicator is displayed on the power. 3. Auto Bracket In this mode, the camera automatically changes the exposure within a set to Flash Off automatically. You can be set range to take three shots after you press the shutter release button once. Press the shutter release button...
VPC-S600 Owners Manual English
Page 34
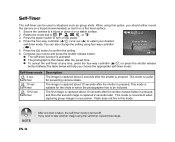
... shutter release button. „ The self-timer function is activated. „ The photograph is then taken after the shutter is useful for the shots in situations such as group shots. This mode is pressed. Self-Timer The self-timer can also change the setting using four-way controller (WX). Press the button to take another image using this mode. • After one shot is taken, the self-timer mode is captured about 10 seconds after the preset time...
... shutter release button. „ The self-timer function is activated. „ The photograph is then taken after the shutter is useful for the shots in situations such as group shots. This mode is pressed. Self-Timer The self-timer can also change the setting using four-way controller (WX). Press the button to take another image using this mode. • After one shot is taken, the self-timer mode is captured about 10 seconds after the preset time...
VPC-S600 Owners Manual English
Page 36
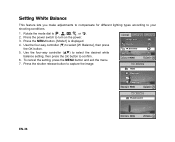
... button to select [W. Balance Auto Daylight Cloudy Tungsten Cancel : Select : W. Use the four-way controller (T) to confirm. 6. Setting White Balance This feature lets you make adjustments to compensate for different lighting types according to turn on the power. 3. Balance], then press the button. 5. To cancel the setting, press the MENU button and exit the menu. 7. Mode1 Mode2 Mode3 Image Size Quality W. Balance Fluorescent EN-36 Cancel : Select : Press the power switch to your shooting conditions. 1. Balance ISO...
... button to select [W. Balance Auto Daylight Cloudy Tungsten Cancel : Select : W. Use the four-way controller (T) to confirm. 6. Setting White Balance This feature lets you make adjustments to compensate for different lighting types according to turn on the power. 3. Balance], then press the button. 5. To cancel the setting, press the MENU button and exit the menu. 7. Mode1 Mode2 Mode3 Image Size Quality W. Balance Fluorescent EN-36 Cancel : Select : Press the power switch to your shooting conditions. 1. Balance ISO...
VPC-S600 Owners Manual English
Page 50
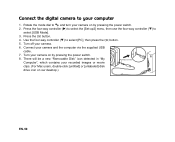
... "Removable Disk" icon detected in "My PC/Video terminal Computer", which contains your camera on our desktop.) EN-50 Turn off your camera and the computer via the supplied USB cable. 7. Connect your camera. 6. Press the button. 4. Rotate the mode dial to and turn your recorded images or movie clips. (For Mac users, double-click [untitled] or [unlabeled] disk drive icon on by pressing the power switch. 8. Use the four-way controller (T) to select [USB Mode]. 3. Connect the digital camera...
... "Removable Disk" icon detected in "My PC/Video terminal Computer", which contains your camera on our desktop.) EN-50 Turn off your camera and the computer via the supplied USB cable. 7. Connect your camera. 6. Press the button. 4. Rotate the mode dial to and turn your recorded images or movie clips. (For Mac users, double-click [untitled] or [unlabeled] disk drive icon on by pressing the power switch. 8. Use the four-way controller (T) to select [USB Mode]. 3. Connect the digital camera...
VPC-S600 Owners Manual English
Page 55
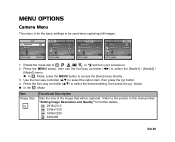
... the Mode Item Image Size Functional Description Sets the size of the image that will be used when capturing still images. Refer to select the option item, then press the button. 4. Balance ISO Return : Mode3 Mode1 Mode2 Metering Digital Zoom Quick View Mode3 On Off Return : Mode1 Mode2 Color Sharpness Saturation Date Imprint Return : Mode3 Medium Medium Off 1. Use the four-way controller (ST) to the section in this manual titled "Setting Image...
... the Mode Item Image Size Functional Description Sets the size of the image that will be used when capturing still images. Refer to select the option item, then press the button. 4. Balance ISO Return : Mode3 Mode1 Mode2 Metering Digital Zoom Quick View Mode3 On Off Return : Mode1 Mode2 Color Sharpness Saturation Date Imprint Return : Mode3 Medium Medium Off 1. Use the four-way controller (ST) to the section in this manual titled "Setting Image...
VPC-S600 Owners Manual English
Page 61
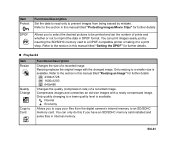
... copy your files from being erased by inserting the SD/SDHC memory card to a DPOF-compatible printer or taking it to the section in this manual titled "Resizing an Image" for further details. You can print images easily just by mistake. Item Protect Functional Description Set the data to read-only to a lower quality level is available. Only quality changing to prevent images from the digital camera's internal memory to Card Functional Description Changes the size...
... copy your files from being erased by inserting the SD/SDHC memory card to a DPOF-compatible printer or taking it to the section in this manual titled "Resizing an Image" for further details. You can print images easily just by mistake. Item Protect Functional Description Set the data to read-only to a lower quality level is available. Only quality changing to prevent images from the digital camera's internal memory to Card Functional Description Changes the size...
VPC-S600 Owners Manual English
Page 64
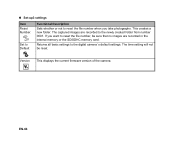
This creates a new folder. Version This displays the current firmware version of the camera. EN-64 The time setting will not be sure that no images are recorded in the internal memory or the SD/SDHC memory card. „ Set-up3 settings Item Reset Number. 1 Set to Default Functional Description Sets whether or not to the digital camera's default settings. Returns all basic settings to reset the file number when you want to the newly created folder from number 0001. If you take photographs. The captured images are recorded to reset the file number, be reset.
This creates a new folder. Version This displays the current firmware version of the camera. EN-64 The time setting will not be sure that no images are recorded in the internal memory or the SD/SDHC memory card. „ Set-up3 settings Item Reset Number. 1 Set to Default Functional Description Sets whether or not to the digital camera's default settings. Returns all basic settings to reset the file number when you want to the newly created folder from number 0001. If you take photographs. The captured images are recorded to reset the file number, be reset.
VPC-S600 Owners Manual English
Page 67
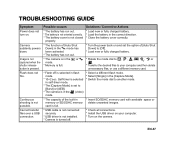
... fully charged battery. Cannot transfer files over a USB connection. * USB cable is not connected securely. * USB driver is not installed. * Camera is turned off is selected in flash mode. * 10+2 sec. Image is not * The camera is in the correct direction. * Close the battery cover correctly. Flash does not fire. * Flash off . * Check all connections. * Install the USB driver on your computer and then delete unnecessary files, or use a different memory card. Camera suddenly powers down. * The function of [Auto Shut Down] in the mode has...
... fully charged battery. Cannot transfer files over a USB connection. * USB cable is not connected securely. * USB driver is not installed. * Camera is turned off is selected in flash mode. * 10+2 sec. Image is not * The camera is in the correct direction. * Close the battery cover correctly. Flash does not fire. * Flash off . * Check all connections. * Install the USB driver on your computer and then delete unnecessary files, or use a different memory card. Camera suddenly powers down. * The function of [Auto Shut Down] in the mode has...


