Owners Manual
Page 3
...this manual. Other names and products may differ from those described in this user manual. Products very often vary between retailers especially with your camera may be trademarks or registered trademarks of their market requirements, customer demographics, and geographical preferences. This User Manual is a trademark of your dealer... is a general reference guide for the purpose of explanation and may be different from the actual design of Apple Inc. Contact your camera. SDHC™ is a registered trademark of Microsoft Corporation. Pentium® is a trademark.
...this manual. Other names and products may differ from those described in this user manual. Products very often vary between retailers especially with your camera may be trademarks or registered trademarks of their market requirements, customer demographics, and geographical preferences. This User Manual is a trademark of your dealer... is a general reference guide for the purpose of explanation and may be different from the actual design of Apple Inc. Contact your camera. SDHC™ is a registered trademark of Microsoft Corporation. Pentium® is a trademark.
Owners Manual
Page 4
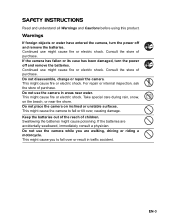
...special care during rain, snow, on inclined or unstable surfaces. Swallowing the batteries might cause fire or electric shock. Continued use the camera in traffic accident. This might cause fire or electric shock. For repair or internal inspection, ask the store of children. This might...reach of purchase. If the batteries are walking, driving or riding a motorcycle. Do not use might cause poisoning. This might cause the camera to fall or tilt over or result in areas near the shore. Consult the store of purchase. This might cause you are accidentally swallowed,...
...special care during rain, snow, on inclined or unstable surfaces. Swallowing the batteries might cause fire or electric shock. Continued use the camera in traffic accident. This might cause fire or electric shock. For repair or internal inspection, ask the store of children. This might...reach of purchase. If the batteries are walking, driving or riding a motorcycle. Do not use might cause poisoning. This might cause the camera to fall or tilt over or result in areas near the shore. Consult the store of purchase. This might cause you are accidentally swallowed,...
Owners Manual
Page 5
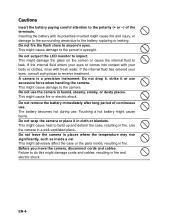
..., such as inside , resulting in fire. Do not fire the flash close to impact. This might cause fire or electric shock. Use the camera in humid, steamy, smoky, or dusty places. Cautions Insert the battery paying careful attention to the polarity (+ or -) of continuous use . ...rinse with its polarities inverted might adversely affect the case or the parts inside a car. Do not use excessive force when handling the camera. Inserting the battery with fresh water. This might cause damage to the battery rupturing or leaking. Do not remove the battery immediately after...
..., such as inside , resulting in fire. Do not fire the flash close to impact. This might cause fire or electric shock. Use the camera in humid, steamy, smoky, or dusty places. Cautions Insert the battery paying careful attention to the polarity (+ or -) of continuous use . ...rinse with its polarities inverted might adversely affect the case or the parts inside a car. Do not use excessive force when handling the camera. Inserting the battery with fresh water. This might cause damage to the battery rupturing or leaking. Do not remove the battery immediately after...
Owners Manual
Page 8
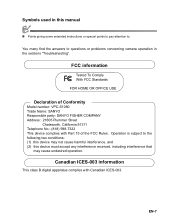
... USE Declaration of Conformity Model number: VPC-S1080 Trade Name: SANYO Responsible party: SANYO FISHER COMPANY Address: 21605 Plummer Street Chatsworth, California 91311 Telephone No.: (818) 998-7322 This device complies with Canadian ICES-003. EN-7 Symbols used in the sections "Troubleshooting". Canadian ICES-003 information This class B digital apparatus complies with Part 15 of...
... USE Declaration of Conformity Model number: VPC-S1080 Trade Name: SANYO Responsible party: SANYO FISHER COMPANY Address: 21605 Plummer Street Chatsworth, California 91311 Telephone No.: (818) 998-7322 This device complies with Canadian ICES-003. EN-7 Symbols used in the sections "Troubleshooting". Canadian ICES-003 information This class B digital apparatus complies with Part 15 of...

Owners Manual
Page 9
... types (together) or mix old and new batteries. The batteries may feel warm after a long period of the camera or the flash. The camera may be captured. Charge the rechargeable batteries fully before use manganese batteries. Never use . If the batteries are not...at least one complete cycle before using a new rechargeable batteries or rechargeable batteries that can shorten the battery life and reduce camera performance. Avoid extremely cold environments as low temperatures can be impaired. Therefore Ni-MH rechargeable batteries are exception), it may affect...
... types (together) or mix old and new batteries. The batteries may feel warm after a long period of the camera or the flash. The camera may be captured. Charge the rechargeable batteries fully before use manganese batteries. Never use . If the batteries are not...at least one complete cycle before using a new rechargeable batteries or rechargeable batteries that can shorten the battery life and reduce camera performance. Avoid extremely cold environments as low temperatures can be impaired. Therefore Ni-MH rechargeable batteries are exception), it may affect...

Owners Manual
Page 10
CONTENTS 10 INTRODUCTION 10 Overview 10 Package Contents 11 GETTING TO KNOW YOUR CAMERA 11 Front View 12 Rear View 13 LCD Monitor Display 15 GETTING STARTED 15 Preparation 16 Initial Settings 18 CAPTURE MODE 18 Capturing Images 19 ...
CONTENTS 10 INTRODUCTION 10 Overview 10 Package Contents 11 GETTING TO KNOW YOUR CAMERA 11 Front View 12 Rear View 13 LCD Monitor Display 15 GETTING STARTED 15 Preparation 16 Initial Settings 18 CAPTURE MODE 18 Capturing Images 19 ...
Owners Manual
Page 11
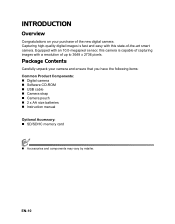
... ensure that you have the following items: Common Product Components: „ Digital camera „ Software CD-ROM „ USB cable „ Camera strap „ Camera pouch „ 2 x AA size batteries „ Instruction manual Optional Accessory: „ SD/SDHC memory card „ Accessories ...and components may vary by retailer. Package Contents Carefully unpack your purchase of the new digital camera. Capturing high-quality digital images is capable of capturing images with this state-of up to 3648 x 2736 pixels. Equipped with an 10.0-megapixel ...
... ensure that you have the following items: Common Product Components: „ Digital camera „ Software CD-ROM „ USB cable „ Camera strap „ Camera pouch „ 2 x AA size batteries „ Instruction manual Optional Accessory: „ SD/SDHC memory card „ Accessories ...and components may vary by retailer. Package Contents Carefully unpack your purchase of the new digital camera. Capturing high-quality digital images is capable of capturing images with this state-of up to 3648 x 2736 pixels. Equipped with an 10.0-megapixel ...
Owners Manual
Page 16
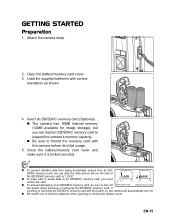
... of the SD/SDHC memory card) to "LOCK". „ To save, edit, or erase data on , the camera will automatically turn off . „ Be careful not to format the memory card with correct orientation as shown. 4....an SD/SDHC memory card, you can load an SD/SDHC memory card to expand the camera's memory capacity. „ Be sure to drop the batteries when opening or closing the battery cover.... EN-15 Load the supplied batteries with this camera before its initial usage. 5. Close the battery/memory card cover and make sure it is locked ...
... of the SD/SDHC memory card) to "LOCK". „ To save, edit, or erase data on , the camera will automatically turn off . „ Be careful not to format the memory card with correct orientation as shown. 4....an SD/SDHC memory card, you can load an SD/SDHC memory card to expand the camera's memory capacity. „ Be sure to drop the batteries when opening or closing the battery cover.... EN-15 Load the supplied batteries with this camera before its initial usage. 5. Close the battery/memory card cover and make sure it is locked ...
Owners Manual
Page 17
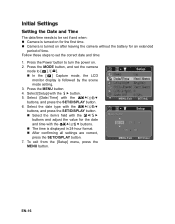
Initial Settings Setting the Date and Time The date/time needs to be set if and when: „ Camera is turned on for the first time. „ Camera is followed by the scene mode setting. 3. Press the MODE button, and set the correct date and time: 1. Select the date type with the c/... „ After confirming all settings are correct, press the SET/DISPLAY button. 7. EN-16 Follow these steps to set the camera mode to turn the power on after leaving the camera without the battery for the date and time with the c/ d buttons, and press the SET/DISPLAY button. 6. To exit ...
Initial Settings Setting the Date and Time The date/time needs to be set if and when: „ Camera is turned on for the first time. „ Camera is followed by the scene mode setting. 3. Press the MODE button, and set the correct date and time: 1. Select the date type with the c/... „ After confirming all settings are correct, press the SET/DISPLAY button. 7. EN-16 Follow these steps to set the camera mode to turn the power on after leaving the camera without the battery for the date and time with the c/ d buttons, and press the SET/DISPLAY button. 6. To exit ...
Owners Manual
Page 18
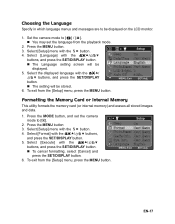
... set the language from the playback mode. 2. Press the MENU button 3. Select [Setup] menu with the c/ d buttons, and press the SET/DISPLAY button. 5. Set the camera mode to [ P ] / [S]. „ You may set the...
... set the language from the playback mode. 2. Press the MENU button 3. Select [Setup] menu with the c/ d buttons, and press the SET/DISPLAY button. 5. Set the camera mode to [ P ] / [S]. „ You may set the...
Owners Manual
Page 19
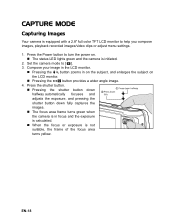
Set the camera mode to help you compose images, playback recorded images/video clips or adjust menu settings. 1. Compose your image in the LCD monitor. „ Pressing the ... shutter button down fully captures the images. „ The focus area frame turns green when the camera is in on the subject, and enlarges the subject on . „ The status LED lights green and the camera is equipped with a 2.8" full color TFT LCD monitor to [ P ]. 3. EN-18 CAPTURE MODE Capturing Images Your...
Set the camera mode to help you compose images, playback recorded images/video clips or adjust menu settings. 1. Compose your image in the LCD monitor. „ Pressing the ... shutter button down fully captures the images. „ The focus area frame turns green when the camera is in on the subject, and enlarges the subject on . „ The status LED lights green and the camera is equipped with a 2.8" full color TFT LCD monitor to [ P ]. 3. EN-18 CAPTURE MODE Capturing Images Your...
Owners Manual
Page 20
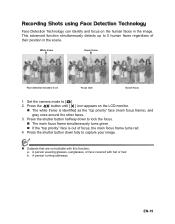
... the scene. EN-19 Recording Shots using Face Detection Technology Face Detection Technology can identify and focus on Focus lock Out of focus 1. Set the camera mode to capture your image. „ Subjects that are not suitable with hat or hair. Press the shutter button down to 5 human faces regardless of...
... the scene. EN-19 Recording Shots using Face Detection Technology Face Detection Technology can identify and focus on Focus lock Out of focus 1. Set the camera mode to capture your image. „ Subjects that are not suitable with hat or hair. Press the shutter button down to 5 human faces regardless of...
Owners Manual
Page 21
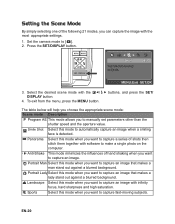
... hand shaking when you want to capture fast-moving subjects. l Sports Select this mode when you want to capture an image. EN-20 Set the camera mode to manually set parameters other than the shutter speed and the aperture value. To exit from the menu, press the MENU button. i Panorama Select...
... hand shaking when you want to capture fast-moving subjects. l Sports Select this mode when you want to capture an image. EN-20 Set the camera mode to manually set parameters other than the shutter speed and the aperture value. To exit from the menu, press the MENU button. i Panorama Select...
Owners Manual
Page 23
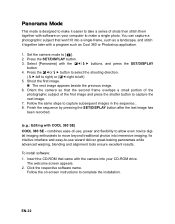
Set the camera mode to -use , power and flexibility to allow even novice digital imaging enthusiasts to make it together later with a program such...easy-to [ P ]. 2. Click the respective software name. You can capture a photographic subject that came with the camera into your computer to move beyond traditional photos into a single frame, such as a landscape, and stitch it easier ... in the sequence.: 8. Panorama Mode This mode is designed to make a single photo. Orient the camera so that the second frame overlaps a small portion of the photographic subject of -use wizard deliver great...
Set the camera mode to -use , power and flexibility to allow even novice digital imaging enthusiasts to make it together later with a program such...easy-to [ P ]. 2. Click the respective software name. You can capture a photographic subject that came with the camera into your computer to move beyond traditional photos into a single frame, such as a landscape, and stitch it easier ... in the sequence.: 8. Panorama Mode This mode is designed to make a single photo. Orient the camera so that the second frame overlaps a small portion of the photographic subject of -use wizard deliver great...
Owners Manual
Page 24
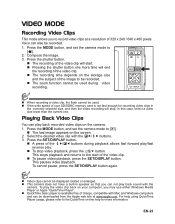
...Video Clips This mode allows you to record video clips at www.apple.com. Voice can also be displayed rotated or enlarged. „ This camera does not have a built-in the currently selected size, and then the video recording will stop video playback, press the button. Press the ... available free of charge, compatible with Mac and Windows-computers and can play back sound with the [ /X buttons. 3. Select the desired video clip with the camera. Press the SET/DISPLAY button. „ A press of 320 x 240 / 640 x 480 pixels. Press the shutter button. „ The recording of the ...
...Video Clips This mode allows you to record video clips at www.apple.com. Voice can also be displayed rotated or enlarged. „ This camera does not have a built-in the currently selected size, and then the video recording will stop video playback, press the button. Press the ... available free of charge, compatible with Mac and Windows-computers and can play back sound with the [ /X buttons. 3. Select the desired video clip with the camera. Press the SET/DISPLAY button. „ A press of 320 x 240 / 640 x 480 pixels. Press the shutter button. „ The recording of the ...
Owners Manual
Page 25
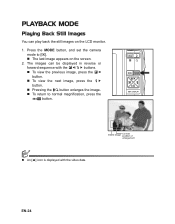
x1.5 „ An [S] icon is displayed with the [ /X buttons. „ To view the previous image, press the [ button. „ To view the next image, press the X button. „ Pressing the button enlarges the image. „ To return to [x]. „ The last image appears on the LCD monitor. 1. EN-24 Press the MODE button, and set the camera mode to normal magnification, press the button. The images can play back the still images on the screen. 2. PLAYBACK MODE Playing Back Still Images You can be displayed in reverse or forward sequence with the video data.
x1.5 „ An [S] icon is displayed with the [ /X buttons. „ To view the previous image, press the [ button. „ To view the next image, press the X button. „ Pressing the button enlarges the image. „ To return to [x]. „ The last image appears on the LCD monitor. 1. EN-24 Press the MODE button, and set the camera mode to normal magnification, press the button. The images can play back the still images on the screen. 2. PLAYBACK MODE Playing Back Still Images You can be displayed in reverse or forward sequence with the video data.
Owners Manual
Page 26
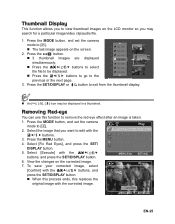
Press the MODE button, and set the camera mode to [x]. „ The last image appears on the screen. 2. Press the SET/DISPLAY or button to exit from the thumbnail display. „ An [t], [D], [a] icon ... an image is taken. 1. Press the MENU button. 4. Fix Red Eyes Next Menu Slide Show 3 sec. EN-25 Press the MODE button, and set the camera mode to [x]. 2. Thumbnail Display This function allows you to view thumbnail images on the LCD monitor so you want to edit with the [ /X buttons. 3. Removing...
Press the MODE button, and set the camera mode to [x]. „ The last image appears on the screen. 2. Press the SET/DISPLAY or button to exit from the thumbnail display. „ An [t], [D], [a] icon ... an image is taken. 1. Press the MENU button. 4. Fix Red Eyes Next Menu Slide Show 3 sec. EN-25 Press the MODE button, and set the camera mode to [x]. 2. Thumbnail Display This function allows you to view thumbnail images on the LCD monitor so you want to edit with the [ /X buttons. 3. Removing...
Owners Manual
Page 27
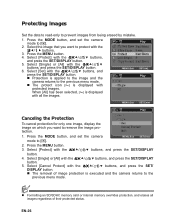
...with the / buttons, and press the SET/DISPLAY button. 4. Select [Single] or [All] with protected images. Press the MODE button, and set the camera mode to remove the image protection. 1. Select the image that you want to protect with the / buttons, and press the SET/DISPLAY button. „... Protection is applied to the image and the camera returns to the previous menu mode. „ The protect icon [y] is executed and the camera returns to the previous menu mode. „ Formatting an SD/SDHC memory card or internal memory...
...with the / buttons, and press the SET/DISPLAY button. 4. Select [Single] or [All] with protected images. Press the MODE button, and set the camera mode to remove the image protection. 1. Select the image that you want to protect with the / buttons, and press the SET/DISPLAY button. „... Protection is applied to the image and the camera returns to the previous menu mode. „ The protect icon [y] is executed and the camera returns to the previous menu mode. „ Formatting an SD/SDHC memory card or internal memory...
Owners Manual
Page 28
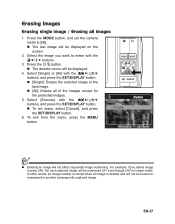
...] with the [ /X buttons. 3. Erasing Images Erasing single image / Erasing all of the images except for the protected images. 5. Press the MODE button, and set the camera mode to [x]. „ The last image will be displayed on the screen. 2. Press the %F button. „ The deletion menu will be displayed. 4. To exit from...
...] with the [ /X buttons. 3. Erasing Images Erasing single image / Erasing all of the images except for the protected images. 5. Press the MODE button, and set the camera mode to [x]. „ The last image will be displayed on the screen. 2. Press the %F button. „ The deletion menu will be displayed. 4. To exit from...
Owners Manual
Page 31
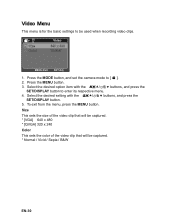
... x 240 Color This sets the color of the video clip that will be used when recording video clips. 1. Press the MODE button, and set the camera mode to enter its respective menu. 4. Press the MENU button. 3. Video Menu This menu is for the basic settings to be captured. * Normal / Vivid / Sepia...
... x 240 Color This sets the color of the video clip that will be used when recording video clips. 1. Press the MODE button, and set the camera mode to enter its respective menu. 4. Press the MENU button. 3. Video Menu This menu is for the basic settings to be captured. * Normal / Vivid / Sepia...


