Owners Manual
Page 3
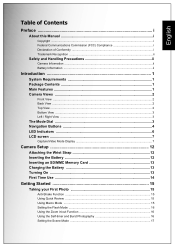
... ...i About this Manual i Copyright ...i Federal Communications Commission (FCC) Compliance i Declaration of Conformity i Trademark Recognition ...ii Safety and Handling Precautions ii Camera Information ...ii Battery Information ...ii Introduction 1 System Requirements 1 Package Contents 1 Main Features ...1 Camera Views 2 Front View ...2 Back View ...2 Top View ...2 Bottom View ...3 Left / Right View ...3 The Mode Dial 3 Navigation Buttons 4 LED Indicators...
... ...i About this Manual i Copyright ...i Federal Communications Commission (FCC) Compliance i Declaration of Conformity i Trademark Recognition ...ii Safety and Handling Precautions ii Camera Information ...ii Battery Information ...ii Introduction 1 System Requirements 1 Package Contents 1 Main Features ...1 Camera Views 2 Front View ...2 Back View ...2 Top View ...2 Bottom View ...3 Left / Right View ...3 The Mode Dial 3 Navigation Buttons 4 LED Indicators...

Owners Manual
Page 8
... down can cause damage to the product and possibly start a fire. • Download all pictures and remove the battery from cold to warm temperatures. • Do not touch the camera lens. • Do not expose the lens to direct sunlight for long periods. English ii Preface Trademark Recognition Windows 98/2000/ME...
... down can cause damage to the product and possibly start a fire. • Download all pictures and remove the battery from cold to warm temperatures. • Do not touch the camera lens. • Do not expose the lens to direct sunlight for long periods. English ii Preface Trademark Recognition Windows 98/2000/ME...
Owners Manual
Page 9
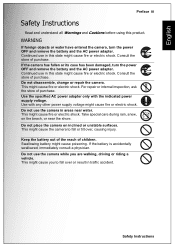
...riding a vehicle. Take special care during rain, snow, on inclined or unstable surfaces. Do not place the camera on the beach, or near water. Keep the battery out of the reach of purchase. This might cause fire or electric shock. English Preface iii Safety Instructions Read...shock. WARNING If foreign objects or water have entered the camera, turn the power OFF and remove the battery and the AC power adapter. Continued use the camera in this product. Consult the store of purchase. If the battery is accidentally swallowed, immediately consult a physician. Consult the ...
...riding a vehicle. Take special care during rain, snow, on inclined or unstable surfaces. Do not place the camera on the beach, or near water. Keep the battery out of the reach of purchase. This might cause fire or electric shock. English Preface iii Safety Instructions Read...shock. WARNING If foreign objects or water have entered the camera, turn the power OFF and remove the battery and the AC power adapter. Continued use the camera in this product. Consult the store of purchase. If the battery is accidentally swallowed, immediately consult a physician. Consult the ...
Owners Manual
Page 10
... steamy, smoky, or dusty places. Wash hands after long period of continuous use excessive force when handling the camera. Do not subject the LCD monitor to the battery rupturing or leaking. If the internal fluid enters your eyes or comes into contact with the laws of the State... accordance with your eyes, consult a physician to do this might adversely affect the case or the parts inside a car. The battery becomes hot during use the camera in places where the temperature may rise significantly, such as inside , resulting in a well-ventilated place. This might cause damage ...
... steamy, smoky, or dusty places. Wash hands after long period of continuous use excessive force when handling the camera. Do not subject the LCD monitor to the battery rupturing or leaking. If the internal fluid enters your eyes or comes into contact with the laws of the State... accordance with your eyes, consult a physician to do this might adversely affect the case or the parts inside a car. The battery becomes hot during use the camera in places where the temperature may rise significantly, such as inside , resulting in a well-ventilated place. This might cause damage ...
Owners Manual
Page 13
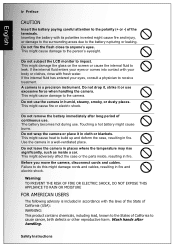
... may differ from those described in this manual. This User Manual is due to the fact that come with accessories such as batteries, chargers, AC adapters, memory cards, cables, pouches, and language support. This is a general reference guide for precise product ...definition and included accessories. • The illustrations in this manual are subject to suit their respective owners. Safety Instructions Contact your camera. • The manufacturer assumes no liability for the purpose of their market requirements, customer demographics, and geographical preferences. This ...
... may differ from those described in this manual. This User Manual is due to the fact that come with accessories such as batteries, chargers, AC adapters, memory cards, cables, pouches, and language support. This is a general reference guide for precise product ...definition and included accessories. • The illustrations in this manual are subject to suit their respective owners. Safety Instructions Contact your camera. • The manufacturer assumes no liability for the purpose of their market requirements, customer demographics, and geographical preferences. This ...
Owners Manual
Page 15
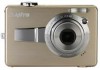
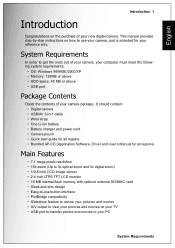
...; A/V output to view your pictures and movies on your TV • USB port to transfer photos and movies to your new digital camera. English Introduction 1 Introduction Congratulations on the purchase of your reference only. This manual provides step-by-step instructions on how to get... Contents Check the contents of your PC System Requirements It should contain: • Digital camera • USB/AV 3-in-1 cable • Wrist strap • One Li-ion battery • Battery charger and power cord • Camera pouch • Quick start guide for all regions • Bundled AP-CD (...
...; A/V output to view your pictures and movies on your TV • USB port to transfer photos and movies to your new digital camera. English Introduction 1 Introduction Congratulations on the purchase of your reference only. This manual provides step-by-step instructions on how to get... Contents Check the contents of your PC System Requirements It should contain: • Digital camera • USB/AV 3-in-1 cable • Wrist strap • One Li-ion battery • Battery charger and power cord • Camera pouch • Quick start guide for all regions • Bundled AP-CD (...
Owners Manual
Page 17
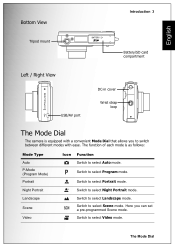
Here you to select Auto mode. 3X OPTICAL ZOOM English Bottom View Tripod mount Introduction 3 BATTERY Battery/SD card compartment Left / Right View USB/AV port DC-in cover Wrist strap loop The Mode Dial The camera is as follows: Mode Type Auto P-Mode (Program Mode) Portrait Night Portrait Landscape Scene Video Icon Function...
Here you to select Auto mode. 3X OPTICAL ZOOM English Bottom View Tripod mount Introduction 3 BATTERY Battery/SD card compartment Left / Right View USB/AV port DC-in cover Wrist strap loop The Mode Dial The camera is as follows: Mode Type Auto P-Mode (Program Mode) Portrait Night Portrait Landscape Scene Video Icon Function...
Owners Manual
Page 24
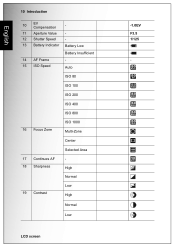
English 10 Introduction 10 EV Compensation - 11 Aperture Value - 12 Shutter Speed - 13 Battery Indicator Battery Low 14 AF Frame 15 ISO Speed Battery Insufficient Auto ISO 80 ISO 100 ISO 200 ISO 400 ISO 800 16 Focus Zone ISO 1000 Multi-Zone Center Selected Area 17 Continues AF 18 Sharpness High Normal 19 Contrast Low High Normal Low LCD screen -1.0EV F3.5 1/125 -
English 10 Introduction 10 EV Compensation - 11 Aperture Value - 12 Shutter Speed - 13 Battery Indicator Battery Low 14 AF Frame 15 ISO Speed Battery Insufficient Auto ISO 80 ISO 100 ISO 200 ISO 400 ISO 800 16 Focus Zone ISO 1000 Multi-Zone Center Selected Area 17 Continues AF 18 Sharpness High Normal 19 Contrast Low High Normal Low LCD screen -1.0EV F3.5 1/125 -
Owners Manual
Page 26
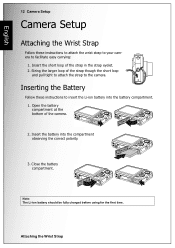
... these instructions to attach the wrist strap to your camera to insert the Li-ion battery into the compartment observing the correct polarity. 3. String the larger loop of the strap in the strap eyelet. 2. Insert the short loop of ... tight to attach the strap to the camera. Close the battery compartment. Attaching the Wrist Strap English 12 Camera Setup Camera Setup Attaching the Wrist Strap Follow these instructions to facilitate easy carrying: 1. Open the battery compartment at the bottom of the camera. 2. Note: The Li-ion battery should be fully charged before using for ...
... these instructions to attach the wrist strap to your camera to insert the Li-ion battery into the compartment observing the correct polarity. 3. String the larger loop of the strap in the strap eyelet. 2. Insert the short loop of ... tight to attach the strap to the camera. Close the battery compartment. Attaching the Wrist Strap English 12 Camera Setup Camera Setup Attaching the Wrist Strap Follow these instructions to facilitate easy carrying: 1. Open the battery compartment at the bottom of the camera. 2. Note: The Li-ion battery should be fully charged before using for ...

Owners Manual
Page 27
... To remove the SD/MMC card, gently push the card until it pops out. Charging the Battery Insert the battery into the memory card slot as shown. Connect the power supply to turn off the camera, press the Power button again. Follow these instructions to insert the SD/MMC card. 1. To... turn on the camera. Open the battery compartment at the bottom of the camera. 2. Inserting an SD/MMC Memory Card English Camera Setup 13 Inserting an SD/MMC Memory Card The camera features 16 MB internal flash memory but you may also use an optional...
... To remove the SD/MMC card, gently push the card until it pops out. Charging the Battery Insert the battery into the memory card slot as shown. Connect the power supply to turn off the camera, press the Power button again. Follow these instructions to insert the SD/MMC card. 1. To... turn on the camera. Open the battery compartment at the bottom of the camera. 2. Inserting an SD/MMC Memory Card English Camera Setup 13 Inserting an SD/MMC Memory Card The camera features 16 MB internal flash memory but you may also use an optional...

Owners Manual
Page 28
...when done Note: If the Date and Time is reset (when running out the battery and not in "Turning On" on page 13, a welcome screen displays on the camera. Use the Navigation Buttons to confirm. If the camera is selected, the Date and Time menu pops up automatically after powering on the ...DEUTSCH FRANCAIS ITALIANO ESPANOL After the desired language is turned on for a long period), the Date and Time setup screen displays automatically. English 14 Camera Setup First Time Use Press the Power button as described in use for the first time, the Language menu pops up . First Time Use
...when done Note: If the Date and Time is reset (when running out the battery and not in "Turning On" on page 13, a welcome screen displays on the camera. Use the Navigation Buttons to confirm. If the camera is selected, the Date and Time menu pops up automatically after powering on the ...DEUTSCH FRANCAIS ITALIANO ESPANOL After the desired language is turned on for a long period), the Date and Time setup screen displays automatically. English 14 Camera Setup First Time Use Press the Power button as described in use for the first time, the Language menu pops up . First Time Use

Owners Manual
Page 40
... mode 2 Image resolution 3 Sharpness 4 Protect 5 Color mode 6 Flash mode 7 Quantity 8 SD card / Internal memory 9 Histogram 10 File Name 11 Date and Time 12 Next 13 Battery status 14 Previous 15 Voice memo 16 Mode icons 17 ISO Speed 18 Contrast 19 White balance Icon Photo mode: Video mode: 640 (640x480), 320...
... mode 2 Image resolution 3 Sharpness 4 Protect 5 Color mode 6 Flash mode 7 Quantity 8 SD card / Internal memory 9 Histogram 10 File Name 11 Date and Time 12 Next 13 Battery status 14 Previous 15 Voice memo 16 Mode icons 17 ISO Speed 18 Contrast 19 White balance Icon Photo mode: Video mode: 640 (640x480), 320...
Owners Manual
Page 50
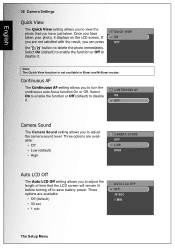
Select On to enable the function or Off (default) to save battery power. Three options are available: • Off • Low (default) • High CAMERA SOUND OFF LOW HIGH Auto LCD Off The Auto LCD Off setting allows you to adjust the length of time that you to disable it ...displays on the LCD screen. English 36 Camera Settings Quick View The Quick View setting allows you to delete the photo immediately. If you are available: • Off (default) • 30 sec •...
Select On to enable the function or Off (default) to save battery power. Three options are available: • Off • Low (default) • High CAMERA SOUND OFF LOW HIGH Auto LCD Off The Auto LCD Off setting allows you to adjust the length of time that you to disable it ...displays on the LCD screen. English 36 Camera Settings Quick View The Quick View setting allows you to delete the photo immediately. If you are available: • Off (default) • 30 sec •...
Owners Manual
Page 60
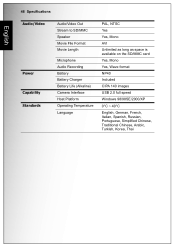
46 Specifications English Audio/Video Power Capability Standards Audio/Video Out Stream to SD/MMC Speaker Movie File Format Movie Length Microphone Audio Recording Battery Battery Charger Battery Life (Alkaline) Camera Interface Host Platform Operating Temperature Language PAL, NTSC Yes Yes, Mono AVI Unlimited as long as space is available on the SD/MMC card...
46 Specifications English Audio/Video Power Capability Standards Audio/Video Out Stream to SD/MMC Speaker Movie File Format Movie Length Microphone Audio Recording Battery Battery Charger Battery Life (Alkaline) Camera Interface Host Platform Operating Temperature Language PAL, NTSC Yes Yes, Mono AVI Unlimited as long as space is available on the SD/MMC card...
Owners Manual
Page 61
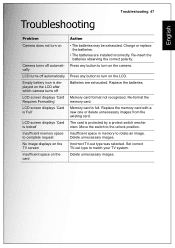
Troubleshooting Troubleshooting 47 English Problem Camera does not turn on Camera turns off automatically LCD turns off automatically Empty battery icon is displayed on the LCD after which camera turns off LCD screen displays 'Card Requires Formatting' LCD screen displays 'Card is Full' LCD screen displays '... displays on the TV screen Insufficient space on the camera. Re-format the memory card. Charge or replace the batteries. • The batteries are exhausted. Press any button to turn on the card Action • The batteries may be exhausted. The card is full. Incorrect ...
Troubleshooting Troubleshooting 47 English Problem Camera does not turn on Camera turns off automatically LCD turns off automatically Empty battery icon is displayed on the LCD after which camera turns off LCD screen displays 'Card Requires Formatting' LCD screen displays 'Card is Full' LCD screen displays '... displays on the TV screen Insufficient space on the camera. Re-format the memory card. Charge or replace the batteries. • The batteries are exhausted. Press any button to turn on the card Action • The batteries may be exhausted. The card is full. Incorrect ...


